R TIPO CHÃO/TECTO AR CONDICIONADO DE SALA MANUAL DE INSTRUÇÕES INDOOR UNIT UNIDAD INTERIOR UNITA' INTERNA UNIDADE INTERIOR UNITE INTERIEURE ∑Ç ÜN∑TE ZIMMERGERÄT OUTDOOR UNIT UNIDAD EXTERIOR UNITA' ESTERNA UNIDADE EXTERIOR UNITE EXTERIEURE DIΩ ÜN∑TE AUSSENGERÄT GS-XP07FR GS-XP09FR GS-XP12FR GS-XP18FR GS-XP24FR GS-XP27FR AE-X7FR AE-X9FR AE-X12FR GU-XR18FR GU-XR24FR GU-XR27FR * Plasmacluster is a trademark of SHARP Corporation. GS-XP07FR_Eng.
A. Information on Disposal for Users (private households) 1. In the European Union Attention: If you want to dispose of this equipment, please do not use the ordinary dust bin! Used electrical and electronic equipment must be treated separately and in accordance with legislation that requires proper treatment, recovery and recycling of used electrical and electronic equipment.
f This manual explains the proper use of your new air conditioner. Please read this manusl carefully before using the product. This manual should be kept in a safe place for handy reference. CONTENTS • IMPORTANT SAFETY INSTRUCTIONS ..... E-1 • ADDITIONAL NOTES ON OPERATION ............. E-3 • TIPS ON SAVING ENERGY ........................ E-3 • PART NAMES .............................................. E-4 • USING THE REMOTE CONTROL .............. E-6 • BASIC OPERATION ....................................
IMPORTANT SAFETY INSTRUCTIONS CAUTIONS FOR USE a window or door periodically to ventilate the room, especially when using gas 1 Open appliances. Insufficient ventilation may cause oxygen shortage. 2 Do not operate the buttons with wet hand. It may cause electric shock. safety, turn the circuit breaker off when not using the unit for an extended period of 3 For time. the outdoor unit mounting rack periodically for wear and to make sure it is firmly 4 Check in place.
ADDITIONAL NOTES ON OPERATION OPERATING TEMPERATURE RANGE INDOOR TEMP. OUTDOOR TEMP. upper limit COOLING lower limit upper limit HEATING lower limit 32˚C 23˚C 21˚C 15˚C 27˚C D.B. W.B. D.B. W.B. D.B. 43˚C D.B. 21˚C D.B. 24˚C D.B. 18˚C W.B. –7˚C D.B. –8˚C W.B. 20˚C D.B. - • The built-in protective device may prevent the unit from operating when used out of this range. • Condensation may form on the air outlet if the unit operates continuously in the COOL or DRY mode when humidity is over 80 percent. D.
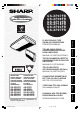
PART NAMES INDOOR UNIT (When installed on the floor) 1 Outlet (Air) 2 Vertical Adjustment Louvres 3 Horizontal Adjustment Louvres 1 2 3 4 Indicator Panel 5 Air Filters 6 Intake Grille 4 7 Inlet (Air) 8 Remote Control 5 9 OPERATION Lamp (red 0 TIMER Lamp (orange ) ) q PLASMACLUSTER Lamp (blue) 6 7 w RECEIVER Window e AUX. Button (When installed on the ceiling) 8 9 0 q w AUX.
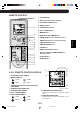
REMOTE CONTROL 1 1 TRANSMITTER 2 DISPLAY (Liquid Crystal Display) 3 PLASMACLUSTER Button 4 ON/OFF Button 2 5 THERMOSTAT Button 6 FULL POWER Button 7 MODE Button MODE 1h FAN 8 ONE-HOUR OFF TIMER Button 4 9 TIMER ON Button (for setting the timer) 5 0 TIMER OFF Button (for setting the timer) 6 7 8 9 0 q TIME ADVANCE Button q w e r t y u SWING SET/C ENGLISH 3 w TIME REVERSE Button e FAN Button r TIMER SET/CANCEL Button t Indicates BATTERY COMPARTMENT is below this mark y CLOCK Button u SWING B
USING THE REMOTE CONTROL LOADING BATTERIES Use two size-AAA (R03) batteries. 1 Remove cover. the remote control Remote control cover batteries in the compart2 Insert ment, making sure the ± and — polarities are correctly aligned. • The display indicates "AM 6:00" when batteries are properly installed. 3 Reinstall - the cover. + + - NOTES: • The battery life is approximately one year in normal use. • When you replace the batteries, always change both batteries, and make sure they are the same type.
CAUTION • Do not allow the signal receiver window to receive strong direct sunlight, since it can adversely affect its operation. If the signal receiver window is exposed to direct sunlight, close a curtain to block the light. • Using a fluorescent lamp with a quick starter in the same room may interfere with transmission of the signal. • The unit can be affected by signals transmitted from the remote control of a television, VCR or other equipment used in the same room.
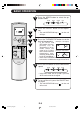
BASIC OPERATION 1 Press the MODE button to select the operation mode. AUTO 2 2 3 1h 4 FAN DRY Press the ON/OFF button to start operation. ) on the unit Press the THERMOSTAT button to set the desired temperature. (Example: 1°C higher) • In the AUTO and DRY modes, the temperature can be C changed in 1°C increments within the range of 2°C higher (Example: 2°C lower) to 2°C lower from the temperature automatically determined C by the air conditioner.
TIPS ABOUT AUTO MODE In the AUTO mode, the temperature setting and mode are automatically selected according to the room temperature and outdoor temperature when the unit is turned on. Modes and Temperature Settings the figures in ( ) are temperature settings During operation, if the outdoor temperature changes, the temperature settings will automatically slide as shown in the chart.
ADJUSTING THE AIR FLOW DIRECTION VERTICAL AIR FLOW DIRECTION HOW TO ADJUST THE AIR FLOW DIRECTION Press the SWING button on the remote control once. • The vertical adjustment louvre will change its angle continuously. Press the SWING button again when the vertical adjustment louvre is at the desired position. • The louvre will stop moving within the range shown in the diagram. • The adjusted position will be memorized and will be automatically set to the same position when operated the next time.
FULL POWER OPERATION In this operation, the air conditioner works at maximum power to makes the room cool or warm so rapidly that you can use it just after you come home. activate the FULL POWER operation, press the 1 To FULL POWER button during operation. • The remote control will display . • The temperature display will go off. TO CANCEL PM Press the FULL POWER button again. 1 NOTE: • You cannot set the temperature or fan speed during the FULL POWER operation.
TIMER OPERATION NOTE: Before setting the timer, make sure the clock is properly set with the current time. TIMER OFF ) button. 1 Press the TIMER OFF ( TIMER OFF indicator will blink; press the 2 The TIME ADVANCE or REVERSE buttons to set the desired time. (The time can be set in 10minute increments.) the remote control at the signal receiver 3 Point window on the unit and press the TIMER SET (SET/C) button. • The orange TIMER lamp ( ) on the unit will light.
TIMER ON 1 Press the TIMER ON ( ) button. TIMER ON indicator will blink; press the TIME 2 The ADVANCE or REVERSE buttons to set the desired time. (The time can be set in 10-minute increments.) the remote control at the signal receiver 3 Point window on the unit and press the TIMER SET • The orange TIMER lamp ( ) on the unit will light. • The unit will generate a beep when it receives the signal. MODE 1 4 1h FAN 2 3 SWING SET/C Select the operation condition.
TIPS ABOUT PLASMACLUSTER OPERATION The Plasmacluster ion generator inside the air conditioner will release positive and negative Plasmacluster ions into the room. Approximately the same numbers of positive and negative ions released into the air will reduce some airborne mold. Plasmacluster ions PLASMACLUSTER OPERATION operation, 1 During button. press the PLASMACLUSTER • The remote control will display " " • The blue PLASMACLUSTER lamp on the unit will light up.
AUXILIARY MODE Use this mode when the remote control is not available. TO TURN ON Press the AUX. button using a thin stick on the indicator panel. • The red OPERATION lamp ( ) on the unit will light and the unit will start operating in the AUTO mode. • The fan speed and temperature setting are set to AUTO. AUX. TO TURN OFF • The red OPERATION lamp ( unit will turn off. ENGLISH Press the AUX. button again. ) on the NOTE: If the AUX. button is pressed during normal operation, the unit will turn off.
MAINTENANCE CLEANING THE FILTERS The air filters should be cleaned every two weeks. 1 TURN OFF THE UNIT Stopper THE INTAKE GRILLE 2 OPEN 1 Slide the stoppers to the left ( OPEN ). Two stoppers are provided for each the intake grille. 2 Gently pull and open the intake grille. Intake Grille THE AIR FILTERS 3 REMOVE Push both projections on the air filters slightly and unhook the filters. Projection Hook THE AIR FILTERS 4 CLEAN Use a vacuum cleaner to remove dust.
BEFORE CALLING FOR SERVICE The following conditions do not denote equipment malfunctions UNIT DOES NOT OPERATE SWISHING NOISE The unit will not operate if it is turned on immediately after it is turned off. The unit will not operate immediately after the mode is changed. This is to protect the internal mechanisms. Wait 3 minutes before operating the unit. The soft, swishing noise is the sound of the refrigerant flowing inside the unit. The unit is preheating or de-icing.
A. Información sobre eliminación para usuarios particulares 1. En la Unión Europea Atención: su producto está marcado con este símbolo. Significa que los productos eléctricos y electrónicos usados no deberían mezclarse con los residuos domésticos generales. Existe un sistema de recogida independiente para estos productos.
ESPAÑOL Este manual explica cómo utilizar de forma correcta su nuevo acondicionador de aire. Antes de usar el producto lea el manual detenidamente. Este manual debería de guardarse en un lugar seguro para futuras referencias. ÍNDICE cto or a • FUNCIONAMIENTO CON EL TEMPORIZADOR DE UNA HORA ............ S-11 • FUNCIONAMIENTO CON EL TEMPORIZADOR ................................. S-12 • CONSEJOS SOBRE EL FUNCIONAMIENTO DEL PLASMACLUSTER ............................
INSTRUCCIONES IMPORTANTES DE SEGURIDAD PRECAUCIONES PARA EL USO 1 2 3 4 5 6 7 8 9 Abrir periódicamente una ventana o una puerta para ventilar la habitación, sobre todo si se usan aparatos que funcionan con gas. Una ventilación insuficiente puede causar escasez de oxigeno. No opere los botones con las manos mojadas. Esto puede causar descargas eléctricas. Por seguridad, desconece el diferencial cuando no esté utilizando la unidad por un período de tiempo prolongado.
OBSERVACIONES ADICIONALES SOBRE EL FUNCIONAMIENTO GAMA DE TEMPERATURA DE FUNCIONAMIENTO TEMP. INTERIOR TEMP. EXTERIOR límite superior ENFRIAR límite inferior límite superior CALENTAR límite inferior B.S. = Bulbo seco 32 °C 23 °C 21 °C 15 °C 27 °C 20 °C - B.S. B.H. B.S. B.H. B.S. 43 °C 21 °C 24 °C 18 °C –7 °C –8 °C B.S. B.H. = Bulbo húmedo B.S. B.S. B.S. B.H. B.S. B.H. • El dispositivo protector incorporado en el aparato puede impedir que éste continúe funcionando, cuando se use fuera de este margen.
DESIGNACIÓN DE LAS PIEZAS UNIDAD INTERIOR (Cuando se instala en el suelo) 1 Salida de aire 2 Deflectores de ajuste vertical 1 2 3 3 Deflectores de ajuste horizontal 4 Panel de indicaciones 5 Filtros de aire 4 5 6 7 6 Rejilla de admisión 7 Entrada de aire 8 Mando a distancia 9 Lámpara de FUNCIONAMIENTO (roja ) 0 Lámpara de TEMPORIZADOR (anaranjada ) q Lámpara de PLASMACLUSTER (azul) w Ventana RECEPTORA e Tecla AUX.
MANDO A DISTANCIA 1 1 TRANSMISOR 2 VISUALIZADOR (de cristal líquido) 3 Tecla PLASMACLUSTER 4 Tecla de CONEXIÓN/DESCONEXIÓN 2 5 Tecla del TERMOSTATO 6 Tecla de CAPACIDAD MÁXIMA 7 Tecla MODO (MODE) 3 8 Tecla TEMPORIZADOR EN UNA HORA 4 9 Tecla de ACTIVACIÓN DEL TEMPORIZADOR (para regularlo) MODE 6 7 8 9 0 1h FAN q w e r t y u SWING SET/C 0 Tecla de DESACTIVACIÓN DEL TEMPORIZADOR (para regularlo) q Tecla de AVANCE HORAS w Tecla de RETROCESO DE HORAS e Tecla VENTILACIÓN (FAN) r Tecla de AJUSTE/CANC
USO DEL MANDO A DISTANCIA FORMA DE COLOCAR LAS PILAS Use dos pilas tamaño AAA (R03). la cubierta 1 Retire a distancia. del mando Cubierta del mando a distancia las pilas en el comparti2 Inserte miento, asegúrese de que las polaridades ± y — están correctamente alineadas. • Si las pilas están bien colocadas, en el visualizador aparecerá “AM 6:00”. 3 - Coloque de nuevo la cubierta en su sitio. + + - NOTAS: • Las pilas alcanzan para un año de uso normal, aproximadamente.
PRECAUCIÓN • No permita que la ventana receptora de señal reciba la luz directa del sol, ya que esto puede deteriorar su funcionamiento. Si la ventana receptora de señal es expuesta a la luz solar directa, utilice una cortina para bloquear la luz. • El uso de una lámpara fluorescente con interruptor rápido en la misma habitación puede interferir con la transmisión de la señal.
FUNCIONAMIENTO BÁSICO 1 Pulse la tecla MODE para elegir el modo de funcionamiento. AUTOMÁTICO 2 CALENTAR ENFRIAR DESHUMECTAR Pulse la tecla de CONEXIÓN/DESCONEXIÓN comenzar el funcionamiento. • La lámpara roja de FUNCIONAMIENTO ( en la unidad se iluminará. 2 5 3 1 1h 4 FAN Pulse la tecla del TERMOSTATO para regular la temperatura deseada.
NOTAS SOBRE EL MODO AUTOMÁTICO En el modo AUTOMÁTICO, los ajustes de temperatura y modo son regulados automáticamente dependiendo de la temperatura ambiente y la temperatura exterior cuando la unidad está activada. Ajustes de los modos y la temperatura & & Enfriar (24°C) ' Calentar Calentar (24°C) (23°C) Temp. interior (°C) Temp. exterior (°C) !" Enfriar (25°C) Enfriar (26°C) Deshumectar ambiente) (Temp.
REGLAJE DE LA DIRECCIÓN DE LA CORRIENTE DE AIRE CORRIENTE DE AIRE VERTICAL FORMA DE AJUSTAR LA DIRECCIÓN DE LA CORRIENTE DE AIRE Pulse una vez la tecla SWING en el mando a distancia. • El deflector de ajuste vertical cambiará su ángulo continuamente. Pulse nuevamente la tecla SWING cuando el deflector de ajuste vertical esté en la posición deseada. • El deflector detendrá su movimiento dentro del margen mostrado en el diagrama.
FUNCIONAMIENTO A CAPACIDAD MÁXIMA En esta operación, el acondicionador de aire trabaja a la capacidad máxima para enfriar la habitación o calentarla tan rápidamente que puede utilizarlo justo cuando llega usted a su casa. activar la función de CAPACIDAD MÁXIMA, 1 Para pulse la tecla de CAPACIDAD MÁXIMA teniendo la unidad ya conectada. • En el mando a distancia se visualiza la indicación “ • Desaparece la indicación de temperatura. PM ”. PARA CANCELAR Pulse de nuevo la tecla de CAPACIDAD MÁXIMA.
FUNCIONAMIENTO CON EL TEMPORIZADOR NOTA: Antes de programar el temporizador‚ asegúrese de que el reloj esté ajustado apropiadamente con la hora actual. DESACTIVACIÓN DEL TEMPORIZADOR la tecla de DESACTIVACIÓN DEL TEM1 Pulse PORIZADOR ( ). indicador de DESACTIVACIÓN DEL TEMPO2 ElRIZADOR parpadeará; pulse las teclas de AVANCE o RETROCESO DE HORAS para ajustar la hora deseada. (El tiempo puede regularse en incrementos de 10 minutos).
ACTIVACIÓN DEL TEMPORIZADOR la tecla de ACTIVACIÓN DEL TEMPORIZA1 Pulse ). DOR ( indicador de ACTIVACIÓN DEL TEMPORIZA2 ElDOR parpadeará; pulse las teclas de AVANCE o RETROCESO DE HORAS para ajustar la hora deseada. (El tiempo puede regularse en incrementos de 10 minutos). el mando a distancia a la ventana receptora 3 Apunte de señal en la unidad y pulse la tecla de AJUSTE DEL TEMPORIZADOR (SET/C). • En la unidad la lámpara anaranjada de TEMPORIZADOR ( ) se iluminará.
CONSEJOS SOBRE EL FUNCIONAMIENTO DEL PLASMACLUSTER El generador de iones Plasmacluster que se encuentra dentro del acondicionador de aire, liberará en la habitación iones plasmacluster positivos y negativos. La liberación en el aire de aproximadamente el mismo número de iones negativos y positivos reducirá el moho transportado en el aire. Iones Plasmacluster FUNCIONAMIENTO DEL PLASMACLUSTER el funcionamiento, pulse la tecla PLASMA1 Durante CLUSTER. • En el mando a distancia se visualiza la indicación “ ”.
MODO AUXILIAR Use este modo si no dispone de un mando a distancia. ACTIVACIÓN Pulse la tecla AUX. en el panel indicador utilizando un palo delgado. • Se encenderá la lámpara roja de FUNCIONAMIENTO ( ) que está en la unidad y ésta comenzará a funcionar en el modo AUTOMÁTICO. • La velocidad del ventilador y el reglaje de la temperatura se ajustan al modo AUTOMÁTICO. AUX. DESACTIVACIÓN Pulse de nuevo la tecla AUX. • La lámpara roja de FUNCIONAMIENTO ( en la unidad se apagará. ) Si la tecla AUX.
MANTENIMIENTO LIMPIEZA DE LOS FILTROS Los filtros de aire deben limpiarse cada dos semanas. 1 DESCONECTE LA UNIDAD Tapón LA REJILLA DE ADMISIÓN 2 ABRA 1 Deslice los tapones hacia la iz- Rejilla de admisión ). quierda ( OPEN Hay dos tapones para cada rejilla de admisión. 2 Tire de la rejilla de admisión con cuidado y ábrala. LOS FILTROS DE AIRE 3 SAQUE Empuje ligeramente ambos salientes en los filtros de aire y desengánche los filtros.
ANTES DE LLAMAR AL DEPARTAMENTO DE SERVICIO TÉCNICO Las siguientes condiciones no significan mal funcionamiento del equipo. LA UNIDAD NO FUNCIONA RUIDOS DE SILBIDOS La unidad no funcionará inmediatamente después de encenderla. La unidad no funcionará inmediatamente después de que el modo de servicio se haya cambiado. Esto sucede con el fin de proteger los mecanismos internos. Espere 3 minutos antes de operar la unidad.
A. Informazioni sullo smaltimento per gli utenti (privati) 1. Nell'Unione europea Attenzione: Per smaltire il presente dispositivo, non utilizzare il normale bidone della spazzatura! Le apparecchiature elettriche ed elettroniche usate devono essere gestite a parte e in conformità alla legislazione che richiede il trattamento, il recupero e il riciclaggio adeguato dei suddetti prodotti.
ITALIANO Questo manuale spiega come usare al meglio il vostro nuovo condizionatore. Leggete attentamente questo manuale prima di usare il prodotto. Questo manuale deve essere conservato in un posto sicuro per una facile consultazione. INDICE in a otto o • IMPORTANTI ISTRUZIONI PER LA SICUREZZA ......................................... I-1 • ULTERIORI NOTE RIGUARDANTI IL FUNZIONAMENTO ................................ I-3 • SUGGERIMENTI PER RISPARMIARE ENERGIA ...........................................
IMPORTANTI ISTRUZIONI PER LA SICUREZZA PRECAUZIONI PER L’USO 1 Aprite una finestra o una porta periodicamente per ventilare la stanza, specialmente quando si usano apparecchi a gas. Una ventilazione insufficiente potrebbe causare mancanza di ossigeno. 2 3 4 5 6 7 8 9 Non toccate i tasti con le mani bagnate. Ciò potrebbe provocare una scossa elettrica. Per sicurezza, spegnete l’interruttore del circuito quando non si usa l’unità per un lungo periodo di tempo.
ULTERIORI NOTE RIGUARDANTI IL FUNZIONAMENTO CAMPO DELLA TEMPERATURA OPERATIVA TEMP. INTERNA TEMP. ESTERNA RINFRESCAMENTO RISCALDAMENTO limite sup. limite inf. limite sup. limite inf. B.A. = Bulbo asciutto 32°C B.A. 23°C B.B. 21°C B.A. 15°C B.B. 27°C B.A. 20°C B.A. - 43°C B.A. 21°C B.A. 24°C B.A. 18°C B.B. –7°C B.A. –8°C B.B. B.B. = Bulbo bagnato • Il sistema di protezione incorporato potrebbe interrompere il funzionamento dell’unità quando la si utilizza fuori da questo campo di variazione.
NOMI DEI COMPONENTI UNITÀ INTERNA (Quando è installata sul pavimento) 1 Uscita (d’aria) 1 2 3 4 5 2 Deflettore di regolazione verticale 3 Deflettore di regolazione orizzontale 4 Pannello degli indicatori 5 Filtri dell’aria 6 Griglia di aspirazione 7 Presa (aria) 8 Telecomando 9 Spia di FUNZIONAMENTO (rossa ) 6 7 0 Spia TIMER (arancione ) q Spia PLASMACLUSTER (blu) w Finestra di RICETTORE e Tasto AUSILIARIO (AUX.) 8 (Quando è installata sul soffitto) 9 0 q w AUX.
TELECOMANDO 1 1 TRASMETTITORE 2 DISPLAY (display a cristalli liquidi) 3 Tasto PLASMACLUSTER 4 Tasto d’ACCENSIONE/SPEGNIMENTO 2 5 Tasto TERMOSTATO 6 Tasto di PIENA POTENZA 7 Tasto MODO (MODE) 3 4 5 MODE 6 7 8 9 0 1h 8 Tasto TIMER DI SPEGNIMENTO DOPO UN’ORA 9 Tasto TIMER ATTIVATO (per impostare il timer) 0 Tasto TIMER DISATTIVATO (per impostare il timer) q Tasto di AVANZAMENTO DELL’ORA w Tasto di ARRETRAMENTO DELL‘ORA e Tasto VENTILATORE (FAN) q w e r t y u SWING SET/C r Tasto IMPOSTAZIONE/ANNULLAM
USO DEL TELECOMANDO INSERIMENTO DELLE BATTERIE Utilizzate due batterie di dimensioni AAA (R03). il coperchio del teleco1 Togliete mando. Coperchio del telecomando le batterie nel comparto, 2 Inserite assicurandovi che le polarità ± e — siano allineate correttamente. • Il display indica “AM 6:00” quando le batterie sono inserite correttamente. 3 Rimettete il coperchio. + + - NOTE: • In condizioni di uso normali, le batterie durano circa un anno.
PRECAUZIONI • Evitate di esporre il ricevitore alla luce solare diretta, in quanto ne può danneggiare il funzionamento. Se il ricevitore è esposto alla luce solare diretta, schermatela. • L’uso di una lampada fluorescente nello stesso locale può interferire con la trasmissione del segnale. • L’unità può essere influenzata da segnali trasmessi dal telecomando di un televisore, videoregistratore o altre attrezzature usate nella stessa stanza.
FUNZIONI DI BASE 1 Premete il tasto MODE per selezionare la modalità di funzionamento. AUTOMATICO 2 3 1 1h 4 FAN Premete il tasto d’ACCENSIONE/SPEGNIMENTO per iniziare il funzionamento. ) Premete il tasto TERMOSTATO per impostare la temperatura desiderata.
SUGGERIMENTI SULLA MODALITÀ AUTOMATICO Nel modo AUTOMATICO, le impostazioni della temperatura ed il modo vengono selezionati automaticamente in funzione della temperatura ambientale e della temperatura esterna al momento dell’accensione dell’unità. Modalità e impostazioni della temperatura ' & & Raffrescamento (24°C) RisRiscalda- caldamento mento (24°C) (23°C) Deumid. stenza (Temp.–2°C ) !" Raffrescamento (25°C) Temp. esterna (°C) Raffrescamento (26°C) Riscaldamento (22°C) Temp.
REGOLAZIONE DELLA DIREZIONE DEL FLUSSO D’ARIA DIREZIONE VERTICALE DEL FLUSSO D’ARIA COME REGOLARE LA DIREZIONE DEL FLUSSO D’ARIA Premete il tasto SWING sul telecomando una volta. • Il deflettore di regolazione verticale cambierà l’angolo continuamente. Premete il tasto SWING nuovamente quando il deflettore di regolazione verticale è nella posizione desiderata. • Il deflettore smetterà di muoversi all’interno della gamma mostrata nel diagramma.
FUNZIONAMENTO A PIENA POTENZA In questa modalità, il condizionatore d’aria funziona a piena potenza e rinfresca o riscalda l’ambiente così velocemente che potete usarlo non appena rientrate a casa. attivare il funzionamento a PIENA POTENZA, 1 Per premete il tasto di PIENA POTENZA durante il funzionamento. • Il telecomando attiverà il display “ ”. • Il display della temperatura scomparirà. PM PER ANNULLARE Premete nuovamente il tasto di PIENA POTENZA.
FUNZIONAMENTO DEL TIMER NOTA: Prima di impostare il timer, assicuratevi che l’orologio sia impostato con l’ora giusta. TIMER DISATTIVATO ). 1 Premete il tasto TIMER DISATTIVATO ( TIMER DISATTIVATO lampeggerà; 2 L’indicatore premete i tasti di AVANZAMENTO o ARRETRAMENTO DELL’ORA per impostare l’ora desiderata (l’ora può essere impostata in incrementi di 10 minuti). il telecomando verso il ricevitore del 3 Puntate segnale sull’unità e premete il tasto IMPOSTAZIONE TIMER (SET/C).
TIMER ATTIVATO 1 Premete il tasto TIMER ATTIVATO ( ). TIMER ATTIVATO lampeggerà; 2 L’indicatore premete i tasti di AVANZAMENTO o ARRETRAMENTO DELL’ORA per impostare l’ora desiderata (l’ora può essere impostata in incrementi di 10 minuti). il telecomando verso il ricevitore del 3 Puntate segnale sull’unità e premete il tasto IMPOSTAZIONE TIMER (SET/C). • La spia arancione TIMER ( ) sull’unità si illuminerà. • Un segnale acustico “bip” verrà emesso dall’unità interna quando riceverà il segnale.
SUGGERIMENTI SUL FUNZIONAMENTO DEL PLASMACLUSTER Il generatore di ioni Plasmacluster all’interno del condizionatore d’aria rilascerà ioni al plasma (plasmacuster) positivi e negativi nella stanza. Approssimativamente lo stesso numero di ioni positivi e negativi rilasciati nell’aria ridurranno alcuni funghi causati dall’aria. Ioni Plasmacluster FUNZIONAMENTO DEL PLASMACLUSTER il funzionamento, premere il tasto PLASMA1 Durante CUSTER. • Il telecomando attiverà il display “ ”.
MODALITÀ AUSILIARIA Usate questo modo quando il telecomando non è disponibile. PER ACCENDERE IL RICEVITORE Premete il tasto AUX. sul pannello degli indicatori mediante un bastoncino. • La spia rossa di FUNZIONAMENTO ( ) sull’unità si illuminerà e l’unità comincerà il funzionamento nel modo AUTOMATICO. • La velocità del ventilatore e l’impostazione della temperatura sono impostate su AUTOMATICO. AUX. PER SPEGNERE Premete nuovamente il tasto AUX. • La spia rossa di FUNZIONAMENTO ( sull’unità si spegnerà.
MANUTENZIONE PULIZIA DEI FILTRI I filtri dell’aria dovrebbero essere puliti ogni due settimane. 1 SPEGNETE L’UNITÀ 2 APRITE ZIONE Fermo Griglia di aspirazione LA GRIGLIA DI ASPIRA- 1 Fate scorrere i fermi sulla sinistra ). (OPEN Sono presenti due fermi su ogni griglia di aspirazione. 2 Tirate delicatamente e aprite la griglia di aspirazione. I FILTRI DELL’ARIA 3 ESTRAETE Premere leggermente entrambe Sporgenza Gancio le sporgenze sui filtri dell’aria e sbloccare i filtri.
PRIMA DI RICHIEDERE ASSISTENZA Le condizioni seguenti non significano malfunzionamento L’UNITÀ NON FUNZIONA SIBILO L’unità non funziona se accesa subito dopo averla spenta. L’unità non funziona immediatamente dopo aver cambiato la modalità. Ciò al fine di proteggere il meccanismo interno. Attendere 3 minuti prima che l’unità funzioni. Il suono delicato, tipo sibilo, è prodotto dal refrigerante che scorre all’interno dell’unità. L’unità è in fase di preriscaldamento o di sbrinamento.
A. Informações sobre a Eliminação de Produtos para os Utilizadores (particulares) 1. Na União Europeia Atenção: O seu produto está identificado com este símbolo. Significa que os produtos eléctricos e electrónicos não devem ser misturados com o lixo doméstico comum. Existe um sistema de recolhas específico para estes produtos.
PORTUGUÊS Este manual explica como utilizar o seu novo ar condicionado da melhor maneira. Por favor, leia este manual cuidadosamente antes de utilizar o produto. Este manuel deve ser mantido num local seguro para fácil consulta. CONTEÚDO a co o seu • INSTRUÇÕES DE SEGURANÇA IMPORTANTES ......................................... P-1 • NOTAS ADICIONAIS SOBRE A OPERAÇÃO ........................................... P-3 • SUGESTÕES PARA POUPAR ENERGIA .... P-3 • NOMES DAS PEÇAS ...............................
INSTRUÇÕES DE SEGURANÇA IMPORTANTES PRECAUÇÕES COM A UTILIZAÇÃO 1 Abrir periodicamente uma janela ou uma porta para ventilar a sala, especialmente quando utilizar electrodomésticos a gás. A ventilação insuficiente poderá causar redução de oxigénio. 2 3 4 5 6 7 8 9 Não utilizar os botões com as mãos molhadas. Poderá causar choque eléctrico. Para segurança, desligar o disjuntor corta-circuitos quando não utilizar a unidade por um período longo de tempo.
NOTAS ADICIONAIS SOBRE A OPERAÇÃO O FUNCIONAMENTO GAMA DE TEMPERATURA DE SERVIÇO TEMP. INTERIOR TEMP. EXTERIOR • O dispositivo de protecção ARREFECIMENTO AQUECIMENTO limite superior limite inf limite superior limite inf A.S. = Ampola seca 32°C 23°C 21°C 15°C 27°C A.S. A.H. A.S. A.H. D.B. 43°C A.S. 21°C A.S. 24°C A.S. 18°C A.H. –7°C A.S. –8°C A.H. 20°C A.S. - instalado pode impedir o funcionamento da unidade ao ser usada fora desta gama.
NOMES DAS PEÇAS UNIDADE INTERIOR (Quando instalada no chão) 1 Saída (Ar) 2 Persiana reguladora vertical 1 2 3 3 Persiana reguladora horizontal 4 Painel indicador 5 Filtros de ar 4 5 6 7 6 Grelha de entrada 7 Entrada (Ar) 8 Controlo remoto 9 Lâmpada de FUNCIONAMENTO (vermelha ) 0 Lâmpada de TEMPORIZADOR (laranja ) q Lâmpada PLASMACLUSTER (azul) w Janela RECEPTORA e Botão AUX. 8 (Quando instalada no tecto) 9 0 q w AUX.
CONTROLO REMOTO 1 1 TRANSMISSOR 2 MOSTRADOR LCD (de cristais líquidos) 3 Botão PLASMACLUSTER 4 Botão LIGAR/DESLIGAR 2 5 Botão do TERMOSTATO 6 Botão de PLENA FORÇA 7 Botão MODE 3 8 Botão TEMPORIZADOR DE UMA HORA 4 9 Botão LIGAR POR TEMPORIZADOR (para regular o temporizador) MODE 6 7 8 9 0 1h FAN q w e r t y u SWING SET/C 0 Botão DESLIGAR POR TEMPORIZADOR (para regular o temporizador) q Botão AVANÇAR HORA w Botão RECUAR HORA e Botão VENTOINHA (FAN) r Botão ACTIVAR/CANCELAR TEMPORIZADOR (SET/C) t
UTILIZAÇÃO DO CONTROLO REMOTO INSTALAR AS PILHAS Use duas pilhas AAA (R03). a tampa do controlo re1 Retire moto. Controlo remoto tampa as pilhas no compartimen2 Insira to assegurando que os pólos ± e — fiquem correctamente posicionados. • Se as pilhas estiverem devidamente instaladas aparecerá no mostrador “AM 6:00”. - 3 Recoloque a tampa. + + - NOTAS: • A duração de vida útil da pilha é de aproximadamente um ano sob condições normais de utilização.
ATENÇÃO • Não exponha a janela receptora à insolação demasiado forte ou directa, pois os raios solares podem afectar o funcionamento correcto. Caso seja necessário, feche as cortinas para evitar essa exposição directa. • Se utilizar uma lâmpada fluorescente com um arrancador rápido na mesma sala em que se encontra o ar condicionado, podem surgir interferências durante a transmissão do sinal.
FUNCIONAMENTO BÁSICO 1 Carregue no botão MODE para escolher o modo de funcionamento. AUTO 2 3 1 1h 4 FAN SECAR Carregue no botão LIGAR/DESLIGAR para activar a função. Carregue no botão do TERMOSTATO para regular a temperatura desejada. • Em modos AUTO e (Exemplo: 1°C mais alta) SECAR, a temperatura pode ser alterada em incrementos de C 1°C dentro da gama de 2°C acima a 2°C (Exemplo: 2°C mais baixa) abaixo da temperatura automaticamente determinada pelo ar conC dicionado.
SUGESTÕES SOBRE O MODO AUTO No modo AUTO, a temperatura e o modo são seleccionados automaticamente consoante a temperatura ambiente e a temperatura exterior no momento em que a unidade é ligada. Modos e regulações de temperatura & & Frio (24°C) ' Calor (24°C) Temp. interior (°C) Calor (23°C) !" Frio (25°C) Temp. exterior (°C) Frio (26°C) Seco de sala ( Temp.
REGULAÇÃO DA DIRECÇÃO DO FLUXO DO AR DIRECÇÃO DO FLUXO VERTICAL DO AR COMO REGULAR A DIRECÇÃO DO FLUXO DO AR Carregue uma vez no botão SWING no controlo remoto. • A persiana reguladora vertical modifica continuamente o seu ângulo. Carregue mais uma vez no botão SWING assim que a persiana reguladora vertical alcançar a posição desejada. • A persiana pára dentro da margem apresentada no diagrama.
MODO DE FUNCIONAMENTO A PLENA FORÇA Nesta operação, o ar condicionado trabalha em plena força para arrefecer ou aquecer a sala tão rapidamente que a poderá utilizar logo após chegar a casa. activar o funcionamento de PLENA FORÇA, 1 Para pressione o botão de PLENA FORÇA durante o funcionamento. • O controlo remoto mostrará “ ”. • O mostrador da temperatura desligar-se-á. PM PARA CANCELAR Pressione de novo o botão de PLENA FORÇA.
FUNCIONAMENTO COM TEMPORIZADOR NOTA: Antes de acertar o temporizador, verifique primeiro se a hora do relógio está certa. DESLIGAR POR TEMPORIZADOR no botão DESLIGAR POR TEMPO1 Carregue RIZADOR ( ). DESLIGAR POR TEMPORIZADOR 2 Oficaindicador intermitente; prima os botões AVANÇAR ou RECUAR A HORA para acertar a hora. (A hora pode ser regulada em passos de 10 minutos.) o controlo remoto para a janela receptora 3 Aponte da unidade e carregue no botão ACTIVAR TEMPORIZADOR (SET/C).
LIGAR POR TEMPORIZADOR no botão LIGAR POR TEMPORIZADOR 1 Carregue ). ( indicador LIGAR POR TEMPORIZADOR fica 2 Ointermitente; prima os botões AVANÇAR ou RECUAR A HORA para acertar a hora. (A hora pode ser regulada em passos de 10 minutos.) o controlo remoto para a janela receptora 3 Aponte da unidade e carregue no botão ACTIVAR TEMPORIZADOR (SET/C). • A lâmpada laranja de TEMPORIZADOR ( ) na unidade acender-se-á. • Ouve-se um som a título de confirmação de que a unidade está a receber o sinal.
SUGESTÕES SOBRE O FUNCIONAMENTO DO PLASMACLUSTER O gerador de iões Plasmacluster dentro do ar condicionado libertará iões Plasmacluster positivos e negativos para dentro da sala. Aproximadamente o mesmo número de iões positivos e negativos libertados reduzem os fungos no ar. Iões de Plasmacluster FUNCIONAMENTO DO PLASMACLUSTER a operação, 1 Durante CLUSTER. prima o botão PLASMA- • O controlo remoto mostrará “ ”. • A lâmpada azul PLASMACLUSTER iluminar-se-á na unidade.
MODO DE FUNCIONAMENTO AUXILIAR Use este modo de funcionamento quando não tiver o controlo remoto à disposição. PARA ACTIVAR Prima o botão AUX. utilizando uma ponta fina no painel indicador. • A lâmpada vermelha de FUNCIONAMENTO ( ) na unidade acende e a unidade começa a funcionar no modo AUTO. • A velocidade da ventoinha e a regulação da temperatura são ajustadas em AUTO. AUX. PARA DESACTIVAR Prima novamente o botão AUX. • A lâmpada vermelha de FUNCIONAMENTO ( ) na unidade apaga-se.
MANUTENÇÃO Os filtros de ar devem ser limpos de duas em duas semanas. LIMPEZA DOS FILTROS 1 DESLIGAR A UNIDADE Batente A GRELHA DE ENTRADA 2 ABRA 1 Coloque os batentes para a es). querda (OPEN Existem dois batentes para cada grelha de entrada. 2 Puxe e abra a grelha de entrada. Grelha de entrada OS FILTROS DE AR 3 REMOVA Carregue nas duas saliências dos filtros de ar e desencaixe os filtros. Saliência Gancho OS FILTROS DE AR 4 LIMPE Use um aspirador para retirar o pó.
ANTES DE SOLICITAR ASSISTÊNCIA As condições de funcionamento seguidamente descritas não denunciam avarias do equipamento. UNIDADE NÃO FUNCIONA RUÍDO SIBILANTE A unidade não funcionará se for ligada imediatamente após ter sido desligada. A unidade não funcionará imediatamente após o modo de funcionamento ter sido alterado. Esta característica é para proteger o mecanismo interno. Espere 3 minutos até colocar a unidade em funcionamento.
A. Informations sur la mise au rebut à l'intention des utilisateurs privés (ménages) 1. Au sein de l'Union européenne Attention : votre produit comporte ce symbole. Il signifie que les produits électriques et électroniques usagés ne doivent pas être mélangés avec les déchets ménagers généraux. Un système de collecte séparé est prévu pour ces produits.
FRANÇAIS Ce mode d’emploi explique l’utilisation de votre nouveau climatiseur. Veuillez le lire en entier avant sa première utilisation. Ce mode d’emploi doit être conservé dans un endroit sûr pour pouvoir le consulter ultérieurement. s TABLE DES MATIERES s. • CONSIGNES DE SECURITE IMPORTANTES ......................................... F-1 • AUTRES REMARQUES SUR LE FONCTIONNEMENT ................................. F-3 • CONSEILS SUR LES ECONOMIES D’ENERGIE................................................
CONSIGNES DE SECURITE IMPORTANTES PRECAUTIONS D’EMPLOI 1 Ouvrir périodiquement une fenêtre ou une porte pour aérer la pièce, en particulier lors de l’utilisation d’appareils à gaz. Une ventilation insuffisante risque de provoquer un manque d’oxygène. 2 3 4 5 6 Ne pas utiliser les touches avec les mains mouillées. Cela risque de provoquer une électrocution. 7 8 9 Ne pas placer une cuvette contenant de l’eau sur l’appareil.
AUTRES REMARQUES SUR LE FONCTIONNEMENT GAMME DE TEMPERATURES DE SERVICE TEMP. INT. REFROIDISSEMENT limite supérieure limite inférieure limite supérieure CHAUFFAGE limite inférieur S. = Ampoule sèche 32°C 23°C 21°C 15°C 27°C 20°C - TEMPE. EXT. S. H. S. H. S. 43°C S. 21°C S. 24°C S. 18°C H. –7°C S. –8°C H. S. • Le dispositif de protection intégré peut empêcher cette unité de fonctionner quand celle-ci est utilisée hors de cette portée.
NOMENCLATURE UNITE INTERIEURE 1 Bouche de sortie (Air) (Si installée sur le sol) 2 Volets d’aération à réglage vertical 1 2 3 3 Volets d’aération à réglage horizontal 4 Panneau d’indicateurs 5 Filtres à air 4 6 Grille d’admission de l’air 7 Bouche d’entrée (Air) 5 8 Télécommande 9 Voyant de MARCHE (rouge ) 6 7 0 Voyant de la MINUTERIE (orange ) q Voyant de PLASMACLUSTER (bleu) w Fenêtre de RECEPTION 8 e Touche AUX. (Si installée au plafond) 9 0 q w AUX.
TELECOMMANDE 1 1 EMETTEUR 2 AFFICHAGE (Affichage à cristaux liquides) 3 Touche PLASMACLUSTER 4 Touche MARCHE/ARRET 2 5 Touche de THERMOSTAT 6 Touche PLEIN REGIME 7 Touche MODE 3 8 Touche de d’ARRET APRES UNE HEURE 4 9 Touche MARCHE DE LA MINUTERIE (pour régler la minuterie) MODE 6 7 8 9 0 1h FAN q w e r t y u SWING SET/C 0 Touche ARRET DE LA MINUTERIE (pour régler la minuterie) q Touche d’AVANCE DU TEMPS w Touche de RECUL DU TEMPS e Touche VENTILATEUR (FAN) r Touche de REGLAGE DE LA MINUTERIE/
UTILISATION DE LA TELECOMMANDE CHARGER LES BATTERIES Utiliser deux piles de format AAA (R03). le couvercle de la télé1 Retirer commande. Couvercle de la télécomande les piles dans le compar2 Insérer timent, en s’assurant que les polarités ± et — sont alignées correctement. • L’affichage indique “AM 6:00” lorsque les piles sont insérées correctement. - 3 Remettre le couvercle en place. + + - REMARQUES : • La durée de service des piles est d’environ un an dans des conditions d’utilisation normales.
ATTENTION • Ne pas exposer la fenêtre de réception du signal aux rayons directs du soleil, étant donné qu’ils peuvent gêner son fonctionnement. Si la fenêtre de réception du signal est exposée aux rayons directs du soleil, tirer le rideau pour bloquer la lumière. • Le fait d’utiliser une lampe fluorescente avec un démarreur rapide dans la même pièce risque de créer des interférences avec la transmission du signal.
FONCTIONNEMENT DE BASE 1 Appuyer sur la touche MODE pour sélectionner le mode de fonctionnement. AUTO CHAUFFAGE FRAIS 2 5 3 1 1h 4 FAN ) s’allume Appuyer sur la touche de THERMOSTAT pour régler la température souhaitée. • En modes AUTO et (Example : 1°C plus élevé) SEC, la température peut être changée par C pas de 1°C dans une plage allant de 2°C en plus à 2°C en moins (Example : 2°C plus faible) par rapport à la température déterminée automatiquement par C le climatiseur.
CONSEILS A PROPOS DU MODE AUTO En mode AUTO, les réglages de température et de mode sont sélectionnés automatiquement selon la température de la pièce et la température extérieure lorsque l’appareil est allumé. Modes et réglages de température & & Frais (24°C) ' Chauf- Chauffage fage (24°C) (23°C) !" Frais (25°C) Temp. extérieure (°C) Frais (26°C) Sec de la pièce ( Temp. –2°C ) Chauffage (22°C) Temp.
REGLAGE DE LA DIRECTION DU DEBIT D’AIR DEBIT D’AIR VERTICAL VOICI COMMENT AJUSTER LA DIRECTION DU DEBIT D’AIR Appuyer une fois sur la touche SWING de la télécommande. • Le volet de réglage vertical d’aération change continuellement d’angle. Appuyer à nouveau sur la touche SWING lorsque volet de réglage vertical est à la position désirée. • Le volet d’aération arrête de se déplacer dans l‘intervalle indiqué sur le schéma.
FONCTIONNEMENT A PLEIN REGIME Dans ce mode de fonctionnement, le climatiseur fonctionne à plein régime pour rafraîchir ou réchauffer l’atmosphère de la pièce si rapidement que vous pouvez vous contenter de le mettre en marche juste au moment où vous rentrez chez vous. activer le fonctionnement en PLEIN REGIME, 1 Pour appuyer sur la touche PLEIN REGIME pendant le fonctionnement. • La télécommande affiche “ ”. • L’affichage de température s’éteint.
FONCTIONNEMENT DE LA MINUTERIE REMARQUE : Avant de régler la minuterie, s’assurer que l’horloge est réglée correctement à l’heure courante. ARRET DE LA MINUTERIE sur la touche d’ARRET DE LA MINU1 Appuyer TERIE ( ). voyant ARRET DE LA MINUTERIE com2 Le mence à clignoter ; appuyer sur la touche d’AVANCE DU TEMPS ou de RECUL DE TEMPS pour régler l’heure courante. (L’heure peut être réglée par incréments de 10 minutes.
MARCHE DE LA MINUTERIE d’abord le réglage ( ) MARCHE DE 1 Annuler LA MINUTERIE, puis le régler à nouveau. voyant MARCHE DE LA MINUTERIE com2 Le mence à clignoter ; appuyer sur la touche d’AVANCE DU TEMPS ou de RECUL DE TEMPS pour régler l’heure courante. (L’heure peut être réglée par incréments de 10 minutes.) la télécommande sur la fenêtre de réception 3 Pointer du signal de l’appareil et appuyer sur la touche de REGLAGE DE LA MINUTERIE (SET/C).
CONSEILS CONCERNANT LE FONCTIONNEMENT DU PLASMACLUSTER L’ionisateur Plasmacluster à l’intérieur du climatiseur va délivrer des ions dans la pièce. Une même quantité d’ions négatifs et positifs permettent de réduire la quantité de champignons de moisissure formés dans l’air. Groupes d’ions plasma FONCTIONNEMENT DU PLASMACLUSTER le fonctionnement, appuyer sur la touche 1 Pendant PLASMACLUSTER. • La télécommande affiche “ ”. • Le voyant bleu de PLASMACLUSTER s’allume sur l’appareil.
MODE AUXILIAIRE Utiliser ce mode si la télécommande n’est pas disponible. POUR ALLUMER Appuyer sur la touche AUX. à l’aide d’une pointe fine sur le panneau indicateur. • Le voyant rouge de MARCHE ( ) s’allume sur l’appareil et l’appareil commence à fonctionner en mode AUTO. • La vitesse du ventilateur et le réglage de température sont en position AUTO. AUX. POUR ETEINDRE Appuyer de nouveau sur la touche AUX. • Le voyant rouge de MARCHE ( sur l’appareil. ) s’éteint REMARQUE : Si la touche AUX.
ENTRETIEN Les filtres à air doivent être nettoyés toutes les deux semaines. NETTOYAGE DES FILTRES 1 ETEINDRE L’APPAREIL LA GRILLE D’ADMISSION 2 OUVRIR DE L’AIR Butée 1 Faire glisser les butées vers la ). gauche ( OPEN Deux butées sont fournies pour chaque grille d’entrée d’air. 2 Tirer doucement et ouvrir la grille d’entrée d’air. Grille d’admission de l’air LES FILTRES A AIR 3 RETIRER Appuyer doucement sur les deux saillies des filtres à air pour les décrocher.
AVANT D’APPELER LE SERVICE APRES-VENTE Les conditions suivantes ne signifient pas un mauvais fonctionnement de l’appareil. L’APPAREIL NE FONCTIONNE PAS LEGER BRUISSEMENT L’appareil ne fonctionne pas s’il est allumé immédiatement après sa mise hors circuit. L’appareil ne fonctionne pas immédiatement après le changement de mode. Cela sert à protéger le mécanisme interne. Attendre 3 minutes avant de faire fonctionner l’appareil.
GS-XP07FR_Tur.p65 2 10.4.
TÜRKÇE SHARP klima sat∂n ald∂πınız için teμekkür ederiz. Lütfen, klimayı çalıμtırmadan önce bu kılavuzu dikkatle okuyun. ∑Ç∑NDEK∑LER • ÖNEML∑ GÜVENL∑K TAL∑MATLARI ........... T-1 • ∑ΩLET∑MLE ∑LG∑L∑ ∑LAVE NOTLAR ............ T-3 • ENERJ∑ TASARRUFUYLA ∑LG∑L∑ B∑LG∑LER .................................................... T-3 • PARÇALARIN ∑S∑MLER∑ ............................. T-4 • UZAKTAN KUMANDANIN KULLANIMI ...... T-6 • TEMEL ∑ΩLET∑M .........................................
ÖNEML∑ GÜVENL∑K TAL∑MATLARI KULLANIMLA ∑LG∑L∑ ÖNLEMLER gazlı cihazlar kullanırken odayı havalandırmak için periyodik olarak bir pencere 1 Özellikle veya kapı açın. Yetersiz havalandırma oksijen eksikliπine sebep olabilir. 2 Düπmelere ıslak ellerle dokunmayın. Elektrik çarpmasına sebep olabilir. 3 Emniyet amacıyla, klima uzun süre kullanılmayacaπı zaman devre kesiciyi kapatın. montaj zemininde periyodik olarak aµınma kontrolü yapın ve ünitenin yerinde 4 Harici saπlam durduπundan emin olun.
∑ΩLET∑MLE ∑LG∑L∑ ∑LAVE NOTLAR ÇALIΩMA SICAKLI∏I ARALI∏I SO∏UTMA üst limit alt limit üst limit ISITMA alt limit K.T. = Kuru Termometre ∑Ç SIC. DIΩ SIC. 32˚C K.T. 23˚C Y.T. 21˚C K.T. 15˚C Y.T. 27˚C K.T. 20˚C K.T. - 43˚C K.T. 21˚C K.T. 24˚C K.T. 18˚C Y.T. -7˚C K.T. -8˚C Y.T. • Entegre koruma tertibatı, bu aralık dıµında kullanıldıπında ünitenin çalıµmasını önler. • Nem %80’in üzerinde olduπunda ünite SO∏UTMA veya NEM ALMA modunda sürekli çalıµırsa hava çıkıµında çiπlenme olabilir. Y.T.
PARÇALARIN ∑S∑MLER∑ ∑Ç ÜN∑TE (Yere kurulduπunda) 1 Hava çıkıµı 2 Düµey ayarlı kanatçıklar 3 Yatay ayarlı kanatçıklar 1 2 3 4 Gösterge paneli 5 Hava filtreleri 6 Giriµ ızgarası 7 Hava giriµi 4 8 Uzaktan kumanda 9 ∑ΩLET∑M lambası (kırmızı 5 ) 0 ZAMANLAYICI lambası (turuncu ) q PLASMACLUSTER lambas∂ (mavi) 6 7 w Alıcı penceresi e YARDIMCI MOD düπmesi (AUX.) (Tavana kurulduπunda) 8 9 0 q w AUX.
UZAKTAN KUMANDA 1 1 VER∑C∑ 2 GÖSTERGE (Sıvı Kristal Gösterge) 3 PLASMACLUSTER düπmesi 4 AÇMA/KAPAMA düπmesi 2 5 TERMOSTAT düπmesi 6 TAM GÜÇ düπmesi 7 MOD (MODE) düπmesi 3 8 B∑R SAAT SONRA KAPANMA düπmesi 4 9 ZAMANLAYICI AÇMA düπmesi (saat ayarı için) 5 MODE 0 ZAMANLAYICI KAPAMA düπmesi (saat ayarı için) 6 7 8 9 0 1h FAN q ZAMAN ∑LER∑ düπmesi w ZAMAN GER∑ düπmesi e FAN düπmesi r ZAMANLAYICI AYAR/∑PTAL (SET/C) düπmesi q w e r t y u SWING SET/C t P∑L BÖLMES∑N∑N bu iµaretin altında olduπunu gös
UZAKTAN KUMANDANIN KULLANIMI P∑LLER∑N TAKILMASI ∑ki adet AAA (R03) ebadında pil kullanın. kumandanın kapaπını 1 Uzaktan çıkarın. Kontrol kapaπını çıkartın bölmeye yerleµtirin; ± ve 2 Pilleri — kutupların doπru hizada olmasına dikkat edin. • Piller uygun µekilde takıldıπında göstergede “AM 6:00” görülür. 3 Kapaπı yerine takın. + + - NOTLAR: • Pillerin ömrü, normal kullanımda yaklaµık 1 yıld∂r. • Pilleri deπiµtirirken daima ikisini birlikte deπiµtirin ve ayn∂ tipte olmas∂na dikkat edin.
D∑KKAT • Sinyal al∂c∂s∂n∂n güçlü direkt güneµ ∂µ∂π∂ almas∂na izin vermeyin, çünkü çal∂µmas∂n∂ olumsuz etkileyebilir. Sinyal al∂c∂ güçlü direkt güneµ ∂µ∂π∂ al∂rsa ∂µ∂π∂ kesmek için perde kullan∂n. • Ayn∂ odada h∂zl∂ starterli bir floresan lamba kullan∂lmas∂ sinyal aktarımını etkileyebilir. • Ünite, ayn∂ odadaki bir televizyon, video cihaz∂ veya baµka ekipmanlar∂n uzaktan kumandas∂ndan gönderilen sinyallerden etkilenebilir. • Uzaktan kumanday∂ direkt güneµ ∂µ∂π∂nda veya bir ∂s∂t∂c∂ yak∂n∂nda b∂rakmay∂n.
TEMEL ∑ΩLET∑M 1 ∑µletim modunu seçmek için MODE düπmesine bas∂n. OTOMAT∑K ISITMA SO∏UTMA NEM ALMA 2 2 • Ünite üzerindeki k∂rm∂z∂ ∑ΩLET∑M lambas∂ ( ) yanar. 5 3 3 1h 4 FAN ∑stenen sıcaklıπı ayarlamak için TERMOSTAT düπmesine basın. (Örnek: 1°C artırma) • OTOMAT∑K ve NEM ALMA modlarında, klima tarafından otomatik olarak belirlenen sıcaklıktan 2°C daha yüksek ve 2°C daha düµük dereceler arasından 1°C kademelerle deπiµtirilebilir. • SO∏UTMA ve ISITMA modlarında, sıcaklık 18–32°C arasında ayarlanabilir.
OTOMAT∑K MODU HAKKINDA B∑LG∑LER OTOMAT∑K modunda s∂cakl∂k ayar∂ ve modu, ünitenin devreye al∂nd∂π∂ zamanki oda s∂cakl∂π∂na ve dıµ s∂cakl∂πa göre otomatik olarak seçilir.
HAVA AKIΩ YÖNÜNÜN AYARLANMASI DÜΩEY HAVA AKIΩI HAVA AKIΩ YÖNÜNÜ AYARLAMA Uzaktan kumanda üzerindeki SWING düπmesine bir kez bas∂n. • Düµey ayarl∂ kanatç∂k, aç∂s∂n∂ sürekli deπiµtirir. Düµey ayarlı kanatçık istenen pozisyonda olduπunda tekrar SWING düπmesine basın. • Düπmeye bas∂ld∂π∂nda kanatç∂klar∂n hareketi durur. • Ayarlanan pozisyon haf∂zaya al∂n∂r ve bir sonraki iµletimde otomatik olarak tekrar ayn∂ pozisyon ayarlan∂r.
TAM GÜÇTE ∑ΩLET∑M Bu iµletimde, klima, eve geldikten hemen sonra kullanabilmeniz için oday∂ çok h∂zl∂ soπutmak amac∂yla maksimum güçte çal∂µ∂r. GÜÇTE iµletimi devreye sokmak için, iµletim 1 TAM s∂ras∂nda TAM GÜÇ düπmesine bas∂n. • Uzaktan kumanda göstergesinde gösterilir “ • S∂cakl∂k göstergesi söner. ”. ∑PTAL ETMEK ∑Ç∑N PM Tekrar TAM GÜÇ düπmesine bas∂n. • TAM GÜÇTE iµletim, iµletim modu deπiµtirildiπinde veya ünite kapat∂ld∂π∂nda da iptal olur.
ZAMANLAYICI AYARI NOT: Zamanlay∂c∂y∂ ayarlamadan önce saatin uygun µekilde ayarlanmas∂na dikkat edin. ZAMANLAYICIYI KAPAMA KAPAMA ( 1 ZAMANLAYICIYI bas∂n. ) düπmesine KAPAMA göstergesi yan∂p 2 ZAMANLAYICIYI söner; ZAMAN ∑LER∑ veya GER∑ düπmelerine basarak istenen zaman∂ ayarlay∂n. (Zaman 10 dakikal∂k aral∂klarla ayarlanabilir.) kumanday∂ ünite üzerindeki sinyal 3 Uzaktan al∂c∂ya doπru tutun ve ZAMANLAYICI ∑PTAL (SET/C) düπmesine bas∂n. • Ünite üzerindeki turuncu ZAMANLAYICI lambası ( ) yanar.
ZAMANLAYICI AÇMA 1 ZAMANLAYICIYI AÇMA ( ) düπmesine bas∂n. AÇMA göstergesi yan∂p söner. 2 ZAMANLAYICIYI ZAMAN ∑LER∑ veya GER∑ düπmesine basarak istenen zaman∂ ayarlay∂n. (Zaman 10 dakikal∂k aral∂klarla ayarlanabilir.) kumanday∂ ünite üzerindeki sinyal al∂c∂ya 3 Uzaktan doπru tutun ve ZAMANLAYICI AYAR (SET/C) düπmesine bas∂n. • Ünite üzerindeki turuncu ZAMANLAYICI lambas∂ ( ) yanar. • Ünite sinyali ald∂π∂nda bir bip sinyali verir. MODE ∑µletim durumunu seçin.
PLASMACLUSTER ∑ΩLET∑M∑ HAKKINDA ∑PUÇLARI Klimanın içindeki plazma kümesi iyon oluµturucusu odaya artı ve eksi plazma kümesi iyonları bırakır. Havaya bırakılan yaklaµık aynı sayıdaki artı ve eksi iyon, havadaki nemi biraz azaltır. Plasmacluster iyonları PLASMACLUSTER’IN ∑ΩLET∑M∑ sırasında 1 ∑µlem basın. PLASMACLUSTER düπmesine • Uzaktan kumandada “ ” görülür. • Ünitedeki mavi PLASMACLUSTER lambası yanar. ∑PTAL ETMEK ∑Ç∑N 1 PLASMACLUSTER düπmesine tekrar basın.
YARDIMCI MOD Uzaktan kumanda bulunmad∂π∂ zaman bu modu kullan∂n. AÇMAK ∑Ç∑N ∑nce bir çubuk kullanarak gösterge panelindeki AUX. düπmesine basın. • Ünite üzerindeki k∂rm∂z∂ ∑ΩLET∑M lambas∂ ( ) yanar ve ünite OTOMAT∑K modda çal∂µmaya baµlar. • Fan h∂z∂ ve s∂cakl∂k ayar∂ OTOMAT∑K’e ayarlan∂r. AUX. KAPATMAK ∑Ç∑N AUX. düπmesine tekrar basın. • Ünite üzerindeki k∂rm∂z∂ ∑ΩLET∑M lambas∂ ( ) söner. NOT: Normal çal∂µma s∂ras∂nda AUX. düπmesine bas∂l∂rsa ünite kapan∂r.
BAKIM F∑LTRELER∑N TEM∑ZLENMES∑ Hava filtreleri iki haftada bir temizlenmelidir. 1 ÜN∑TEY∑ KAPATIN Durdurucu IZGARASINI AÇ 2 G∑R∑Ω 1 Durdurucuları sola kaydırın (OPEN ). Her giriµ ızgarası için iki durdurucu sunulmuµtur. 2 Hafif çekin ve giriµ ızgarasını açın. Giriµ Izgarası F∑LTRELER∑N∑ SÖKÜN 3 HAVA Hava filtrelerindeki her iki çıkıntıyı da hafif itin ve filtreleri çengelden çıkarın. Çıkıntı Çengel F∑LTRELER∑N∑ TEM∑ZLEY∑N 4 HAVA Elektrikli süpürgeyle tozunu al∂n.
SERV∑S ÇA∏IRMADAN ÖNCE Aµaπ∂daki koµullar ekipman∂n hatal∂ çal∂µt∂π∂n∂ göstermez. ÜN∑TEN∑N ÇALIΩMAMASI TISLAMA Ünite kapat∂ld∂ktan hemen sonra aç∂l∂rsa çal∂µmaz. Ünite mod deπiµtirildikten hemen sonra çal∂µmaz. Bu, dahili mekanizmalar∂ korumak içindir. Üniteyi çal∂µt∂rmak için 3 dakika bekleyin. Yumuµak t∂slama sesi, ünitenin içinde akan soπutma gaz∂n∂n sesidir. ÜN∑TEN∑N SICAK HAVA ÜFLEMEMES∑ Ünite ön ısıtma veya buz çözme konumundad∂r.
A. Entsorgungsinformationen für Benutzer aus Privathaushalten 1. In der Europäischen Union Achtung: Ihr Produkt trägt dieses Symbol. Es besagt, dass Elektro- und Elektronikgeräte nicht mit dem Haushaltsmüll entsorgt, sondern einem getrennten Rücknahmesystem zugeführt werden sollten.
te er n, e en Dieses Handbuch erklärt die ordnungsgemäße Bedienung Ihres neuen Raumklimagerätes. Lesen Sie sich dieses Handbuch vor der Inbetriebnahme des Produktes sorgfältig durch. Dieses Handbuch sollte für ein späteres Nachschlagen griffbereit an einem sicheren Ort aufbewahrt werden. INHALT • WICHTIGE SICHERHEITSHINWEISE ...... D-1 • ZUSÄTZLICHE ANMERKUNGEN ZUM BETRIEB .................................................... D-3 • ENERGIESPARTIPPS ...............................
WICHTIGE SICHERHEITSHINWEISE SICHERHEITSHINWEISE ZUM BETRIEB 1 Öffnen Sie regelmäßig ein Fenster oder eine Tür, um den Raum zu lüften, und das insbesondere dann, wenn Sie mit Gas betriebene Geräte verwenden. Eine unzureichende Belüftung kann einen Sauerstoffmangel verursachen. 2 3 4 5 Bedienen Sie die Tasten nicht mit nassen Händen. Dies könnte einen elektrischen Schlag verursachen.
ZUSÄTZLICHE ANMERKUNGEN ZUM BETRIEB BETRIEBSTEMPERATUREN INNENTEMP. obere Grenze KÜHLEN untere Grenze obere Grenze HEIZEN untere Grenze TK = Trockenkugel 32°C 23°C 21°C 15°C 27°C 20°C - TK FK TK FK TK TK AUSSENTEMP. 43°C 21°C 24°C 18°C –7°C –8°C TK TK TK FK TK FK FK = Feuchtkugel • Eine eingebaute Schutzvorrichtung sperrt den Gerätebetrieb, wenn der entsprechende Temperaturbereich überschritten wird.
TEILEBEZEICHNUNGEN ZIMMERGERÄT (bei der Installation am Boden) 1 Auslass (Luft) 1 2 3 4 2 Lamellen zur vertikalen Einstellung 3 Lamellen zur horizontalen Einstellung 4 Anzeigefeld 5 Luftfilter 6 Einlassgitter 7 Einlass (Luft) 5 8 Fernbedienung 9 BETRIEB-Lampe (rot 6 7 ) 0 ZEITSCHALTER-Lampe (orange ) q PLASMACLUSTER-Lampe (blau) w EMPFÄNGER-Fenster e RESERVE-Taste (AUX.) 8 (bei der Installation an der Decke) 9 0 q w AUX.
FERNBEDIENUNG 1 1 SENDER 2 ANZEIGE (Flüssigkristallanzeige) 3 PLASMACLUSTER-Taste 4 EIN-/AUS-Taste 2 5 THERMOSTAT-Taste 6 VOLLLEISTUNG-Taste 7 BETRIEBSART-Taste (MODE) 3 4 5 MODE 6 7 8 9 0 1h 8 EIN-STUNDEN-AUSSCHALTZEITSCHALTER-Taste 9 ZEITSCHALTER-EIN-Taste (zur Einstellung der Einschaltzeit) 0 ZEITSCHALTER-AUS-Taste (zur Einstellung der Ausschaltzeit) q ZEITVORLAUF-Taste w ZEITRÜCKLAUF-Taste e LÜFTER-Taste (FAN) FAN q w e r t y u SWING SET/C r ZEITSCHALTER-EINSTELL-/ABBRUCHTaste (SET/C) t Das
VERWENDUNG DER FERNBEDIENUNG EINLEGEN DER BATTERIEN Verwenden Sie zwei AAA (R03)Batterien. Sie die Abdeckung der 1 Entfernen Fernbedienung. Abdeckung der Fernbedienung Sie Batterien in das Batte2 Legen riefach ein; achten Sie dabei auf die richtige Ausrichtung der ± und — Polarität. • Wenn die Batterien richtig eingelegt worden sind, wird auf dem Display “AM 6:00” angezeigt. + + Sie die Abdeckung der 3 Setzen Fernbedienung wieder auf.
VORSICHT • Setzen Sie das Empfängerfenster keinem direkten Sonnenlicht aus, da sich dies negativ auf den Betrieb auswirken könnte. Falls direktes Sonnenlicht auf das Empfängerfenster fällt, schließen Sie bitte die Vorhänge, um das Licht am Eindringen zu hindern. • Die Verwendung einer schnell startenden Leuchtstoffröhre im selben Raum kann die Übertragung des Signals möglicherweise stören.
GRUNDLAGEN DES BETRIEBS 1 Drücken Sie zum Auswählen des Betriebsmodus die MODE-Taste. AUTOM. 2 3 1 1h 4 FAN ) am Gerät Drücken Sie zur Einstellung der gewünschten Temperatur die THERMOSTAT-Taste. • In den AUTOM.- und (Beispiel: 1 °C höher) TROCKNEN-Betriebsarten kann die Temperatur in 1°C-Schritten C geändert werden, wobei sie 2°C über und bis zu 2°C unter der (Beispiel: 2 °C niedriger) vom Klimagerät automatisch bestimmten C Temperatur liegen kann.
TIPPS ZUR BETRIEBSART AUTOM. In der AUTOM.-Betriebsart werden automatisch sowohl die Temperatur-Einstellung als auch die Betriebsart entsprechend der beim Einschalten des Gerätes herrschenden Raum- und Außentemperatur gewählt. Betriebsart- und Temperatureinstellungen & & Kühlen (24°C) ' Heizen Heizen (24°C) (23°C) !" Außentemp. (°C) Kühlen Kühlen (25°C) (26°C) Trocknen ( Raumtemp. ) –2°C Heizen (22°C) Raumtemp. (°C) Bei den Angaben in ( ) handelt es sich um die Temperatureinstellungen.
EINSTELLUNG DER LUFTSTROMRICHTUNG VERTIKALER LUFTSTROM RICHTIGE EINSTELLUNG DER LUFTSTROMRICHTUNG Drücken Sie einmal die SWING-Taste auf der Fernbedienung. • Die Lamellen für den vertikalen Luftstrom ändern ihren Winkel kontinuierlich. Drücken Sie die SWING-Taste noch einmal, sobald sich die senkrechten Einstellungslamellen in der gewünschten Position befinden. • Die Lamellen beenden ihre Bewegung innerhalb des in der Abbildung aufgeführten Bereiches.
VOLLLEISTUNGSBETRIEB Bei dieser Funktion arbeitet das Klimagerät mit maximaler Leistung, um den Raum so schnell abzukühlen oder zu erwärmen, dass Sie sich kurz nach Ihrem Eintreffen darin bei angenehmer Temperatur aufhalten können. Sie zum Aktivieren der VOLLLEISTUNG1 Drücken Betriebsart die VOLLLEISTUNG-Taste, während das Klimagerät in Betrieb ist. • Die Fernbedienung zeigt “ ” an. • Die Temperaturanzeige erlischt. PM ABBRECHEN Drücken Sie noch einmal die VOLLLEISTUNG-Taste.
BETRIEB MIT DEM ZEITSCHALTER HINWEIS: Stellen Sie vor der Einstellung des Zeitschalters sicher, dass die Uhr auf die richtige Uhrzeit eingestellt ist. ZEITSCHALTER-AUS Sie die ZEITSCHALTER-AUS-Taste 1 Drücken ). ( ZEITSCHALTER-AUS-Anzeige blinkt; drüc2 Die ken Sie die ZEITVORLAUF- oder ZEITRÜCKLAUF-Taste, um die gewünschte Zeit einzustellen. (Die Zeit kann in 10-Minuten-Schritten eingestellt werden.
ZEITSCHALTER EIN 1 Drücken Sie die ZEITSCHALTER-EIN-Taste ( ). ZEITSCHALTER-EIN-Anzeige blinkt; drücken 2 Die Sie die ZEITVORLAUF- oder ZEITRÜCKLAUF-Taste, um die gewünschte Zeit einzustellen. (Die Zeit kann in 10-Minuten-Schritten eingestellt werden.) Sie die Fernbedienung auf das Empfän3 Richten gerfenster am Gerät und drücken Sie die ZEITSCHALTER-EINSTELL-/ABBRUCH-Taste (SET/C). • Die orange ZEITSCHALTER-Lampe ( ) am Gerät leuchtet auf. • Beim Empfangen des Signals erzeugt das Gerät einen Piepton.
TIPPS ZUM PLASMACLUSTER-BETRIEB Der Plasmacluster-Ionengenerator im Klimagerät gibt positive und negative Plasmacluster-Ionen in den Raum frei. Etwa dieselbe Anzahl positiver und negativer Ionen, die in die Raumluft abgegeben werden, reduzieren einen Teil der in der Luft enthaltenen Schimmelpilze. Plasmacluster-Ionen PLASMACLUSTER-BETRIEB Sie während des Betriebs die PLASMA1 Drücken CLUSTER-Taste. • Die Fernbedienung zeigt “ ” an. • Die blaue PLASMACLUSTER-Lampe am Gerät leuchtet.
HILFSBETRIEB Verwenden Sie diesen Betrieb, wenn die Fernbedienung nicht zur Verfügung steht. EINSCHALTEN Drücken Sie die AUX.-Taste auf dem Anzeigefeld mit Hilfe eines dünnen Stifts. • Die rote BETRIEB-Lampe ( ) am Gerät leuchtet und das Gerät startet seinen Betrieb in der AUTOM.-Betriebsart. • Die Lüftergeschwindigkeit und die Temperatureinstellung sind auf AUTOM. gestellt. AUX. AUSSCHALTEN Drücken Sie noch einmal die AUX.-Taste. • Die rote BETRIEB-Lampe ( erlischt.
WARTUNG REINIGUNG DER FILTER Die Luftfilter sollten alle zwei Wochen gereinigt werden. 1 SCHALTEN SIE DAS GERÄT AUS. Stopper 2 ÖFFNEN TER. SIE DAS EINLASSGIT- 1 Schieben Sie die Stopper nach ). links (OPEN Für jedes Einlassgitter gibt es zwei Stopper. 2 Ziehen Sie vorsichtig am Einlassgitter und öffnen Sie es. Einlassgitter SIE DIE LUFTFILTER. 3 ENTFERNEN Drücken Sie beide Vorsprünge auf den Luftfiltern leicht hinein und enthaken Sie die Filter. Vorsprung Haken SIE DIE LUFTFILTER.
BEVOR SIE DEN KUNDENDIENST RUFEN Die nachfolgend aufgeführten Zustände weisen nicht auf eine Fehlfunktion des Gerätes hin: DAS GERÄT LÄUFT NICHT. ZISCHGERÄUSCHE Das Gerät läuft nicht, wenn es direkt nach dem Ausschalten wieder eingeschaltet wird. Das Gerät läuft nicht direkt nach dem Ändern der Betriebsart. Dadurch wird der interne Mechanismus geschützt. Warten Sie 3 Minuten, bevor Sie das Gerät in Betrieb nehmen.
SHARP ELECTRONICS (Europe) GmbH Sonninstraße 3, D-20097 Hamburg Printed in Thailand TINSEA602JBRZ 10D- GS-XP07FR_Eng.p65 20 10.4.