TINSE4415XHTZPP UX-CD600 MODEL UX-CD600 FACSIMILE E L I M I S C A F 1. Installation 2. Using the Cordless Handset 3. Using the Answering System 4. Sending Faxes 5. Receiving Faxes 6. Making Copies 7. Special Functions 8. Printing Lists 9. Maintenance 10. Troubleshooting NUAL MA TION A OPER SharpPlace congratulations on the purchase of your new Sharp Product! To ensure Sharp quality, look for the Sharp Genuine Supplies Logo on Your business products.
TINSE4415XHTZPP all.book Page 2 Wednesday, January 21, 2004 3:38 PM WARNING - FCC Regulations state that any unauthorized changes or modifications to this equipment not expressly approved by the manufacturer could void the user’s authority to operate this equipment. Note: This equipment has been tested and found to comply with the limits for a Class B digital device, pursuant to Part 15 of the FCC Rules.
TINSE4415XHTZPP all.book Page 1 Wednesday, January 21, 2004 3:38 PM Introduction Welcome, and thank you for choosing a SHARP UX-CD600 fax machine and cordless handset! In addition to the cordless handset that comes with the fax machine, you can purchase up to seven accessory cordless handsets. The cordless handsets can be used for intercom communication, and each cordless handset has its own personal box in the answering system. Fax machine and general specifications.
TINSE4415XHTZPP all.book Page 2 Wednesday, January 21, 2004 3:38 PM Automatic dialing Common book: 99 numbers Private book: 50 numbers (each cordless handset has 1 private book) Applicable telephone line Public switched telephone network Number of connectable lines Two Telephone function Yes (cannot be used if power fails) Reception modes AUTO ATTENDANT / TEL / TAD Automatic document feeder 10 pages max. (letter/A4, 20 lb paper) 2 Input document size Automatic feeding: Width: 5.8 to 8.
TINSE4415XHTZPP all.book Page 3 Wednesday, January 21, 2004 3:38 PM Dimensions (without attachments) Width: 13.9" (353 mm) Depth: 7.6" (193 mm) Height: 6.9" (174 mm) Weight (without attachments) Approx. 6.2 lbs. (2.8 kg) Cordless handset specifications Frequency 2.4 GHz (2.405 to 2.475 GHz) Dimensions Width: 1.8" (46 mm) Depth: 1.7" (42 mm) Height: 7.1" (180 mm) (not including antenna) Weight Approx. 0.3 lbs. (115 g) (without battery) Battery 3.
TINSE4415XHTZPP all.book Page 4 Wednesday, January 21, 2004 3:38 PM Important safety information Do not disassemble this machine or attempt any procedures not described in this manual. Refer all servicing to qualified service personnel. Do not install or use the machine near water, or when you are wet. For example, do not use the machine near a bath tub, wash bowl, kitchen sink or laundry tub, in a wet basement, or near a swimming pool. Take care not to spill any liquids on the machine.
TINSE4415XHTZPP all.book Page 5 Wednesday, January 21, 2004 3:38 PM Do not store or carry the battery with other metal objects such as keys or pins. These may short the battery and cause it to overheat. Do not allow the battery to become wet. Do not dispose of the battery in a fire or heat the battery. The battery may explode. Health care facilities and equipment Radio frequency energy emitted from the cordless handset equipment may cause medical equipment to malfunction.
TINSE4415XHTZPP all.book Page 6 Wednesday, January 21, 2004 3:38 PM Table of Contents A Look at the Operation Panel 1. Installation Unpacking Checklist . . . . . . . . . . . . . . . . . . . . . . . . . . . . . . . . . . . . . Setting Up. . . . . . . . . . . . . . . . . . . . . . . . . . . . . . . . . . . . . . . . . . . . . Loading the Imaging Film . . . . . . . . . . . . . . . . . . . . . . . . . . . . . . . . . Loading Printing Paper . . . . . . . . . . . . . . . . . . . . . . . . . . . . . . . . . .
TINSE4415XHTZPP all.book Page 7 Wednesday, January 21, 2004 3:38 PM Table of Contents Loading the Document . . . . . . . . . . . . . . . . . . . . . . . . . . . . . . . . . . . 85 Adjusting the Resolution and Contrast . . . . . . . . . . . . . . . . . . . . . . . 86 Sending a Fax by Normal Dialing . . . . . . . . . . . . . . . . . . . . . . . . . . . 88 Sending a Fax by Automatic Dialing . . . . . . . . . . . . . . . . . . . . . . . . . 90 Sending a Fax From Memory . . . . . . . . . . . . . . . . . . .
TINSE4415XHTZPP all.
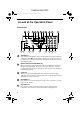
TINSE4415XHTZPP all.book Page 9 Wednesday, January 21, 2004 3:38 PM 6 Display This displays messages and prompts to help you operate the machine. 7 MIC The microphone is located here. Speak toward MIC when using the speakerphone or when recording an outgoing message or memo. 8 UP and DOWN arrow keys Enlarge/reduce setting: When making a copy of a document, press these keys to select an enlarge/reduce setting (page 107).
TINSE4415XHTZPP all.book Page 10 Wednesday, January 21, 2004 3:38 PM 15 INTERCOM/CONFERENCE key Press this key to page or locate a cordless handset (page 53). During a phone call, press the key to transfer the call to a cordless handset or begin a conference call (page 56).
TINSE4415XHTZPP all.book Page 11 Wednesday, January 21, 2004 3:38 PM Cordless handset 1 2 12 3 13 4 UP FUNCTION /PAUSE 5 6 START REVIEW REMOTE /FLASH DOWN 7 8 9 4 GHI 22 SEARCH OFF TALK 1 14 2 ABC 3 DEF 5 JKL 6 MNO 15 16 23 RECEPTION 7 PQRS PLAY 8 TUV PLAY NEW 9 WXYZ STOP 0 REPEAT 10 INTER COM CONFERENCE 11 SKIP DELETE REDIAL HOLD 17 18 19 ERASE 20 21 1 Antenna 2 Display This displays messages and prompts to help you use the cordless handset.
TINSE4415XHTZPP all.book Page 12 Wednesday, January 21, 2004 3:38 PM 4 FUNCTION/PAUSE key This key is used during the procedures for storing and editing auto dial numbers (pages 48 and 50). When entering a number for automatic dialing, press this key to insert a pause between digits. 5 TALK key Press this key to make or answer a call (pages 42 and 43).
TINSE4415XHTZPP all.book Page 13 Wednesday, January 21, 2004 3:38 PM 14 OFF key Press this key to end a call. 15 SEARCH (right) arrow key Use this key to search for an auto dial number (page 49). This key can also be used to move the cursor right when entering or editing an auto-dial number or name. 16 RECEPTION key Press this key after pressing REMOTE /FLASH to change the reception mode on the fax machine (page 58). 17 STOP key Press this key to stop playback of messages (page 70).
TINSE4415XHTZPP all.book Page 14 Wednesday, January 21, 2004 3:38 PM 1. Installation Unpacking Checklist Before setting up, make sure you have all of the following items. If any are missing, contact your dealer or retailer.
TINSE4415XHTZPP Page 15 Wednesday, January 21, 2004 3:38 PM Setting Up Setting Up Selecting a location for the fax machine To maximize the talking range of the cordless handset, we recommend installing the fax machine in a high and central location away from obstructions such as walls. High and central location with no obstructions Keep the fax machine away from other electrical appliances such as TVs, microwave ovens, computers, and other cordless phones. Do not place the machine in direct sunlight.
TINSE4415XHTZPP all.book Page 16 Wednesday, January 21, 2004 3:38 PM Setting Up Connecting the machine’s handset Connect the machine’s handset as shown and place it on the handset rest. ♦ The ends of the handset cord are identical, so they will go into either jack. Make sure the handset cord goes into the jack marked with a handset symbol on the side of the machine! Use the handset to make ordinary phone calls, or to transmit and receive faxes manually.
TINSE4415XHTZPP Page 17 Wednesday, January 21, 2004 3:38 PM Setting Up Connecting the phone lines If you have two phone lines, both lines can be connected to the machine. The phone lines can be used simultaneously. For example, you can make a phone call using the machine’s handset on line 1 while sending a fax on line 2, or make simultaneous phone calls using one cordless handset on line 1 and another cordless handset on line 2. ♦ Line 1 is primarily for phone calls. Line 2 is primarily for fax.
TINSE4415XHTZPP all.book Page 18 Wednesday, January 21, 2004 3:38 PM Setting Up If you are connecting only one line: Insert one end of the provided telephone line cord into your phone jack and the other end into the jack on the machine marked LINE 1/2. ♦ Do not connect the line cord to the LINE 2 jack! ♦ Be sure to disable line 2 as explained on page 37. LIN E2 LIN E1 /2 About the Dial Mode: The machine is initially set for touch-tone dialing.
TINSE4415XHTZPP Page 19 Wednesday, January 21, 2004 3:38 PM Setting Up Attach the paper tray and paper tray extension Attach the paper tray. Attach the paper tray extension. Click! Insert horizontally and rotate up Note: The paper tray extension has a top side and a bottom side. If the tabs do not go into the holes, turn the support over.
TINSE4415XHTZPP all.book Page 20 Wednesday, January 21, 2004 3:38 PM Setting Up Raising the base antenna Raise the base antenna to ensure clear communication with the cordless handset. Connecting the cordless handset charger 1 2 Connect the AC adapter to the cordless handset charger. Fit the cord into the holders. Plug the AC adapter into a standard 120 V AC outlet. Important: Never cover the charger and AC adapter with a blanket, cloth, or other material.
TINSE4415XHTZPP Page 21 Wednesday, January 21, 2004 3:38 PM Setting Up Installing the battery and charging the cordless handset 1 Connect the battery connector ➊, and then place the battery pack in the cordless handset. • Place the wires as shown. Red Black Red Black 2 Place the battery cover on the cordless handset, making sure it snaps firmly into place. • Make sure the wires are not caught or pinched by the cover. 3 Place the cordless handset in the charger with the dial pad facing forward.
TINSE4415XHTZPP all.book Page 22 Wednesday, January 21, 2004 3:38 PM Setting Up When the battery needs charging, LOW BATTERY will appear in the display and you will hear beeps during a phone conversation. If you need to continue the conversation, transfer the call to the fax machine or another cordless handset (see page 56). Place the cordless handset in the charger and let it charge.
TINSE4415XHTZPP Page 23 Wednesday, January 21, 2004 3:38 PM Setting Up Entering a name for the cordless handset You can enter a name for the cordless handset in the machine. ♦ The machine will transmit the name that you enter to your cordless handset. The name will appear in the cordless handset’s display. 1 Press FUNCTION Machine display: once and twice on ENTRY MODE the machine. 2 Press once and 3 Press once. HS NAME SET 1=SET, 2=CLEAR 4 Press to select SET. SELECT HS NO.
TINSE4415XHTZPP all.book Page 24 Wednesday, January 21, 2004 3:38 PM Setting Up ♦ To clear a mistake, press SPEAKER . ♦ To enter a lower case letter, continue pressing the key for the letter until the lower case letter appears. ♦ To enter one of the following symbols, press or repeatedly: . / ! " # $ % & ’ ( ) + + , - : ; < = > ? @ [ ¥ ] ^ _ ' { | } )( 7 Press 8 Press START/MEMORY STOP Display: to store the name. to exit.
TINSE4415XHTZPP Page 25 Wednesday, January 21, 2004 3:38 PM Setting Up Connecting a headset You can connect a headset (purchased separately) to the headset jack. Remove the cap and insert the connector as shown. Accessory cordless handsets You can use up to 7 additional UX-K02 cordless handsets with the fax machine. If you need an additional cordless handset, please purchase a UX-K02 handset. Please purchase accessory UX-K02 handsets at your dealer or retailer.
TINSE4415XHTZPP all.book Page 26 Wednesday, January 21, 2004 3:38 PM Loading the Imaging Film Loading the Imaging Film Your fax uses a roll of imaging film to create printed text and images. The print head in the fax applies heat to the imaging film to transfer ink to the paper. Follow the steps below to load or replace the film. The initial starter roll of imaging film included with your fax can print about 30 letter-size pages. When replacing the film, use a roll of Sharp UX5CR imaging film.
TINSE4415XHTZPP Page 27 Wednesday, January 21, 2004 3:38 PM Loading the Imaging Film 4 Remove the new roll of imaging film from its packaging. • Cut the band that holds the rolls together. 5 Insert the green gears. 1 slot Make sure the gears fit into the slots in the ends of the rolls. 6 Insert the film into the print compartment. 2 slots Fit ends of rolls onto hubs Thick roll to rear 7 8 Rotate the front gear as shown until the film is taut.
TINSE4415XHTZPP all.book Page 28 Wednesday, January 21, 2004 3:38 PM Loading Printing Paper Loading Printing Paper You can load letter or legal size paper in the paper tray. Recommended paper weight is 20-lb. Copy Bond. The maximum number of sheets is as follows: 1 2 Letter size: Approx. 50 sheets (20-Ib.
TINSE4415XHTZPP Page 29 Wednesday, January 21, 2004 3:38 PM Loading Printing Paper Setting the paper size The fax has been set at the factory to scale received faxes to letter size paper. If you loaded legal paper, you must change the paper size setting to LEGAL. 1 Press 2 Press once and 3 Press once. 4 Select the paper size: FUNCTION once and LETTER: 5 Press once. Display: OPTION SETTING PAPER SIZE SET 4 times.
TINSE4415XHTZPP all.book Page 30 Wednesday, January 21, 2004 3:38 PM Entering Your Name and Fax Number Entering Your Name and Fax Number Before you can begin sending faxes, you must enter your name and fax (telephone) number. You also need to set the date and time. Once you enter this information, it will automatically appear at the top of each fax page you send. Important! FCC regulations require that your name, telephone/fax number, and the date and time appear on each fax message you send.
TINSE4415XHTZPP Page 31 Wednesday, January 21, 2004 3:38 PM Entering Your Name and Fax Number 4 Enter your fax number by pressing the number keys (max. 20 digits). • To insert a space between digits, press • To clear a mistake, press 5 6 Press START/MEMORY SPEAKER . . to enter the fax number in memory. Enter your name by pressing number keys for each letter as shown in the chart below. Up to 24 characters can be entered.
TINSE4415XHTZPP all.book Page 32 Wednesday, January 21, 2004 3:38 PM Setting the Date and Time Setting the Date and Time The date and time appear in the display and are printed at the top of every page you fax. Set the date and time as shown below. STOP START/MEMORY 1 Press 2 Press once and 3 Press once. 4 FUNCTION FUNCTION once and twice. Display: ENTRY MODE DATE&TIME SET once.
TINSE4415XHTZPP Page 33 Wednesday, January 21, 2004 3:38 PM Setting the Date and Time 6 7 Enter the year (four digits). The currently set time appears (example): Example: 2004 DATE&TIME SET TIME 12:19 PM Enter a two-digit number for the hour (“01” to “12”) and a two-digit number for the minute (“00” to “59”). DATE&TIME SET TIME 09:25 PM Example: 9:25 8 Press 9 Press 10 Press to select A.M. or START/MEMORY STOP to select P.M. to start the clock.
TINSE4415XHTZPP all.book Page 34 Wednesday, January 21, 2004 3:38 PM Setting the Reception Mode Setting the Reception Mode The machine has three modes for receiving calls and faxes: AUTO ATTENDANT ( ) mode: Select this mode when you wish to route callers to specific cordless handsets. The machine will automatically answer all incoming calls without ringing and your recorded greeting will play.
TINSE4415XHTZPP Page 35 Wednesday, January 21, 2004 3:38 PM Line Settings Line Settings Setting the dial mode The machine is set for tone dialing. If you are on a pulse dial line, you must set the machine for pulse dialing. Press the panel keys as explained below. ♦ If you have connected two lines, the dial mode must be set separately for line1 and line 2. Display: 1 Press 2 Press 3 To set the dial mode for line 1, press FUNCTION once and once. OPTION SETTING once. twice.
TINSE4415XHTZPP all.book Page 36 Wednesday, January 21, 2004 3:38 PM Line Settings Specifying how the line is selected (dialing line setting) If you have connected two lines to the machine, use this setting to specify how the line is selected when you make a phone call or send a fax by manual dialing. The settings are MANUAL and AUTO. When MANUAL is selected, you must manually select the line each time you make a phone call. When AUTO is selected, the machine will automatically select an open line.
TINSE4415XHTZPP Page 37 Wednesday, January 21, 2004 3:38 PM Line Settings Disabling line 2 (line 2 invalid setting) If you have only connected one line to the machine, follow the steps below to disable line 2. This will prevent accidental selection of the line when making a call or sending a fax (the LINE2 icon and messages related to line 2 will no longer appear in the display). 1 Press FUNCTION Display: once and once on OPTION SETTING the machine. 2 Press once and 3 Press once.
TINSE4415XHTZPP all.book Page 38 Wednesday, January 21, 2004 3:38 PM Line Settings Voice mail message alert (requires subscription to service) If you subscribe to a voice mail service from your phone company and your service includes a visual alert feature that tells you when you have new messages, “VOICE MAIL” will appear in the display of both the machine and the cordless handset when you have new messages (“VOICE MAIL 2” will appear when you have new messages on line 2).
TINSE4415XHTZPP Page 39 Wednesday, January 21, 2004 3:38 PM Volume Adjustment - Fax Machine Volume Adjustment - Fax Machine SPEAKER You can adjust the volume of the speaker, handset, and ringer using the up and down arrow keys. Speaker 1 While using the speaker to make a phone call or send a fax, press or to adjust the volume. (To use the speaker to make a phone call, press SPEAKER , press or to select the line if “WHICH LINE?’ appears in the display, and then press the number keys to dial.
TINSE4415XHTZPP all.book Page 40 Wednesday, January 21, 2004 3:38 PM Volume Adjustment - Cordless Handset Fax machine ringer 1 Press or to select the desired Display: RINGER: HIGH volume level. (Make sure SPEAKER has not been RINGER: MIDDLE pressed, the handset is not lifted, and a document is not loaded in the feeder.) • The ringer rings once at the selected RINGER: LOW level, and then the date and time reappear in the display.
TINSE4415XHTZPP Page 41 Wednesday, January 21, 2004 3:38 PM Volume Adjustment - Cordless Handset Cordless handset receiver volume 1 When talking on the cordless handset, press or to select the desired Cordless handset display: RECEIVER: HIGH volume level. • Note: The volume reverts to MIDDLE each time you hang up (press OFF OFF ).
TINSE4415XHTZPP all.book Page 42 Wednesday, January 21, 2004 3:38 PM 2. Using the Cordless Handset Making a Phone Call OFF OFF TALK 1 Cordless handset display: Pick up the cordless handset and press 2 TALK TALK . WHICH LINE? PRESS 1 OR 2 If the display at right appears, press 1 to select line 1 or 2 ABC to select line 2. (If the display at right does not appear, go directly to Step 3.
TINSE4415XHTZPP all.book Page 43 Wednesday, January 21, 2004 3:38 PM Receiving a Phone Call then pressing TALK ♦ Check the number in the display before pressing 2. Cordless Handset You can also dial by entering the phone number first and . TALK . If there is a HOLD mistake, press ERASE to clear the mistake and then enter the correct digits.
TINSE4415XHTZPP all.book Page 44 Wednesday, January 21, 2004 3:38 PM Receiving a Fax Using the Cordless Handset If calls come in on both lines simultaneously If calls come in on both lines simultaneously, the display will alternately show <<< RINGING >>> to indicate that there is a call on line 1, and <<>> to indicate that there is a call on line 2.
TINSE4415XHTZPP all.book Page 45 Wednesday, January 21, 2004 3:38 PM Using Auto Attendant Mode Using Auto Attendant Mode 2. Cordless Handset Auto Attendant mode is used to route callers to specific handsets. The machine will automatically answer all incoming calls without ringing and your recorded greeting will play. After listening to the instructions in your greeting, the caller will press the number of the desired person and only the cordless handset of that person will ring.
TINSE4415XHTZPP all.book Page 46 Wednesday, January 21, 2004 3:38 PM Using Auto Attendant Mode Selecting Auto Attendant mode To select Auto Attendant mode, press RESOLUTION/ RECEPTION MODE until appears in the display.
TINSE4415XHTZPP all.book Page 47 Wednesday, January 21, 2004 3:38 PM Storing and Using Auto-Dial Numbers 3 Press 4 Press a number from 1 to 4 to select the desired pseudo ring time. : 15 seconds : 30 seconds : 60 seconds : 120 seconds The display briefly shows your selection, then: 5 Press STOP 2. Cordless Handset PSEUDO RING 1=15 SECONDS once. FAX SIGNAL RX to return to the date and time display.
TINSE4415XHTZPP all.book Page 48 Wednesday, January 21, 2004 3:38 PM Storing and Using Auto-Dial Numbers 3 4 Press FUNCTION /PAUSE ENTER TEL # _ . Enter the number by pressing the number keys. (Note: A space cannot be entered.) HOLD • To clear a mistake, press ERASE . • If a pause is required between any of the digits to access a special service FUNCTION /PAUSE or an outside line, press . The pause appears as a hyphen (two seconds per pause). Several pauses can be entered in a row.