Introduction Contents Getting Ready Learning the Basics Basic Manual Phone Address Book Mail Internet Multimedia 1Seg Applications Settings of IS14SH Global Function Appendix/Index
Preface Thank you for purchasing the IS14SH. Before using your IS14SH, be sure to read the Basic Manual (this PDF manual) to ensure correct usage. After you have finished reading this manual, store this PDF manual and the printed manuals (Accessories) in safe places so you can retrieve them whenever you need them. If the printed manuals (Accessories) are lost, please contact an au shop or Customer Service Center.
Before Using an au Phone • You cannot receive or make calls in a location where the signal cannot be received, even within the service area. Calling may not be available in a location where the signal is weak. If you move to a location where the signal is weak during a call, the call may be interrupted. • The au phone is a digital cell phone and can maintain a high call quality until the signal weakness reaches its limit. Therefore, once the limit has been reached, the call may be disconnected suddenly.
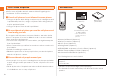
Cell Phone Etiquette Introduction Cell phones always emit weak radio waves when power is on. Use cell phones in an enjoyable and safe manner without forgetting to be considerate of others around you. Accessories Check whether all the contents are included. ■ Use of cell phones is not allowed in some places. • Using a cell phone while driving a car/motorcycle is dangerous and is prohibited by law. Also, using a cell phone while riding a bicycle may be punished by law.
Illustrations and Descriptions in This Manual In this manual, the key illustrations are simplified as shown below. Introduction ■ Note on Key Illustrations ■ Description of Operations for Selecting Item/Icon/ Key etc. In this manual, operation steps are described as below. Description On the character entry screen, [Input mode. On the character entry screen, A. Explanation Tap on the character entry screen. Then tap Input mode. Press A on the character entry screen.
■ Note on Screenshots Introduction The screenshots in this manual are simplified and may look different from the actual screens. Also, part of the screen may be abbreviated. Actual screen In this manual, part of the screen such as icons are abbreviated. Security Code and PIN Code Security Code and Passwords In this manual You have to use each security code for using the IS14SH. You can use a security code and other passwords described below.
PIN Code ■ PIN Code You can set the IS14SH to require PIN code entry every time the power is turned on, to prevent unauthorized use of the au IC-Card by a third party. • At the time of purchase, the PIN code is not to be required to use phone. On the home screen, tap [Settings [Location & security [Set up UIM card lock [Mark Lock UIM card to set the PIN code to be required. The PIN code is also required when setting Lock UIM card. • The initial setting of the PIN code is “1234”.
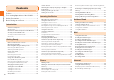
Contents Preface............................................................ ii Contents For Learning Operations of the IS14SH.......... ii Safety Precautions.......................................... ii Before Using an au Phone.............................. 1 Introduction Cell Phone Etiquette ...............................................2 Accessories.............................................................2 Illustrations and Descriptions in This Manual ..........3 Security Code and PIN Code .......
Multimedia 1Seg Using Global Passport CDMA ...............................77 For Overseas Use without Anxiety ........................77 Configuring the Overseas Settings .......................77 Making a Call at Your Travel Destination ..............78 Receiving a Call at Your Travel Destination ..........79 Contents Using the Camera................................................. 61 Cautions for Using the Camera ............................ 61 Taking Photos...........................................
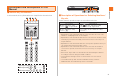
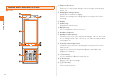
Names and Functions of Parts ■ Front Getting Ready 8 A Earpiece (Receiver) Emits voice of other party during a call, messages in Answering memo, etc. B Charging/Incoming indicator Illuminates in red while charging. Flashes according to the settings when receiving a call or mail message. C Display D e Menu key Displays the option menu. E # Home key Use it to display the home screen etc. F Hardware keyboard G Mouthpiece (Microphone) Transmits your voice to the other party during a call.
■ Left Side/Right Side P ud Volume up/down key Adjusts the volume. Hold u down on the unlock screen to turn on the mobile light. Hold d down on the unlock screen to enable/disable Manner mode.
Getting Ready T FeliCa mark Hold it over a reader/writer when using Osaifu-Keitai®. Sends and receives data via IC communication. U Battery pack cover V Internal antennas Do not cover the internal antennas area with your hand when you call, use the Internet, Wi-Fi® or Bluetooth® function or retrieve GPS information (only the upper part on the back of the cell phone is responsible for Wi-Fi®, Bluetooth® and GPS functions). Also, do not paste stickers around the internal antennas area.
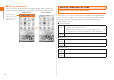
Opening the IS14SH Slide the display part of the IS14SH to the direction of the arrow to open it. Getting Ready Concave portion B Remove the battery pack. • Note that touching the display/e/#/^/m may be recognized as an operation when you open or close the IS14SH while the backlight illuminates. Remove the battery pack by pulling up on the PULL tab in the direction of the arrow.
Attaching the Battery Pack Using au IC-Card Use the specified battery pack for the IS14SH and attach it properly. A After making sure that the PULL tab is closely attached to the battery pack, align the contacts on the au IC-Card An au IC-Card records your personal information such as phone numbers. au IC-Card battery pack with those of the IS14SH and then insert Getting Ready the battery pack securely.
Inserting au IC-Card Using microSD Memory Card Turn off the power and remove the battery pack before inserting the au IC-Card. A Pull the tab of the tray straight out. B Place the au IC-Card on the tray with the IC (metal Insert the au IC-Card according to the orientation of its cutout. You can set microSD memory card (including microSDHC memory card) to the IS14SH, and save data. And also you can save address book, mail messages, bookmarks, etc. in microSD memory card.
• The following microSD memory cards have been confirmed for operation based on the criteria by au. For operation confirmation results of other microSD memory cards, contact each microSD memory card manufacturer.
D Attach the battery pack cover. • Do not touch the terminal part of microSD memory card. • Do not remove the microSD memory card forcefully. It may result in damage to the microSD memory card or the IS14SH or data loss. • Application installed to microSD memory card cannot be used once you removed microSD memory card. • The microSD memory card may be warm after a long time use. It is normal.
D Put back slowly the guide of the microSD memory card slot and lock it. E Attach the battery pack cover. Getting Ready • Insert a microSD memory card with the right side up in the appropriate direction. Inserting a microSD memory card forcefully into the slot could result in failure to remove the microSD memory card or damage to the microSD memory card or the IS14SH. • Do not insert the microSD memory card too deeply when attaching it.
■ Charging the Battery Pack with the Specified AC Adapter (sold separately)/DC Adapter (sold separately) The followings are the explanation of how to connect the common AC adapter 03 (sold separately)/the common DC adapter 03 (sold separately) to charge. Charging time is as shown below. 03 (sold separately)/the common DC adapter 03 (sold separately) to the external connection jack of the IS14SH. C Plug the common AC adapter 03 (sold separately) power plug into a 100 V AC power outlet/Plug the Approx.
F Unplug the common AC adapter 03 (sold separately) power plug from the power outlet/Unplug the common DC adapter 03 (sold separately) plug from the cigarette lighter socket. • Although you can charge the IS14SH while the power is turned on, charging time lengthens. Getting Ready • If you charge the IS14SH when the battery has run out, the charging/ incoming indicator may not illuminate soon. However, charging is in progress. Turning the Power Off A Hold down K for at least two seconds.
• Do not touch the screen when you disable sleep mode. Otherwise touch panel operations may not be performed properly. Unlock Screen The unlock screen is displayed when you disable sleep mode while the IS14SH is closed. Switching the Display Language to English You can switch the display language for function names and other items to English. A On the home screen, . B 設定 (Settings). D 言語(Language)を選択 (Select language). E English. Getting Ready C 言語とキーボード (Language & keyboard).
F Yes/No. If you tap No, the initial setup screen is not displayed from the next startup. • Alternatively, on the home screen, tap set up. [Settings [Default settings to Setting Up a Google Account Getting Ready If you set up a Google account, you can use online services provided by Google. When you activate an application which requires a Google account before setting one up, the Google account adding screen is displayed. Alternatively, on the home screen, tap [au one-ID Setting. [Settings B OK.
Operating the Touch Panel The display of the IS14SH is a touch panel. You can operate the IS14SH by directly touching the screen. ■ Slide Gently touch a screen and then trace it to the desired direction. • Scroll screen or switch pages. In addition, operate gauge and bar when adjusting volume and brightness. ■ Tap/Double-Tap Tap: Gently touch a screen and then immediately release your finger. Double-tap: Tap quickly twice on the same position. • Select an item or icon displayed on the screen.
■ Pinch Touch a screen with two of your fingers and then move them apart or closer together. • Enlarge/Reduce the screen. Using the Home Screen Viewing the Home Screen The home screen consists of multiple desktops, and you can add shortcuts, widgets and folders on each desktop. Learning the Basics ■ Drag Gently touch a screen and then trace it to the desired position. • Move an icon on the screen to the desired position.
• A shortcut/widget/folder cannot be added when the displayed desktop has no space enough for one. • Long-touch a shortcut and drag it to a folder to store the shortcut in the folder. • Select a folder [Long-touch the folder name at the upper part of the folder [Enter a folder name [OK to change the folder name. • While a live wallpaper is set, the battery level is reduced faster than usual. Using Menu in the Home Screen A On the home screen, e.
Display settings Learning the Basics Settings Search Notifications Undo Theme settings Set themes of the home screen. Scroll unit Set whether to change the number of desktops/launchers to be scrolled depending on how strong you slide/flick the screen. Indicator setting Set whether to display the thumbnail when you tap the indicator of desktops/ launchers. Perform various settings for the IS14SH. Displays the quick search box screen. Displays the notifications and status panel.
Icon Description Make a call and use outgoing history/incoming history. Address Book Manage phone numbers or mail addresses. Mail Use e-mail or C-mail. Browser Browse web sites on the Internet. Maps Use Google Maps. Send and Receive Send and receive data via by Infrared infrared communication. au one Market Use au one Market. Market Use Android Market. Osaifu-Keitai Use Osaifu-Keitai®. Contents Displays and manage data on a Manager microSD memory card.
Icon Name of icon Download 3LM Learning the Basics 安心アプリ制限 (Restrict Applications) Facebook Twitter Skype Friends Note Gmail PC-mail Talk Latitude * らぶぺ! (Love pets!) One Seg テレビ.Gガイド (TV. G-Guide) Smart Familink 26 Camera Description Displays the list of data downloaded from the browser and manage them. Delete data in the IS14SH and microSD memory card or lock its operations in case of loss of your IS14SH. Restrict inappropriate applications, Wi-Fi communication, etc. for children. Use Facebook.
Icon * Description Use various services such as downloading and viewing applications. GALAPAGOS Purchase and view e-books App for such as newspapers, magazines Smartphone and books. au災害対策 (au This is an application in which Disaster you can use Disaster Message Countermeasure) Board and Early warning mail (earthquake early warnings and disaster/evacuation information). auお客さまサ Check the subscription contents ポート (au or monthly usage of your au Customer phone etc.
Icon Learning the Basics * Name of icon じぶん銀行 (JIBUN BANK) * Sockets LIVE * トレンド (ついっ ぷるトレンド) (Trend (twipple trend)) Disneyカレン ダー (Disney calendar) * Description Check the statement of your account balance, search for nearest available ATMs, and so on through the screen optimized for Smartphones. Watch videos about various news of the world or Japan. Displays issues which have stolen the headlines in Twitter (words, images, celebrities, tweets, etc.) in ranking style.
■ Examples of notification indicator Indicator Indicator Description • When multiple notifications of the same type exist, the number of them is displayed on the lower right of some indicators. ■ Examples of status indicator Indicator ~ Description Learning the Basics Missed call New mail message (Mail) New mail message (PC-mail) New mail message (Gmail) Alarm terminated • Appears when the alarm is terminated without the operation for terminating the alarm.
Indicator Description Learning the Basics In roaming Character type : Kanji : Half-width alphabet : Half-width numeric : Half-width Katakana : Full-width alphabet : Full-width numeric : Full-width Katakana : Character code Manner mode status : Standard manner mode : Drive manner mode : Silent manner mode During a call using hands-free Microphone set to off during a call Home Network status : Suspending (Green): Preparing (Blue): Running Wi-Fi ® signal strength* : Level 4 : Level 3 : Level 2 : Level 1 : L
Switching Orientation Portrait and landscape display are switched according to the orientation of the IS14SH. Example: When rotating the IS14SH 90 degrees from Portrait (Landscape) display to the left (right). 《Landscape display》 《Portrait display》 Learning the Basics D Auto-rotate You can set the automatic rotation of the display when the IS14SH is opened/closed. E Time Displays the current time. You can tap to set the alarm. F Clear You can clear all the notifications by tapping the key.
Displaying Available Menu ■ Context Menu ■ Option Menu The context menu is displayed by long-touching an item or a display where the menu is available. The option menu is displayed by tapping e on the screen where the menu is available. Example: In the character entry screen (Notepad) Example: In the inbox screen Learning the Basics Context menu Option menu More • When the number of available option menus exceeds the number that can be displayed on the screen as icon, More is displayed.
Character Input (Software Keyboard) Viewing the Character Entry Screen Switching Software Keyboards Tap the character entry field while the IS14SH is closed to display software keyboard and enter characters by tapping keys on the screen. The following software keyboards are available for the IS14SH. 12Key A On the character entry screen, Learning the Basics QWERTY You can enter a character, changing characters by repeatedly tapping the character entry key.
D E F Learning the Basics G H I 34 : You can cancel the last operation such as returning the determined characters to the undetermined state by tapping the key. Software keyboard You can enter a character assigned to each key. Cursor key Moves the cursor to the left and right. Change the range of the characters for character input and conversion. Emoji, Symbol, and Facemark key/Kana, Alphanumeric key : Displays the emoji/decoration-emoji/symbol/facemark list.
• While the prediction candidates list/relational prediction candidates list/ normal conversion candidates list is not displayed, tap ^ to hide the keyboard. Switching Character Entry Modes A On the character entry screen, Entering Emoji/Decoration-emoji/Symbol/ Facemark A On the character entry screen, . Tap when there is no conversion target on the character entry screen. [Input mode. B Select the character type.
Learning the Basics E Character entry mode switch key : Displays emojis converted automatically when sent to a cell phone of other carrier. : Displays normal emojis. : Displays full-width symbols. : Displays half-width symbols. F Delete key Deletes the selected character or the character on the left of the cursor. When the cursor is at the beginning, the character on the right of the cursor is deleted.
Switching Character Entry Modes B Select an emoji/a decoration-emoji/symbol/facemark [c. • There are some lists that cannot be displayed and some emojis/ decoration-emojis/symbols/facemarks that cannot be entered depending on the screen you operate. ■ Operations on the Emoji/Decoration-emoji/Symbol/ Facemark list screen C: While displaying the emoji list, switches between the emoji list converted automatically when sent to a cell phone of other carrier and the normal emoji list.
Making a Call A On the home screen, [Phone. F Delete key Deletes a single-digit on the left side of the cursor. If you long-touch it, all the numbers on the left side of the cursor are deleted and all the numbers are deleted when there is no number on the left side of the cursor. B Enter a phone number. When calling to a fixed-line phone, enter the phone number starting with the area code even if you are in the same area. C Call [Talk. Press u or d during a call to adjust the other party’s voice.
* The numbers are emergency call numbers. The IS14SH notifies your present location to the emergency call destination with a signal from a base station when you call to the agency that received the emergency call. • The following NTT services are unavailable. • Collect call • Message service • Dial Q2 • 116 (NTT business information) Making an International Call (au International Call Service) C Enter the country code of America “1”. D Enter the city code “212”.
Answering a Call Answering an Incoming Call A Slide to the right during an incoming call. When you get an incoming call while the backlight illuminates (except for when the unlock screen is displayed), tap Answer. Returning a Call (Outgoing History/ Incoming History) A On the home screen, [Phone [Outgoing History/ Incoming History. B Talk [End call. Putting the Call on Hold Phone A Slide to the left during an incoming call.
F Talk time G Incoming call status icon : Normal incoming call : Missed call : Missed call (One-ring call*) : Rejecting call H Calling time * The missed call cut off in approximately 3 seconds is considered as one-ring call. Note that it may make customers call back to connect to malicious paid programs. B Select the entry to call back. The outgoing history/incoming history detail screen is displayed. You can tap Mail to create C-mail.
Playing a Message in Answering Memo A On the home screen, [ Settings [Call settings [Call/Ans Memo [Answering Memo List. Phone 《Answering memo list screen》 A Icons to indicate the playing status of the Answering memo : Answering memo which has not been played (red) : Answering memo which has already been played (green) Icon of the protected Answering memo has .
Adding an Address Book Entry A On the home screen, [Address Book [e [Add new entry. If you have set an account, select the destination to register a contact to. B (Face) (Whole body) Family name Given name Read last Phone number Mail mixi Twitter Chat Group setting Birthday Nickname Postal GPS Organization Website Memo Event Internet call Set the sound, the lamp and the vibration when an incoming call and a mail message is received. C Save [Yes.