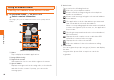
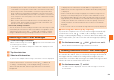
Using an Address Book Viewing the Address Book Details Screen A On the home screen, [Address Book [Select a contact information. Tap image (face) on the address book list screen (newly arrived order). Address Book 《Address book details screen》 A Name Tap to display the available applications. B Image (Whole body) C Registered contents Slide upward to check or use all the registered contents. D Speech bubble Displays messages such as incoming calls, received mails and mixi from the contact.
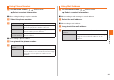
Using Phone Number A On the home screen, Using Mail Address [Address Book A On the home screen, [Select a contact information. [Address Book [Select a contact information. ■ When calling/sending to a phone number ■ When sending a mail message to a mail address B Select the phone number. B Select the mail address. C ■ When setting a mail address Call Edit and call Create mail ■ When setting a phone number B Long-touch the phone number.
Using E-mail/C-mail E-mail (~@ezweb.ne.jp) is a service that you can exchange e-mail with other cell phones and with PCs that support e-mail. In addition to text messages, you can also send data such as photos and movies by e-mail. C-mail is a service that uses phone numbers as the destination to exchange messages between cell phones which support C-mail and between cell phones of other carriers which support short messages. • Connecting to the packet communication is required to use e-mail.
Send/ Receive history Mail Group Profile Secrecy Enter a mail address in the destination entry field by selecting one included in the list of entries from the send/receive history. • On the send/receive history selecting screen, tap e [Set secrecy not to display Send/Receive history when selecting destinations etc. Enter a mail address in the destination entry field by selecting one included in a mail group. Enter a mail address in the destination entry field by selecting one registered in the profile.
B . You can also enter a phone number as the destination directly by tapping the destination entry field. If you have already entered destinations, is displayed. Tap it to display the destination list screen. You can edit/delete destinations in the same way as e-mail. C Address Book Send/ Receive history Profile Mail Secrecy Enter a phone number in the destination entry field by selecting one included in an entry from the address book.
• C-mails stored in the C-mail center will be sent in the following conditions. • Immediately after a C-mail is stored: All the C-mails stored in the C-mail center will be sent every time a new C-mail is stored in the C-mail center.
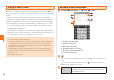
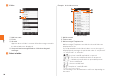
B Folder. Example: In the inbox screen 《Folder list screen》 Mail A Mail box name B Folder C All mails Appears when a folder is created. All mail messages saved in the inbox/outbox are displayed. D Unopened mail messages/Number of failed sending mail messages C Select a folder. 《Inbox screen》 A Mail box name B Folder name C Mail messages/Templates list Mail messages/Templates saved in the selected folder are displayed as a list.
: Received mail message which are replied : Received mail message which are forwarded : Mail message with attached files : Protected mail message : Mail message with Auto resend/Sending reservation set : Failed sending mail message D Indicator Appears when there are multiple folders and it indicates the currently displayed folder. A folder in which unopened mails are saved is displayed in orange.
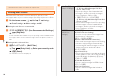
• If mail messages are sent while the outbox is full, sent mail messages will be deleted from the oldest ones which are unprotected. Setting Mail Filters Mail filters have functions to receive and reject specific e-mail messages and to reject e-mail messages spoofing cell phones or PHSs. A On the home screen, [Mail [e [Settings [E-mail settings [Other settings [OK. ■ Setting the mail filter as recommended B オススメの設定はこちら (See Recommended Settings) [ 登録 (Register).
詳細設定 (Advanced Settings) 詳細設定 (Advanced Settings) 設定確認/設定 解除 (Check Settings/ Release Settings) PC設定用ワンタ イムパスワード 発行 (Issue One Time Password for PC Setting) 設定にあたって (Notes on Setting Mail Filter) アドレス帳受信設定 (Address Book Receive Setting) Receive mail messages sent from the mail addresses saved on either au one Address Book or au one Friends Note. Check the setting status of the mail filters and release all the settings at one time. Issue a one time password to set the mail filter on your PC.
• If the security code is incorrectly entered three times consecutively during a single day, the mail filter setting operation will be disabled until the next day. • Note that you cannot receive e-mail messages once rejected by mail filters. Be careful when you set mail filters. Mail • Mail filters functions apply to new e-mail messages in order of the followings.
Rejecting Spam C-mail Messages You can register the phone numbers to reject C-mail messages. You can also set to reject C-mail messages sent from the phone numbers not registered in the address book. A On the home screen, [Mail [e [Settings [C-mail settings [Receiving filter [Enter Lock No. [OK. B Block specified numbers Set whether to block e-mail notifications. • Even when you reject receiving by receiving filter, the sender is supposed to send the mail message correctly, and the charge applies.
E Select an account type. When setting by POP3 server, the PC-mail saved in the IS14SH terminal may be deleted depending on the provider you use. When using the mail server supporting IMAP (Gmail, au one mail, etc.), set by IMAP server. F Username/ Domain¥Username Password POP3 server/IMAP server/Server Port Security type Delete email from server Mail IMAP path prefix Use secure connection (SSL) Accept all SSL certificates Enter the user information. Enter the password. Enter the server information.
Sending PC-mail Messages A On the home screen, [PC-mail [e E Send. If you tap Save as draft, PC-mail is saved to draft without sending it. If you tap Discard, PC-mail in process of composition is discarded. [Compose. Receiving PC-mail Messages A PC-mail is received. If PC-mail is received, tone sounds. appears on the status bar, and the mail ring B Tap the status bar. C Select PC-mail information. D Select the received PC-mail.
Sending Gmail A On the home screen, [Gmail [e [Compose. B Tap the destination entry field [Enter the destination. C Tap the subject entry field [Enter the subject. D Tap the message entry field [Enter the message. E 《Inbox tray screen》 Mail 58 A Tray/Label name, Number of unopened mail messages Tap to display trays/labels as a list. B Mail message C Account name Tap to display accounts as a list. D Label Displayed on a mail message for which a label is set.
Viewing Sites with Browser A On the home screen, [Browser. The browser screen is displayed. On the home screen, tap [au one to connect to the au one portal site. Using Bookmarks/History Displaying a Site from Bookmarks/History A On the home screen, [Browser [ . • When browsing a web page with a large amount of data, the application may be terminated automatically. 《Bookmarks/History screen》 A Bookmark/History list Displays the list of the bookmark/history.
Bookmarking a Web Page Bookmark the displayed site. A On the home screen, [Browser [ [Add. B OK. • On the home screen, tap [Browser [ [Long-touch a bookmark [Delete bookmark to delete the bookmark. Likewise, on the home screen, tap [Browser [ [History [Long-touch a history [Delete from bookmarks to delete the bookmark.
Using the Camera IS14SH has a CMOS camera with approximately 8.04 effective megapixels for shooting photos and movies. • All the photos and movies shot are saved in a microSD memory card. Insert a microSD memory card before using the camera. • The mobile light flashes in red while each camera mode (except for “mosimo camera”) is activated.
• • • • • • Multimedia • • • • • 62 ・ Subjects which move quickly Do not position the mobile light close to your eyes. Do not look at the mobile light directly while it is on. Do not point on the mobile light toward the eyes of others. It may harm eyesight. The tone for locking AF and the shutter tone sounds, even if you set Manner mode. The tone for starting and stopping movies also sounds. You cannot change the tone volume.
A Shake reducing icon On the home screen, tap [Camera [ [Shake Reducing [ON. After that, the icon is displayed. B Automatic current location adding icon [Save On the home screen, tap [Camera [ Settings [Location info [Automatic added [ON. After that, the icon is displayed. C Miniature setting/Blog mode setting key • On the home screen, tap [Camera [ [Switch camera [Miniaturize Cam* [ [Miniaturize Set to change the pattern of the blurring.
D Self-timer key Set the self-timer. Start recording if the set time has passed after is tapped. • The mobile light flashes while counting down. • Tap ^ to stop a countdown. E Various setting key Change the various settings. F Mobile light ON/OFF G Amount of the time left for recording. H Previously recorded data Displays the thumbnail of previously recorded data. Tap the thumbnail to confirm the data. I Record/Stop J Camera switching key K Recording time L Zoom bar Zoom in/out the subject.
• If the battery level becomes (approximately 10 %) or lower while recording, recording is stopped and saved automatically. • When you get an incoming call while recording, the recording is stopped and saved, and then the incoming call screen is displayed. If Auto Save is set to OFF, the recording is stopped, and then the incoming call screen is displayed. After the incoming call or the call, the movie preview screen is displayed.
Music: Displays voice data recorded by the built-in voice recorder, music and sounds. TV/SD-Video: Displays recorded data of 1Seg or recorded data such as data cooperated with recorders. Doc.: Displays Office and text data. Others: Displays other data. D Searching icon Set the search criteria. E Thumbnail Displays thumbnails of the data. If the thumbnail is not available, displays an icon for data type. F File name Displays title name if the data contains title information.
Cautions for Using 1Seg ■ Cautions for using 1Seg • No communication charges apply for watching 1Seg. However, when you use an additional service using communication on a data broadcast, packet communication charges apply. • 1Seg is only for the terrestrial digital TV broadcasting in Japan. You cannot watch 1Seg overseas due to the differences in the system and frequency of the broadcasting. Also, you cannot watch BS and 110 degree CS digital broadcasting. • The IS14SH may be warm while watching 1Seg.
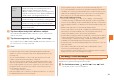
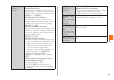
Watching 1Seg A On the home screen, [One Seg [One Seg TV. G H I 《1Seg screen》 1Seg 68 A Program information Tap to display the program name. B Video image Tap to show/hide the program information and operation key. Double-tap to switch image sizes. Long-touch to display the channel list. Slide/Flick to the left/right to switch channels. C Operation key / : Switches channels or searches for a channel by long-touch.
■ Operations while displaying Channel List Select the broadcast station name: Switches to the selected broadcast station. Long-touch the broadcast station [Channel overwrite registration [Yes: Assigns the broadcast station being watched to the selected remote control number. Long-touch the broadcast station [Delete channel [Yes: Deletes the broadcast station from the selected remote control number.
Using au Disaster Countermeasure Application au Disaster Countermeasure is an application in which you can use Disaster Message Board and Early warning mail (earthquake early warnings and disaster/evacuation information). A On the home screen, [ au災害対策 (au Disaster For details, refer to “Disaster Message Board Service” on au homepage. A From the au disaster countermeasure menu, 災害用伝言板 (Disaster Message Board). Follow the instructions on the screen for registration/confirmation.
削除 (Delete) 設定 (Settings) Delete received mails. 緊急地震速報 (Earthquake Early Warning) (At the top) Set whether to receive earthquake early warnings. 災害・避難情報 (Disaster/Evacuation information) (At the top) Set whether to receive disaster/evacuation information. 音量 (Volume) Set the volume of the receiving sound for earthquake early warnings. バイブ (Vibrator) Set whether to activate the vibrator when receiving earthquake early warnings.
Using Android Market You can download and install various applications such as useful tools or games from Android Market offered by Google. • Google account is required to use Android Market. For details on Google account, refer to the “Setting Up a Google Account”. • For details, on the Android Market screen, tap e [Help to refer to Android Market Help. A On the home screen, [Market. The Android Market screen is displayed.
■ 3LM Security • If the IS14SH is stolen or lost, you can delete data on the IS14SH. Contact the Customer Service Center to delete the data. • If the IS14SH is stolen or lost, you can lock the IS14SH remotely. Also, you can unlock the IS14SH remotely. • When activating “3LM Security” or the IS14SH is locked remotely, the location information of the IS14SH will be sent to the server. Also, you can set the location information to be always sent.
Using VirusBuster™ mobile for au A On the home screen, [ウイルスバスター (VirusBuster). Alternatively, on the home screen, tap [au お客さまサポート (au Customer Support) [ サポート & サービス (Support & Services) [ 安心セキュリティパック (Anshin Security Pack) [ ウイルスバスター モバイル for au (VirusBuster mobile for au). When you activate VirusBuster for the first time, the license agreement for VirusBuster is displayed, so tap 同意する (Agree) after confirming the contents.
Checking Your Profile A On the home screen, [Settings [Profile. • If au IC-Card is not inserted or different au IC-Card is inserted, auIC Card(UIM) error. Please insert card appears for checking your profile. Tap OK to display the profile screen. However, information such as Own phone number, Own mail address or ICCID is not displayed. Also, some operations, such as attaching the profile to mail, may not be carried out. Insert your au IC-Card and turn on power again.
Initializing microSD Memory Card When initializing a microSD memory card, all data (including applications) saved on the microSD memory card is deleted. A On the home screen, [Settings [microSD & phone storage [Unmount microSD [OK. B Erase microSD [Erase microSD [Enter Lock No. [OK [Erase everything. • Initialize a microSD memory card while charging or with the battery fully charged. • To have the microSD memory card recognized after having unmounted it, tap Mount microSD.
Using Global Passport CDMA For Overseas Use without Anxiety The overseas network condition is available on the au homepage. Make sure to check the condition before leaving Japan. http://www.au.kddi.com/service/kokusai/tokomae/ ■ When the IS14SH is Stolen or Lost • If the IS14SH is stolen or lost while overseas, please contact Customer Service Center immediately to suspend phone service.
■ Setting the Area Making a Call at Your Travel Destination You can set the area where you use the IS14SH. A On the home screen, [Settings [Wireless & networks [Mobile networks [Roaming settings [Area settings. B Japan Roaming Set for using within Japan. Set for using overseas (Automatic setting in accordance with the PRL). • The country selection screen may be displayed if Area settings is set to Roaming. Select the travel country.
■ Making a Call within the Same Country While Overseas You can call to general fixed-line phones or mobile phones with the same method as when calling in Japan. A On the home screen, [Phone. B Enter a phone number. The method for making calls varies depending on where you are calling. Travel destination U.S.
Troubleshooting Trouble Cannot turn on the power by pressing K. The power is turned off automatically. The power is turned off while the wake-up logo is displayed. Cannot make calls. Cannot receive calls. Appendix/Index 80 (out of service area indicator) appears. Detail • Is the battery pack charged? (zP.16) • Is the battery pack attached properly? (zP.12) • Is the jack of the battery pack clean? Wipe the external connection jack with a dry swab etc. periodically. • Did you hold down K? (zP.
Trouble Display is dark. Cannot hear the other party. • • • Cannot use the microphone of earphone/ microphone. Cannot watch 1Seg, images or sounds are interrupted or noise occurs. For more detailed information, visit auお客さまサポート (au Customer Support) on the au homepage. http://www.kddi.com/customer/service/au/trouble/kosho/ index.html • Does the IS14SH receive an adequate digital broadcasting signal? (zP.67) • Is TV antenna extended? (zP.
Index Numeric 3LM ................................................ 73 A Absence Memo ............................. 40 Accept all SSL certificates........... 56 Accessories .................................... 2 Add................................................. 60 Address Book Address Book ............................. 43 Cmail ........................................... 48 Appendix/Index Create ......................................... 46 Advanced Settings .......................
Forward ......................................... 58 G Gallery ........................................... 65 Given name................................... 43 Global passport CDMA ................ 77 Gmail ............................................. 57 Google account ............................ 20 GPS ............................................... 43 GREE_MARKET............................ 72 Group setting................................ 43 H Hardware keyboard........................ 8 History........
Receiving calls from countries other than Japan ....................... 79 Receiving filter.............................. 55 Receiving Gmail............................ 58 Receiving mail .............................. 49 Receiving PC-mail ........................ 57 Remote Support............................ 73 Removing au IC-Card ................... 12 Removing folders ......................... 24 Removing microSD memory card .................................................... 14 Removing shortcuts.......
For inquiries, call: Customer Service Center For general information and charges (toll free) From fixed-line phones: From au cell phones: area code not required PRESSING ZERO WILL CONNECT YOU TO AN OPERATOR AFTER CALLING 157 ON YOUR au CELLPHONE.