DVD CINEMA MODEL HT-DV40H HT-DV50H OPERATION MANUAL Note: This product is not compatible with MTP and AAC file systems. Thank you for purchasing this SHARP product. To obtain the best performance from this product, please read this manual carefully. It will guide you in operating your SHARP product. This manual contains two different home cinema systems, and may not be available in all countries. HT-DV40H DVD Cinema consisting of HT-DV40H (main .
Important Instruction HT-DV40H HT-DV50H Special Notes WARNINGS When the ON/STAND-BY button is set at STAND-BY position, mains voltage is still present inside the unit. When the ON/ STAND-BY button is set at STAND-BY position, the unit may be brought into operation by the timer mode or remote control. This unit contains no user serviceable parts. Never remove covers unless qualified to do so.
Special Note HT-DV40H HT-DV50H Cleaning cloth Stands Accessories 1 Subwoofer wire 2 1 Stand covers 2 Deco back covers 2 Pattern paper 1 Speaker wires 2 Please confirm that the following accessories are included.
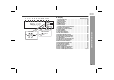
HT-DV40H HT-DV50H Contents Page General Information Precautions . . . . . . . . . . . . . . . . . . . . . . . . . . . . . . . . . . . . . . . . . . 5 Controls and indicators . . . . . . . . . . . . . . . . . . . . . . . . . . . . 6 - 10 Description of discs . . . . . . . . . . . . . . . . . . . . . . . . . . . . . . 11 - 12 General Information Preparation for Use System installation . . . . . . . . . . . . . . . . . . . . . . . . . . . . . . . . . . 13 System connections . . . . . . . . . . . . . . . .
Precautions General Please ensure that the equipment is positioned in a well-ventilated area and ensure that there is at least 10 cm (4") of free space along the sides, top and back of the equipment. 10 cm (4") 10 cm (4") 10 cm (4") 10 cm (4") Do not place subwoofer system on the same surface as main unit to prevent sound interruption during playback. Use the unit on a firm, level surface free from vibration.
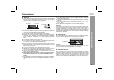
HT-DV40H HT-DV50H Controls and indicators Front panel 1 9 2 3 10 General Information 4 5 6 7 8 11 DOOR OPEN 9 10 11 1 2 3 4 12 13 5 6 6 Reference page 1. CD Compartment . . . . . . . . . . . . . . . . . . . . . . . . . . . . . . . . . 36 2. On/Stand-by Button . . . . . . . . . . . . . . . . 30, 36, 43, 52, 61, 64 3. Timer Indicator . . . . . . . . . . . . . . . . . . . . . . . . . . . . . . . . . . . 60 4. DVD/CD/USB Play/Pause Button . . . . . . . . . . . 37, 41, 46, 50 5.
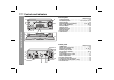
1 2 3 4 5 6 7 8 9 10 11 12 CHAP TITLE FOLD MP3 WMA RDS TA PTYI TP TOTAL SLEEP DAILY ST DIGITAL VS PL MTS IVC NB SS MEMORY MHz A1 B 25 26 27 13 14 15 16 DAILY ST DIGITAL VS PL 18 19 20 21 22 23 17 24 MTS IVC NB SS MEMORY Display Reference page 1. Chapter Indicator . . . . . . . . . . . . . . . . . . . . . . . . . . . . . . . . . 44 2. Title Indicator . . . . . . . . . . . . . . . . . . . . . . . . . . . . . . . . . . . . 44 3. Folder Indicator . . . . . . . . . . . . . . . . . . . . . . . . . . .
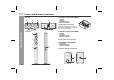
HT-DV40H HT-DV50H Controls and indicators (continued) Speaker system (CP-DV40H) CP-DV40H 1 2 3 4 Speaker grilles are removable: Make sure nothing comes into contact with the speaker diaphragms when you remove the speaker grilles. LEFT General Information 1. Tweeter 2. Woofers 3. Bass Reflex Duct 4. Speaker Terminals Speaker system (CP-DV50H) CP-DV50H 1 1. Tweeter 2. Woofers 3. Bass Reflex Duct 4. Speaker Terminals Speaker grilles are not removable. 2 Subwoofer (CP-SW40H) 3 4 1.
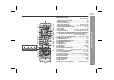
HT-DV40H HT-DV50H 1 2 3 1 2 3 4 5 6 7 8 9 0 +10 4 15 16 17 18 5 6 7 8 9 10 11 12 13 14 19 20 21 22 23 24 25 26 27 28 29 30 31 32 33 34 35 36 37 38 39 40 Reference page 1. Remote Control Transmitter . . . . . . . . . . . . . . . . . . . . . . . . 22 2. DVD Direct Button . . . . . . . . . . . . . . . . . . . . . . . . . . . . . . . . 40 3. DVD On Screen Button. . . . . . . . . . . . . . . . . . . . . . . . . . . . . 44 4. Direct Search Buttons . . . . . . . . . . . . . . . . .
HT-DV40H HT-DV50H Controls and indicators (continued) 35. Cursor Right Button . . . . . . . . . . 23, 36, 40, 42, 43, 48, 49, 50 36. DVD Chapter Skip/DVD/MP3/WMA Fast Forward/CD/MP3/ WMA Track Up/Tuner Preset Up and Time Up Button . . . . . . . . . . . . . . . . . . . . . . . . . . . . . . . . . . . . . 31, 37, 39, 53, 55, 56, 61 37. DVD Slow Button . . . . . . . . . . . . . . . . . . . . . . . . . . . . . . . . . . 41 38. DVD/CD/MP3/WMA Play or Pause Button . . . . . . . . . . . 37, 41 39.
HT-DV40H HT-DV50H Description of discs Disc type Disc contents DVD Video Disc Audio and video (movies) DVD-R Audio and video (movies) Disc recorded in Video Mode (*1)(*2) DVD-RW Types of playable DVD discs vary depending on the region. This unit can play back only DVDs with the same region number written on the back of the unit.
HT-DV40H HT-DV50H Description of discs (continued) General Information Discs that cannot be played Icons used on DVD discs DVDs without the region CDG DVD+R number on the back of the unit. CDV DVD+RW DVDs with SECAM Photo CD system CD-ROM DVD-ROM SACD DVD-RAM Discs recorded in DVD-Audio special formats, etc. The discs above cannot be played at all, or no sound is heard although images appear on the screen or vice versa.
HT-DV40H HT-DV50H System installation Magnetically shielded speakers HT-DV40H Installation image: CP-DV40H speakers (left and right) The speakers can be placed beside or near the TV as they are magnetically shielded. However, uneven colours may appear on the screen depending on the type of TV. If colour variation occurs: Turn off the TV (from the power switch). After 15 - 30 minutes, turn the TV on again. Note: The speakers and subwoofer are magnetically shielded.
HT-DV40H HT-DV50H System connections Make sure to unplug the AC power lead before making any connections.
HT-DV40H HT-DV50H HT-DV50H Left speaker Right speaker Left speaker FM aerial To a wall socket Subwoofer Purple Preparation for Use Red Red 15
HT-DV40H HT-DV50H System connections (continued) Make sure to leave the AC power lead disconnected when connecting the speakers. To prevent accidental short circuits between + and - terminals, connect the speaker wires to the speakers first, then to the unit. CP-DV40H To mount the speakers on the wall To install the speaker stand Preparation for Use 1 Align the hole on the speaker stand to the hole on speaker. Fix them securely with the special screw provided.
HT-DV40H HT-DV50H Horizontal position : Fix the pattern paper and fix two screws into the wall with a distance of 160 mm (6-5/16") in between. Vertical position : Fix the pattern paper and screws into the wall. (Horizontal position) 160 6 6-5/1 mm ( 1 (Vertical position) Align the deco back cover to the hole on the speaker. Fix them securely with the flush screw.
HT-DV40H HT-DV50H System connections (continued) CP-DV50H 1 2 4 Connect the wire without insulation tube to the speakers minus (-) terminal, and the wire with red insulation tube to the speakers plus (+) terminal. 5 Connect the other end of speaker wire to the main unit. Route the speaker wire through a stand hole and attach the bottom cabinet to stand. Fix them securely with the supplied 3 washer screws.
HT-DV40H HT-DV50H External FM aerial Subwoofer 1 Connect the wire without insulation tube to the SUBWOOFER minus (-) terminal, and the wire with purple insulation tube to the SUBWOOFER plus (+) terminal. Use an external FM aerial if you require better reception. Consult your dealer. 75 ohms coaxial cable External FM aerial Purple Caution: Never mistake the FRONT SPEAKERS and the SUBWOOFER terminals. The unit or the speakers may be damaged.
HT-DV40H HT-DV50H Connecting to a conventional TV/monitor Caution: Turn off all other equipment before making connections. If the TV/monitor has video input, connect it to the VIDEO OUT socket on the rear of the unit. TV Video signal Preparation for Use (not supplied) Notes: Change the TV input in accordance with the connected socket. Do not connect other equipment between the TV and this unit. If they are connected via a VCR, pictures may be distorted.
HT-DV40H HT-DV50H Audio connection to other equipment Caution: Turn off the other equipment before making this connection. Connection for the analogue sound (VCR, etc.) To select AUX function: On main unit: Press FUNCTION button repeatedly until AUX is displayed. On remote control: Press AUX button repeatedly until AUX is displayed.
HT-DV40H HT-DV50H Remote control Battery installation 1 2 Preparation for Use 3 Open the battery cover. Insert the supplied batteries according to the direction indicated in the battery compartment. When inserting or removing the batteries, push them towards the battery terminals. Close the cover. Test of the remote control Precautions for battery use: Replace all old batteries with new ones at the same time. Do not mix old and new batteries.
Changing the set up menu HT-DV40H HT-DV50H 1 2 3 4 5 6 7 8 9 0 +10 Turn on the TV. Set the TV to the correct input, eg. “AV1”, “VIDEO”, etc. Turn on the unit by pressing the ON/STAND-BY button. The SHARP startup screen appears. Note: Startup screen will be displayed when both S-Video cable and SCART cable are connected to the TV. If only the SVideo cable is connected, the screen may be blank. To set up S-Video mode, use video out cable or SCART cable. 4 Press the SHIFT and SET UP buttons.
HT-DV40H HT-DV50H Changing the set up menu (continued) Preparation for Use Set up menu Selectable parameters (* indicates default setting) SYSTEM TV SYSTEM NTSC PAL* SET UP AUTO VIDEO S-VIDEO SCART* COMP. P-SCAN ON COMP.
HT-DV40H HT-DV50H ******** AUDIO SET UP AUDIO OUT SP DIF/OFF SP DIF/RAW SP DIF/PCM* Description Select the language audible from the speakers. Select the subtitle displayed on the TV screen. Select the disc menu language. SHARP provide you the DivX registration code that allows you to rent and purchase videos using the DivX service. Please go to www.divx.com/vod for more information. Useful whilst using HDMI cable.
HT-DV40H HT-DV50H Changing the set up menu (continued) Set up menu Selectable parameters (* indicates default setting) VIDEO BRIGHTNESS SET UP 12 10 8 6 4 2 0 Preparation for Use CONTRAST 26 Description To adjust TV screen brightness level. To adjust TV screen contrast level. 12 10 8 6 4 2 0 HUE To adjust TV screen hue level.
HT-DV40H HT-DV50H Set up menu Selectable parameters (* indicates default setting) SATURATION Description To adjust TV screen saturation level. HDMI OUTPUT DIGITAL SET UP DYNAMIC RANGE 480P/576P 720P* 1080 I To select HDMI resolution. Dynamic Range Control can be set from OFF to FULL. FULL FULL : Dynamic Range Control set to maximum. : Dynamic Range Control set to off. OFF 6/8 4/8 2/8 OFF EXIT SET UP Preparation for Use 12 10 8 6 4 2 0 The setting is completed.
HT-DV40H HT-DV50H Changing the set up menu (continued) Preparation for Use TV display setting Indicator Setting 4:3 PS When playing a wide image (16:9) disc, the left and right sides of the image are cut (pan scan) to display a natural-looking 4:3 size image. A wide image disc without pan scan is played back in 4:3 letterbox. A 4:3 disc is played in 4:3. 4:3 LB When playing a wide image (16:9) disc, black bands are inserted at the top and bottom and you can enjoy full wide images (16:9) on a 4:3 size TV.
HT-DV40H HT-DV50H 3 4 5 Rating setting Select “SYSTEM SET UP” on the Set up menu screen (see steps 1 - 6 on page 23). Before setting “RATING”, ensure password is unlocked “ ”. The “RATING” level cannot be set if the password is locked “ ”. After selecting “RATING” in steps 1 - 6 on page 23, select the rating level and press the ENTER button to confirm. After entering rating level, select “PASSWORD” to lock the password key.
HT-DV40H HT-DV50H General control Volume auto fade-in If you turn off and on the main unit with volume set to 34 or higher, the volume starts at 20 and fades in to the last set level. If you turn off and on the main unit with the volume level set to less than 34, the volume starts at the last level volume setting. Volume control Volume ring 1 2 3 4 5 6 7 8 9 0 +10 Main unit operation: When the VOLUME control is turned clockwise, the volume will increase.
Setting the clock (Remote Control only) 5 2 3 4 5 6 7 8 9 0 +10 Press the or button once to advance the time by 1 hour. Hold it down to advance continuously. 6 In this example, the clock is set for the 24-hour (0:00) display. 1 2 3 Press the ON/STAND-BY button to turn the power on. 4 Press the or button to select 24-hour or 12-hour display and then press the MEMORY/DIMMER button. Press the CLOCK/TIMER button.
HT-DV40H HT-DV50H Enjoying surround sound (sound mode) Preset sound modes and sound image Basic Operation You can enjoy normal stereo sounds. Enjoy a wide sound field like 5.1ch as well as enhanced powerful bass sounds. Suitable for movies, etc. Easy to listen to bass sounds such as voice of narration (even at low volume) due to well-controlled bass sounds. Suitable for news, etc.
HT-DV40H HT-DV50H Preset sound mode Dolby Virtual Speaker (DVS) sound mode Select any of the 8 preset modes already set to the optimal sound quality levels. Select a desired sound mode by pressing the SHIFT and SOUND MODE buttons simultaneously. Preset sound mode Display STANDARD The Dolby Virtual Speaker (DVS) creates virtual surround sound comparable to the 5.1ch sound produced by the 2.1ch speaker.
HT-DV40H HT-DV50H Enjoying surround sound (sound mode) (continued) Audistry sound mode ON The Dolby Virtual Speaker creates multichannel-like sound effects. Compared with the cinema mode, the bass sound level is slightly reduced. Enjoy a variety of sounds by each or any combination of the 4 modes. Press the SHIFT and desired mode button simultaneously. Press it again to cancel. Basic Operation The Dolby Pro Logic indicator also lights up if 2ch sound signals are detected.
HT-DV40H HT-DV50H (The SOUND SPACE indicator lights up.) NATURAL BASS (Bass sound expansion) The system's low-frequency characteristics realise the optimal bass sounds. (The NATURAL BASS indicator lights up.) INTELLIGENT VOLUME (Peak limiter and expander) Appropriate listener-friendly volumes realised; the volume is decreased during loud sounds, and increased during low sounds. Notes: When setting each mode of Audistry to “ON”, the preset sound mode setting is cancelled.
HT-DV40H HT-DV50H Playing a disc Turn on the TV, and switch the input to the “VIDEO 1”, “VIDEO 2”, etc. accordingly. Playback 1 2 WMA Press the ON/STAND-BY button to turn the power on. “SHARP” startup screen appears on the TV screen. DVD Operation NO DISC 3 4 Press the DVD/CD button on the remote control. Insert the disc into the disc slot, label side up. The disc must be fully inserted into the disc slot before playing.
HT-DV40H HT-DV50H Caution: Do not play discs of special shapes (heart, octagon, etc). They may cause malfunctions. Do not push the disc whilst it is moving. If the power fails whilst the disc is moving, wait until the power is restored. If TV or radio interference occurs during CD operation, move the unit away from the TV or radio. Auto power on function When you press any of these buttons during stand-by mode, the units turns on.
HT-DV40H HT-DV50H Playing a disc (continued) To interrupt playback Press the (DVD/CD ) button. To resume playback from the same point, press the ) button. (DVD/CD To stop playback DVD: Press the button twice. To resume playback after stopping (resume play) You can resume playback from the point playback is stopped. 1 Whilst a disc is playing, press the button. The system stores the point you stopped. 2 To restart play, press the RESUME Audio CD/MP3/WMA/JPEG/DivX: Press the button.
HT-DV40H HT-DV50H Basic operation Fast forward/Fast reverse (search) 1 2 WMA 3 You can search the desired point as you play the disc. 5 6 7 8 9 0 +10 1 1 2 3 4 5 6 7 8 9 0 +10 Whilst a disc is playing, press and hold the or button. The scanning speed will change as follows at each press of the button. PLAY (Normal play) Forward X 2 PLAY (Normal play) Backward X 2 Forward X 4 Backward X 4 The disc is forwarded by the button.
HT-DV40H HT-DV50H Basic operation (continued) To start playback from the desired point (direct play) To select and play the desired title and chapter: 1 To play by specifying time (time search): You can play back from the desired point by specifying the time. 1 Whilst in the stop or playback mode, press the DIRECT button.
HT-DV40H HT-DV50H Useful operation Slow motion play You can slow down the playback speed. 1 2 3 4 5 6 7 8 9 0 +10 button The speed changes as follows: SF 1/2 SF 1/2 PLAY (Normal play) 2 Press the playback. SF 1/3 (DVD/CD SF 1/4 SF 1/5 SF 1/6 SF 1/7 ) button to return to the normal Notes: On some discs with movies inside, the slow-motion play function is disabled. The sound is muted during slow-motion play.
HT-DV40H HT-DV50H Useful operation (continued) To change the angle To play the contents between the specified points repeatedly (A-B repeat) You can change the angle of view when playing a DVD disc that contains scenes recorded from multiple angle. When “ ” is displayed in the upper left corner of the TV screen, press the ANGLE button repeatedly to select the desired angle number. 2 WMA You can play the desired portion repeatedly by specifying it during playback.
HT-DV40H HT-DV50H WMA You can play back the desired tracks in a specific order. Maximum of 16 tracks can be programmed. 1 Whilst in the stop mode, press the MEMORY/DIMMER button. The PROGRAM screen shows as follows on CD and USB: TV screen Unit display PROG PLAY 2 CLEAR Enter a track and chapter number with the Direct Search buttons.
HT-DV40H HT-DV50H Useful operation (continued) To play repeatedly (repeat play) To change the display on TV screen WMA You can play a chapter (track) or a title repeatedly by specifying it during playback. 1 Whilst a disc is playing, press the TV screen REP: button to Repeat 1. Unit display You can display or hide the operation indicators on the TV screen. Whilst a disc is playing, press the ON SCREEN button. (The display is changed at each press.
HT-DV40H HT-DV50H Function Display Title Display Album Display Artist Display Note: If “UNKNOWN” is displayed, it means Title or Artist or Album name is not recorded. To change the subtitle language You can change the subtitle language or hide subtitles during playback. Whilst a disc is playing, press the SUBTITLE button repeatedly to select the desired subtitle language. : [ENGLISH] Notes: On some discs, the subtitle language cannot be changed.
HT-DV40H HT-DV50H Listening to a CD or MP3/WMA disc CD, CD-R and CD-RW Operation This system can play back a standard CD, CD-R/RW in the CD format and CD-R/RW with MP3 or WMA files, but cannot record on them. Some audio CD-R and CD-RW discs may not be playable due to the state of the disc or the device that was used for recording. 46 MP3: MP3 is a form of compression. It is an acronym which stands for MPEG Audio Layer 3.
HT-DV40H HT-DV50H Advanced CD or MP3/WMA disc playback WMA The tracks on the disc play back can be played in random order automatically. In the stop or playback mode, press the SHIFT button and then the RANDOM button. All the tracks play in random order. TV screen Random Unit Display [ON] To cancel random play: To cancel random playback, press the SHIFT and RANDOM buttons, so that the random “R**” character will disappear. Notes: On some disc, this function cannot be used.
CD, CD-R and CD-RW Operation HT-DV40H HT-DV50H 48 DivX and JPEG disc operation Page Playing a disc . . . . . . . . . . . . . . . . . . . . . . . . . . . . . . . . . . . 36 - 38 To locate the beginning of a chapter track (skip) . . . . . . . . . . 39 Fast forward/Fast reverse (search) . . . . . . . . . . . . . . . . . . . . . . 39 To start playback from the desired point (direct play) . . . . . . 40 Still picture/Frame advance . . . . . . . . . . . . . . . . . . . . . . . . . . .
HT-DV40H HT-DV50H 1 2 1 During playback, press the ZOOM button. Each press of the ZOOM button cycles through the zoom setting as follows: NORMAL PLAY (ZOOM : OFF) 3 Rotating a picture ZOOM 2 ZOOM 3 ZOOM 4 ZOOM 1/4 ZOOM 1/3 ZOOM 1/2 To shift the view and display the desired part of a zoomed image, press the , , or button repeatedly. During playback, press the , , button. Press the button. Press the button. Press the button. button.
HT-DV40H HT-DV50H Playback on USB memory device To remove USB memory device Playback on USB memory device WMA USB Memory Playback You can play USB recorded in JPEG, MP3 and WMA formats. 50 1 2 3 4 5 6 7 8 9 0 +10 Note: This product is not compatible with MTP and AAC file systems. 1 Open the bottom door. Connect the USB device. Press the (USB ) button. To select USB function, press the (USB ) button. To remove USB memory device 1 2 Press the button.
Advanced USB playback Repeat play (REMOTE CONTROL ONLY) Repeat play can play single track and all track sequence continuously. 1 2 3 4 5 6 7 8 9 0 +10 Whilst a disc is playing, each time the button is pressed, the repeat mode changes in the following order: In case of an USB mode: REP: [REP 1] “1-REPEAT” Repeat the currently playing track. Repeat the currently playing directory. REP: [REP DIR] “FOLD REPEAT” REP: [REP ALL] “ALL REPEAT” Repeat the currently playing USB.
HT-DV40H HT-DV50H Advanced USB playback (continued) Listening to the radio To cancel random playback, press again the SHIFT and RANDOM buttons, so that the random indicator will disappear. USB Memory Playback Notes: If you press the or button during random play, you can move to the track selected next by the random operation. In random play, the unit will select and play tracks automatically. (You cannot select the order of the tracks.
HT-DV40H HT-DV50H FM stereo receiving indicator 4 Within 30 seconds, press the MEMORY/DIMMER button to store that station in memory. If the “MEMORY” and preset number indicators disappear before the station is memorised, repeat the operation from step 2. 5 Repeat steps 1 - 4 to set other stations, or to change a preset station. When a new station is stored in memory, the station previously memorised for that preset channel number will be erased.
HT-DV40H HT-DV50H Using the Radio Data System (RDS) Advanced Features RDS is a broadcasting service which a growing number of FM stations provide. These FM stations send additional signals along with their regular programme signals. They send their station names, and information about the type of programme such as sport, music, etc. When tuned to an RDS station, “RDS” and the station name will be displayed.
HT-DV40H HT-DV50H Whilst in the ASPM operation mode, the tuner will automatically search for new RDS stations. Up to 30 stations can be stored. If you have already stored some stations in memory, the number of new stations you can store will be less. 1 2 Press the TUNER button to select the FM band. Press and hold down the SHIFT and RDS ASPM button on the remote control for at least 3 seconds. 1 After “ASPM” has flashed for about 4 seconds, scanning will start (87.50 - 108.00 MHz).
HT-DV40H HT-DV50H Using the Radio Data System (RDS) (continued) Notes: The same station name can be stored in different channels. In a certain area or during certain time periods, the station names may temporarily be different. Advanced Features Notes for RDS operation If any of the following events occur, it does not mean that the unit is faulty: “PS”, “NO PS” and a station name appear alternately, and the unit does not operate properly.
HT-DV40H HT-DV50H If you select the traffic programme: If you select the traffic programme (TP) in step 3, “TP” will appear. (This does not mean that you can listen to the traffic information at that time.) When the traffic information is broadcast, “TA” will appear. Descriptions of the PTY (Programme Type) codes, TP (Traffic Programme) and TA (Traffic Announcement). You can search for and receive the following PTY, TP and TA signals.
HT-DV40H HT-DV50H Using the Radio Data System (RDS) (continued) LIGHT M CLASSICS OTHER M Advanced Features WEATHER FINANCE CHILDREN SOCIAL RELIGION PHONE IN TRAVEL LEISURE JAZZ 58 Classical music for general, rather than specialist appreciation. Examples of music in this category are instrumental music, and vocal or choral works. Performances of major orchestral works, symphonies, chamber music, etc., and including Grand Opera. Musical styles not fitting into any of the other categories.
Timer and sleep operation (Remote Control only) HT-DV40H HT-DV50H Timer playback: The unit turns on and plays the desired source (DVD/CD, USB, TUNER, OPTICAL 1, OPTICAL 2, AUX IN, SCART) at a preset time. This unit has 2 types of timer: ONCE TIMER and DAILY TIMER. 2 3 4 5 6 7 8 9 0 +10 Once timer play works for one time only at a preset time. Daily timer: Daily timer play works at the same preset time every day. For example, set the timer as a wake-up call every morning.
HT-DV40H HT-DV50H Timer and sleep operation (Remote Control only) (continued) 4 Advanced Features 5 60 Within 10 seconds, press the or button to select “ONCE SET” or “DAILY SET”, and press the MEMORY/ DIMMER button. 9 Adjust the volume using the VOLUME control, and then press the MEMORY/DIMMER button. Do not turn the volume up too high. 10 Press the ON/STAND-BY button to enter the power standby mode. The “TIMER” indicator lights up and the unit is ready for timer playback.
HT-DV40H HT-DV50H Checking the timer setting in the timer stand-by mode: 1 Press the CLOCK/TIMER button. 2 Within 10 seconds, press the or button to select “ONCE” or “DAILY”, and press the MEMORY/DIMMER button. 3 Within 10 seconds, press the or button to select “ONCE CALL” or “DAILY CALL”, and press the MEMORY/DIMMER button. The unit returns to the timer stand-by mode after displaying the settings in order. Cancelling the timer setting in the timer stand-by mode: 1 Press the CLOCK/TIMER button.
HT-DV40H HT-DV50H Timer and sleep operation (Remote Control only) (continued) Headphone connection To cancel the sleep operation: Press the ON/STAND-BY button whilst “SLEEP” is indicated. To cancel the sleep operation without setting the unit to the stand-by mode, proceed as follows. 1 Whilst “SLEEP” is indicated, press the CLOCK/TIMER button. 2 Within 10 seconds, press the or button to select “SLEEP OFF”, and press the MEMORY/DIMMER button.
Troubleshooting chart General Symptom The power is not turned on. No sound is heard. The sounds from speakers are not well balanced. Noise is heard during playback. When a button is pressed, the unit does not respond. Interference or noise occurs on the TV image. The display on the unit is dark. No images are displayed. DVD player Symptom Even though a disc is loaded, “No Disc” is displayed.
HT-DV40H HT-DV50H Troubleshooting chart (continued) USB Symptom Device cannot be detected. References Playback does not start. Wrong time display. Wrong file name display.
HT-DV40H HT-DV50H (*): Set the main unit to the stand-by mode and turn the power on again, or unplug and plug it back in. Should the same message appear, contact your authorised SHARP dealer or service centre. Care of compact discs Compact discs are fairly resistant to damage, however mistracking can occur due to an accumulation of dirt on the disc surface. Follow the guidelines below for maximum enjoyment from your CD collection and player.
HT-DV40H HT-DV50H Specifications As part of our policy of continuous improvement, SHARP reserves the right to make design and specification changes for product improvement without prior notice. The performance specification figures indicated are nominal values of production units. There may be some deviations from these values in individual units. References Video output terminals Audio input terminals Audio output terminals Dimensions Weight AC 220 - 240 V ~ 50 Hz Power on: 82 W Power stand-by: 0.
HT-DV40H HT-DV50H Signal system Supported disc types Video signal Audio signal CP-DV50H Speaker PAL/NTSC colour DVD (with the same region number at the back of the unit), audio CD, CD-R, CD-RW, JPEG, DivX (version 3 ~ 6) Horizontal resolution: 500 lines S/N ratio: 70 dB Frequency Linear PCM DVD: characteristics 20 Hz to 20 kHz (sampling rate: 48 kHz) 20 Hz to 20 kHz (sampling rate: 96 kHz) CD: 20 Hz to 20 kHz S/N radio CD: 94 dB (1 kHz) Dynamic range Linear PCM DVD: 95 dB CD: 94 dB Total harmonic 0.
TINSEA226AWZZ 07M R AS 1 03/12/17 HT-CN40_50_BACK.