
User Manual


EN
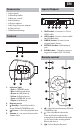
500 mm
500 mm
1
1
2
(4mm)
2
500 mm
ARC OPTICAL LINE IN UPGRADE
~AC IN
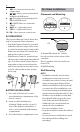
1. Drill 2 parallel holes (Ø 6mm) in the
wall. The distance between the holes
should be 500 mm.
Firmly x one plug into each hole
in the wall and then insert screws
into them.
2. Leave a 4mm gap between the wall
and the screw’s head. Lift the unit‘s
integrated wall brackets over the
heads of the screws and slot into
place.
Connections
OPTICAL DC INLINE INUSB
ARC
HDMI ARC input
The ARC (Audio Return Channel) function
allows you to send audio from your ARC-
compliant TV to your sound bar through a
single HDMI connection. To enjoy the ARC
function, please ensure your TV is both
HDMI-CEC and ARC compliant and set up
accordingly. When correctly set up, you
can use your TV remote control to adjust
the volume output (VOL +/- and MUTE) of
the sound bar.
Connect the HDMI cable (not included)
from unit‘s HDMI (ARC) socket to the
HDMI (ARC) socket on your ARC com-
pliant TV. Then press the remote control
to select HDMI ARC.
TIPS:
• Your TV must support the HDMI-CEC
and ARC function. HDMI-CEC and ARC
must be set to On.
• The setting method of HDMI-CEC and
ARC may di er depending on the TV.
For details about ARC function, please
refer to your TV owner’s manual.
• Only HDMI cables of version 1.4 or
higher can support the ARC function.
• While in HDMI ARC mode, if there’s no
sound output from the unit, you may
need to activate PCM signal output
on your source device (eg. TV, DVD or
Blu-ray player).
OPTICAL DC INLINE INUSBARC
OPTICAL input
• Use the optical cable to connect the
optical input of this soundbar to the
optical output of VCD, CD, VCR, DVD
player.
TIPS:
• While in OPTICAL mode, if there’s no
sound output from the unit, you may
need to activate PCM signal output
on your source device (eg. TV, DVD or
Blu-ray player).