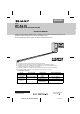
ENGLISH MODEL HT-SL70 SOUND BAR HOME THEATER SYSTEM OPERATION MANUAL Thank you for purchasing this SHARP product. To obtain the best performance from this product, please read this manual carefully. It will guide you in operating your SHARP product. HT-SL50 Sound Bar Home Theater system consisting of Sound Bar and Subwoofer. Notes: ● This product is recommended for flat panel TV (LCD and plasma). ● For HDMI connection, this product only supports PCM (Pulse Code Modulation) signals.
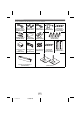
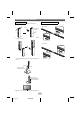
Accessories Please confirm that only the following accessories are included.
Special Notes NOTE This equipment has been tested and found to comply with the limits for a Class B digital device, pursuant to Part 15 of the FCC Rules. These limits are designed to provide reasonable protection against harmful interference in a residential installation. This equipment generates, uses, and can radiate radio frequency energy and, if not installed and used in accordance with the instructions, may cause harmful interference to radio communications.
Important Safety Instructions Electricity is used to perform many useful functions, but it can also cause personal injuries and property damage if improperly handled. This product has been engineered and manufactured with the highest priority on safety. However, improper use can result in electric shock and/or fire. In order to prevent potential danger, please observe the following instructions when installing, operating and cleaning the product.
For U.S. customer only CONSUMER LIMITED WARRANTY SHARP ELECTRONICS CORPORATION warrants to the first consumer purchaser that this Sharp brand product (the "Product"), when ship in its original container, will be free from defective workmanship and materials, and agrees that it will, at its option, either repair the defect or replace the defective Product or part thereof with a new or remanufactured equivalent at no charge to the purchaser for parts or labor for the period(s) set forth below.
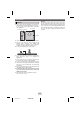
Precautions General ● Please ensure that the equipment is positioned in a well-ventilated area and ensure that there is at least 4" (10 cm) of free space along the sides, top and back of the equipment. 4" (10 cm) 4" (10 cm) 4" (10 cm) Warning: The voltage used must be the same as that specified on this unit. Using this product with a higher voltage other than that which is specified is dangerous and may result in a fire or other type of accident causing damage.
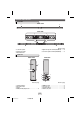
Controls and indicators Sound Bar FRONT VIEW 1 2 REAR VIEW 4 5 L R 3 3 Reference page 4. Right Front Speaker terminal (Red/Black). . . . . 10 5. Left Front Speaker terminal (White/Black) . . . . 10 1. Left Front Speaker 2. Right Front speaker 3. Bass Reflex Duct Subwoofer FRONT VIEW 1 REAR VIEW 3 2 4 5 ACTIVE SUBWOOFER SYSTEM HT-SL70 6 Reference page 1. Stand-by Indicator 2. Bass Reflect Duct 3. Woofer 4. HDMI (TV ARC) Output Jack . . . . . . . . . . . . . . . .
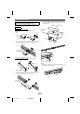
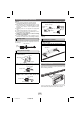
System preparation 3. Peel off the double sided tape separator and attach the sound bar stand cushion at the bottom surface of the sound bar stand. Make sure to unplug the AC power lead before installing the unit or changing the position. Select from three installation methods according to the preferred position. Sound bar stand cushion Using stand For 46" TV sound bar assembly 1. Pull out the cover of joint A (short) as below.
System preparation (continued) To mount the sound bar on the wall Using sound bar stand 1. Pull out the cover of sound bar stand as below. 1. Fix the brackets to the holes as shown. (For 52" TV) Cover RIGHT Sound bar stand LEFT 2. Slot in the sound bar into the sound bar stand and fix its cover as shown. (For 46" TV) RIGHT LEFT 3. Slot in the sound bar to the base stand according to your TV size. 46" TV 52" TV Groove to neatly arrange the wire in.
System preparation (continued) Caution: ● Be very careful to prevent the sound bar [1.46 lbs (0.66 kg)] from falling when mounting on the wall. ● Before mounting, check the wall strength. (Do not put on the veneer plaster or whitewashed wall. The sound bar may fall.) If unsure, consult a qualified service technician. ● Mounting screws are not supplied. Use appropriate ones. ● Check all wall mount angle screws for looseness. ● Select a good location.
Placing the system Installation image: Notes: ● As the sound from the system is omni-directional, you can place the speaker anywhere you like. However, it is recommended to place it as close to the TV as possible. ● The front panel of the speaker is not removable. Caution: ● Do not change the installation direction when the unit is turned on. TV Placing the stand Place the stand as shown. ACTIVE SUBWOOFER SYSTEM HT-SL70 Blu-ray DVD player Place the system as shown.
System connections (continued) Connecting to TV (with HDMI) Caution: Turn off all other equipment before making this connection. Notes: ● This unit supports HDMI which enables ARC (Audio Return Channel). ● To enable ARC make sure to use High Speed HDMI cable. ● This structure also needs TV that supports ARC. ● To listen to the sound from non-ARC-compatible TV, connect the audio output from TV to this system AUDIO IN (TV) terminal.
System connections (continued) Connecting a TV (with AUDIO IN (TV)) Connect to the TV using an audio cable. 1. Method 1 TV To HEADPHONE terminal Audio cable Audio signal Subwoofer To AUDIO IN (TV) input terminal 2. Method 2 TV To audio output terminal RCA cable Audio signal Subwoofer To AUDIO IN (TV) input terminal Note: To control the volume, some setting in the TV MENU is needed. For details refer to the operation manual of the TV.
General Control Make sure to enable the HDMI CEC when making HDMI connection. To turn the power on Plug the AC power cord into an AC outlet, the stand-by indicator turns red. This unit will automatically power on if: 1. TV or similar component which supports HDMI CEC, is turned on. 2. audio signal is detected from Audio input. The stand-by indicator turns blue. Notes: ● HDMI input will override the Audio input signal. ● Audio input will function only when there is no signal from HDMI input.
Troubleshooting chart Many potential problems can be resolved by the owner without calling a service technician. If something is wrong with this product, check the following before calling your authorized SHARP dealer or service center. General Symptom ● No sound is heard. Possible cause Condensation Sudden temperature changes, storage or operation in an extremely humid environment may cause condensation inside the cabinet. Condensation can cause the unit to malfunction.
Specifications As part of our policy of continuous improvement, SHARP reserves the right to make design and specification changes for product improvement without prior notice. The performance specification figures indicated are nominal values of production unit. There maybe some deviations from these values in individual unit.