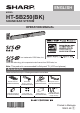
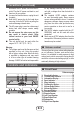
ENGLISH MODEL HT-SB250(BK) odesoft SOUND BAR SYSTEM OPERATION MANUAL ww.barcodesoft.com SOUND BAR SYSTEM HT-SB250 e Symbology: Code 93; Font Facename: Code93MHr Encode: TINSZA877AWZZ is a trademark of SRS Labs, Inc. WOW HD technology is incorporated under license from SRS Labs, Inc. Note: This product is recommended for flat panel TV (LCD and plasma). Accessories ze 8 : *TINSZA877AWZZFP*| ze 10 : Please confirm that only the following accessories are included.
Special notes equipment does cause harmful interference to radio or television reception, which can be determined by turning the equipment off and on, the user is encouraged to try to correct the interference by one or more of the following measures: ● Reorient or relocate the receiving antenna. ● Increase the separation between the equipment and receiver. ● Connect the equipment into an outlet on a circuit different from that to which the receiver is connected.
IMPORTANT SAFETY INSTRUCTIONS Electricity is used to perform many useful functions, but it can also cause personal injuries and property damage if improperly handled. This product has been engineered and manufactured with the highest priority on safety. However, improper use can result in electric shock and/or fire. In order to prevent potential danger, please observe the following instructions when installing, operating and cleaning the product.
IMPORTANT SAFETY INSTRUCTIONS (continued) d) 19) 20) 21) 22) If the product does not operate normally by following the operating instructions.
For U.S. customer only CONSUMER LIMITED WARRANTY SHARP ELECTRONICS CORPORATION warrants to the first consumer purchaser that this Sharp brand product (the "Product"), when ship in its original container, will be free from defective workmanship and materials, and agrees that it will, at its option, either repair the defect or replace the defective Product or part thereof with a new or remanufactured equivalent at no charge to the purchaser for parts or labor for the period(s) set forth below.
Precautions (continued) ● ● ● ● ● disconnect the AC power cord from the AC outlet. Plug the AC power cord back in, and then turn on your system. In case of an electrical storm, unplug the unit for safety. Hold the AC power plug by the head when removing it from the AC outlet, as pulling the cord can damage internal wires. The AC power plug is used as a disconnect device and shall always remain readily operable. Do not remove the outer cover, as this may result in electric shock.
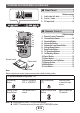
Controls and indicators (continued) 1 LINE IN 2 2 ■ Rear Panel 3 Reference page . Audio Line In 2 Jack..................................9 2. Line In 1 Jacks . ........................................9 . DC Input Jack .........................................10 RIGHT LEFT LINE IN 1 ■ Remote Control 1 2 3 9 10 11 4 5 6 7 12 13 14 15 8 Remote control Plastic shield Reference page . Remote Control Transmitter 2. Cinema/Game Button..............................12 . Standard Button.............
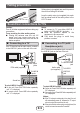
System preparation Note: Option 1 or option 2 foot cushion positions based on LCD TV stand. Make sure to unplug the AC power cord before installing the unit or changing the position. Select from three installation methods according to the preferred position. Using spikes Nuts (secured on spikes) must be used when installing spikes. The unit can be levelled by adjusting the spikes and nuts.
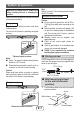
System preparation (continued) ■ Installing the sound bar 2 Make a hole on the wall following the screw point marks on the pattern paper by using a drill. 1-1/4” (32 mm) Align the wall mount slot at the unit to the wall mount angle. 2 Slot the unit into the wall mount angle. Fix them securely. 3/8” (8-9 mm) Wall surface Wall surface Fix a wall mount plug into the hole using a hammer, until it is flush with the wall surface.
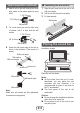
Falling prevention Safety wires (not supplied) are useful to prevent the unit from falling off the table. Loop the safety wires (not supplied) into each hole as shown and tie the safety wires to the LCD TV stand. Sound bar connections to TVs Caution: Turn off all other equipment before making any connections. Tuner receiving for other audio system ● Placing the antenna near the unit AC power cord may cause noise pick up. Place the antenna away from the unit for better reception.
AC power connection Remote control After checking all the connections have been made correctly, connect the AC power cord to the AC power input jack, then to the AC outlet. ■ Using with the AC/DC adaptor 1 Plug the AC power cord into the AC/DC adaptor. 2 Plug the AC/DC adaptor cable into the DC INPUT jack on the unit. 3 Plug the AC power cord into an AC outlet.
General control Remote control (continued) shall not be exposed to excessive heat such as sunshine, fire or the like. ● Installing the battery incorrectly may cause the unit to malfunction. Notes concerning use: ● Replace the battery if the operating distance is reduced or if the operation becomes erratic. Purchase “CR 2025”, coin lithium battery. ● Periodically clean the transmitter on the remote control and the sensor on the unit with a soft cloth.
General control (continued) Remote control operation: Press the VOLUME + button to increase the volume and the VOLUME – button to decrease the volume. ■ Bass control Press the BASS/TREBLE button to select “BASS”. ■ Muting The volume is muted temporarily when pressing the MUTE button on the remote control. Press again to restore the volume. (+ or –) button to adjust the bass.
Troubleshooting chart Many potential problems can be resolved by the owner without calling a service technician. If something is wrong with this product, check the following before calling your authorized SHARP dealer or service center.
Troubleshooting chart ■(continued) Condensation Maintenance ■ Cleaning the cabinet Sudden temperature changes, storage or operation in an extremely humid environment may cause condensation inside the cabinet or on the transmitter on the remote control. Condensation can cause the unit to malfunction. If this happens, leave the power on until normal playback is possible (about 1 hour). Wipe off any condensation on the transmitter with a soft cloth before operating the unit.
Error indicators and warnings When you fail to perform operations properly, the following messages are displayed on the unit. Display or Meaning or Power indicator (blinks red) ● Malfunction of the surround circuit. Place the unit away from noise source and plug the AC power cord into another AC outlet. (*) ● When the protection circuit of the amplifier is activated.