
User`s manual


Table Of Contents
- Safety Precautions
- Table of contents
- Chapter 1: Outline
- 1-1 Features
- 1-2 Controller
- 1-3 Measurement program
- [1] Positional deviation measurement
- [2] Degree of match inspection
- [3] Lead inspection
- [4] BGA/CSP inspection (IV-S32M/S33M)
- [5] Area measurement by binary conversion
- [6] Object counting by binary conversion
- [7] Object identification by binary conversion
- [8] Point measurements
- [9] Distance and angle measurement
- [10] Multiple position measurement (IV-S33M)
- [11] Multiple degree of match inspection (IV-S33M)
- Chapter 2 : Precautions for Use
- Chapter 3 : System Configuration
- Chapter 4 : Part Names and Functions
- Chapter 5 : Connection and Installation Methods
- Chapter 6 : Setting and Operating Outlines
- Chapter 7 : Simplified Menu Operation
- 7-1 Operation screen
- 7-2 Image display
- 7-3 Setting functions that are different with each controller
- 7-4 Setting procedures
- 7-5 Setting the operation conditions
- 7-6 Setting object types
- 7-7 Setting the shutter speed
- 7-8 Setting the positioning conditions
- 7-9 Setting the existence inspection conditions
- 7-10 Measurement triggering
- 7-11 Saving data
- 7-12 Specify the system conditions
- Chapter 8 : Specifications
- Chapter 9 : Operation Examples
- Glossary
- Appendix
- Alphabetical Index
7-30
Simplified Menu Operation
7
[5] Setting the system time (IV-S32M/S33M)
Set the time displayed on the monitor for the IV-S32M/S33M.
1. Move the cursor to the "7TIME" item using the
up and down keys, and press the SET key.
2. Move the cursor to "SEC.," "MIN.," "D," "M," and
"Y" using the left and right keys, and enter the
correct value at each location using the up and
down keys.
Y = 1999 to 2098
M = 01 to 12
D = 01 to 31
H = 00 to 23
MIN. = 00 to 59
3. Press the SET key. The time will be set and the
system will start using the new time.
[4] Self-diagnosis
The IV-S31M/S32M/S33M controller can check all of its own hardware, to ensure that it is operating
normally.
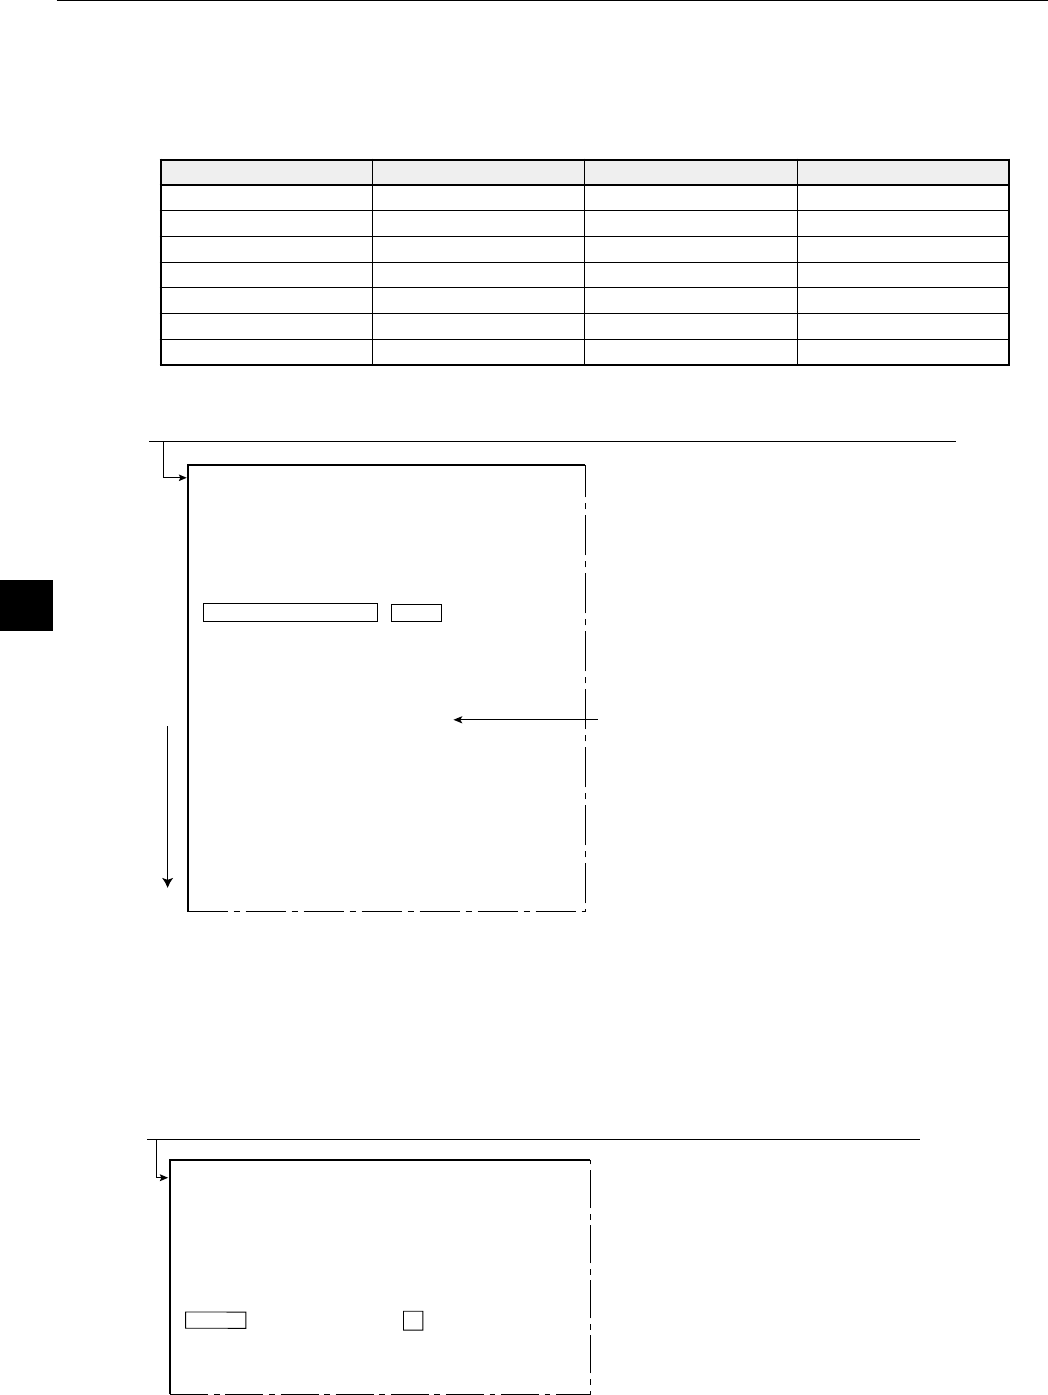
(1) Diagnostic items and methods
(2) Operating procedure
1. Move the cursor to item "6 SELF
DIAGNOSTICS" with the up and down keys,
and press the SET key.
- The [SELF DIAGNOSITICS] menu will be
displayed, and each item will be checked. If
the result of each diagnosis is normal, OK
will be displayed. If the result is abnormal,
NG will be displayed.
If any abnormality occurs, consult our service
center.
metI tcejbO dohtemkcehC yalpsidrorrE
MARV)yromem(MARVetirwretfadaeRGN
MARDS)yromem(MARDSetirwretfadaeRGN
remiT GN
snoitidnocepyttcejbOyromemhsalFmuskcehC.oNtcejbororre+GN
egamiecnerefeRyromemhsalFmuskcehCGN
margorptooByromemhsalFmuskcehCGN
margorpmetsySyromemhsalFmuskcehCGN
[SYSTEM COND]
①SERIAL OUTPUT NO PC-LINK SERIAL
②COMM.SET (TO NEXT SUB-MENU)
③COMPUTER LINK (TO NEXT SUB-MENU)
④INITIALIZATION ALL-INIT INIT-RAM
⑤SIMPLE→SEL MENU EXEC
⑥SELF DIAGNOSTICS EXEC
⑦TIME 2000Y 08M 01D 18H 56M
⑧CAMERA TYPE (TO NEXT SUB-MENU)
DIAGNOSING
VRAM OK
SDRAM OK
TIME OK
TYPE COND OK
REFERENCE IMG
OK
BOOT-PROG OK
SYSTEM-PROG OK
OPS-MENU
On the MAIN OPS MENU, move the cursor to the "SYS-CND" item, and press the SET key.
After the diagnosis is complete,
the message will change to
"COMPLETE DIAGNOSIS."
Order of diagnosis
On the MAIN OPS MENU, move the cursor to the "SYS-CND" item, and press the SET key.
OPS-MENU
[SYSTEM COND]
①SERIAL OUTPUT NO PC-LINK SERIAL
②COMM.SET (TO NEXT SUB-MENU)
③COMPUTER LINK (TO NEXT SUB-MENU)
④INITIALIZATION ALL-INIT INIT-RAM
⑤SIMPLE→SEL MENU EXEC
⑥SELF DIAGNOSTICS EXEC
⑦TIME 2000Y 08M 01D 18H 56M
⑧CAMERA TYPE (TO NEXT SUB-MENU)