
User`s manual


Table Of Contents
- Safety Precautions
- Table of contents
- Chapter 1: Outline
- 1-1 Features
- 1-2 Controller
- 1-3 Measurement program
- [1] Positional deviation measurement
- [2] Degree of match inspection
- [3] Lead inspection
- [4] BGA/CSP inspection (IV-S32M/S33M)
- [5] Area measurement by binary conversion
- [6] Object counting by binary conversion
- [7] Object identification by binary conversion
- [8] Point measurements
- [9] Distance and angle measurement
- [10] Multiple position measurement (IV-S33M)
- [11] Multiple degree of match inspection (IV-S33M)
- Chapter 2 : Precautions for Use
- Chapter 3 : System Configuration
- Chapter 4 : Part Names and Functions
- Chapter 5 : Connection and Installation Methods
- Chapter 6 : Setting and Operating Outlines
- Chapter 7 : Simplified Menu Operation
- 7-1 Operation screen
- 7-2 Image display
- 7-3 Setting functions that are different with each controller
- 7-4 Setting procedures
- 7-5 Setting the operation conditions
- 7-6 Setting object types
- 7-7 Setting the shutter speed
- 7-8 Setting the positioning conditions
- 7-9 Setting the existence inspection conditions
- 7-10 Measurement triggering
- 7-11 Saving data
- 7-12 Specify the system conditions
- Chapter 8 : Specifications
- Chapter 9 : Operation Examples
- Glossary
- Appendix
- Alphabetical Index
4-7
Part Names and Functions
4
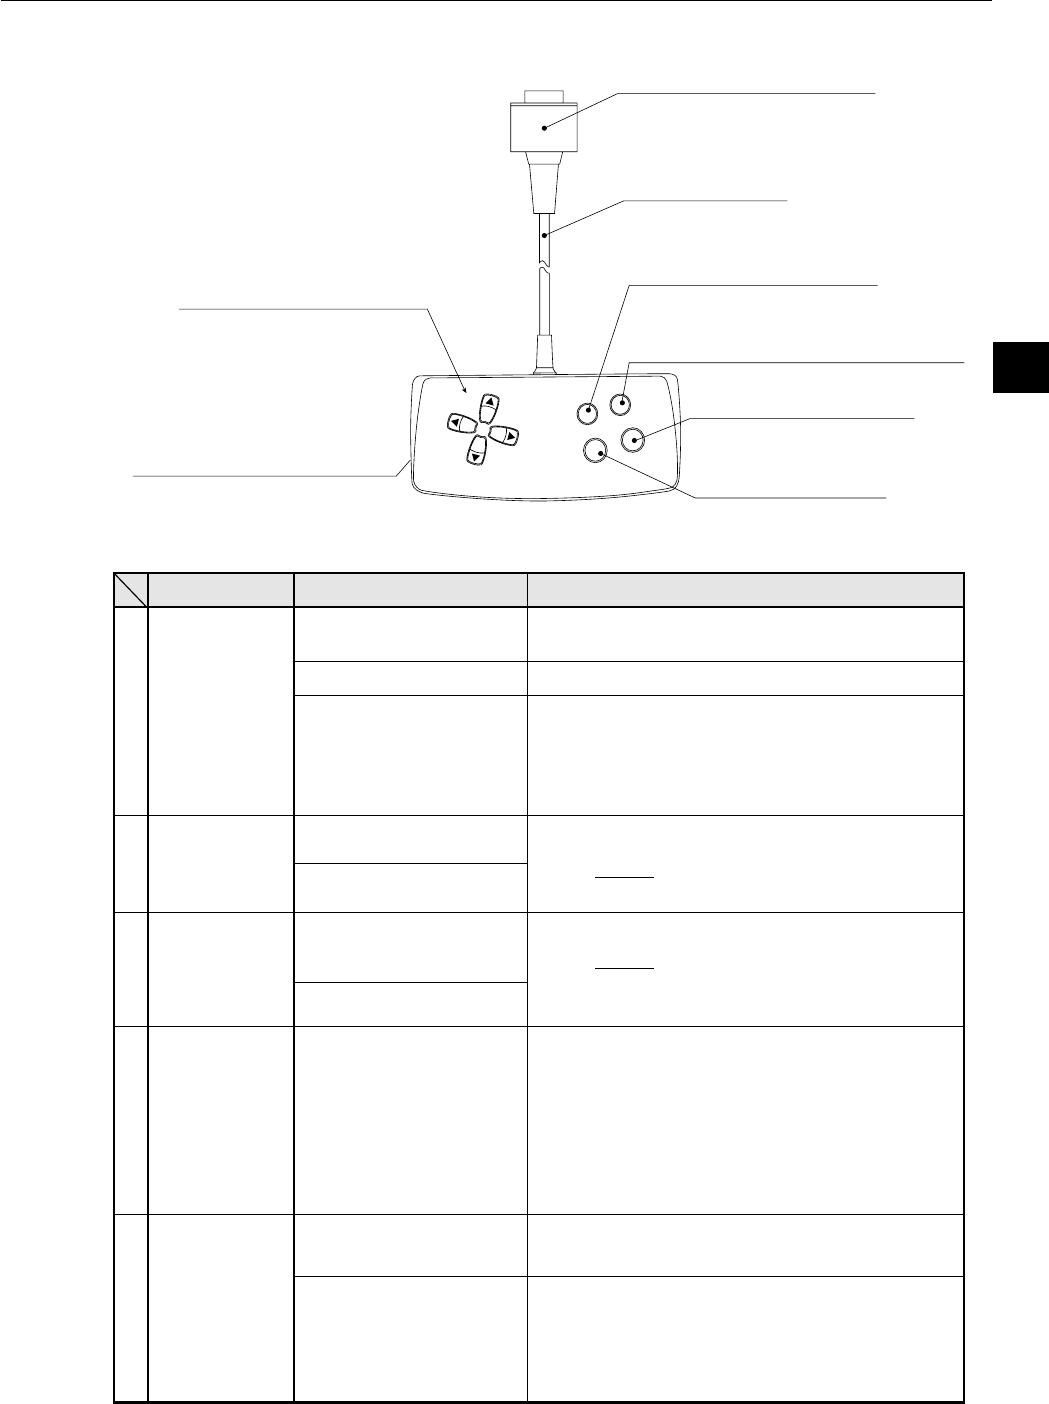
4-3 Remote keypad (IV-S30RK1)
4 Image change key (SEL)
1 Direction keys
(up, down, left and right)
5 Measurement start/brightness
select key (TRG/BRT)
2 Set (select) key (SET)
3 Cancel key (ESC)
Dimensions (mm)
130 (W) × 61 (D) × 22.5 (H)
Cable length 3 m
Connector
- Connected to the controller
(IV-S31M/S32M/S33M)
Selecting an item on a
menu screen
Setting a value
Determine the setting
value
Switching the image
mode between the
through mode and freeze
mode
Start measurement input
Switching the brightness
level (H and L)
DescriptionFunctionKey name
- Select a digit or an item with the left and right
keys, and then specify a value with the up and
down keys.
- Specify a value with the up, down, right and left
keys.
Switch the image mode between through and
freeze on a setting screen. (See the preceding
page.) When the mode is switched from
through to freeze, a new image is captured.
Note: The run screen is only displayed in the
freeze mode, and the "GAIN/OFFSET"
screen is only displayed in the through
mode.
Press this key on the run screen, and a new
measurement is triggered.
Change the displayed image brightness.
- Use this key when the image is so bright that
characters are difficult to see.
- The brightness can be changed on any
screen other than the run screen.
Direction keys
(up, down, left
and right)
Set (select) key
(SET)
Cancel key
(ESC)
Image change
key (SEL)
Measurement
start/brightness
select key
(TRG/BRT)
1
2
3
4
5
Select an item with the up, down, left and right
keys.
*
* The direction keys have an auto-repeat function.
Set each coordinate.Setting a window
Returning a setting to its
original state before be-
ing changed
Returning to the previous
menu
Determine a highlighted
item