Self-Cleaning Convection Ranges www.GEAppliances.com Safety Instructions Anti-Tip Device . . . . . . . . . . . . . . 2 Oven . . . . . . . . . . . . . . . . . . . . . . . 6 Safety Precautions . . . . . . . . . 3, 4 Surface Units . . . . . . . . . . . . . . . . 5 Operating Instructions Owner’s Manual JBP85 JB940 JB960 JB965 Broiling Guide . . . . . . . . . . . . . .15 Clock and Timer . . . . . . . . . . . .16 Convection . . . . . . . . . . . . . .19-24 Cookware . . . . . . . . . . . . . . . . . . .
WARNING! For your safety, the information in this manual must be followed to minimize the risk of fire, electric shock, or to prevent property damage, personal injury, or loss of life. WARNING ANTI-TIP DEVICE All ranges can tip and injury could result. Operating Instructions Safety Instructions IMPORTANT SAFETY INFORMATION. READ ALL INSTRUCTIONS BEFORE USING. To prevent accidental tipping of the range, attach it to the wall and floor by installing the Anti-Tip device supplied.
IMPORTANT SAFETY NOTICE The California Safe Drinking Water and Toxic Enforcement Act requires the Governor of California to publish a list of substances known to the state to cause cancer, birth defects or other reproductive harm, and requires businesses to warn customers of potential exposure to such substances. Fluorescent light bulbs contain mercury. If your model has a surface light, you must recycle the fluorescent light bulb according to local, state and federal codes.
WARNING! SAFETY PRECAUTIONS Do not operate the oven or cooktop controls if the glass is broken. Food splatter or cleaning solution may penetrate a broken control panel and create a risk of electrical shock. Contact a qualified technician immediately should your glass control panel become broken. ■ Do not store flammable materials in an oven or near the cooktop. Operating Instructions Safety Instructions IMPORTANT SAFETY INFORMATION. READ ALL INSTRUCTIONS BEFORE USING.
SURFACE UNITS Use proper pan size—select cookware having flat bottoms large enough to cover the surface unit heating element. The use of undersized cookware will expose a portion of the surface unit to direct contact and may result in ignition of clothing. Proper relationship of cookware to surface unit will also improve efficiency.
WARNING! OVEN Stand away from the range when opening the oven door. Hot air or steam which escapes can cause burns to hands, face and/or eyes. ■ Do not heat unopened food containers. Pressure could build up and the container could burst, causing an injury. Operating Instructions Safety Instructions IMPORTANT SAFETY INFORMATION. READ ALL INSTRUCTIONS BEFORE USING. ■ Keep the oven vent unobstructed. ■ Keep the oven free from grease buildup.
www.GEAppliances.com Throughout this manual, features and appearance may vary from your model. How to Set Push the knob in and turn in either direction to the setting you want. Be sure you turn the control knob to OFF when you finish cooking. A HOT COOKTOP indicator light will glow when any radiant element is turned on, and will remain on until the surface is cooled to approximately 150°F. Indicator light will: ■ come on when the unit is hot to the touch.
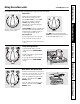
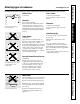
Safety Instructions Operating Instructions Care and Cleaning About the radiant surface units… SURFACE COOKING ,,,,,,,,,,,,, ,,,,,,,,,,,, , ,,,, ,,, ,, ,,,,,,,, Never cook directly on the glass. Always use cookware. OFF CENTER ,,,,,,,,,,, ,,,,,,,,,,, , ,,,, ,,, ,,,,,,,,,,, , ,,,, ,,, ,the center of Always place the pan in the surface unit you are cooking on.
www.GEAppliances.com The following information will help you choose cookware which will give good performance on glass cooktops. Stainless Steel: Glass-ceramic: recommended usable, but not recommended Poor performance. May scratch the surface. Aluminum: Stoneware: Operating Instructions Check pans for flat bottoms by using a straight edge. heavy weight recommended Good conductivity. Aluminum residues sometimes appear as scratches on the cooktop, but can be removed if cleaned immediately.
Throughout this manual, features and appearance may vary from your model. Operating Instructions Safety Instructions Using the oven controls. Care and Cleaning Oven Control, Clock and Timer Features and Settings SELF CLEAN Pad COOKING TIME Pad Touch this pad to select the self-cleaning function. See the Using the self-cleaning oven section. Touch this pad and then touch the number pads to set the amount of time you want your food to cook. The oven will shut off when the cooking time has run out.
www.GEAppliances.com Your new touch pad control has additional features that you may choose to use. The following are the features and how you may activate them. The special feature modes can only be activated while the display is showing the time of day. They remain in the control’s memory until the steps are repeated. When the display shows your choice, touch the START pad. The special features will remain in memory after a power failure, except for the Sabbath feature, which will have to be reset.
Hour, 24 Hour or Clock Black-Out Your control is set to use a 12 hour clock. If you would prefer to have a 24 hour military time clock or black-out the clock display, follow the steps below. Touch the BAKE and BROIL HI/LO pads at the same time for 3 seconds until the display shows SF. Operating Instructions Safety Instructions Special features of your oven control. Touch the CLOCK pad once. The display will show 12 hr. If this is the choice you want, touch the START pad.
(On some models) www.GEAppliances.com The Sabbath feature can be used for baking/roasting only. It cannot be used for convection, broiling, self-cleaning, or Delay Start cooking. NOTE: The oven light comes on automatically (on some models) when the door is opened and goes off when the door is closed. The bulb may be removed. See the Oven Light Replacement section. On models with a light switch on the control panel, the oven light may be turned on and left on.
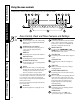
Safety Instructions To avoid possible burns, place the shelves in the desired position before you turn the oven on. Before you begin… The shelves have stops, so that when placed correctly on the supports, they will stop before coming completely out, and will not tilt. When placing and removing cookware, pull the shelf out until it stops. On some models, the bake heating element is under the oven floor. Do not place foods on the oven bottom for cooking. The oven has 6 shelf positions.
How to Set the Oven for Broiling Place the meat or fish on the broiler grid in the broiler pan. Follow suggested shelf positions in the Broiling Guide. Use LO Broil to cook foods such as poultry or thick cuts of meat thoroughly without Touch the BROIL HI/LO pad once for HI Broil. To change to LO Broil, touch the BROIL HI/LO pad again. Touch the START pad. When broiling is finished, touch the CLEAR/OFF pad.
Safety Instructions To Set the Clock Make sure the clock is set to the correct time of day. The clock must be set to the correct time of day for the automatic oven timing functions to work properly. The time of day cannot be changed during a timed baking or self-cleaning cycle. Touch the CLOCK pad. Touch the number pads. Touch the START pad until the time of day shows in the display. To Set the Timer Touch the KITCHEN TIMER ON/OFF pad. The timer is a minute timer only.
www.GEAppliances.com NOTE: Foods that spoil easily–such as milk, eggs, fish, stuffings, poultry and pork–should not be allowed to sit for more than 1 hour before or after cooking. Room temperature promotes the growth of harmful bacteria. Be sure that the oven light is off because heat from the bulb will speed harmful bacteria growth. How to Set an Immediate Start and Automatic Stop The oven will turn on immediately and cook for a selected length of time.
Safety Instructions For many foods, especially roasts and poultry, internal food temperature is the best test for doneness. The temperature probe takes the guesswork out of roasting by cooking foods to the exact doneness you want. Use of probes other than the one provided with this product may result in damage to the probe. Use the handles of the probe and plug when inserting and removing them from the food and outlet.
www.GEAppliances.com The convection oven fan shuts off when the oven door is opened. DO NOT leave the door open for long periods of time while using convection cooking or you may shorten the life of the convection heating element. To help you understand the difference between convection bake and roast and traditional bake and roast, here are some general guidelines. Convection Bake Roasting rack Post ■ Good for large quantities of baked foods.
Cookware for Convection Cooking Before using your convection oven, check to see if your cookware leaves room for air circulation in the oven. If you are baking with several pans, leave space between them. Also, be sure the pans do not touch each other or the walls of the oven. Operating Instructions Safety Instructions Using the convection oven. Paper and Plastic Heat-resistant paper and plastic containers that are recommended for use in regular ovens can be used in convection ovens.
How to Set the Oven for Convection Roasting when Using the Probe (on some models) For best results when roasting large turkeys and roasts, we recommend using the probe included in the convection oven. The display will flash PROBE and the oven control will signal if the probe is inserted into the outlet, and you have not set a probe temperature and touched the START pad. Plug the probe into the outlet in the oven. Make sure it is pushed all the way in. Close the oven door. Touch the CONVECTION ROAST pad.
Safety Instructions Operating Instructions Using the convection oven. Convection Roasting Guide Meats Beef Care and Cleaning Oven Temp. Internal Temp. 325°F. 325°F. 325°F. 325°F. 325°F. 325°F. 325°F. 325°F. 300°F. 325°F. 325°F. 325°F. 325°F. 325°F. 325°F. 325°F. 325°F. 325°F. 325°F. 325°F. 325°F. 400°F. 140°F. 160°F. 170°F. 140°F. 160°F. 170°F. 140°F. 160°F. 170°F. 170°F. 170°F. 170°F. 170°F. 170°F. 140°F. 140°F. 140°F. 160°F. 170°F. 160°F. 170°F. Fish, whole (3 to 5 lbs.
www.GEAppliances.com You will hear a fan while cooking with this feature. The fan will stop when the door is opened but the heat will not turn off. NOTE: Foods that spoil easily–such as milk, eggs, fish, stuffings, poultry and pork–should not be allowed to sit for more than 1 hour before or after cooking. Room temperature promotes the growth of harmful bacteria. Be sure that the oven light is off because heat from the bulb will speed harmful bacteria growth.
You may find that your new oven cooks differently than the one it replaced. Use your new oven for a few weeks to become more familiar with it. If you still think your new oven is too hot or too cold, you can adjust the thermostat yourself. Do not use thermometers, such as those found in grocery stores, to check the temperature setting of your oven. These thermometers may vary 20–40 degrees. NOTE: This adjustment will not affect the broiling or the self-cleaning temperatures.
www.GEAppliances.com The oven door must be closed and all controls set correctly for the cycle to work properly. Before a Clean Cycle We recommend venting your kitchen with an open window or using a ventilation fan or hood during the first self-clean cycle. Wipe up heavy soil on the oven bottom. The oven shelves and convection roasting rack can be self-cleaned, but they will darken, lose their luster and become hard to slide.
The oven door must be closed and all controls set correctly for the cycle to work properly. How to Delay the Start of Cleaning Make sure the clock shows the correct time of day. Touch the SELF CLEAN pad. Using the number pads, enter the desired clean time. Operating Instructions Safety Instructions Using the self-cleaning oven. Touch the DELAY START pad. The earliest start time you can set will appear in the display. Using the number pads, enter the time of day you want the clean cycle to start.
www.GEAppliances.com Be sure all controls are off and all surfaces are cool before cleaning any part of the range. If your range is removed for cleaning, servicing or any reason, be sure the anti-tip device is re-engaged properly when the range is replaced. Failure to take this precaution could result in tipping of the range and cause injury. Safety Instructions Care and cleaning of the range. How to Remove Packaging Tape Apply with a soft cloth and allow to soak.
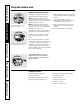
Safety Instructions Operating Instructions Care and cleaning of the range. Locked position Lift-Off Oven Door The oven door is removable for easier access to the light bulb. Unlocked position Do not lift the door by the handle. To remove the door: Fully open the door. Pull the hinge locks down to the unlocked position. Each hinge has a hinge lock. Using a tool, pull the hinge locks down against the door frame. Firmly grasp the door at the top sides. Close the door to the stop position.
Oven Light Replacement CAUTION: Before replacing your oven light bulb, disconnect the electrical power to the range at the main fuse or circuit breaker panel. Be sure to let the light cover and bulb cool completely. To remove the cover: Wire cover holder. Replace bulb with a 40-watt appliance bulb. To replace the cover: Place it into groove of the light receptacle. Pull wire forward to the center of the cover until it snaps into place. Connect electrical power to the range.
Stainless Steel Surfaces (on some models) Do not use a steel-wool pad; it will scratch the surface. To clean stainless steel surfaces, use a hot, damp cloth with a mild detergent suitable for stainless steel surfaces. Use a clean, hot, damp cloth to remove soap. Dry with a dry, clean cloth. Operating Instructions Safety Instructions Care and cleaning of the range. If food soil remains, try a general kitchen cleaner, such as Fantastik®, Simple Green®, or Formula 409®.
www.GEAppliances.com Control Lockout (on some models) Begin by locking the cooktop; see the Control Lockout section. Normal Daily Use Cleaning To maintain and protect the surface of your glass cooktop, follow these steps: Clean your cooktop after each spill. Before using the cooktop for the first time, clean it with the cooktop cleaning cream. This helps protect the top and makes clean-up easier. Shake the cleaning cream well. Apply a few drops of the cream directly to the cooktop.
Metal Marks and Scratches Be careful not to slide pots and pans across your cooktop. It will leave metal markings on the cooktop surface. These marks are removable using the cleaning cream with a scrub sponge and/or razor scraper. black discoloration on the cooktop. This should be removed immediately before heating again or the discoloration may be permanent. WARNING: Carefully check the bottom of pans for roughness that would scratch the cooktop.
www.GEAppliances.com Troubleshooting Tips Save time and money! Review the charts on the following pages first and you may not need to call for service. Surface units will not maintain a rolling boil or cooking is not fast enough Improper cookware being used. • Use pans which are flat and match the diameter of the surface unit selected. Surface units do not work properly A fuse in your home may be blown or the circuit breaker tripped. • Replace the fuse or reset the circuit breaker.
Safety Instructions Troubleshooting Tips Problem Possible Causes What To Do Food does not bake or roast properly Oven controls improperly set. • See the Using the oven section. Shelf position is incorrect or the shelf is not level. • See the Using the oven section. Incorrect cookware or cookware of improper size being used. • See the Using the oven section. Oven thermostat needs adjustment. • See the Adjust the oven thermostat—Do it yourself! section. Oven controls improperly set.
Possible Causes Clock and timer do not work Plug on range is not completely • Make sure electrical plug is plugged into a live, properly inserted in the electrical outlet. grounded outlet. A fuse in your home may be blown or the circuit breaker tripped. What To Do • Replace the fuse or reset the circuit breaker. Oven controls improperly set. • See the Using the clock and timer section. Oven controls improperly set. • See the Using the self-cleaning oven section.
Safety Instructions Operating Instructions Care and Cleaning Troubleshooting Tips Consumer Support Before You Call For Service… Troubleshooting Tips Problem Possible Causes What To Do Control signals after entering cooking time or start time You forgot to enter a bake temperature or cleaning time. • Touch the BAKE pad and desired temperature or the SELF CLEAN pad and desired clean time. Display goes blank A fuse in your home may be blown or the circuit breaker tripped.
GE Service Protection Plus™ GE, a name recognized worldwide for quality and dependability, offers you Service Protection Plus ™—comprehensive protection on all your appliances— No Matter What Brand! Benefits Include: • Backed by GE • All brands covered • Unlimited service calls • All parts and labor costs included • No out-of-pocket expenses • No hidden deductibles • One 800 number to call We’ll Cover Any Appliance. Anywhere. Anytime.
Consumer Product Ownership Registration Dear Customer: Thank you for purchasing our product and thank you for placing your confidence in us. We are proud to have you as a customer! Follow these three steps to protect your new appliance investment: 1 2 3 Complete and mail your Consumer Product Ownership Registration today. Have the peace of mind of knowing we can contact you in the unlikely event of a safety modification. After mailing the registration below, store this document in a safe place.
All warranty service provided by our Factory Service Centers, or an authorized Customer Care® technician. To schedule service, on-line, 24 hours a day, contact us at www.GEAppliances.com, or call 800-GE-CARES. Staple your receipt here. Proof of the original purchase date is needed to obtain service under the warranty. GE Will Provide: One Year From the date of the original purchase Any part of the range which fails due to a defect in materials or workmanship.
Consumer Support. GE Appliances Website www.GEAppliances.com Have a question or need assistance with your appliance? Try the GE Appliances Website 24 hours a day, any day of the year! For greater convenience and faster service, you can now download Owner’s Manuals, order parts, catalogs, or even schedule service on-line. You can also “Ask Our Team of Experts™” your questions, and so much more... Schedule Service www.GEAppliances.com Expert GE repair service is only one step away from your door.