INHALT VORWORT Seite * Hinweise der Redaktion 1 * Wahlen eines Druckertreiber: 1 EINFÜHRUNG SCHAR LASERDRUCKER 2 AUSPACKEN.. 3 HINWEISE ZUR INSTALLATION... v 4 DIE EINZELNEN TEILE UND IHRE FUNKTIONEN. 5 BEDIENFELD... 7 PAPIERARTEN UND FORMATE .. 9 AUFSTELLEN ENTFERNEN DER TRANSPORTSICHERUNGEN 11 NACHFÜLLEN DES VERBRAUCHSMATERIALS . » Installieren der * |Installieren der Bilderstürmerisch * Installieren des Rollenreinigers ANSCHLIESSEN YON NUTZEND SCHNITTSTELLENKABEL * Netzkabel .
INHALT Seite 7. AUSWECHSELN DES VERBRAUCHSMATERIALS UND PFLEGE DES DRUCKERS AUSTAUSCHINTERVALL... v 18 TONER-ENTWICKLEREINHEIT UND ROLLENREINIGER {TONER/ENTWICKLERSATZ) 70 BILDTROMMELEINHEIT .ot s PFLEGE DES DRUCKERS.. s Reinigen des Gehäuses. » Reinigen der Hauptkorona SONSTIGE INFORMATIONEN HEXADEZIMALER AUSDRUCK wwecvccviii et sirssnnssnsnnce 83 TRANSPORT DES DRUCKERS 84 9. SONDERZUBEHÖR UND VERBRAUCHSMATERIAL SONDERZUBEHÖR UND VERBRAUCHSMATERIAL ...
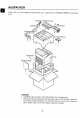
HINWEISE ZUR INSTALLATION b Durch falsche Installation kann der Drucker beschädigt werden. Beachten Sie bitte bei der ersten Installation und immer dann, wenn der Drucker an einem anderen Platz aufgestellt wird, die folgenden Urkirche: 1. Die Maschine an einer Schutzkontakt-Steckdose mit 230 V £10% Wechselspannung, 50 Hz anschließen. 2.
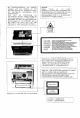
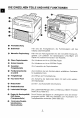
DIE EINZELNEN TEILE UND IHRE FUNKTIONEN Frontabdeckung Bedienfeld [ ® Manueller Papiereinzug Obere Papierkassette Untere Kassette KassettenFreigabeknépfe Datenschutzgerechte (A und B) Freigabeknopf Farce-Down-Fach Netzschalter Netzkabelbuchse Ladeeinheit-Reiniger ®? 588 00 © Qoo Hehler fair Druckqualität/ HP-Dichte {Transparentfolie) e Centronics-ParallelSchnittstelien- Steckverbinder Hier sind die Anzeigelampen, die Funktionstasten und das Display zusammengefasst, Hier wird die Führungsschiene fair den man
DIE EINZELNEN TEILE UND IHRE FUNKTIONEN ® Druckeroberteil Gestautes Papier wird nach Öffnen des Druckeroberteils zugänglich. @ Rollenreiniger Bringen Sie den Rollenreiniger oben an der Fixiereinheit an, noch bevor Sie den Drucker zum ersten Mal benutzen. @ Fixiereinheit @ Unvollkommenheit © @ Übertragungswalze @ Betriebverlagerung Fur großformatige Kopien benutzen oder stets dann verwenden, wenn ein geordnetes Ablegen der aufgeschobenen Ausdrucke gewünscht wird.
BEDIENFELD Das Bediengeld besten aus dem Display und den fir die Bedienung des Druckers erforderlichen Funktionstasten. Die Steuerung des Druckers User die Funktionstasten setzt folgendes voraus: * Um die Funktionstasten betätigen zu kennen, muB der Drucker auf Offline geschaltet sein. Einige Tasten haben mehrere Funktionen, Weiche Funktion aktiviert wird ist von der Zeitdauer abhängig, die Sie die Taste gestrickt halten.
BEDIENFELD @ [MENÜ-Taste Wahl die folgenden zwei Funktionen: SPRING MENÜ — Wahl des Druck-Menüs. (Siehe Seite 29) KONFIGURATION MENÜ — Wahl des Konfigurations-Menüs. (Siehe Seite 29) @ Tasten A und v Hiermit werden die Werte der Menü-Optionen gesetzt. Mit jedem Druck auf diese Tasten nehmen die Werte zu bzw. ab. PAPIERARTEN UND -FORMATE Normalpapier + Automatischer Einzug aus der Papierkassette Formate L Ad L Letter L Legal 210 x 287 mm g2t x 11 x 14" Gewichte gräme 16 lbs 21 1bs.
PAPIERARTEN UND -FORMATE Brief umschlage Formate SO International DL International G5 110 x 220 mm 162 x 228 mm Camembert 10 r-Monarch T (_ {Kusine S T x Gewichte 60 g/m? ) 90 Mime 161bs. | 24 Ibs. » Fir das fortlaufende Zufuhren von bis zu 20 Umschlagen steht eine als Sonderzubehör erhältliche Umschlagkassette zur Verfertigung. + Keine Herumschlage mit Metallzungen, Druckvollen, Fenstern, Schnüren oder anderem Zubehör verwenden, da der Drucker dadurch beschädigt werden kann.
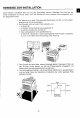
NACHFÜLLEN DES VERBRAUCHSMATERIALS Installieren Sie vor der Inbetriebnahme des Druckers die die Bildtrommeleinheit und den Rollenreiniger. Verwenden Sie nur Original Schar Verbrauchsmaterialien, da diese speziell fur Schar Laserdrucker entwickelt, konstruiert und getestet sind, damit eine möglichst lange Lebensdauer und hohe Leistung erziele wird. Installieren der 1. Trennen Sie den Drucker vom Stromnetz. 2. Öffnen Sie die Frontabdeckung.
NACHFÜLLEN DES VERBRAUCHSMATERIALS 6. Halten Sie die Torerd-Entwicklereinheit fest, und ziehen Sie die Schutzfolie an der Lasche ab. Installieren der Bildtrommeleinheit 1. Nehmen Sie die Voreingenommenheit aus dem versiegelten Beutel; finden Sie den Beutel nicht mit einem Messer, HINWEIS: * Legen Sie die Bildtrommeleinheit, falls notwendig, aut einer ebenen Flache ab; sie kannte sonst beschädigt werden » Eine neue Bildtrommeleinheit ist mit einer schwarzen Schutzfolie versiegelt.
NACHFÜLLEN DES VERBRAUCHSMATERIALS 3. Entfernen Sie die Schutzfolie. Herauf achten, dafür keine entrissen Stücke im Drucker bleifreien. Installieren des Rollenreinigers 1. Klappen Sie das Druckeroberteil bei geöffneter Frontabdeckung auf, HINWEIS: Beide Seiten nach unten drinstecken, bis die obere Abdeckung mil einem Klickgeräusch entriegelt wird, 2. Nehmen Sie den Rollenreiniger aus dem Plastikbeutel, und bringen Sie ihn an der Fixiereinheit an. 3.
ANSCHLIESSEN VON NUTZEND SCHNITTSTELLENKABEL . Netzkabel P 1. Trennen Sie den Drucker vom Stromnetz. 2, Stecken Sie den Kabelstecker in den Netzanschub am Grat, Schnittstellenkabel Der Laserdrucker ist mit einer Parallel-Schrittstelle (Centronics) ausgestattet. HINWEIS: Um den Anforderungen nach FCC Klasse B bzw. VDE 0871 und 0875 zu entsprachen, ist ein abgeschirmtes Kabel mit Schutzleiter und Stecker erforderlich. 1. Trennen Sie den Drucker vom Stromnetz. 2.
EINLEGEN VON PAPIER Aus der Papierkassette, die ca. 250 Blatt Papier normalen Gewichts (€0 80 umzog) ausnehmen kann, wird das Papier autokratisch eingezogen. Wenn die Papierkassetten zum ersten Mal verwendet werden: 1. Drinstecken Sie auf den Freigabeknopf, und nehmen Sie die Kassette heraus. 2. Halten Sie die Druckplatte fest, drinstecken Sie das Sicherungselement mit den Daunen hinunter, und drehen sie es wie unten gezeigt.
EINLEGEN VON PAPIER . Legen Sie das Papier in die Kassette ein, und schilfigen Sie die Ecken dabei unter die Metallwinkel. Wenn das Papier nur knapp unter die Metallzungen pafft, nehmen Sie einige Blattes heraus. Schütteln Sie die Papierkassette leicht, urn das Papier gerade auszurichten. * Die nach oben wissende Seite wird bedruckt. * Deals Papier darf nicht Geber der roten Begrenzungslinie stehen, da sonst Papierstau eintreten kann.
ANDERN DER SYSTEMSPRACHE Der kann Display-Meldungen, Font listen und Selbstiesi-Ausdrucke in den folgenden fing Sprachen ausgeben: Englisch, Französisch, Deutsch, italienisch und Spanisch. Englisch Ist dabei die Standardvorgabe, Fuhren Sie die folgenden Schritte durch, wenn Sie eine andere Sprache wohlen machten. 1. Schalten Sie den Drucker mit der auf Offline. 2. Halten Sie cie MENÜ-Taste gedruckt, bls im Display erscheint. 3.
SELBSTTESTS Nach der Installation des Druckers empfiehlt es sich, SELBSTTEST 1 und 2 durchzuführen, um sicherzustellen, da der Drucker richtig funktioniert. SELBSTTEST 1 druckt die aus dem Druck und Konfigurationsmont gewahrten Optionen, sowie andere Informationen Geber den aktuellen Druckerstatusau. SELBSTTEST 2 bedruckt ein ganzes Blatt mit einem Testmuster aus Zeichen des internen Zeichensatzes. Vor dem Seilosttest muB (übertrifft werden, dafür * Bildtrommeleinheit und Rollenreiniger installiert sind.
SELBSTTESTS n Selbsttest 2 Halten Sie die gestrickt, bis im Display "SELBSTTEST 2* erscheint. » Die DATA-Lampe leuchtet auf und der Ausdruck beginnt, * Der Drucker gibt ein mit einem Testmuster bedrucktes Blatt aus, und die DATA-Lampe erlischt. = Überprüfen Sie, ob der Ausdruck ähnlich fern unten gezeigten Beispiel ist.
| 3| DRUCKEN | Inhalt: » Normales Druckverfahren » Drucken mit manueller Papiereinzug Bevor Sie Computer-Dateien ausdrucken, (berufenen Sie, daB « Voreingenommenheit und Rollenreiniger installiert sind. » Papier eingelegt und die Papierkassette im Drucker installiert ist. « das Netzkabel des Druckers ans Stromnetz und das Schnittstellenkabel am Computer angeschlossen ist. e Seilosttests 1 and 2 den einwandfreien Betrieb des Druckers bestätigt haben.
DRUCKEN MIT MANUELLEM PAPIEREINZUG User den Manuellen Einzug kann, Bauer Normalpapier von 60 80 umzog. auch Papier schwererer Qualität, OHO-Folien, Eingezirkelten oder Umschlage zugeführt werden. {Umschlage kennen auch automatisch aber die als Sonderlombarde erhältliche Umschlagkassette zugeführt werden.
DRUCKEN MIT MANUELLEM PAPIEREINZUG Fortlaufende manuelle Zuführungsdraht 1. 10. 11 Wenn der Drucker Online ist, schallen Sie thn mit der [LINDE-Taste auf Offline. * Die ON LINDE-Lampe erlischt, und im Display erscheint "BEREIT". . Wahlen Sie mit der [MENÜ-Taste das Druck-Mendel. Im Display erscheint LASS, BEHOBEN. . Drucken Sie die Taste A oder v mehrmals, bis im Display "NUR M.E." erscheint, . -ricken Sie die ENTERBESETMENUTaste. « Die MANUAL-Lampe leuchtest auf.
DRUCKEN MIT MANUELLEM PAPIEREINZUG 13. Drucken Sle die [MENÜ-Taste und wohlen Sie das Druck-Menü. * Im Display erscheint "NUR M.E", 14. Wahlen Sie mit der Taste A oder ¥ die gewünschte Papierquelle und drinstecken Sie die INTERESSENT 15. Drucken Sie einmal auf die im Display erscheint nun die Anzeige "BEREIT [LJ3]O", und die ON LINDE-Lampe leuchtet aut. EINSTELLUNG DER (TRANSPARENTFOLIE) Verwenden Sie den Regler fir die Hochqualitativ OHO-Dichte (Transparentfolie) an der Rockseite.
WAHLEN DER DOKUMENTATIONEN Druck und Konfigurationsfiles Es gibt zwei Chauvinismen: das Druck-Mine und das Konfigurationsmond. User das Druck-Minis kennen Optionen gewählt werden, die das Aussehen der gedruckten Seite bestimmen. Die Optionen des Konfigurationsminis legen die Kommunikationsmethode zwischen Computer und Drucker fest. Welche der vorhandenen Meinen-Optionen und -Werte zutreffen, sangt von der gewahrten Druck-Betriebsart ab. Bitte lesen Sie hierzu im Kapitel EMULATIONEN auf Seite 38 nach.
WAHLEN DER DOKUMENTATIONEN Allgemeine Einstellungen 1. Schalten Sie den Drucker mit der auf Offline. 2. Durch einmaligen Druck auf dis [MENÜ-Taste rufen Sie das Druck-Meinen w ;o auf. Druck-Menü: im Display erscheint "LASS. BEHOBEN. Durch Druck und Festhalteei der rufen Sie das Konfigurationsmond auf, Konfigurationsmond: Im Display erscheint . Drucken Sie die so oft, bis die einschiebe Menü-Option im Display erscheint. . Wahlen Sie den gewischten Wert mit der Taste A oder 7. .
HP-PCL 5-EMULATION Schriftweite Datei-Seitenformset Ausrichtung Formatvorlage {Zeilen pro Seite) Zeilenformat Symbolsatz Bestimmt die Anzahl! der Zeichen pro Zoll (= 25,4 mm) Zeilenlunge. Schriftwelt gilt nur fur Fonts mit veränderbarer Hohe und konstantem Zeichenabstand. Zur Wahl eines der drei Bogenformate, bzw. eines der vier Umschlag-Formate. Bestimme die Papierorientierung oder die Richtung, in der die Seite bedruckt wird.
HP-PCL 5-EMULATION Zeichensatz-Liste Symbolsatz-Code Anzeige Symbolsatz sy ROMAN-8 Roman 8 ON EMMA-84 IS0 100 Latein 1 10U 1BM-US PC-8 11U IBM-D/N PC-8 Nordamerikanisch 120 PC-850 PC-850 1y LEGAL Legal 2U 180-2 180 IRV 1E 180-4 180 Englisch ou 150-6 ANSI ASCII (US-ASCII) 38 15010 1SO Schwedisch 05 180-11 1SQ Schwedisch: Fugennamen oK 180-14 JIS ACH al 150-15 1SO Stalinistisch 48 18016 IS0 Portugiesisch 25 SO-17 150 Spanisch 1G 180-21 IS0 Deutsch OF 150-25 1SO Französisch 2K 180-67 SO Chinesisch oD 180-60 IS
HP-PCL 5-EMULATION Kopien zahl Font quelle Frontnummer Drinstecken Sie zum Abspeichern einmal aut die . Schalten Sie den Drucker mit der [LINDE -Taste auf Offline. . Drucken Sie einmal auf die erscheint nun im Display. . Drinstecken Sie die bis "Kopieren" im Display erscheint. . Wahren Sie mit der Taste A oder ¥ eine Kopieren! zwischen 1 und 89. Verticken Sie dic [ENTEREESETHENU-Taste. = Rechts im Display erscheint ein Sternchen (X). .
HP-PCL 5-EMULATION . Schalten Sie den Drucker mit der auf Offline. 2. Drucken Sie die einmal; auf dem Display erscheint nun Schriftgrube Schriftweite . Drucken Sie die so oft, bis im Display "PT. erscheint. . Wahlen Sie mit der Taste A oder v die gewünschte Schriftliche in den Grenzen von 4,00 bis 999,75, . Drucken Sie die [ENTERRESETMENU-Taste. * Rechts im Display erscheint nun ein Sternchen .
HP-PCL 5-EMULATION Ausrichtung Formatvorlage . Schalten Sie den Drucker mit der auf Offline. . Drinstecken Sie die [MENÜ-Teste einmal; im Display erscheint nun . Drucken Sie die [MENÜ-Taste so oft, bis "AUSRICHTUNG= Px" im Display erscheint. . Wahlen Sie mit der Taste A bzw. v die geschwiegen Ausrichtung. P steht dabei fir Hochformset (Ölportrait, L fir Querformat (Landescup. . Drinstecken Sie dic [ENTERRESETHENU-Taste. » Reichs im Display erscheint nun ein Sternchen (X). .
HP-PCL 5-EMULATION Zeilenformat Symbolsatz Schalten Sie den Drucker mit der auf Offline. 2. Drinstecken Sie die MENÜ-Taste einmal. Im Display erscheint "LASS. BEHOBEN, 3. Drucken Sie die [MENÜ-Taste so oft, bis "ZEILENFORMAT=77%" im Display erscheint. 4, Wahlen Sie mit der Taste A oder ¥ das gewünschte Zeilenformat, 77 oder 80. 5. Drinstecken Sie die ENTERRESETHENDTaste. * Rechts im Display erscheint nun ein Sternchen (X). 6.
HP-PCL 5-EMULATION Optionen des Konfigurationsfiles Das Konfigurationsmont fir die HP PCL. 5-Emulation enthalte folgende Optionen: Schnitt Als Hellenistische steht standardmäßig die parallele Centronics-Schnittsteile stelle und die als Sonderzubehör erhältliche serielle RS-232C-Schnittstelle zur Verfügung. Der Drucker ist werksseitig fir parallele Liveübertragung eingestellt. (Paraliel-Schnittstelle) Parallel” bezeichnest die parallele Centronics-Schnittstelle.
HP-PCL 5-EMULATION Schnittstelle Die Option SERIELL steht natürlich nur dann zur Versagung, wenn die entsprechende als Sonderzubehör erhebliche Schnittstellenkarte installiert ist. 1. Schalten Sie den Drucker it der auf Offline. 2. Halten Sie die [MENÜ-Taste gedruckt, bis im Display erscheint. — 3. Wahlen Sie mit cer Taste A oder 7 die gewünschte Schuttstelle: PARALLEL oder SERIELL*. * Sonderzubehör « Die im Konfigurationsminis enthaltenen Optionen sind je nach der benutzten Schnittstelle unterschiedlich.
HP-PCL 5-EMULATION {Serielle Schnittstelle) Drinstecken Sie die ENTERRESETMENUTaste. * Reichs im Display erscheint ein Sternchen (X). Drinstecken Sie die [MEMO-Taste einmal. Im Display erscheint "BAUD Wahlen Sie mit der Taste A oder ¥ die gewünschte Einstellung und drinstecken Sie dic ENTERRESETRENDTaste, * Rechts im Display erscheint ein Sternchen . Drinstecken Sie die MENÜ-Taste einmal. Im Display erscheint "Datenbit" .
HP-PCL 5-EMULATION Automatischer Schnittstellenwechsel Die Möglichkeit eines automatischen Schnittstellenwechsels ist nur dann gegeben, wenn Raine Seriell*oder installiert ist. Sie wird durch die Option AUTO aktiviert. 1. Schalten Sie den Drucker it der auf Offline. 2. Drinstecken Sie die [MENÜ-Taste so oft, bis im Display erscheint. 3. Wahlen Sie mit der Taste 2 oder ¥ die Option AUTO. 4, Drinstecken Sie die [HERUNTERSETZEND Taste. * Rechts im Display erscheint nun ain Sternchen (X), 5.
HP-PCL 5-EMULATION Seitenspeicher Emulation Zum Aktivieren dieses Modus ist eine Gesamt-Speicherkapazität von mindestens 2 MB* erforderlich. *Im Modell JX-9600PS wird eine 2-MB-Spelchererweiterung als Standardisierung mitgeliefert, Schalten Sie den Drucker mit der [Linkslastige auf Offline. 2. Drucken Sie die (MENÜ-Taste einmal; auf dem Display erscheint nun X" 3. Betätigen Sie die so oft, bis im Display die Option "KOMPLEX. SETE=OFFX" erscheint, 4. Wahlen Sie mit der Taste » oder v das Seitenformat, .
HP-PCL 5-EMULATION Automatischer Emulationswechsel Ein automatischer Emulationswechsel ist nur zwischen den Emulationen HPLJS und PostScript möglich. Sle wird durch die Option AUTO aktiviert. Zum Aktivieren dieser Funktion ist eine Giesamt-Speicherkapazitat von mindestens 3 MB erforderlich. (Der Drucker JE-9600 ist standardmäßig mit 1 B Speicher ausgestattet. Im Modell JX-0B00PS wird eine 2-MB-Speichererweiterung als Standardausrüstung mitgeliefert.) 1. Schalten Sie den Drucker mit der auf Offline. 2.
POSTSCRIPT-EMULATION Diese Einstellung wird bei der Installation der als Sonderzubehör erheblichen Postkartengroße vorgenommen. Im Modell JX-8600PS als Standardisierung enthalten. Die PostScript-Emulation kann nur dann verwendet werden, wenn der Drucker mit mindestens 1 MB Speichererhaltungsakku ausgestattet ist. Wenn JOBSITZE = LEGAL ist, muB eine Speicherkapazität von mindestens 3 MB zur Verfertigung stehen.
WEITERE EMULATIONEN Die Menüstruktur, Mini-Optionen und wahlfreien Werte bei der Emulation des Epson FIX-80, 1BM Proprietärer und IBM Graphits Sprinter sind jeweils unterschiedlich. Die zur Wah! der Mini-Optionen verwendeten Tasten und die Einsteilverfahren sind die gleichen wie bei der Emulation des HP PCL 5. Hisse Allgemeine Einstellungen auf Seite 30. Bei den obigen Emulationen bestehen gegenüber der Emulation des HP PCL 5 die folgenden zusätzlichen Optionen.
EMULATIONSVORGABEN Druckbreite Die Druckbreite fir die einzelnen Papierformakte beim Drucken im Hochformrat ist unten aufgeführt. Dieser Drucker kann sowohl HPGL/2 als auch PCL 5 verarbeiten, Der Zeichenabstand ist in beiden Betriebseigenen unterschiedlich. Die Druckbreite auf Ad-Papier betragt maximal 2400 Punkte. Dies bedeutest, daB bei seinem Patch von 10 cpi 80 Zeichen in einer Zelle gedruckt werden konnten.
Papierstaubbeseitigung * Fehlerbeseitigung « Fehler und Service-Meldungen PAPIERSTAUBBESEITIGUNG Der Drucker stoppt, wenn Papierstau auftritt. Im Display erscheint in diesem Fall "PAPIERSTAU". Nach Befestigung des Papierstaus drinstecken Sie die Der Drucker druckt dann die Seite, bei der Papierstau aufgetreten ist, erbaut aus. Manchmal werden zwei Seiten — die soeben ausgegebene und die im Druck befindliche — neu gedruckt, so daB unter Umstandes eine Seite zweimal ausgedruckt wird. 1.
PAPIERSTAUBBESEITIGUNG A. Kassetten 1. Drucken Sie den entsprechenden Freigabeknopf, und Ziehen Sle die aktuell gewisslich Kassette heraus. Entfernen Sle auch die andere Kassette, wenn sich das eingeklemmte Bill nicht ohne weiteres entfernen 14Bt. 2. Ziehen Sie das eingeklemmte Blatt stets vorsichtig heraus, so daf es nicht raubt. Entfernen Sie alle Papierfetzen, falls das Blatt doch teilen sollte. 3. Schieben Sie die Kassette wieder hinein, bis sie hörbar einrastet.
PAPIERSTAUBBESEITIGUNG 2. Untersuchen Sie das Druckerinnere auf einen Papierstau, und ziehen Sig das eingeklemmte Blatt vorsichtig heraus. * Dabei sollten die Kassetten herausgezogen sein. 3. Schlieren Sie die Frontabdeckung; scann anklicken, bis sie mit einem Klickgeräusch einrastet. HINWEIS: * Entfernen Sie niemals das Papier aus den Kassetten; das Druckerinnere wird dadurch verschmutzt, was zu verschmutzten Ausdrucken fahrt.
PAPIERSTAUBBESEITIGUNG C. Ausgabebereich 1. Öffnen Sie die Frontabdeckung. « Betätigen Sie den Freigabeknopf (@ ), und Klappen Sie die Frontabdeckung an beladen Seiten auf. ) & 2. Öffnen Sie das Druckeroberteil. Sie werden das eingeklemmte Blatt heizt wahrscheinlich unter dem Druckeroberseil finden. HINWEIS: ) Drinstecken Sie beim Öffnen des Druckereibetriebs auf beide Seiten, bis es hörbar entriegelt wird. [VORSIEHT Die Fixiereinheit kann noch hei sein. Gehen Sle besonders vorsichtig vor, \ um sich nicht z
FEHLERBESEITIGUNG Einzuberufen Sie zuerst folgende Punks, bevor Sie den Kundendienst rufen. Drucker schaltet nicht ein * Ist der Drucker an das Stromnetz angeschossenen? Stecken Sie den Netzstecker in eine geerdete Steckdose. + Ist der Netzschalter eingeschaltet? Schalten Sie den Netzschalter ein. Drucker schaltet ein, aber die vom Computer gesendeten Daten werden nicht gedruckt * Ist der Drucker auf Online geschaltet? Drinstecken Sie die [LINDE-Taste.
| /| AUSWECHSELN DES VERBRAUCHSMATERIALS UND PFLEGE DES DRUCKERS {halt: + Austauschintervall « Auswechseln der und des Rollenreinigers * Auswechseln der Bildtrommel « Pflege des Druckers AUSTAUSCHINTERVALL Meidungen im Display weisen darauf hin, wenn sin Verbrauchsmaterial ersetzt werden mus. Arthand der folgenden Aufstellung einrenke Sie den Zeitpunkt fr den Austausch jedoch ungefähr vorausbestimmen.
UND ROLLENREINIGER Die Meidung ‘TONER ENDE" soll darauf aufmerksam machen, daB der Tonerdvorrat fast erschöpft ist (es konnten noch etwa 500 bis 1000 Seiten gedruckt werden). Diese Meldung erscheint nach Einschalten des Druckers und wird nach etwa zehn Sekunden automatisch gelocht. Wenn auf dem Display "TONER WECHSELN' erscheint, muf die ausgetauscht werden. Ersetzen Sie bei dieser Gelegenheit auch den Rollenreiniger. Diese Verbrauchmaterialien sind im enthalten.
UND ROLLENREINIGER 5. Entfernen Sie die gebrauchte Toner/Entwicklereinheait. * Ziehen Sie die an ihrem Griff heraus. 6. Nehmen Sie die neue Toner/Entwicklersinheit aus dem metallisierten Beutel, 7. Packen Sic die alte in den metallisierten Beutel der neuen, versiegeln Sie den Beutel, und entsorgen Sie ihn sofort, 8. Scheiteln Sie die neue kräftig, vier oder fünf Mal. 9. Halten Sie die am Griff, und fuhren Sie sie waagerecht und mit der Rolle nach vom vorsichtig ein, Drinstecken Sie nun den Griff hinunter.
UND ROLLENREINIGER 10. Halten Sie die fest, und ziehen Sie die Schutzfolie ab. 11. Entkernen Sie die Trommelschutzabdeckung und fuhren Sie die Bildtrommeleinheit ein, bis sie hörbar einrastet. 12. Öffnen Sie das Druckeroberteil, bel eingeredeter Frontabdeckung auf. HINWEIS: Beide Saiten nach unten drucken, bis die obere Abdeckung mil einem Klickgeräusch entriegelt wird. 13. Den neuen Rollenreiniger aus der Plastikelite herausnehmen. 14, Ersetzen Sie den alten Rollenreiniger durch den neuen.
BILDTROMMELEINHEIT Die Meldung "TROMMEL ENDE" soll darauf aufmerksam machen, daf die Bildtremmeleinhait demnächst ersetzt werden mus (es Kennen noch etwa 500 bis 1500 Seiten gedruckt werden). Diese Meldung erscheint nach Einschalten des Druckers und wird nach etwa zehn Sekunden automatisch gelöscht.
BILDTROMMELEINHEIT &, Fuhren Sie die neue Bildtrommeleinheld senkrecht und mit der Walze nach unten entlang den Führungen eln, und schwenken Sie sie in die Waagerechte, bis sie hörbar einrastet. 7. Entfernen Sie die Schutzfolie. Darauf achten, daB keine zerrissenen Stricke im Drucker bleiben. 8. Schiefen Sie die Frontabdeckung, bis sie hörbar einrastest.
PFLEGE DES DRUCKERS Reinigen des Gehäuses Reinigen Sie das Druckergehäuse. mit einem weichen, sauberen Tuch. Falls erforderlich, kann das Tuch leicht mit Wasser angefeuchtet werden, Verdonner, Benzin oder ähnliche pflichtige Reinigungsmittel surfen nicht verwendet werden, Reinigen der Hauptladeeinheit Fleckige Ausdrucke und Streifen weisen auf eine verschmutze Hauptladeeinheit hin. Reinigen Sie die Hauptladeeinheit folgendermaßen. Reinigen der Hauptladeeinheit: 1.
PFLEGE DES DRUCKERS 4. Nehmen Sie den Ladeeinheil-Reiniger von der hinteren Abdeckung. 5 Setzen Sle den Ladeeinheft-Reiniger an der Hauptladeeinheil- an, und wischen Sie die Ladetestei wie gezeigt ab. HINWEIS: Wischen Sie seist von einem Ende ganz bis an das andere; rechen Sie die Waschbewegung also nicht in der Mitte ab. . Bringen Sie den Saisonbereinigter wieder an der hinteren Abdeckung an. 7. Schliefen Sie die Bildtrommeleinheit, bis sie hörbar einrastet. 8. Schliffen Sie die Frontabdeckung. 9.
TRANSPORT DES DRUCKERS Beachten Sie die folgenden Anweisungen, wenn der Drucker transportiert oder versandt werden muB. 1. Öffnen Sie die Frontabdeckung + Betätigen Sie den Freigabeknopf (D), und Klappen Sie die Frontabdeckung an beiden Seiten (2 ) auf. 2. Entfernen Sie die Bildtrommelmund die Naher Hinweise finden Sie auf den Seiten 77 und &0. HINWEIS: Packen Sie die Voreingenommenheit nach jedem Ausbau sofort in einen lichtdurchlässigen Beutel. 3.
UNDERSHORTS UND MATERIALISTICALLY JX-8CBF JX-9C5J JX-9CEM JX-CEN JX-8C5P JX-9CBUY Fontanel HEWLETT PACKARD/LASERJET (F); (ROMAN 8 US ASCII, ROMAN EXT) HEY Bold Prop Port. 14.4 TMS RMN Med Prop Port. 10 THIS RMN Bond Prop Port. 10 TMS RMN Med (1t) Prop Port. 10 TMS RMN Med Prop Port. 8 Line Printer Med Port. 8.5 Forequarter HEWLETT PACKARD/LASERJET (J); (ROMAN 8, US ASCII, ROMAN EXT, MATH 8, MATH 8A, MATH 8B, MATH 7, PI FONT, PI FONT A} PRESTIGE ELITE Med Fixed Port.
UNDERSHORTS UND MATERIALISTICALLY JX-9C5Z Forequarter HEWLETT (ROMAN 8, US ASCII, ACME 94 (Latin 1)) HEY Med Prop Port. & HEY Med Prop Port, 10 HELVE Bold Prop Port. 10 HEY italic Prop Port. 10 HELVE Med Prop Part. 12 HELVE Bold Prop Port. 12 HEY Italic Prop Port. 12 HEY Bold Prop Port, 14 TMS RMN Med Prop Port. 8 TMS RMN Med Prop Port. 10 TMS RMN Bald Prop Port. 10 TMS RMN italic Prop Port. 10 TMS RMN Med Prop Port. 12 TMS RMN Bold Prop Port, 12 TMS BMN italic Prop Port. 12 TMS RMN Bold Prop Port.
\ | INSTALLIEREN DES SONDERZUBEHÖRS Speichererweiterungskarte, PostScript und Existentialistischen Fuhren Sie, noch bevor Sie eine dieser Karten installieren, die Schritte 1, 2 und 3 durch. Fahren Sie nach der Installation den Schrill 4 durch. 1. Schalten Sie den Netzschaltier aus, und ziehen Sie das Netzkabel ab. Entfernen Sie, falls installiert, die Kartoniere und das Datenkalbs.
INSTALLIEREN DES SONDERZUBEHÖRS Speichererweiterungskarte: Nehmen Sie die Speichererweiterungskarte aus ihrer Verpackung, richten Sie die beiden Aussparungen auf die Vorspringe an der Controllerplatine aus, und fuhren Sie die Karte von oben in den Schiit ein. Gabel ist es egal, welchen Schlitz Sie verwenden, PostScript-Karte: Nehmen Sie die PostScript-Karte aus ihrer Verpackung, und fahren Sie sie, wie gezeigt ein.
TECHNISCHE DATEN Gewicht ca. 14.5ky Rauschpegel max. 48 dBA (Drucken), max. 40 dBA Bereitschaft (unter 70 dBA, gemessen nach DIN 45835) Betriebsbedingungen Temperatur: 10~30°C Luftfeuchtigkeit: 20-85% Bedingt durch fortlaufende technische Verbesserungen behält sich SCHAR das Recht vor, das Design und die technischen Daten ohne vorherige Ankündigung &andern zu konnten. Die angegebenen Leistungswerte stellen die Nennwerke einer in Interessentenmeldung produzierten Einheit dar.
SCHNITTSTELLEN-HARDWARE Signalbeschreibung Pin (STB, Drucker-Eingang): Signal ist Low, wenn die an den Drucker zu sendenden Daten giftig sind. Pins 29 (DATA 1 bis DATA 8, Drucker-Eingang): Impuls geht auf Hightech bei Logik-1-Daten. Pin 10 (KNACK, Drucker-Ausgang): Impuls Low legislativ, daf Daten empfangen arid verarbeitet worden sind, und der Computer die naschten Daten senden kann.