MODEL KB-3411J Followed by indicating color: K = black, W = white, S = stainless steel CONTENTS .......................................................2 MICROWAVE DRAWER™ COOKING ...................... 15-21 CUSTOMER ASSISTANCE ......................................3 OVEN COOKING-REGULAR ............................... 22-25 PRECAUTIONS TO AVOID POSSIBLE EXPOSURE TO OVEN COOKING-CONVECTION ........................... 25-28 EXCESSIVE MICROWAVE ENERGY ............................
CONTENTS CUSTOMER ASSISTANCE ......................................3 AUDIBLE SIGNAL ELIMINATION .................................21 END OF COOKING REMINDER......................................21 PRECAUTIONS TO AVOID POSSIBLE EXPOSURE TO EXCESSIVE MICROWAVE ENERGY ............................3 OVEN COOKING-REGULAR ............................... 22-25 CONTENTS .......................................................2 HELP .................................................................................
CUSTOMER ASSISTANCE To aid in reporting this electric range, please record below the model number and serial number located on the unit. We also suggest you record all the information listed and retain for future reference.
CONSUMER LIMITED WARRANTY SHARP ELECTRONICS CORPORATION warrants to the first consumer purchaser that this Sharp brand product (the “Product”), when shipped in its original container, will be free from defective workmanship and materials, and agrees that it will, at its option, either repair the defect or replace the defective Product or part thereof with a new or remanufactured equivalent at no charge to the purchaser for parts or labor for the period(s) set forth below.
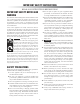
IMPORTANT SAFETY INSTRUCTIONS READ ALL INSTRUCTIONS BEFORE USING IMPORTANT SAFETY NOTICE AND WARNING 6 Do not repair or replace any part of appliance unless specifically recommended in this manual. All other servicing should be referred to a qualified technician.
IMPORTANT SAFETY INSTRUCTIONS RADIANT SURFACE UNITS 16 Avoid scratching the glass cooktop. The cooktop can be scratched with items such as sharp instruments, rings or other jewelry and rivets on clothing. 1 Use proper pan size — this appliance has different size surface units. Select utensils having flat bottoms large enough to cover the surface unit heating element.
IMPORTANT SAFETY INSTRUCTIONS 14 Be sure that fingers or other objects or materials are OVEN not around the Microwave Drawer opening when the Microwave Drawer is closed. 1 Use care when opening door—let hot air or steam escape before removing or replacing food. 15 Do not put fingers or clothes around the drawer guides 2 Do not heat unopened food containers. Build-up of when the Microwave Drawer is opened or closed. They could be caught in the guides when the Microwave Drawer is closed.
PARTS NAME ELECTRIC RANGE WITH MICROWAVE DRAWER 12 2 1 2 13 3 14 4 5 9 6 15 7 16 8 17 9 18 10 19 11 1 Hot surface indicator 10 Oven 2 Radiant surface units 11 Gasket 3 Cooktop Warm 12 Adjustable backsplash 4 Control panel 13 Glass ceramic cooktop 5 Cooktop Warm indicator 14 Control knobs 6 Cooktop-on indicator 15 Drawer light 7 Waveguide cover 16 Microwave Drawer Menu Label 8 Drawer sealing surfaces 18 Rack supports DO NOT REMOVE 17 Microwave Drawer™ 9 Microwave Drawer guid
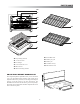
PARTS NAME 20 21 22 23 24 10 29 25 26 27 30 28 26 Roast/Broil rack 20 Top heating element 27 Broiler pan grid 21 Oven door lock 28 Broiler pan 22 Oven light 29 Standard rack (2) 23 Convection fan cover 30 EZ Pull oven rack 24 Rear heater 25 Bottom heating element ADJUSTABLE HEIGHT BACKSPLASH The range backsplash is adjustable so that you can customize it for your particular kitchen situation.
PARTS NAME EZ PULL OVEN RACK INSTRUCTIONS The EZ Pull Oven Rack makes it easy and convenient to place food in and remove food from the lower oven. It is ideal for heavier foods or dishes. While the EZ Pull Oven Rack can be used in any position, you will find it most useful when placed in a lower position. IMPORTANT Do not leave the EZ Pull Oven Rack in oven during self-cleaning cycle.
PARTS NAME GLASS CERAMIC COOKTOP RADIANT SURFACE UNIT WARM ZONE RADIANT SURFACE UNIT RADIANT SURFACE UNIT RADIANT SURFACE UNIT HOT SURFACE INDICATOR LIGHTS CONTROL KNOBS CONTROL KNOBS CONTROL PANEL OFF OFF OFF LO LO HI LO HI OFF SMALL HI Cooktop LARGE HI HI Cooktop LO MED MED MED LO 14 14 KEYSHEET OVEN MICROWAVE 12 21 12 21 29 23,24 25-28 23 29 14 14 29 21, 29-30 17, 21 12, 20 18-19 20 18 Numbers next to the keysheet illustration indicate pages on which there are f
BEFORE OPERATING OVEN MICROWAVE TIMERS Before operating your new range make sure you read and understand this operation manual completely. Your Insight Range features two separate independent Kitchen Timers. • Before the range can be used, follow these steps: 1 Plug in the range. The Microwave Drawer display will show TOUCH WAIT for 30 seconds, then ENJOY CLEAR AND TOUCH 2 Touch the Stop/Clear pad.
COOKTOP USE INFORMATION YOU NEED TO KNOW ABOUT COOKING UTENSILS ABOUT THE COOKTOP For best results and energy conservation, choose cooking utensils as below. • Glass ceramic cooktop - Make sure the surface and the pan bottom are clean before turning on. Do not use the cooktop if the glass is broken or if metal melts on it. • Bottom of pan - Pans should have flat bottoms that make good contact with the entire surface unit. Check for flatness by using a straight edge.
COOKTOP USE COOKTOP WARM ZONE RADIANT SURFACE UNIT RADIANT SURFACE UNIT COOKTOP-ON INDICATOR LIGHT COOKTOP-ON INDICATOR LIGHT RADIANT SURFACE UNIT RADIANT SURFACE UNIT CONTROL PANEL OFF LO OFF HI LO OFF HI LO Cooktop MED OFF SMALL HI LARGE HI HI Cooktop MED MED LO LO COOKTOP WARM INDICATOR RADIANT SURFACE UNITS SUGGESTED HEAT SETTINGS Surface units are turned on and adjusted using the control knobs.
MICROWAVE DRAWER COOKING • Check for doneness. Look for signs indicating that cooking temperatures have been reached. Doneness signs include: - Food steams throughout, not just at edge. - Center bottom of dish is very hot to the touch. - Poultry thigh joints move easily. - Meat and poultry show no pinkness. - Fish is opaque and flakes easily with a fork. INFORMATION YOU NEED TO KNOW ALWAYS have food in the Microwave Drawer when it is on to absorb the microwave energy.
MICROWAVE DRAWER COOKING need tenderizing. DO NOT use metal twist ties. Remember to slit bag so steam can escape. How to use aluminum foil in your Microwave Drawer: • Small flat pieces of aluminum foil placed smoothly on the food can be used to shield areas that are either defrosting or cooking too quickly. • Foil should not come closer than one inch to any surface of the Microwave Drawer. Should you have questions about utensils or coverings, check a good microwave cookbook or follow recipe suggestions.
MICROWAVE DRAWER COOKING TIME COOKING SENSOR SETTINGS Your Microwave Drawer can be programmed for 99 minutes 99 seconds (99.99). Always enter the seconds after the minutes, even if they are both zeros. Sharp's Sensor is a semi-conductor device that detects the vapor (moisture and humidity) emitted from the food as it heats. The sensor adjusts the cooking times and power levels for various foods and quantities. • Suppose you want to cook for 5 minutes at 100%. 1 Enter cooking time 5 0 0.
MICROWAVE DRAWER COOKING COVERING FOODS: SENSOR POPCORN / SENSOR REHEAT Some foods work best when covered. Use the cover recommended in the charts for these foods. You may refer to the hints by touching the Custom Help pad. See page 21. You can pop popcorn and reheat many foods and donʼt need to calculate cooking time or power level. Touch Sensor Reheat or Sensor Popcorn and START/ Minute Plus pad. 1 Casserole lid.
MICROWAVE DRAWER COOKING SENSOR COOK CHART (CONT.) FOOD 2 Fresh vegetables: hard AMOUNT PROCEDURE Place in casserole. Add 1 - 4 tablespoons water. Cover with lid for tender vegetables. Use plastic wrap cover for tender-crisp vegetables. After cooking, stir, if possible. Let stand, covered, for 2 to 5 minutes. Carrots, sliced Corn on the cob Green beans Winter squash: diced halves .25 - 1.5 lb. 2-4 .25 - 1.5 lb. 3 Frozen vegetables .25 - 1.25 lb. Add no water. Cover with lid or plastic wrap.
MICROWAVE DRAWER COOKING DEFROST Shield any warm portions. Close the Microwave Drawer. Touch START/Minute Plus pad. Use this feature to defrost the foods shown in the DEFROST CHART below. 1 Touch Defrost pad. SEE LABEL SELECT 7 After defrost cycle ends, cover and let stand as indicated in the chart below. FOOD NUMBER Note: 2 See Menu Label. Select desired food by touching the • Defrost can be programmed with More or Less Time Adjustment. See below. number pad. Ex: Touch 2 for steaks/chops.
MICROWAVE DRAWER COOKING MICRO WARM MULTIPLE SEQUENCE COOKING Micro Warm allows you to keep food warm up to 30 minutes. Your Microwave Drawer can be programmed for up to 4 automatic cooking sequences, switching from one power level setting to another automatically. 1 Touch Micro Warm pad. TIME UP TO 30 MICRO WARM ENTER Sometimes cooking directions tell you to start on one power level and then change to a different power level. Your Microwave Drawer can do this automatically.
OVEN COOKING-REGULAR • Do not use oven for storing food or cookware. INFORMATION YOU NEED TO KNOW • Be sure all packing material is removed from oven before turning on. • Oven vent location - The oven vent is located at the right side of the front panel between the Microwave Drawer and oven. This area could become hot during oven use. It is normal for steam to come out of the vent. The vent is important for proper air circulation in the oven and good baking results. Never block this vent.
OVEN COOKING-REGULAR FOOD temperature is 105˚F or higher, when you enter 90-100˚F and touch the START pad, the oven will display TOO HOT. The oven will not start until it cools below 105˚F, a safe temperature for yeast. When the oven cools, the oven display will change to PUSH START . Simply touch the START pad and the oven will maintain 90-100˚F for proofing.
OVEN COOKING-REGULAR Note: TO BROIL • The oven will cook for the set amount of time, then turn off automatically if you set Timed Cook. 1 Touch Broil pad. HIGH 2 Touch START pad. • If your recipe requires preheating, you may need to add additional cooking time. PUSH HIGH Touch Broil pad once for High. Twice for Medium. • Baked items that require a preheated oven, such as cakes, cookies and breads, are not recommended to be cooked with the delay start feature.
OVEN COOKING-REGULAR REGULAR BROILING CHART (CONT.) FOOD AMOUNT DONENESS BROIL SETTING SHELF POSITION FROM BOTTOM FIRST SIDE TIME (MIN.) SECOND SIDE TIME (MIN.) 1 - 3 lb.
OVEN COOKING-CONVECTION CONVECTION BAKING CHART FOOD RACK POSITION TEMERATURE Compared with usually recommended in recipe or on package APPROXIMATE TIME SAVING COMMENTS Calculate from minimum recipe/ package time CAKE 1 Sheet, 2 layers or 1 cupcake pan 2 50˚ lower 5% 2&4 50˚ lower 5% Bundt 2 50˚ lower - Angel food 1 Usual 15% Cheesecake 3 25˚ lower 15% 1 25˚ lower 5 - 10% 2 Sheets, 4 layers or 2 cupcake pans PIES Frozen Pie shell 1 or 2 Usual 10% Double crust 1 Usual*
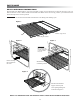
OVEN COOKING-CONVECTION CONVECTION ROAST HOW TO SET DELAY START Use the broiler pan, grid and roast/broil rack. The roast/broil rack enables the heated air to circulate on all sides of the roast or poultry so that juices are sealed in and the outside browns well. The oven will turn on at the time of day you set, cook for a specific length of time and then turn off automatically. The Convection Roast setting is a special setting to ensure tasty results every time it is used.
OVEN COOKING-CONVECTION CONVECTION ROASTING CHART FOOD RACK POSITION Based on Usual Roasting Charts APPROXIMATE TIME SAVING SUGGESTED ROASTING TEMPERATURE Beef, eye round 2 40% 325˚F Beef, top round 2 20% 325˚F Lamb, leg boneless 2 20% 325˚F Lamb, leg bone-in 2 — 325˚F Pork, loin boneless 2 30% 325˚F Pork, loin bone-in 2 40% 325˚F Pork, tenderloin 2 5% 425˚F Chicken, whole 1 40% 375˚F Turkey, whole 1 35% 325˚F Turkey breast, boneless 2 25% 325˚F Turkey breast, bo
OTHER FEATURES HOW TO START SELF-CLEAN TIMER Remember to allow time for the oven to cool down and the oven door to unlock (approx. 1 hour) if you are planning to use the oven after a self-clean cycle. Remove the broiler pan and broiler grid, all utensils and any foil. We recommend removing the oven racks. If they go through the clean cycle, they will darken, lose their luster and become hard to slide. With soap and water, clean any soil from the oven frame and the area outside the gasket on the door.
OTHER FEATURES 2 Touch Setup/Custom Help pad again. SOUND TOUCH 12 HOUR SHUT OFF OFF ? START 3 Touch START pad. The display shows SOUND Oven will automatically turn off after 12 hours of operation for baking or after 5 hours for broil if it is accidentally left on. This feature can be deactivated, if desired. Default is 12 Hour Automatic Shut-off ON. OFF TO RESTORE SOUND 1 Touch Setup/Custom Help pad. TOUCH AGAIN 2 Touch Setup/Custom Help pad again.
CLEANING AND CARE Before cleaning any part of the range, be sure all controls are turned OFF and all surfaces are cool. 1 Apply a few drops of cleaner cream to the cooktop that is not hot. 2 Dampen clean paper towel and clean top. NON-COOKTOP SURFACES 3 Wipe off with another clean, damp paper towel, then wipe dry. EXTERIOR The outside surface is precoated metal and plastic. Clean the outside with mild soap and water; rinse and dry with a soft cloth. Do not use any type of household or abrasive cleaner.
CLEANING AND CARE • Cookware with rough bottoms can mark or scratch the cooktop surface. REMOVE AND REPLACE OVEN DOOR 1 Open the door to the fully opened position. • Do not use a dull or nicked blade. Be sure to use a new, sharp razor scraper. 2 Pull the lock located on both hinge supports up and engage in the hook of the hinge levers. You may have to apply a little downward pressure on the door to pull the locks fully over the hooks.
CLEANING AND CARE OVEN RACKS OVEN LIGHT REPLACEMENT Clean with soap and water, rinse and polish dry. CAUTION Be sure the oven is unplugged and all parts are COOL before replacing the oven lightbulb. Do not turn the oven light on during the self-cleaning cycle. The high temperature will reduce lamp life. To remove stubborn soil, use an abrasive cleanser or steel wool. After cleaning, rinse the racks with clean water and dry with a clean cloth.
BEFORE YOU CALL FOR SERVICE Please check the following before calling for service. It may save you time and expense. PROBLEM 1 Part or all of range does not operate. POSSIBLE CAUSE • Power cord of range is not completely connected to the electrical outlet. • Power outage. • Fuse/circuit breaker at home doesnʼt work. • Range is in Demo Mode. SOLUTION • Make sure the power cord is tightly connected to the outlet. • Check house lights to be sure. Call your local electric company for service.
BEFORE YOU CALL FOR SERVICE PROBLEM POSSIBLE CAUSE SOLUTION 14 Lower oven will not open. • Lower oven door is locked. • See page 30 to unlock oven door. • See 18 below. 15 Poor baking results. • Oven controls improperly set. • Check if the controls have been properly set. See page 23. • See page 22. • Use cookware suggested in recipe. • Do not use pans that are dented or warped. • See page 30. • Place a marked glass measuring cup filled with water on the center of the oven rack.
NOTES 36
NOTES 37
NOTES 38
AUTO-TOUCH GUIDE For more complete information and safety precautions, refer to your Operation Manual. MICROWAVE DRAWER DEFROST OPERATION Use this feature to defrost the foods shown on the Menu Label. SET CLOCK 1 1 Touch Timer/Clock pad and number 2. 2 Touch number pads for correct time of day and touch Timer/Clock pad again. If the electrical power supply to your range should be interrupted, the display will intermittently show: ENJOY YOUR TOUCH CLEAR AND TOUCH CLOCK 2 5.
AUTO-TOUCH GUIDE For more complete information and safety precautions, refer to your Operation Manual. LOWER OVEN TIMER BAKE 1 Touch Bake pad. 000˚ SET 1 Touch Timer/Hold to Clear/3 Min Plus pad. SET TIME 2 Touch the number pads to enter time in hours and minutes. For 30 minutes, enter 3�0. :30 PUSH TEMP 2 Touch the number pads to set the desired oven temperature between 90˚F and 550˚F. For example: 375˚ PUSH 3 START 3 Touch START pad.