OPERATION MANUAL KB-5121K Followed by indicating color: K = black, W = white, S = stainless steel CONTENTS ......................................................... 2 INTRODUCTION TO TOUCHSCREEN .............................10 CUSTOMER ASSISTANCE ......................................... 3 BEFORE OPERATING .........................................10-11 PRECAUTIONS TO AVOID POSSIBLE EXPOSURE COOKTOP USE ...............................................12-13 TO EXCESSIVE MICROWAVE ENERGY ...............
CONTENTS CONTENTS .......................................................... 2 MICROWAVE DRAWER COOKING............................14-26 CUSTOMER ASSISTANCE ......................................... 3 INFORMATION YOU NEED TO KNOW ................................14-15 PRECAUTIONS TO AVOID POSSIBLE EXPOSURE TO EXCESSIVE MICROWAVE ENERGY ......................... 3 TIME COOKING .................................................................... 16 MANUAL OPERATION .......................................
CUSTOMER ASSISTANCE To aid in reporting this electric Cooktop+Microwave Drawer, please record below the model number and serial number located on the unit. We also suggest you record all the information listed and retain for future reference.
CONSUMER LIMITED WARRANTY SHARP ELECTRONICS CORPORATION warrants to the first consumer purchaser that this Sharp brand product (the “Product”), when shipped in its original container, will be free from defective workmanship and materials, and agrees that it will, at its option, either repair the defect or replace the defective Product or part thereof with a new or remanufactured equivalent at no charge to the purchaser for parts or labor for the period(s) set forth below.
IMPORTANT SAFETY INSTRUCTIONS READ ALL INSTRUCTIONS BEFORE USING IMPORTANT SAFETY NOTICE AND WARNING 9 WARNING ANTI-TIP DEVICE To reduce the risk of tipping of this appliance from abnormal usage by excessive loading of the Microwave Drawer, the appliance must be secured by installing the Anti-Tip device supplied. If it is not, there is a possible risk of the product tipping and causing injury if you or a child stand, sit or lean on the open drawer.
IMPORTANT SAFETY INSTRUCTIONS 4 To reduce the risk of burns, ignition of flammable 5 6 7 8 9 10 11 12 13 14 15 16 17 18 19 20 MICROWAVE DRAWER materials and spillage due to unintentional contact with utensils, the handle of a utensil should be positioned so that it is turned inward and does not extend over adjacent surface units. Do not cook on broken cooktop. If cooktop should break, cleaning solutions and spillovers may penetrate the broken cooktop and create a risk of electric shock.
IMPORTANT SAFETY INSTRUCTIONS 18 To reduce the risk of fire in the Microwave Drawer cavity: removed from the Microwave Drawer is not always present. THIS COULD RESULT IN VERY HOT LIQUIDS SUDDENLY BOILING OVER WHEN A SPOON OR OTHER UTENSIL IS INSERTED INTO THE LIQUID. To reduce the risk of injury to persons: a Do not overheat the liquid. b Stir the liquid both before and halfway through heating it. c Do not use straight-sided containers with narrow necks. Use a wide-mouthed container.
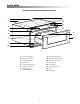
PARTS NAME ELECTRIC COOKTOP WITH MICROWAVE DRAWER 3 1 2 2 10 11 5 4 15 6 12 7 13 8 9 14 1 Hot surface indicator 8 Drawer sealing surfaces 2 Radiant surface units 9 Microwave Drawer guides 3 Cooktop Warm Zone 10 Glass ceramic cooktop 5 Cooktop Warm indicator 12 Drawer light 4 Control panel 11 Control knobs 6 Cooktop-on indicator 13 Microwave Drawer™ 7 Waveguide cover 14 Vent DO NOT REMOVE.
* ,/-Ê --Ê , Ê "" /"* 7!2- :/.% 2!$)!.4 352&!#% 5.)4 2!$)!.4 352&!#% 5.)4 2!$)!.4 352&!#% 5.)4 2!$)!.4 352&!#% 5.)4 (/4 352&!#% ).$)#!4/2 ,)'(43 #/.42/, +./"3 " /," Ê* #/.42/, +./"3 £Î £Î #//+4/0 /. ).$)#!4/2 ,)'(4 #//+4/0 7!2- :/.% /. ).$)#!4/2 ,)'(4 9- #//+4/0 /. ).$)#!4/2 ,)'(4 / ÓÇ Ón £Î ÓÇÓn ££ ÓÇ ££ Óx Numbers next to the keysheet illustration indicate pages on which there are feature descriptions and usage information.
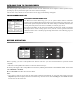
INTRODUCTION TO TOUCHSCREEN This Sharp Insight Cooktop+Microwave Drawer features an LCD Touchscreen that is designed to make operation easy by providing step-by-step instructions right on the active touchscreen display. After the time of day and date are set (instructions on next page), the Home Page will appear. TOUCHSCREEN DISPLAY MICROWAVE DRAWER HOME PAGE The Microwave Drawer Home Page gives you six options: Reheat, Defrost, Automatic Cooking, Popcorn, Minute Plus and Keep Warm.
BEFORE OPERATING TO SET DATE AND TIME 1 After touching Set Clock or Clock, enter the correct month 2 Enter the date by touching the number pads on the control 3 Enter the time by touching the number pads. Select AM/PM 4 The month, date and time will appear in the banner. The by touching Month repeatedly. The month appears in the banner at the top of the display. When set for the correct month, touch ENTER. panel. Example: for June 1, touch 01. Check the date in the banner, then touch ENTER.
COOKTOP USE INFORMATION YOU NEED TO KNOW ABOUT COOKING UTENSILS ABOUT THE COOKTOP For best results and energy conservation, choose cooking utensils as below. • Glass ceramic cooktop - Make sure the surface and the pan bottom are clean before turning on. Do not use the cooktop if the glass is broken or if metal melts on it. • Bottom of pan - Pans should have flat bottoms that make good contact with the entire surface unit. Check for flatness by using a straight edge.
"" /"*Ê1"" /"* 7!2- :/.% 2!$)!.4 352&!#% 5.)4 2!$)!.4 352&!#% 5.)4 #//+4/0 /. ).$)#!4/2 ,)'(4 #//+4/0 /. ).$)#!4/2 ,)'(4 2!$)!.4 352&!#% 5.)4 2!$)!.4 352&!#% 5.)4 " /," Ê* #//+4/0 7!2- :/.% /. ).$)#!4/2 ,)'(4 , /Ê-1, Ê1 /- -1 -/ Surface units are turned on and adjusted using the control knobs. "7Ê/"Ê- /Ê- Ê-1, Setting Ê1 / £ Place correctly sized cookware on the radiant surface unit. Ó Push the knob in and turn in either direction to the desired heat setting.
MICROWAVE DRAWER COOKING • Check for doneness. Look for signs indicating that cooking temperatures have been reached. Doneness signs include: - Food steams throughout, not just at edge. - Center bottom of dish is very hot to the touch. - Poultry thigh joints move easily. - Meat and poultry show no pinkness. - Fish is opaque and flakes easily with a fork. INFORMATION YOU NEED TO KNOW ALWAYS have food in the Microwave Drawer when it is on to absorb the microwave energy.
MICROWAVE DRAWER COOKING need tenderizing. DO NOT use metal twist ties. Remember to slit bag so steam can escape. How to use aluminum foil in your Microwave Drawer: • Small flat pieces of aluminum foil placed smoothly on the food can be used to shield areas that are either defrosting or cooking too quickly. • Foil should not come closer than one inch to any surface of the Microwave Drawer. Should you have questions about utensils or coverings, check a good microwave cookbook or follow recipe suggestions.
MICROWAVE DRAWER COOKING MANUAL OPERATION TIME COOKING Your Microwave Drawer can be programmed for 99 minutes 99 seconds (99.99). Always enter the seconds after the minutes, even if they are both zeros. HIGH POWER COOKING • Suppose you want to cook for 5 minutes at 100%. 1 Enter cooking time by touching number pads 500. 2 Note the top line of the display (the banner). Touch START. You can also activate the microwave by touching the START pad. 3 The display will begin counting down the cooking time.
MICROWAVE DRAWER COOKING MULTIPLE SEQUENCE COOKING The Microwave Drawer can be programmed for up to four automatic cooking sequences, switching from one power level setting to another automatically. Sometimes cooking directions tell you to start on one power level and then change to a different power level. Your Microwave Drawer can do this automatically. • Suppose you want to cook roast beef for 5 minutes at 70% power and then continue to cook for 30 minutes at 50% power.
MICROWAVE DRAWER COOKING appear. The Microwave Drawer may be opened when the remaining time appears on the display. At this time, you may stir or season food, as desired. SENSOR SETTINGS Sharp's Sensor is a semi-conductor device that detects the vapor (moisture and humidity) emitted from the food as it heats. The sensor adjusts the cooking times and power levels for various foods and quantities.
MICROWAVE DRAWER COOKING • Suppose you want to reheat 2 slices of pizza. 1 Touch Reheat pad. 2 Touch Pizza pad. 3 Touch number 2 pad. You can touch Custom Help for additional information or simply touch START. See page 25 for more information on Custom Help. The display will begin counting down the reheating time. REHEAT CHART FOOD AMOUNT FOOD AMOUNT Refrigerated Foods* 4 - 36 oz. Fresh Rolls or Muffins 1 - 8 pieces Canned Foods* 4 - 36 oz.
MICROWAVE DRAWER COOKING AUTOMATIC COOKING Automatic Cooking has six categories and each category has several selections. Many sensor cooked foods are included. See the sensor cooking information on page 18. For foods not using the sensor, follow the directions on the touchscreen to enter quantity or weight. When cooking foods with the sensor, it is not necessary to enter quantity or weight. The foods using the sensor are indicated with “*” in the chart below and on page 21.
MICROWAVE DRAWER COOKING AUTOMATIC COOKING CHART (CONT.) FROZEN FOODS & SNACKS AMOUNT PASTA, GRAINS AMOUNT Vegetables* 0.25 - 1.25 lb White Rice* 0.5 - 2.0 cups Entrees, Main Dishes* 6 - 40 oz Brown Rice* 0.5 - 2.0 cups Snacks* 3 - 8 oz Fresh Pasta 8 - 9 oz Rolls or Muffins 1 - 8 pieces Dry Pasta 2 - 8 oz Hot Dogs in Buns* 1-4 BREAKFAST FOODS Soup* 1 - 6 cups Chicken Nuggets* Soften Ice Cream AMOUNT Scrambled Eggs 1 - 9 eggs 0.25 - 1.
MICROWAVE DRAWER COOKING RECIPES FOR LOW CALORIE ENTREES (RECIPES SERVE 4) Steak Fajitas 3/4 1/3 2 1 1 1 1/2 11/2 1 1 4 1 1/3 1/2 Thai Chicken Kabobs lb beef flank steak, cut in diagonal inch strips c orange juice tbsp lime juice tbsp minced garlic tbsp Worcestershire sauce tbsp chili powder tsp cumin c red, green and yellow pepper strips medium onion, chopped c black beans, rinsed and drained 10-inch warm flour tortillas medium tomato, chopped c salsa c fat free sour cream 2 1 1 1/8 1 4 2 2 Ratatouille
MICROWAVE DRAWER COOKING RECIPES FOR SUPPER SOUPS & SAUCES (RECIPES SERVE 4) CONT.
MICROWAVE DRAWER COOKING DEFROST Defrost pad automatically defrosts all the foods found in the Defrost chart below. • Suppose you want to defrost 1.2 lb ground meat. 1 Touch Defrost pad. 2 Touch Ground Meat pad. 3 Enter weight by touching number pads 12. Then 4 The display will begin counting down the defrosting touch START. time. Follow instructions at the end. DEFROST CHART FOOD AMOUNT FOOD AMOUNT Ground Meat 0.5 - 2.0 lb Boneless Poultry 0.5 - 2.0 lb Steaks, Chops 0.5 - 3.
MICROWAVE DRAWER COOKING OTHER CONVENIENT FEATURES KEEP WARM Keep Warm allows you to keep food warm up to 30 minutes. • Suppose you want to keep food warm for 20 minutes. 1 Touch Keep Warm pad. 2 Enter time by touching number pads 2000. Then touch START. 3 The display will begin counting down the keep warm time. Note: If you attempt to enter more than 30 minutes for Keep Warm, an error message will appear in the display.
MICROWAVE DRAWER COOKING MORE/LESS TIME ADJUSTMENT The programmed cooking times are tailored to the most popular tastes. To adjust the cooking time to your individual preference, use the More/Less pad to either add or reduce cooking time. • Suppose you want to reheat a refrigerated food for more time. 1 Touch Reheat pad. 2 Touch Refrigerated Foods pad. 3 Then touch START. 4 After touching the START pad, More/Less will appear. Touch once for more time. Note: • For less time, touch More/Less pad again.
OTHER FEATURES KITCHEN TIMER • Suppose you want to set Kitchen Timer for 15 minutes. 1 Touch Kitchen Timer pad on the control panel. 2 Touch Min/Sec pad*. 3 To set time, touch number pads 1500 and touch Kitchen Timer pad. TO CANCEL, TOUCH AND HOLD KITCHEN TIMER PAD FOR 3 SECONDS. * If you want to set the Kitchen Timer in hours and minutes, touch Hr/Min pad. Example: To set 1 hour 15 minutes, touch 115. Check the Kitchen Timer in the banner to make sure you have set the timer as you desired.
OTHER FEATURES PAGE FORWARD VIDEO DEMO The Video Demo is an automated “tour” through many of the features of this Cooktop+Microwave Drawer. To see a video demo, press Setup, touch , touch Video Demo and then touch Video Demo ON. DEMO MODE The Demo Mode is a learning tool. Using this function, the Microwave Drawer will not heat. The count down timer moves very quickly. To use Demo Mode, touch Setup, touch Demo Mode and then touch Demo Mode ON.
CLEANING AND CARE Before cleaning any part of the Cooktop+Microwave Drawer, be sure all controls are turned OFF and all surfaces are cool. We recommend that you avoid wiping any surface unit areas until they have cooled and the hot surface indicator light has gone off. Sugar spills are the exception to this. 1 Apply a few drops of cleaner cream to the cooktop that is not hot. NON-COOKTOP SURFACES EXTERIOR 2 Dampen clean paper towel and clean top. The outside surface is precoated metal and plastic.
CLEANING AND CARE Note: MICROWAVE DRAWER GUIDES • Do not use aluminum foil on the cooktop. Remove the food crumbs from the Microwave Drawer guides. Wipe with a soft dry cloth in order to keep the Microwave Drawer opening and closing easily. • If pots or pans of aluminum or copper are allowed to boil dry, permanent damage may affect the ceramic glass surface. WAVEGUIDE COVER • Do not slide pots and pans across the cooktop surface.
BEFORE YOU CALL FOR SERVICE Please check the following before calling for service. It may save you time and expense. PROBLEM POSSIBLE CAUSE SOLUTION 1 Part or all of Cooktop+Microwave Drawer does not operate. • Power outage. 2 Surface units do not heat. • No power to the appliance. • Surface controls improperly set. • See SOLUTION for PROBLEM 1. • Check if the controls have been properly set. See page 13. 3 Surface units too hot or not hot enough. • Improper cookware being used.
AUTO-TOUCH GUIDE For more complete information and safety precautions, refer to your Operation Manual. MICROWAVE DRAWER SET DATE AND TIME If the Cooktop+Microwave Drawer has just been plugged in, touch Set Clock on the screen and follow the directions. To reset the clock, touch Setup pad on the control panel. 1 Touch Clock pad, enter the correct month by touching Month repeatedly. Touch ENTER. 2 Touch number pads for correct date and touch ENTER. 3 Touch number pads for correct time.