
Service manual


7
KB-5121KS/K/W
POWER CONNECTION
Note: This appliance must be properly grounded
Attention Installer: This appliance must be hard wired (direct
wired) into an approved junction box. A plug and receptacle is
NOT permitted on this product.
SELECTING
208 OR 240 VOLT CONNECTION
This appliance can be set for 208V or 240V. The voltage setting for
your appliance is pre-set at 240V from the factory. Follow these
steps to change the voltage setting.
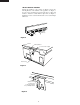
1 ecnailppa eht fo edis tfel eht no hctiws egatlov eht etacoL
(facing the front). See Figure 1.
2 Remove the screw and rotate the switch plate 180˚ as indicated
in the Figure 2.
3 Reinsert the switch plate and replace screw as indicated
in Figure 3. The voltage setting is indicated by the visible
marking.
180˚
240V
208V
Screw
Screw
Figure 1
Figure 2 Figure 3
4-WIRE CONNECTION
When installing to a 4-wire electrical system, new construction,
mobile home and recreational vehicle or when local codes do not
permit grounding through neutral.
1 Disconnect the power supply.
2
In the junction box connect the appliance and residence cable
wires as shown in Figure 4.
Red wires
Green wires
White wires (nutral)
Black wires
Conduit connector
(not supplied)
Appliance
conduit & wires
Power supply
Figure 4
3-WIRE CONNECTION
When local codes permit connecting the cabinet-grounding conduc-
tor to the neutral (white) wire.
1 Disconnect the power supply.
2
In the junction box connect the appliance and residence cable
wires as shown in Figure 5.
Red wires
White wires (nutral)
Black wires
Green wire
(ground)
Conduit connector
(not supplied)
Appliance
conduit & wires
Power supply
REINSTALL JUNCTION BOX COVER
Do not shorten the flexible conduit. The conduit strain relief clamp
(supplied by installer) must be securely attached to the junction box
and the flexible conduit must be securely attached to the clamp. If
the flexible conduit will not fit with the junction box, do not install
the appliance until a clamp of proper size has been obtained.
Figure 5