PURIFICADOR DE AIRE Con función de humidificación MANUAL DE OPERACIÓN FRANÇAIS Purificateur d’air à fonction d’humidification MANUEL D’UTILISATION ESPAÑOL AIR PURIFIER with Humidifying Function OPERATION MANUAL ENGLISH KC-860U “Plasmacluster” and “Device of a cluster of grapes” are registered trademarks of Sharp Corporation in Japan, USA and elsewhere. FACTORY USE ONLY KC860U_4 KC-860U_4th.
Please read before operating your new Air Purifier The air purifier draws in room air from the air intake, passes the air through a Pre-Filter, a Washable Deodorizing filter and a True HEPA filter inside of the unit, then discharges the air through the air outlet. The True HEPA filter can remove 99.97% of dust particles as small as 0.3 microns that pass through the filter and also helps absorb odors. The Washable Deodorizing filter gradually absorbs odors as they pass through the filter.
ENGLISH Unique Combination of Air Treatment Technologies Triple Filtration System + Plasmacluster + Humidification TRAPS DUST* Washable pre-filter traps dust and other large airborne particles. DECREASES ODORS Washable deodorizing filter absorbs many common household odors. REDUCES POLLEN & MOLD* True HEPA filter traps 99.97% of particles as small as 0.3 microns. FRESHENS Plasmacluster refreshes the air similar to the way nature cleans the environment by emitting a balance of positive and negative ions.
FOR CUSTOMER ASSISTANCE (the United States) REGISTER YOUR PRODUCT Registering your new product is easy and offers benefits that help you get the most out of your Sharp product including: Convenience: If you ever need warranty support, your product information is already on file. Communication: Stay up to date with important notifications and special offers from SHARP. Support: Quickly access support content including Owners Manuals, FAQ’s, How-to Videos, and much more.
CONSUMER LIMITED WARRANTY CONSUMER LIMITED WARRANTY FOR U.S.
FOR CUSTOMER ASSISTANCE (Canada) To aid in answering questions for a service call or for reporting loss or theft, please use the space below to record the model and serial number located on either the side or back of the product. Model Number: Serial Number: Date of Purchase: Dealer Name: Address: City: Province: Postal Code: Telephone: PRODUCT SUPPORT If you have questions about the setup or operation of your product, please refer to the corresponding section within this manual.
Sharp Electronics of Canada Ltd.
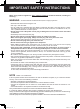
IMPORTANT SAFETY INSTRUCTIONS When using electrical appliances, basic safety precautions should be followed, including the following: WARNING - To reduce the risk of electrical shock, fire or injury to persons: • Read all instructions before using the unit. • Use only a 120 volt outlet. • The air purifier has a polarized plug (one blade is wider than the other). This plug will fit in a polarized outlet only one way. If the plug does not fit into the outlet, reverse it.
• Do not block the intake and/or air outlet. • Do not use the unit near or on hot objects, such as stoves or heaters or where it may come into contact with steam. • Always operate the unit in an upright position. • Always hold the handles on both sides of the unit when moving it. Holding the back panel when carrying may cause it to detach, thus dropping the unit and resulting in bodily injury. • Do not operate the unit without the filters, Water Tank, and Humidifying Tray properly installed.
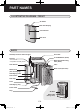
PART NAMES ILLUSTRATIVE DIAGRAM - FRONT Air Outlet Main Unit Display Front Monitor Main Unit BACK Handle(2 locations left and right) Air Outlet Sensors True HEPA filter (white) • Dust Sensor • Temperature / Humidity Sensor Washable Deodorizing filter (black) Tank Handle Tabs Back Panel (Pre-filter) Water Tank (For humidifying) Humidifying Filter Filter Frame Tank Cap Float Humidifying Tray Power Cord Plug Air Inlet Date Label (Rating Label) E-8 KC-860U_4th.
MAIN UNIT DISPLAY Filter Reset Button/ Indicator Light (red) Plasmacluster ON/OFF Button/ Indicator Light (green) Power OFF Button ENGLISH Power ON Button Press any of the buttons to select mode and start the unit. Light Control Button Fan Speed Button/ Indicator Light (green) Clean Air & Humidify MODE Button/ Indicator Light (green) Quick Clean MODE Button/ Indicator Light (blue) Clean Air MODE Button/ Indicator Light (green) FRONT MONITOR Indicates condition and humidity of room air.
PREPARATION FOR USE Unplug the unit before installing or adjusting the filters. FILTER INSTALLATION To maintain the quality of the filters, they are packed in plastic bags and placed in the unit. Be sure to remove the filters from the plastic bags and replace the filters in the unit before initial use. 1 1 Remove the filters Remove the Back Panel. Gently push down on the tabs, then tilt and remove the back panel. Tabs on the top 2 Install the filters the True HEPA filter.
REFILLING THE WATER TANK The unit can be used in the Clean Air Mode without putting water in the Water Tank. When using the Clean Air & Humidify Mode, or the Quick Clean Mode, the Water Tank should be filled with water. the Water Tank by unlatching the 1 Remove top. Water Tank Humidifying Tray the Water Tank Cap and carefully 2 Remove fill the Water Tank with tap water. ENGLISH Tank Handle Water Tank • Change the water in the Water Tank every day with fresh tap water.
OPERATION Fan Speed Quick Clean MODE Button Plasmacluster Button ON/OFF Button Clean Air MODE Button Clean Air & Humidify MODE Button Power OFF Button CLEAN AIR & HUMIDIFY MODE Use the Clean Air & Humidify Mode to quickly clean the air, reduce odors and to humidify. 1 Fill Water Tank. (See E-11) 2 Press the CLEAN AIR & HUMIDIFY MODE Button. 3 Press the FAN SPEED Button to select the desired fan speed.
QUICK CLEAN MODE QUICK CLEAN Mode with humidification releases high-density Plasmacluster ions. By continuously discharging strong airflow cycles, the unit effectively removes airborne dust, pollen, mold and allergens from the air as they are drawn through the filter system. Water must be in the Water Tank when this mode is selected. The unit humidifies when there’s water in the Water Tank, and it operates without humidifying when there is no water in it.
OPERATION LIGHTS CONTROL Button Use when the light on the front panel is too bright. CAUTION Refer to the diagram to select the desired brightness on the front panel. 「 」 The lights on the front panel are brighter. 「 」 The lights on the front panel are darker. 「 」 The lights on the front monitor turn off. The lights on the front monitor are always brighter when starting.
CARE AND MAINTENANCE To maintain optimum performance of this air purifier, please clean the unit including the sensor opening and filters periodically. When cleaning the unit, be sure to first unplug the power cord, and never handle the plug with wet hands. Electrical shock and/or bodily injury may occur as a result.
CARE AND MAINTENANCE WATER TANK Care Cycle Tank Cap Every day when Humidifying Rinse the inside of the tank by leaving a small amount of lukewarm water inside, closing the tank cap firmly, and shaking the tank. Mild household detergents may be used to clean the inside of the tank, but detergent should be diluted and the tank should be thoroughly rinsed to remove all detergent residue. (Note the Water Tank is not dishwasher safe.) Water Tank TANK CAP CARE
HUMIDIFYING TRAY 1 month Frequency of maintenance cycle will depend on the hardness of the water. Avoid spilling water when removing or cleaning the tray. 1 Remove the Water Tank and Humidifying Tray. Unlatch the Water Tank first, then remove the tray. Use both hands when pulling out the Humidifying Tray to avoid spilling water. Tank Handle Water Tank the Water Tank and Humidifying 2 Remove filter from the Humidifying Tray. Drain accumulated water by tilting the Humidifying Tray slowly.
CARE AND MAINTENANCE HUMIDIFYING FILTER Care Cycle Once a month or when the Filter Indicator Light is on. Frequency of maintenance cycle will depend on the hardness or the impurities of the water that you use; the harder the water the more often descaling will be necessary. Pay attention not to spill water when cleaning the filter. 1 5 Remove the Water Tank and Humidifying Tray.
FILTER REPLACEMENT GUIDELINES Filter life will vary depending on the room environment, usage, and location of the unit. If dust or odors persist, replace the filters. (Refer to “Please read before operating your new Air Purifier”) True HEPA filter Up to 5 years after opening Filter life can be greatly reduced depending on the room environment. Cigarette smoke, pet dander, and other airborne particles can reduce filter life. Check filters regularly and replace as necessary.
TROUBLESHOOTING Before calling for service, please review the Troubleshooting chart below, since the problem may not be a unit malfunction. SYMPTOM REMEDY(not a malfunction) Odors and smoke are not removed. • Clean or replace the filters if they appear to be heavily soiled. (See E-15,E-16,E-18) The Front Monitor illuminates green even when the air is impure. • The air could be impure at the time the unit was plugged in. Unplug the unit, wait one minute, and plug the unit in again.
ERROR DISPLAY DIGITAL INDICATION LAMP INDICATION Flashing of the Clean Air & Humidify Indicator Light. Flashing of the Fan Speed Indicator Light ' '. Flashing of the Quick Clean Indicator Light. ERROR DETAILS REMEDY Abnormal humidity filter. Verify if the Humidifying filter, Humidifying Tray and Water Tank are properly installed and then turn power ON again. Abnormal fan motor. Turn power OFF to cancel the error display, wait one minute, and then turn power ON. Abnormal temperaturehumidity sensor.
SPECIFICATIONS Model KC-860U Power supply 120 V 60 Hz Fan Speed Adjustment CLEAN AIR CLEAN AIR & HUMIDIFY Fan Speed (CFM) MAX 272 MED 124 LOW 42 Rated Power (W) 87 14 4.8 Noise Level (dBA) 54 37 19 Fan Speed (CFM) 219 124 74 Rated Power (W) 50 16 9 Noise Level (dBA) 49 37 28 Humidification (pints/hour)*2 1.5 0.9 341 sq.ft (31.7 m2) 0.6 Recommended Room Size *1 CADR (Dust/Smoke/Pollen) 231 / 220 / 245 Water Tank Capacity (gallon) 1.
ENGLISH KC-860U_4th.
Veuillez lire ces instructions avant de faire fonctionner votre nouveau purificateur d’air Le purificateur d’air aspire l’air de la pièce par l'entrée d'air, fait passer l’air à travers un pré-filtre, un filtre désodorisant lavable et un filtre HEPA authentique à l’intérieur de l’unité, puis rejette l’air par la sortie d’échappement.
CARACTÉRISTIQUES TABLE DES MATIÈRES Combinaison unique de techniques de traitement de l’air Action de trois filtres + Plasmacluster + Humidification CAPTE LA POUSSIÈRE* Le pré-filtre lavable capte la poussière et les autres grosses particules en suspension dans l’air. ATTÉNUE LES ODEURS Le filtre désodorisant lavable absorbe un grand nombre d’odeurs domestiques courantes.
POUR VOUS PROTÉGER Pour mieux vous répondre à vos questions lorsque vous appelez pour demander la visite d’un technicien ou pour signaler une perte ou un vol, veuillez consigner dans l’espace ci-dessous les numéros de modèle et de série qui se trouvent sur le côté ou sur le dos du produit.
GARANTIE GARANTIE LIMITÉE LIMITÉE (Canada) GARANTIE LIMITÉE Produits électroniques de grande consommation Merci d’avoir choisi la marque Sharp! FRANÇAIS Conditions : La présente garantie limitée ne s’applique pas : (a) Aux dommages occasionnés ou aux réparations requises sur les appareils qui ont fait l’objet d’un emploi abusif, de négligence, d’un accident, d’une installation inadéquate ou d’une utilisation non appropriée, tel qu’il est mentionné dans le manuel du propriétaire ou dans toute autre documen
INSTRUCTIONS DE SÉCURITÉ IMPORTANTES Lors de l’utilisation d’appareils électriques, les précautions de sécurité de base doivent être suivies, notamment les suivantes : AVERTISSEMENT - Pour réduire le risque d’électrocution, d’incendie ou de blessures corporelles : • Lisez toutes les instructions avant d'utiliser l’appareil. • Ne branchez qu’à une prise de 120 volts. • Le purificateur d’air est doté d’une fiche polarisée (une lame est plus large que l’autre).
PRÉCAUTIONS CONCERNANT LE FONCTIONNEMENT FRANÇAIS • Ne bouchez ni la bouche d’entrée, ni la bouche d’évacuation. • N’utilisez pas l’unité sur des objets chauds ou à proximité, comme sur une cuisinière ou un radiateur ou près d’une source de vapeur d’eau. • Exploitez toujours l’unité en position verticale. • Maintenez toujours les poignées des deux côtés de l’appareil lorsque vous le déplacez.
DÉSIGNATION DES PIÈCES SCHÉMA ILLUSTRATIF - AVANT Sortie d’air Affichage de l’unité principale Moniteur avant Unité principale DOS DE L’APPAREIL Poignée (2 emplacements, gauche et droit) Sortie d’air Filtre HEPA authentique (blanc) Filtre désodorisant lavable (noir) Capteurs • Capteur de poussière • Capteur de température/d’humidité Languettes Poignée du réservoir Panneau arrière (pré-filtre) Réservoir d’eau (pour l’humidification) Filtre d’humidification Cadre de filtre Bouchon du réservoir Flotte
AFFICHAGE DE L’UNITÉ PRINCIPALE Bouton de marche/arrêt du Plasmacluster/ Lampe témoin (verte) Bouton de marche de l’appareil Bouton d’arrêt de l’appareil Appuyez sur l’un ou l’autre bouton pour sélectionner un mode et faire démarrer l’appareil.
PRÉPARATIFS AVANT L’EMPLOI Débranchez l’appareil avant d’installer ou d’ajuster les filtres. INSTALLATION DES FILTRES Pour maintenir la qualité des filtres, ceux-ci sont emballés dans des sacs en plastique et placés dans l’appareil. N’oubliez pas de retirer les filtres des sacs et de les replacer dans l’appareil avant l’utilisation initiale. 1 Retirez les filtres 2 Installez les filtres Retirez le panneau arrière. Installez le filtre HEPA authentique.
REMPLISSAGE DU RÉSERVOIR D’EAU On peut utiliser l’appareil en mode d’épuration de l’air sans mettre d’eau dans le réservoir d’eau. En mode d’épuration de l’air et d’humidification ou en mode d’ épuration rapide, il faut remplir le réservoir d’eau. 2 Retirez le bouchon du réservoir d’eau et remplissez soigneusement le réservoir avec de l’eau du robinet. Poignée du réservoir Réservoir d’eau Bac d’humidification Réservoir d’eau • Remplacez chaque jour l’eau du réservoir par de l’ eau fraîche du robinet.
FONCTIONNEMENT Bouton de marche/arrêt du Plasmacluster Bouton de Mode d'épuration rapide Bouton de vitesse du ventilateur Bouton de mode d'épuration de l'air Bouton d'arrêt de l'appareil Bouton de mode d'épuration de l'air et d'humidification MODE D’ÉPURATION DE L’AIR ET D’HUMIDIFICATION Utilisez le mode d’épuration de l’air et d’humidification pour vite épurer l’air, réduire les odeurs et humidifier. 1 Remplissez le réservoir d’eau. (Reportez-vous à la page F-9.
MODE D’ÉPURATION RAPIDE Le mode d’épuration rapide (QUICK CLEAN) avec humidification libère des ions Plasmacluster à densité élevée. Ce flux d’air puissant permet d’éliminer en 15 minutes toutes les poussières, l’appareil extrait efficacement la poussière, le pollen, les moisissures* et les allergènes qui traversent le système de filtres. Il doit y avoir de l’eau dans le réservoir lorsque ce mode est sélectionné.
FONCTIONNEMENT Bouton DE CONTRÔLE DES TÉMOINS S’utilise pour réduire la luminosité des lampes du panneau avant. ATTENTION Reportez-vous au schéma de droite pour sélectionner le niveau de sensibilité souhaité du panneau avant. 「 」 Les lampes du panneau avant sont plus lumineuses. 「 」 Les lampes du panneau avant sont plus sombres. 「 」 Les lampes du panneau avant s’éteignent. Les lampes du moniteur avant sont toujours plus lumineux au démarrage.
SOIN ET ENTRETIEN Pour maintenir le rendement optimal de ce purificateur d’air, veuillez nettoyer l'appareil périodiquement, y compris l'ouverture du capteur et les filtres. Lorsque vous nettoyez l’appareil, prenez soin de débrancher le câble d’alimentation en premier et ne manipulez jamais la fiche avec les mains mouillées. Sinon, vous vous exposez à une électrocution, à des blessures corporelles ou aux deux.
SOIN ET ENTRETIEN RÉSERVOIR D’EAU Cycle d’entretien Chaque jour en cas d’humidification Rincez l’intérieur du réservoir en laissant une petite quantité d’ eau tiède à l’intérieur, en fermant bien le bouchon du réservoir, puis en secouant le réservoir. Les détergents ménagers doux peuvent servir à nettoyer l’ intérieur du réservoir, mais ils doivent être dilués, et le réservoir doit être rincé méticuleusement pour éliminer tout résidu de détergent. (Notez que le réservoir d’eau ne va pas au lave-vaisselle.
BAC D’HUMIDIFICATION 1 mois La fréquence du cycle d’entretien dépend de la dureté de l’ eau. Évitez de renverser de l’eau lorsque vous retirez ou nettoyez le bac. le réservoir d’eau et le bac d’humidification. 1 Retirez Déverrouillez d’abord le réservoir d’eau, puis retirez le bac. Tirez le bac d’humidification avec les deux mains pour éviter de renverser de l’eau. 2 Poignée du réservoir Réservoir d’eau Retirez le réservoir d’eau et le filtre d’humidification du bac d’humidification.
SOIN ET ENTRETIEN FILTRE D’HUMIDIFICATION Cycle d’entretien Une fois par mois ou lorsque la lampe du filtre est allumée. La fréquence du cycle d’entretien dépend de la dureté ou des impuretés de l’eau que vous utilisez ; plus l’eau est dure, plus souvent il faut détartrer. Faites attention de ne pas renverser d’eau lors du nettoyage du filtre. 1 maintes fois le filtre d’hu5 Rincez midification à l’eau tiède pour Retirez le réservoir d’eau et le bac d’humidification. éliminer tout résidu de solution.
GUIDE DE REMPLACEMENT DES FILTRES La durée de vie des filtres varie selon les conditions ambiantes, l’emploi et l’emplacement de l’appareil. Si la poussière ou les odeurs persistent, remplacez les filtres. (Reportez-vous à “Veuillez lire ces instructions avant de faire fonctionner votre nouveau purificateur d’air”.
RÉSOLUTION DES PROBLÈMES Avant de faire appel au SAV, veuillez lire le tableau de résolution de problèmes ci-dessous, car le problème n’est peut être pas un dysfonctionnement de l’appareil. SYMPTÔME SOLUTION (pas un dysfonctionnement) Les odeurs et la fumée ne sont pas éliminées. • Nettoyez ou remplacez les filtres s’ils semblent très sales. (Reportez-vous aux pages F-13, F-14, F-16.) Le moniteur avant s’allume en vert même lorsque l’air est impur.
AFFICHAGE D’ERREUR Si l'erreur se reproduit, contactez le centre de service Sharp. AFFICHAGE LUMINEUX ORIGINE DE L’ERREUR SOLUTION Clignotement de la lampe témoin d’épuration de l’air et d’humidification. Anomalie du filtre d’humidification. Vérifiez si le filtre d’humidification, le bac d’humidification et le réservoir d’eau sont bien installés, puis rallumez l’appareil. Clignotement de la lampe témoin de vitesse du ventilateur Faible « ». Anomalie du moteur de ventilateur.
CARACTÉRISTIQUES Modèle KC-860U Alimentation 120 V 60 Hz Réglage de la vitesse du ventilateur ÉPURATION DE L'AIR Vitesse de ventilateur (CFM) MAX MOYEN FAIBLE 272 124 42 Puissance nominale (W) 87 14 4,8 Niveau de bruit (dBA) 54 37 19 219 124 74 50 16 9 Vitesse de ventilateur (CFM) ÉPURATION ET Puissance nominale (W) HUMIDIFICATION Niveau de bruit (dBA) DE L'AIR Humidification (points/heure)*2 49 1,5 37 Taille de pièce recommandée *1 0,9 341 sq.
FRANÇAIS KC-860U_4th.
Lea antes de operar su nuevo Purificador de aire El purificador de aire absorbe el aire de la entrada de aire y éste pasa a través del prefiltro, un filtro desodorizador lavable y un Filtro True EPA en la parte interna de la unidad, para descargarlo luego a través del orificio de descarga de aire. El Filtro True EPA puede eliminar el 99.97% de las partículas de polvo de tamaño tan pequeño como 0.3 micrones y también ayuda a absorber los olores.
ESPAÑOL Combinación única de tecnologías para el tratamiento del aire Sistema de triple filtrado + Plasmacluster + Humidificación ATRAPA EL POLVO* El pre-filtro lavable atrapa el polvo y otras partículas grandes en el aire. DISMINUYE LOS OLORES El filtro desodorizador lavable absorbe la mayoría de olores domésticos comunes. REDUCE EL POLEN Y MOHO* El filtro True HEPA atrapa el 99.97% de partículas de tamaño tan pequeño como 0.3 micrones.
INSTRUCCIONES DE SEGURIDAD IMPORTANTES Al usar artefactos eléctricos, se deben cumplir precauciones de seguridad básicas, incluyendo las siguientes: ADVERTENCIA - Para reducir el riesgo de choques eléctricos, incendios o lesiones a personas: • Lea todas las instrucciones antes de usar la unidad. • Use únicamente en un tomacorriente de 120 voltios. • El purificador de aire tiene un enchufe polarizado (una espiga es más ancha que la otra).
• No bloquee la entrada y/o salida de aire. • No use la unidad cerca de o con objetos calientes, como estufas o calentadores o donde pueda entrar en contacto con el vapor. • Siempre opere la unidad en posición vertical. • Siempre sujete el asa por ambos lados de la unidad al moverla. Si sujeta el panel posterior durante el transporte podría ocasionar que se desprenda, ocasionando de este modo que se caiga la unidad y que sufra lesiones corporales.
NOMBRE DE LAS PARTES DIAGRAMA ILUSTRATIVO - PARTE FRONTAL Salida de aire Pantalla de la unidad principal Monitor frontal Unidad principal PARTE POSTERIOR Manija (2 ubicadas a la derecha e izquierda) Salida de aire Sensores Filtro True HEPA (blanco) • Sensor de polvo • Sensor de temperatura/humedad Filtro desodorizador lavable (negro) Manija del tanque Lengüetas Panel posterior (Pre-filtro) Tanque de agua (para el humidificador) Filtro del humidificador Marco del filtro Tapa del tanque Flotador Ba
PANTALLA DE LA UNIDAD PRINCIPAL Botón Plasmacluster ENCENDIDO/APAGADO / Luz del indicador (verde) Botón para ENCENDIDO Botón de velocidad del ventilador / Luz del indicador (verde) Botón control de luces Botón para APAGADO Presione alguno de los botones para seleccionar el modo y hacer funcionar la unidad.
PREPARACIÓN PARA EL USO Desconecte la unidad antes de instalar o ajustar los filtros. INSTALACIÓN DEL FILTRO Los filtros vienen empacados en bolsas de plástico y están colocados dentro de la unidad para conservar su calidad. Asegúrese de retirar las bolsas de plástico y de volver a colocar los filtros dentro de la unidad antes de usarla por primera vez. 1 1 Retire los filtros Retire el panel posterior. Presione suavemente las lengüetas, luego incline y retire el panel posterior.
LLENADO DEL TANQUE DE AGUA Puede usar la unidad en el Modo Clean Air (aire limpio) sin colocar agua en el tanque de agua. Cuando utilice el Modo Clean Air & Humidify (aire limpio y humidificador) o el Modo Quick Clean (limpieza rápida) debe llenar el Tanque de agua con agua. Manija del tanque el tanque de agua abriendo la parte 1 Retire superior. 2 Tanque de agua Bandeja del humidificador Tanque de agua Retire la tapa del tanque de agua y llénelo cuidadosamente con agua de grifo.
OPERATION Botón Plasmacluster Botón de velocidad Botón de MODO limpieza rápida Botón para ENCENDIDO/APAGADO del ventilador APAGADO Botón de MODO aire limpio / humidificador Botón de MODO aire limpio MODO CLEAN AIR & HUMIDIFY (AIRE LIMPIO Y HUMIDIFICADOR) Utilice el Modo Clean Air & Humidify (Aire limpio y humidificador) para limpiar rápidamente el aire, reducir olores y humidificar. 1 2 Llene el tanque de agua.
MODO QUICK CLEAN (LIMPIEZA RÁPIDA) El Modo QUICK CLEAN (LIMPIEZA RÁPIDA) con humidificación libera iones Plasmacluster de alta densidad. Al descargar continuamente ciclos de flujo de aire fuerte, la unidad elimina eficazmente el polvo transportado por el aire, polen, moho y alergenos conforme son extraídos a través del sistema del filtro. Al seleccionar este modo debe haber agua en el tanque de agua.
OPERACIÓN Botón LIGHTS CONTROL (CONTROL DE LUCES) Use el botón cuando la luz del panel delantero sea demasiado brillante. PRECAUCIÓN Consulte el diagrama para seleccionar la cantidad de brillo deseada en el panel delantero. 「 」 Las luces del panel delantero tienen más brillo. 「 」 Las luces en el panel delantero son más oscuras. 「 」 Las luces en el monitor delantero se apagan. Las luces en el monitor delantero siempre son más brillantes al iniciar.
CUIDADO Y MANTENIMIENTO Para mantener un rendimiento óptimo de este purificador de aire, limpie periódicamente la unidad incluyendo la apertura de sensores y filtros. Cuando limpie la unidad, primero asegúrese de desconectar el cable de alimentación y nunca manipule el enchufe con las manos húmedas. Puede causar choque eléctrico y/o lesiones corporales.
CUIDADO Y MANTENIMIENTO TANQUE DE AGUA Ciclo de cuidado A diario cuando use el humidificador Enjuague el interior del tanque dejando una pequeña cantidad de agua templada en el interior, cerrando la tapa del tanque firmemente y sacudiéndolo. Puede usar detergentes domésticos suaves para limpiar el interior del tanque, pero disuelva el detergente y enjuague cuidadosamente el tanque para retirar todo residuo de detergente. (Observe que el tanque de agua no es apto para el lavaplatos.
BANDEJA DEL HUMIDIFICADOR 1 mes La frecuencia del ciclo de mantenimiento dependerá de la dureza del agua…Evite derramar agua cuando retire o limpie la bandeja. Retire el tanque de agua y la bandeja del 1 humidificador. Manija del tanque Primero retire el seguro del tanque de agua, después retire la bandeja. Use ambas manos al tirar de la bandeja del humidificador para evitar que el agua se derrame. Tanque de agua el tanque de agua y el filtro del 2 Retire humidificador de la bandeja del humidificador.
CUIDADO Y MANTENIMIENTO FILTRO DEL HUMIDIFICADOR Ciclo de cuidado Una vez al mes o cuando la luz del indicador del filtro esté encendida. La frecuencia del ciclo de mantenimiento dependerá de la dureza o la cantidad de impurezas del agua que use; mientras más dura sea el agua, mayor será la frecuencia del decapado. Tenga cuidado de no derramar agua cuando limpie el filtro. 1 5 Retire el tanque de agua y la bandeja del humidificador.
PAUTAS PARA REEMPLAZAR EL FILTRO La duración del filtro variará dependiendo del ambiente de la habitación, el uso y la ubicación de la unidad. Si el polvo o el olor persisten, reemplace los filtros. (Consulte “Lea antes de usar su nuevo purificador de aire”) Guía para programar el reemplazo del filtro Filtro True HEPA Hasta 5 años después de abrirlo La duración del filtro se puede reducir en gran medida dependiendo del ambiente de la habitación.
LOCALIZACIÓN DE FALLAS Antes de llamar solicitando servicio, revise el cuadro de localización de fallas a continuación, ya que el problema puede no ser causado por fallas de la unidad. SÍNTOMA SOLUCIÓN (no es una falla) No se eliminan los olores ni el humo. • Limpie o reemplace los filtros si parece que están muy sucios. (Vea S-11,S-12,S-14) El monitor frontal enciende la luz verde aunque el aire está contaminado. • El aire podría estar contaminado a la vez que la unidad está conectada.
MENSAJES DE ERROR Si ocurre un error, comuníquese con el Centro de servicio de Sharp. SEÑAL LUMINOSA Destello de la luz del indicador de aire limpio y humedad Destello de la luz del indicador de velocidad del ventilador ‘ ‘ (BAJO). Destello de la luz del indicador del limpieza rápida. DETALLES DE ERROR SOLUCIÓN Filtro de humedad anormal Verifique si el filtro humidificador, la bandeja humidificadora y el tanque de agua están instalados adecuadamente y vuelva a ENCENDER la alimentación eléctrica.
ESPECIFICACIONES KC-860U Modelo 120 V 60 Hz Fuente de alimentación MAX MED LOW Velocidad del ventilador (CFM) 272 124 42 Potencia nominal (Vatios) 87 14 4,8 Nivel de ruido (dBA) 54 37 19 Velocidad del ventilador (CFM) 219 124 74 Potencia nominal (Vatios) 50 16 9 Ajuste de velocidad del ventilador AIRE LIMPIO AIRE LIMPIO Y HUMIDIFICADOR Nivel de ruido (dBA) 49 37 28 Humidificación (pintas/hora)*2 1,5 0,9 341 sq.
ESPAÑOL KC-860U_4th.
SHARP ELECTRONICS CORPORATION SHARP ELECTRONICS OF CANADA LTD. SHARP CORPORATION SHARP CORPORATION 100 Paragon Drive, Montvale, NJ 07645, U.S.A. Osaka, Japan 335 Britannia Road East, Mississauga, Ontario L4Z 1W9 Canada Osaka, Japan TINS-B027KKRZ 20G- ④ KC-860U_4th.