LC-13B4E LC-15B4E LC-20B4E KOLOROWY TELEWIZOR LCD INSTRUKCJA OBSàUGI
Opisywane urządzenie jest zgodne z wymogami dyrektyw 89/336/EEC i 73/23/EEC z uwzglĊdnieniem poprawki 93/68/EEC.
LC-13B4E LC-15B4E LC-20B4E KOLOROWY TELEWIZOR LCD INSTRUKCJA OBSàUGI Spis treĞci Spis treĞci .............................................................1 Szanowny kliencie ...............................................2 Informacje dotyczące bezpieczeĔstwa ..............2 Dostarczone wyposaĪenie ..................................4 Przygotowania......................................................5 Instalacja baterii w pilocie ..............................5 Korzystanie z pilota ........................
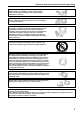
Szanowny kliencie DziĊkujemy za zakup telewizora LCD firmy SHARP. W celu zapewnienia bezpieczeĔstwa i wielu lat bezawaryjnej pracy urządzenia, przed przystąpieniem do pracy naleĪy zapoznaü siĊ z poniĪszymi informacjami. Informacje dotyczące bezpieczeĔstwa Energia elektryczna jest wykorzystywana w bardzo wielu poĪytecznych zastosowaniach. UĪywana nieprawidáowo moĪe byü jednak niebezpieczna dla zdrowia ludzkiego i dóbr materialnych.
Informacje dotyczące bezpieczeĔstwa (ciąg dalszy) Czyszczenie: przed przystąpieniem do czyszczenia odáącz kabel zasilający od gniazdka w Ğcianie. CzyĞü telewizor wilgotną Ğciereczką. Nie uĪywaj Ğrodków czyszczących ciekáych lub w aerozolu. Woda i wilgoü: nie korzystaj z urządzenia w pobliĪu wody – wanien, umywalek, zlewów lub basenów oraz nie ustawiaj go na wilgotnym podáoĪu. Podstawa: nie ustawiaj telewizora na niestabilnych wózkach, podstawach, statywach lub stoáach.
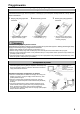
Dostarczone wyposaĪenie Upewnij siĊ, Īe wraz z urządzeniem dostarczone zostaáy wymienione poniĪej elementy.
Przygotowania Instalacja baterii w pilocie Przed przystąpieniem do uruchomienia telewizora po raz pierwszy naleĪy zainstalowaü dwie dostarczone wraz z telewizorem baterie typu AAA. Gdy baterie rozáadują siĊ i pilot nie bĊdzie dziaáaá prawidáowo, naleĪy zainstalowaü nowe baterie. 1 Zdejmij pokrywkĊ pojemnika na baterie. x Odchyl pokrywkĊ naciskając fragment oznaczony (T). 2 WáóĪ baterie typu AAA. x UmieĞü baterie zgodnie z oznaczeniami (+) i (-). 3 Zamknij pokrywkĊ pojemnika na baterie.
Przygotowania (ciąg dalszy) Podáączenie zasilacza Podáącz kabel wyjĞciowy z zasilacza do gniazda DC w telewizorze. Przeáącznik (MAIN POWER) Odciągnij w dóá zaczep, Īeby zdjąü pokrywĊ. Odciągnij w dóá zaczep, Īeby zdjąü pokrywĊ. Gniazdko elektryczne w Ğcianie Do gniazdka POWER INPUT Do gniazdka w Ğcianie Zasilacz Kabel zasilający UWAGI x PrzystĊpując do podáączenia zasilacza naleĪy zawsze wyáączaü zasilanie telewizora przy pomocy przeáącznika POWER).
Przygotowania (ciąg dalszy) Pierwsza instalacja Przy pierwszym wáączeniu telewizora uruchomiona zostanie automatycznie procedura instalacyjna. UmoĪliwi ona wybór jĊzyka menu ekranowego oraz automatycznie wyszuka wszystkie odbierane stacje. 1 NaciĞnij przycisk MAIN POWER ( ). WyĞwietlone zostanie okno ustawieĔ „First installation” z listą jĊzyków menu. UWAGA x W niniejszej instrukcji zaáoĪono, Īe wybrany zostaá jĊzyk angielski.
Nazwy elementów urządzenia gáównego Urządzenie gáówne (widok z przodu) Górny pulpit sterowniczy GáoĞnik GáoĞnik Telewizor moĪna pochyliü o maksymalnie 5 stopni do przodu i 10 stopni do tyáu. Telewizor moĪna równieĪ obróciü o 25 stopni w prawo i w lewo. Telewizor naleĪy ustawiü w ten sposób, Īeby moĪna byáo swobodnie obserwowaü ekran. (Opis regulacji kąta ekranu znajduje siĊ na nastĊpnej stronie.) WskaĨnik odbioru sygnaáu pilota Czerwony wskaĨnik pulsuje, gdy telewizor odbiera sygnaá z pilota.
Nazwy elementów urządzenia gáównego (ciąg dalszy) Gniazda Gniazdo antenowe Gniazdo sáuchawkowe Pochylaj ekran trzymając go za uchwyt jedną rĊką i przytrzymując za podstawĊ drugą.
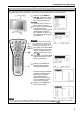
Nazwy elementów pilota Przycisk BRIGHT Ustawia jasnoĞü ekranu (str. 22). Przycisk HOLD Tymczasowo zatrzymuje bieĪącą stronĊ teletekstu (str. 34). Przycisk (str. 11) Przycisk OK (str. 7) Przycisk SUBTITLE WyĞwietla od razu stronĊ teletekstu z napisami dialogowymi (str. 34). Przycisk SOUND Przeáącza tryb emisji dĨwiĊku (str. 30). Przyciski kursora (str. 7). Przycisk czerwony, menu regulacji obrazu (str. 15) Przycisk zielony, menu regulacji dĨwiĊku (str. 15) Przyciski VOLUME (+)/(-) (str.
Podstawy obsáugi Wáączanie i wyáączanie zasilania (MAIN POWER) NaciĞnij przycisk MAIN POWER. WskaĨnik zasilania natychmiast zmieni swój kolor z czerwonego na zielony i urządzenie zostanie wáączone. Informacja ekranowa UWAGA x Informacja ekranowa zniknie po kilku sekundach ĩeby wyáączyü zasilanie, naciĞnij ponownie przycisk MAIN POWER. WskaĨnik zasilania Wáączanie i wyáączanie telewizora Wyáączenie zasilania NaciĞnij przycisk . WskaĨnik zasilania zacznie Ğwieciü na czerwono.
Podstawy obsáugi (ciąg dalszy) Regulacja gáoĞnoĞci Ustawienie gáoĞnoĞci x NaciĞnij przycisk Volume (+), Īeby zwiĊkszyü poziom gáoĞnoĞci. WskaĨnik ekranowy zmieni wskazanie. x NaciĞnij przycisk Volume (-), Īeby zmniejszyü poziom gáoĞnoĞci. WskaĨnik ekranowy zmieni wskazanie. Wyciszenie dĨwiĊku x NaciĞnij przycisk Mute, Īeby tymczasowo wyáączyü dĨwiĊk. Na ekranie pojawi siĊ napis „Sound off”. x NaciĞnij przycisk Mute, Īeby wáączyü dĨwiĊk. Na ekranie pojawi siĊ napis „Sound on”.
Podstawy obsáugi (ciąg dalszy) Posáugiwanie siĊ menu x Menu sáuĪy do dokonywania regulacji róĪnych ustawieĔ telewizora. ĩądany element w menu naleĪy wybraü postĊpując wedáug poniĪszego opisu. Korzystanie z peánego menu 1 2 NaciĞnij przycisk MENU na pilocie, Īeby wyĞwietliü menu. Przyciskami S/T wybierz Īądany element menu. x Kursor bĊdzie siĊ przesuwaá w górĊ lub w dóá. x Kursor wskazuje aktualnie wybrany element menu. 3 NaciĞnij przycisk OK, Īeby wyĞwietliü okno ustawieĔ dla wybranego elementu.
Podstawy obsáugi (ciąg dalszy) Posáugiwanie siĊ menu (ciąg dalszy) Struktura menu Szczegóáowy opis dokonywania ustawieĔ w poszczególnych oknach menu opisane są na wskazanych stronach. UWAGA x Ilustracje zamieszczone w niniejszej instrukcji przeznaczone są wyáącznie w celach informacyjnych i mogą nieznacznie odbiegaü od stanu rzeczywistego.
UĪyteczne funkcje Regulacja obrazu 1 NaciĞnij czerwony przycisk, Īeby wyĞwietliü menu Picture. UWAGA x Menu Picture moĪna takĪe wyĞwietliü wybierając opcjĊ „Picture” w menu (patrz strony 13 i 14). Czerwony 2 Korzystając z przycisków S/T wybierz Īądany element do ustawienia. x Pojawi siĊ kolejne menu. 3 4 Korzystając z przycisków W/X dokonaj regulacji. NaciĞnij przycisk END, Īeby zakoĔczyü ustawienia.
UĪyteczne funkcje (ciąg dalszy) Ustawienia dĨwiĊku Hi-Fi To ustawienie umoĪliwia uzyskanie dĨwiĊku o wyĪszej jakoĞci, gdy telewizor jest podáączony do zewnĊtrznego wzmacniacza poprzez gniazda AUDIO OUT i dodatkowy kabel audio. 1 2 3 4 Po ustawieniu opcji „Sound via” na „Hi-fi” w menu „Sound” (patrz opis na stronie poprzedniej), dĨwiĊk z wbudowanych gáoĞników zostanie wyáączony. Korzystając z przycisków S/T wybierz Īądany element do ustawienia, a nastĊpnie naciĞnij przycisk OK.
UĪyteczne funkcje (ciąg dalszy) Programy telewizyjne [1] Wyszukiwanie automatyczne Wykonaj czynnoĞci opisane poniĪej, Īeby odnaleĨü i zapisaü w pamiĊci telewizora nowe programy. 1 2 NaciĞnij przycisk MENU, Īeby wyĞwietliü menu. Korzystając z przycisków S/T wybierz „Programmes”, a nastĊpnie naciĞnij przycisk OK, Īeby wyĞwietliü okno ustawieĔ „Programmes”. 3 Korzystając z przycisków S/T wybierz „Automatic search”, a nastĊpnie naciĞnij przycisk OK, Īeby wyĞwietliü okno ustawieĔ „Automatic search”.
UĪyteczne funkcje (ciąg dalszy) Programy telewizyjne (ciąg dalszy) [2] Regulacja rĊczna Istnieje moĪliwoĞü dokonania indywidualnych ustawieĔ poszczególnych programów. 1 2 3 Wykonaj czynnoĞci 1 i 2 w opisie [1] Wyszukiwanie automatyczne. Korzystając z przycisków S/T wybierz „Manual adjustment”, a nastĊpnie naciĞnij przycisk OK, Īeby wyĞwietliü okno ustawieĔ „Manual adjustment”.
UĪyteczne funkcje (ciąg dalszy) Programy telewizyjne (ciąg dalszy) [3] Sortowanie Numery kanaáów przyporządkowane poszczególnym programom mogą byü w dowolny sposób zmieniane. 1 2 3 Wykonaj czynnoĞci 1 i 2 w opisie [1] Wyszukiwanie automatyczne, Īeby wyĞwietliü ekran „Programmes”. Korzystając z przycisków S/T wybierz „Sort”, a nastĊpnie naciĞnij przycisk OK, Īeby wyĞwietliü okno ustawieĔ „Sort”. Korzystając z przycisków S/T i W/X wybierz Īądany program, a nastĊpnie naciĞnij przycisk OK.
UĪyteczne funkcje (ciąg dalszy) Programy telewizyjne (ciąg dalszy) [5] Nadawanie i zmiana nazw programów KaĪdemu programowi moĪna nadaü nazwĊ, którą nastĊpnie moĪna dowolnie zmieniaü. 1 2 20 Wykonaj czynnoĞci 1 i 2 w opisie [1] Wyszukiwanie automatyczne, Īeby wyĞwietliü ekran „Programmes”. Korzystając z przycisków S/T wybierz „Enter/change name”, a nastĊpnie naciĞnij przycisk OK, Īeby wyĞwietliü okno ustawieĔ „Enter/change name”. 3 Korzystając z przycisków S/T i/lub W/X wybierz Īądany program.
UĪyteczne funkcje (ciąg dalszy) Funkcje dodatkowe JeĞli zajdzie taka potrzeba, funkcje dodatkowe mogą byü wáączane przez UĪytkownika. 1 2 3 4 5 Ustawiany element Brightness* (jasnoĞü) NaciĞnij przycisk MENU, Īeby wyĞwietliü menu ekranowe. Korzystając z przycisków S/T wybierz „Features”, a nastĊpnie naciĞnij przycisk OK, Īeby wyĞwietliü okno ustawieĔ „Features”. Korzystając z przycisków S/T wybierz Īądaną funkcjĊ, a nastĊpnie naciĞnij przycisk OK.
UĪyteczne funkcje (ciąg dalszy) Funkcje dodatkowe (ciąg dalszy) JasnoĞü i orientacjĊ obrazu moĪna zmieniü takĪe przy pomocy odpowiednich przycisków na pilocie. [1] Regulacja jasnoĞci 1 2 NaciĞnij przycisk BRIGHT, Īeby wyĞwietliü menu „Brightness”. KaĪde naciĞniĊcie przycisku BRIGHT bĊdzie powodowaáo zmianĊ intensywnoĞci podĞwietlenia w nastĊpującej sekwencji: UWAGA x Informacja ekranowa zniknie automatycznie po 4 sekundach. x Fabrycznie ustawiony jest tryb „bright”.
UĪyteczne funkcje (ciąg dalszy) Informacje ekranowe Istnieje moĪliwoĞü dokonania róĪnych ustawieĔ mających wpáyw na sposób wyĞwietlania informacji ekranowych. 1 Niebieski 2 3 4 5 Ustawiany element Position Sound info Wykonaj czynnoĞci 1 i 2 w opisie „Funkcje dodatkowe”. Korzystając z przycisków S/T wybierz „On-screen display”, a nastĊpnie naciĞnij przycisk OK, Īeby wyĞwietliü okno „On-screen display”. Korzystając z przycisków S/T wybierz Īądany element. (Patrz tabela poniĪej.).
UĪyteczne funkcje (ciąg dalszy) Zabezpieczenie przed dzieümi (ciąg dalszy) [2] Zmiana/usuwanie kodu PIN Zmiana kodu PIN czynnoĞci od 1 do 3 1 wWykonaj opisie „[1] Definiowanie kodu PIN”, Īeby wyĞwietliü okno umoĪliwiające wprowadzenie kodu PIN. WprowadĨ Īądany 4-cyfrowy 2 kod PIN (np. 1234) przy pomocy przycisków Channel Select. UWAGI x Wprowadzane cyfry są ukryte pod znakami zapytania (????). x JeĞli wprowadzony zostanie nieprawidáowy kod PIN, wyĞwietlony zostanie komunikat „Wrong PIN!”.
UĪyteczne funkcje (ciąg dalszy) Zabezpieczenie przed dzieümi (ciąg dalszy) [3] Wáączanie zabezpieczenia Są cztery róĪne sposoby aktywacji zabezpieczenia: 1. Natychmiastowe caákowite zabezpieczenie wszystkich programów 2. Caákowite zabezpieczenie wszystkich programów z ograniczeniem dziennym 3. Caákowite zabezpieczenie wszystkich programów z jednorazowym ograniczeniem czasowym 4.
UĪyteczne funkcje (ciąg dalszy) Zabezpieczenie przed dzieümi (ciąg dalszy) [3] Wáączanie zabezpieczenia (ciąg dalszy) Wáączenie zabezpieczenia poszczególnych programów bez ograniczenia czasowego czynnoĞci od 1 do 3 1 wWykonaj opisie „[2] Zmiana/usuwanie kodu PIN”, Īeby wyĞwietliü okno „Child lock”. z przycisków S/T 2 Korzystając wybierz „For individual progr. only”, a nastĊpnie naciĞnij przycisk OK, Īeby wyĞwietliü okno „For individual progr. only”.
UĪyteczne funkcje (ciąg dalszy) Ustawienia związane z podáączeniem dodatkowych urządzeĔ Istnieje moĪliwoĞü dokonania róĪnych ustawieĔ związanych z podáączeniem do telewizora dodatkowych urządzeĔ zewnĊtrznych. [1] Ustawienia związane z gniazdami AV1 i AV2 Dokonaj odpowiednich ustawieĔ związanych z rodzajem sygnaáu i standardem kodowania koloru dla sygnaáów doprowadzonych do gniazd AV1 i AV2.
UĪyteczne funkcje (ciąg dalszy) Ustawienia związane z podáączeniem dodatkowych urządzeĔ (ciąg dalszy) [2] Ustawienia dla programów x Istnieje moĪliwoĞü wáączenia funkcji sterowania napiĊciem z gniazda AV oraz szybkiego wygaszania dla programów od 1 do 199. x Podáączając urządzenia do gniazd AV1 naleĪy dokonaü ustawienia programów dekodera. 1 2 3 4 Wykonaj czynnoĞci 1 i 2 w opisie „Ustawienia związane z gniazdami AV1 i AV2. Korzystając z przycisków S/T wybierz „For programmes”.
UĪyteczne funkcje (ciąg dalszy) Funkcje sterowane zegarem 1 NaciĞnij przycisk Īóáty, Īeby wyĞwietliü okno „Timer functions”. UWAGA ĩóáty x Okno „Timer functions” moĪna równieĪ wyĞwietliü wybierając opcjĊ „Timer functions” w menu ekranowym (patrz strony 13 i 14). 2 3 4 5 6 Ustawiany element Time Switch off Alarm Alarm volume Korzystając z przycisków S/T wybierz „Time”. Przy pomocy przycisków Channel Select wprowadĨ aktualną godzinĊ (GG:MM:SS). Korzystając z przycisków S/T wybierz Īądany element.
UĪyteczne funkcje (ciąg dalszy) Odbiór programów w systemie NICAM JeĞli telewizor odbiera sygnaá w systemie NICAM-I lub NICAM-B/G, istnieje moĪliwoĞü wyboru trybu odbioru. Telewizor moĪe odbieraü sygnaá w systemie NICAM stereo, dwujĊzycznym lub mono. Tryb stereo JeĞli telewizor bĊdzie odbieraá sygnaá stereo, kaĪdorazowe naciĞniĊcie przycisku SOUND bĊdzie powodowaáo wybór trybu „Stereo” lub „Mono”. JeĞli wybrany zostanie tryb „Mono”, z gáoĞników bĊdzie sáychaü dĨwiĊk monofoniczny.
UĪyteczne funkcje (ciąg dalszy) Odbiór programów w niemieckim systemie IGR JeĞli telewizor odbiera sygnaá w systemie IGR-B/G, istnieje moĪliwoĞü wyboru trybu odbioru. Telewizor moĪe odbieraü sygnaá w systemie IGR stereo lub dwujĊzycznym. Tryb stereo JeĞli telewizor bĊdzie odbieraá sygnaá stereo, kaĪdorazowe naciĞniĊcie przycisku SOUND bĊdzie powodowaáo wybór trybu „Stereo” lub „Mono”. JeĞli wybrany zostanie tryb „Mono”, z gáoĞników bĊdzie sáychaü dĨwiĊk monofoniczny.
Teletekst Co to jest teletekst? Jest to tekstowy serwis informacyjny zorganizowany podobnie do tradycyjnej gazety. Jest on nadawany razem ze standardowym sygnaáem telewizyjnym przez niektóre stacje. Opisywany telewizor jest przystosowany do odbioru sygnaáów teletekstu, przetwarzania ich i wyĞwietlania na ekranie.
Teletekst (ciąg dalszy) [3] Przeglądanie stron wewnĊtrznych JeĞli wyĞwietlana aktualnie strona skáada siĊ z kilku stron wewnĊtrznych, moĪna wyĞwietliü stronĊ sterującą, która zawiera informacje o numerach stron wewnĊtrznych. 1 2 NaciĞnij przycisk SUBPAGE. Zamiast górnej linii wyĞwietlona zostanie linia sterująca z numerami stron wewnĊtrznych. Numer aktualnie widocznej strony wewnĊtrznej bĊdzie zaznaczony na niebiesko. Przyciskiem W lub X wybierz Īądany numer strony wewnĊtrznej.
Teletekst (ciąg dalszy) [5] Korzystanie z menu w trybie wyĞwietlania teletekstu Wybór zestawu znaków trybie wyĞwietlania teletek1 W stu naciĞnij przycisk MENU, Īeby wyĞwietliü menu „Character set”. Korzystając z przycisków S/T 2 wybierz Īądany zestaw znaków. x Litery zostaną wyĞwietlone na Īóáto. Podczas wyboru zestawu znaków naciĞniĊcie przycisku OK spowoduje chwilowe wyĞwietlenie liter na niebiesko. 3 NaciĞnij przycisk END, Īeby zamknąü menu.
Podáączenie dodatkowych urządzeĔ zewnĊtrznych Do gniazd znajdujących siĊ z tyáu opisywanego telewizora moĪna podáączyü dodatkowe urządzenia zewnĊtrzne, takie jak magnetowid lub konsola do gier. PrzystĊpując do podáączenia urządzeĔ zewnĊtrznych naleĪy wyáączyü zasilanie telewizora i podáączanego urządzenia, Īeby zapobiec ich uszkodzeniu.
Podáączenie dodatkowych urządzeĔ zewnĊtrznych (ciąg dalszy) Podáączenie dekodera poprzez 21-záączowe gniazdo Euro-SCART (AV-IN1/RGB) 21-záączowe gniazdo Euro-SCART 1. 2. 3. 4. 5. 6. 7. WyjĞcie audio, kanaá prawy WejĞcie audio, kanaá prawy WyjĞcie audio, kanaá lewy Wspólna masa dla sygnaáu audio Masa dla sygnaáu niebieskiego WejĞcie audio, kanaá lewy WejĞcie sygnaáu niebieskiego 8. 9. 10. 11. 12. 13. 14.
Podáączenie dodatkowych urządzeĔ zewnĊtrznych (ciąg dalszy) Podáączenie magnetowidu lub konsoli do gier (AV-IN2) Do gniazd AV-IN2 Do gniazda wejĞciowego S-VIDEO Kabel S-wideo Do gniazd AV-IN2 Kabel audio-wideo Kabel audio-wideo Do gniazd wyjĞciowych audio-wideo Do gniazd wyjĞciowych audio-wideo Do gniazda wyjĞciowego S-VIDEO Wideo Audio (P) Audio (L) Wideo Audio (P) Audio (L) Konsola do gier Magnetowid UWAGA x JeĞli sygnaá bĊdzie docieraá do gniazd VIDEO AV-IN2 i S-VIDEO AV-IN2, sygnaá S-VI
Rozwiązywanie problemów Zanim wezwiesz serwis sprawdĨ propozycje rozwiązana problemów znajdujące siĊ w poniĪszej tabeli. Telewizor Problem MoĪliwe rozwiązania Na ekranie nie ma obrazu i brak dĨwiĊku z gáoĞników. Brak obrazu. Brak obrazu z gniazd AV-IN2. Obraz jest widoczny, ale brak dĨwiĊku z gáoĞników. Brak dĨwiĊku i obrazu. Tylko szum. x Upewnij siĊ, Īe zasilacz jest prawidáowo podáączony. 6 x Byü moĪe odbierany jest sygnaá inny niĪ telewizyjny, który zakáóca inne stacje.
Rozwiązywanie problemów (ciąg dalszy) Antena Problem MoĪliwe rozwiązania x Odbierany sygnaá jest bardzo sáaby. Obraz jest nieostry. x JakoĞü odbieranego sygnaáu moĪe byü záa. x Upewnij siĊ, Īe antena jest ustawiona w dobrym kierunku. Obraz skacze. x Upewnij siĊ, Īe wtyczka antenowa jest prawidáowo podáączona. x Upewnij siĊ, Īe antena jest ustawiona w dobrym kierunku. Widoczny jest podwójny obraz. x Odbierane fale mogą byü odbijane przez sąsiadujące budynki i lub góry.
Wymiary Model LC-13B4E Jednostki: mm 40
Wymiary Model LC-15B4E Jednostki: mm 41
Wymiary Model LC-20B4E Jednostki: mm 42
WAĩNE INFORMACJE DOTYCZĄCE WYàĄCZANIA ZABEZPIECZENIA PRZED DZIEûMI JeĞli zapomniaáeĞ kodu PIN odblokowującego zabezpieczenie przed dzieümi, postĊpuj wedáug poniĪszego opisu: 1. NaciĞnij przycisk MENU, Īeby wyĞwietliü menu. 2. Korzystając z przycisków S/T wybierz „Features”, a nastĊpnie naciĞnij przycisk OK, Īeby wyĞwietliü okno ustawieĔ „Features”. 3. Korzystając z przycisków S/T wybierz „Child lock”, a nastĊpnie naciĞnij przycisk OK. 4. Pojawi siĊ okno do wprowadzania kodu PIN. 5.
44
LC-13B4E/LC-15B4E/LC-20B4E SHARP ELECTRONICS GESSELSCHAFT M.B.H. Sp. z o.o. ODDZIAà W POLSCE 02-844 Warszawa, ul. Puáawska 469 tel.