ENGLISH LC-20B6H LCD COLOUR TELEVISION OPERATION MANUAL
LCD COLOUR TELEVISION ENGLISH ENGLISH ENGLISH LC-20B6H OPERATION MANUAL Contents Dear SHARP Customer .................................................... 2 Useful Features .............................................................. 19 Important Safety Precautions ......................................... 2 Sound Adjustments ................................................... 19 Trademark ......................................................................... 3 Speech Emphasis .................
Dear SHARP Customer Thank you for your purchase of the SHARP LCD colour TV product. To ensure safety and many years of trouble-free operation of your product, please read the Important Safety Precautions carefully before using this product. Important Safety Precautions Electricity is used to perform many useful functions, but it can also cause personal injuries and property damage if improperly handled. This product has been engineered and manufactured with the highest priority on safety.
Important Safety Precautions (Continued) • Cleaning—Unplug the AC cord from the AC outlet before cleaning the product. Use a damp cloth to clean the product. Do not use liquid cleaners or aerosol cleaners. • Water and moisture—Do not use the product near water, such as bathtub, washbasin, kitchen sink, laundry tub, swimming pool and in a wet basement. • Stand—Do not place the product on an unstable cart, stand, tripod or table.
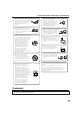
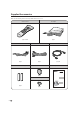
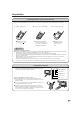
Supplied Accessories Make sure the following accessories are provided with the LCD TV set.
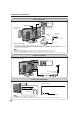
Preparation Installing Batteries in the Remote Control Before using the LCD TV set for the first time, install the two “AAA” size batteries supplied in the remote control. When the batteries become depleted and the remote control fails to operate, replace the batteries with new “AAA” size batteries. 1 Open the battery cover. 2 Insert two “AAA” size batteries. 3 Close the battery cover. – + + – ■ Slide the cover while pressing the ( ) part.
Preparation (Continued) Power Connection Connect to the DC input terminal of the LCD TV set. POWER INPUT DC12V MAIN POWER Pull down the hook to open the cover. Pull down the hook to open the cover. To POWER INPUT terminal Household power outlet Plug into an AC outlet. AC adapter AC cord ■ Using the AC adapter • Although the AC adapter may become warm during use, this is not a malfunction. • Do not wrap or cover the AC adapter with a blanket or similar covering.
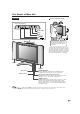
Part Names of Main Unit How to adjust the angle Controls Upper control panel MAIN POWER INPUT MENU CH ( )/( ) VOL ( )/( ) Tilt the display by grabbing onto the carrying handle while securely holding down the stand with your other hand. To change the vertical angle of the LCD TV set, tilt the screen up to 5 degrees forward or 10 degrees backward. The LCD TV set can also be rotated up to 25 degrees to right and left. Please adjust the angle so that the LCD TV set can be watched most comfortably.
Part Names of Main Unit (Continued) Terminals Rear View Carrying handle ANALOG RGB PC-IN COMPONENT2/AV1 AUDIO AV-IN2/OUT COMPONENT1 PR PB Y/VIDEO AUDIO (L) AUDIO (R) S-VIDEO VIDEO AUDIO (L) AUDIO (R) Y PB PR AUDIO (L) AUDIO (R) ANT. (Antenna terminal) POWER INPUT (DC12V) How to fix the cables Pull the cables connected to each terminal through the holes and close the left and right terminal covers. Push the cables into the grooves of the support cover.
Part Names of Remote Control POWER (P. 10) OK (P. 14) BACKLIGHT Selects the brightness and OPC of the display. (P. 23) RETURN Returns to the previous screen. Right/Left Selection (P. 14) MPX Switches to the audio mode. (P. 25) TIMER Displays the Timer functions Menu screen. (P. 24) VOL (+)/(-) (P. 11) Channel Select (P. 11) (Flashback) Returns to the previous channel. (P. 11) LANGUAGE (P. 22) (Status Display) Turns on the status display when the menu is not displayed. (P.
Basic Operation Turning On and Off the Main Power Switching the Input Modes (AV1/AV2/COMPONENT/PC/TV) MAIN POWER 1 Turn on the power of the connected video equipment. 2 Press INPUT to select the applicable input source. The screen changes in order of COMPONENT1, COMPONENT2 or AV1, AV2, PC and TV mode each time INPUT is pressed. COMPONENT1 mode COMPONENT1 48 0 P COMPONENT2 mode COMPONENT2 POWER indicator AV1 mode AV1 48 0 P PAL or ● Press MAIN POWER.
Basic Operation (Continued) Sound Volume Changing Channels ■ To adjust the volume You can select channels using Channel Select or CH ( ● Press VOL (+) to increase the sound volume. The numerical value increases. Volume 50 ● Press VOL (–) to decrease the sound volume. The numerical value decreases. )/( ). • To handle the increasing number of channels available, this LCD TV set allows you to select up to 100 positions (Channels 0 to 99). One-digit and two-digit methods of selection can be used.
Preset On-Screen Display Language Selection MENU on the LCD TV set can also be used to select the language. Upper control panel 3 1 Presetting the Channels (AUTO) Automatically tunes in and presets receivable TV stations. Make sure the antenna cable is properly connected. Upper control panel 1, 2 4 2 1 Press MENU (PRESET-1) on the upper part of the LCD TV set for more than 2 seconds to display the PRESET mode screen. Auto ( B/G ) VHF 1 48.
Preset (Continued) Presetting the Channels (MANUAL) ■ Setting a channel to a desired TV station: conditions. Upper control panel 4 3 ■ In a weak reception area or under bad reception Upper control panel 1, 2, 6 4 1, 2, 3, 5 1 Press MENU (PRESET-1) on the upper part of the LCD TV set for more than 2 seconds to display the AUTO mode screen. 2 Press MENU (PRESET-1) to display the MANUAL mode screen. 3 While the MANUAL mode screen is displayed, press MENU (PRESET-1) for more than 2 seconds.
Preset (Continued) Channel Setting Clock Setup The Timer functions that turn power on at the specified time do not work unless the clock has been adjusted. Be sure to adjust the clock first. 1 Press MENU to display the MENU screen. 2 Press \/| to select “Setup”. 3 Press '/" to select “CH setup”, and press OK. Menu[Setup: Setup Picture Sound CH Clo Dis Ter AV2 PC Lan 4 CH set Features etup k set lay m inal In/Ou setup guage s c p m P C S S F N A 2 Press '/" to select “Clock setup”, and press OK.
Selecting Menu Items ■ Menu setting screens For details on setting each menu item, refer to the page number indicated below. NOTE • The illustrations and on-screen displays in this manual are for explanation purposes and may vary slightly from the actual appearance. • Depending on the setting condition, such as an input mode, it may not be possible to adjust or set some items. In such cases, the alert message is displayed on the menu setting screen.
Basic Adjustment Settings Picture Adjustments Colour System (Only AV1 or AV2 Mode) Adjust the picture to your preference with the following picture settings. 1 Press MENU to display the Menu screen. 2 Press \/| to select “Picture”. 3 Press '/" to select a specific adjustment item. Men Picture Cont Brig Colo Tint Shar Colo Adva Rese u[Picture] Sound Setup Features rast [ 5 0 ] 0 ]– htness [ 0 ]– ur [ 0 ] [ pness [ 0 ]– ur system nced t 2 Press '/" to select “Colour system”, and press OK.
Basic Adjustment Settings (Continued) Colour Temperature I/P Setup Adjust the colour temperature to give a better white balance. 1 Press MENU to display the Menu screen. 2 Press \/| to select “Picture”. 3 Press '/" to select “Advanced”, and press OK. Men Picture Cont Brig Colo Tint Shar Colo Adva Rese 4 u[Picture:Advanced] Sound Setup Features rast [ 5 0 ] 0 ]– htness [ 0 ]– ur [ 0 ] [ pness [ 0 ]– ur system nced t Adjusting the image and input signal can give you a more beautiful picture.
Basic Adjustment Settings (Continued) DNR (Digital Noise Reduction) DNR (Digital Noise Reduction) provides high quality images with minimal dot crawl and cross colour noise. Film Mode Automatically detects a film-based source (originally encoded at 24 frames/second), analyses it, and then recreates each still film frame for high-definition picture quality. 1 Perform steps 1 to 3 in DNR (Digital Noise Reduction) to display the “Advanced” screen. 2 Press '/" to select “Film mode”, and press OK.
Useful Features Speech Emphasis Sound Adjustments You can adjust the sound quality to your preference with the following settings. 1 Press MENU to display the Menu screen. 2 Press \/| to select “Sound”. 3 Press '/" to select a specific adjustment item. Menu[So Picture Sound Tre Bas Bal Adv Res und] Setup le b s a a e nce nced t Features [ 0 ]– 0 ]– [ 0 ]L [ + + R 4 Press \/| to adjust the item to your desired position. 5 Press MENU to exit. Selected item \ button Micronas® VOICE, Speech E
Useful Features (Continued) Sound Wide PC Sound Select (for PC Mode) This feature can increase the spread of the sound. 1 Press MENU to display the Menu screen. 2 Press \/| to select “Sound”. 3 Press '/" to select “Advanced”, and press OK. Menu[So Picture Sound Tre Bas Bal Adv Res 4 und:Advanc Setup Features le [ 0 ] 0 ] [ 0 ] nce [ nced t b s a a e ed] – – L You can switch the sound mode while the LCD TV set is connected to the PC. Make sure the PC mode is selected before making this setting.
Useful Features (Continued) Display Mode Terminal Select You can set the orientation of the picture. 1 Press MENU to display the Menu screen. 2 Press \/| to select “Setup”. 3 Press '/" to select “Display mode”, and press OK. Menu[Setup: Setup Picture Sound CH Clo Dis Ter AV2 PC Lan 4 Displa Features setup ck set play m minal In/Ou setup guage y mode] You can select the input mode according to the external device connected to the COMPONENT2/AV1 terminal.
Useful Features (Continued) AV2 In/Out On-Screen Display Language Setting You can select the AV-IN2/OUT terminal as input terminals or output terminals. 1 Press MENU to display the Menu screen. 2 Press \/| to select “Setup”. 3 Press '/" to select “AV2 In/Out”, and press OK. Menu[Setup: Setup Picture Sound CH Clo Dis Ter AV2 PC Lan 4 AV2 In Features setup ck set play m minal In/Ou setup guage You can select English, Chinese or Arabic as the on-screen display language.
Useful Features (Continued) ■ Directly setting the Backlight Features You can change the setting of Backlight directly. The Feature items can be set by the user. 1 Press MENU to display the Menu screen. 2 Press \/| to select “Features”. 3 Press '/" to select the desired adjustment item, and press OK. Menu[Features] Setup Picture Sound Features Wide mode Backlight Timer functions Auto power off Power management 4 1 Press BACKLIGHT to display the Backlight screen.
Useful Features (Continued) Wide Mode Timer Functions You can select the picture display size for the playback image of the DVD player from the following four modes: “4:3”, “16:9”, “Zoom” and “Stretch”. NOTE • The “Wide mode” setting is not available when 1080Ι or 720P signal is entered through the COMPONENT input terminals. • “Wide mode” cannot be set when the PC mode is selected as an input mode. You can set “Sleep timer” and “Wake-up timer” to automatically turn off and on the LCD TV set.
NICAM Broadcast Selection To let you enjoy NICAM broadcasting, this LCD TV set receives NICAM stereo system, bilingual, and monaural broadcasts. If the sound quality is poor due to a weak signal or other problems during NICAM broadcast reception, set the “Off” position of the NICAM to change the TV sound to monaural. Stereo The LCD TV set is receiving a stereo broadcast. • Each time you press MPX, the mode changes between “NICAM STEREO” and “MONO”.
A2 Stereo Broadcast Selection To let you enjoy A2 stereo broadcasting, this LCD TV set receives A2 stereo system and bilingual broadcasts. If the sound quality is poor due to a weak signal or other problems during A2 stereo broadcast reception, set the “Off” position of the A2 to change the TV sound to monaural. Stereo The LCD TV set is receiving a stereo broadcast. • Each time you press MPX, the mode changes between “STEREO” and “MONO”. • When “MONO” is selected, the TV sound is output monaurally.
Connecting a PC Viewing an Image from a PC Use the PC-IN terminal to connect a PC. NOTE • This LCD TV set is compatible with VESA-standard DDC 1/DDC 2B. • Be sure to read the operation manuals of the devices to be connected before making connections. • Make sure to select the same signal values for the output signal of a PC and the input signal of the LCD TV set before connecting with the PC. (See pages 28 and 29.
Connecting a PC (Continued) Input Signal (for PC Mode) Select the computer input signal before displaying the PC image on the LCD TV screen. Fine Sync. Adjustments (for PC Mode) Adjust the PC image using the “Fine sync.” menu. NOTE • Make sure to select the input signal to “1024 × 768” or “640 × 480”, before connecting a PC. 1 Perform steps 1 to 3 in Input Signal (for PC Mode) to display the “PC setup” screen. 2 Press '/" to select “Fine sync.”, and press OK. Menu[Setup:PC Fine sync.
Connecting a PC (Continued) Power Management (for PC mode) When this function is set to “On”, the power will automatically shut down. PC Compatibility Chart PC/MAC Resolution 640 × 400 720 × 400 VGA 640 × 480 1 2 3 WVGA Press MENU to display the Menu screen. Press \/| to select “Features”. PC SVGA 800 × 600 Press '/" to select “Power management”, and press OK. Menu[Features:Pow Setup Picture Sound Features Wide Backl Timer Auto Power 31.5 60 37.9 85 31.5 60 37.9 85 31.5 60 37.9 72 37.
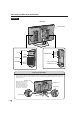
Connecting with External Devices You can enjoy picture and sound by connecting a VCR or a home video game system to the terminals located on the rear of the LCD TV set. When connecting an external device, turn off the power of the LCD TV set first to prevent any possible damage. Example of External Devices that can be Connected To PC-IN terminal • PC To AV-IN2/OUT terminal • VCR • Laser disc player To COMPONENT1 terminal • DVD Player, etc.
Connecting with External Devices (Continued) Connecting a VCR, DVD Player or a Camcorder (COMPONENT1/COMPONENT2/AV1/AV-IN2/PC-IN) RGB cable (supplied) ø3.
Connecting with External Devices (Continued) Outputting Video and Audio (Video Output) You can output video and audio data from the LCD TV set through the AV output terminals (AV-OUT). • When using AV-IN2/OUT as an OUTPUT terminal, select “Setup” in the Menu and set “AV2 In/Out” to “Out”. (See page 22.) • The factory setting for “AV2 In/Out” is “In”. Connect to a VCR, audio amplifier, etc. NOTE • The AV-IN2/OUT terminal has 2 output modes (see page 22).
Troubleshooting Before calling for repair services, check the following items for possible remedies to the encountered symptoms. LCD TV set Problem Sound Picture There is no picture or sound. Picture There is no picture. There is no picture from AV1/AV-IN2. Check item • Make sure the AC adapter is properly inserted in the power outlet. • Reception other than those of broadcasting stations can be considered. • Make sure the input mode is set to the LCD TV set.
Troubleshooting (Continued) Antenna Problem The picture is not sharp. Check item • • • • The reception may be weak. The state of the broadcast may also be bad. Make sure the antenna is facing the correct direction. Make sure the outside antenna has not been disconnected. The picture moves. The picture is doubled or tripled. The picture is spotted. There are stripes on the screen or colours fade. • Make sure the antenna is facing the correct direction.
Specifications ITEMS MODEL LCD panel Number of pixels Video colour systems TV Standard (CCIR) TV Tuning System TV function STEREO/BILINGUAL AUTO PRESET CATV 4-LINE DIGITAL COMB FILTER Brightness Lamp life Viewing angles Audio output Speakers COMPONENT1 COMPONENT2 AV1-IN Terminals AV2-IN/OUT PC-IN Headphone jack OSD LANGUAGE Power requirement Power Consumption Weight Accessories LC-20B6H 20" (51 cm) Advanced Super View & BLACK TFT LCD 2,359,296 dots XGA World multi system I/DK/M/BG Auto preset tuning NIC
36 100 47 59 308.4 450 (including rubber foot) 261 393 452 (including rubber foot) 191 Dimensional Drawings Unit: mm 212 384 673 74 410.
SHARP CORPORATION Printed in Japan Printed on 100% post-consumer recycled paper.