LC-20EIU LIQUID CRYSTAL TELEVISION ENGLISH OPERATION MANUAL IMPORTANT: To aid reporting in case of loss or theft, please record the TV's model and serial numbers in the space provided. The numbers are located at the rear of the TV. Model No.: Serial No.: lusAONLY] IMPORTANT I WARNING: INFORMATION TO NOTREDUCE EXPOSE THE THISRISK PRODUCT OF FIRETOORRAIN ELECTRIC OR MOISTURE.
IMPORTANT I INFORMATION not expressly approved by the manufacturer could void the user's authority to operate this equipment. ARNING: FCC Regulations state that any unauthorized changes or modifications to this equipment I U.S.A. ONLY] I CAUTION: TO PREVENT SHOCK, MATCH PLUG TO WIDEELECTRIC SLOT, FULLY INSERT.
DEAR SHARP CUSTOMER Thank you for your purchase of the Sharp LCD Color TV product. To ensure safety and many years of trouble-free operation of your product, please read the Safety Precautions carefully before using this product. IMPORTANT SAFETY PRECAUTIONS Electricity is used to perform many useful functions, but it can also cause personal injuries and property damage if improperly handled. This product has been engineered and manufactured with the highest priority on safety.
IMPORTANT SAFETY PRECAUTIONS (Continued) • Cleaning--Unplug the power cord from the AC outlet before cleaning the product. Use a damp cloth to clean the product. Do not use liquid cleaners or aerosol cleaners. such as bathtub, washbasin, kitchen sink and laundry tub, swimming pool and in a wet basement. I I not use the product near water, • Stand--Do not place the product on an unstable cart, stand, tripod or table.
IMPORTANT SAFETY PRECAUTIONS (Continued) • If an outside antenna is connected to the television equipment, be sure the antenna system is grounded so as to provide some protection against voltage surges and built-up static charges.
CONTENTS DEAR SHARP CUSTOMER ............................................................................................................. IMPORTANT SAFETY PRECAUTIONS ....................................................................................... SUPPLIED ACCESSORIES ............................................................................................................. PREPARATION .................................................................................................................
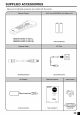
SUPPLIED Make ACCESSORIES sure the following accessories RRMCGA077WJSA RRMCGA077WJSB RRMCGA077WJSC are provided (LC-20E1 U) (LC-20E1 UI3) (LC-20EIUW) QCNWG0003CEPA with the product. UBATU0038CEZZ QACCD3097CEPA _,c pt E IIIN_ UADP-0243CEPZ TINS-A158WJN1 LHLDW0109CESA LC-20E1U,LC-20E1UW) LHLDW0109CES8 (LC-20E1UB) .
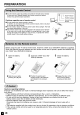
PREPARATION • Use the remote control by pointing it towards the remote sensor window r_ L_ window may preventproper operation. -- Cautions regarding use of remote control • Do not expose theObjects remotebetween control tothe shock. on the main unit. remote control and sensor __ In addition, do not expose the remote control to liquid, and do not place in an area with high humidity. • Do net install or place the remote control under direct sunlight. The heat may cause deformation of the unit.
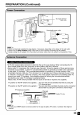
PREPARATION (Continued) Household power outlet • Use a commercially available AC plug adapter, if necessary, depending on the design of the wall outlet. • Always turn the MAIN POWER switch of the LCD TV set to off when connecting the AC adapter. • Always unplug the AC adapter from the product and power outlet when not using for a long periodof time. • A 75-ohm coaxial cable connector is built into the set for easy hookup.
PREPARATION (Continued) • The antenna requirements for good color television reception are more important than those for black & white television reception. For this reason, a good quality outdoor antenna is strongly recommended. The following is a brief explanation of the type of connections that are provided with the various antenna systems. F-type connector 1. A 75-ohm system is generally a round cable with F-type connector that can easily be attached to a terminal without tools (not supplied).
FRONT AND REAR CONTROL OPTIONS I Main unit (front view) I Upper control panel VOL (-)/(+) OH (V)/(_) MENU TV/VIDEO r_etca_nb_s to an angle between 12 degrees and 35 degrees. The screen cannot be set up straight. When changing the angle, make sure to hold the stand and adjust the screen to the best viewable angle. Adjustable range Speaker r Remote sensor window SLEEP indicator The SLEEP indicator lights up red when the SLEEP TIMER is set to on.
FRONT AND REAR CONTROL I Main unit (rear view) p /' p /' L /' -----y ----- OPTIONS (Continued) I VIDEO AUDIO (L) AUDIO (R) PB PR AUDIO (L) AUDIO (R) - AV-IN2/OUT t COMPONEN1 Carrying handle _- VIDEOAUDIO (L)-AV-INI_ AUDIO (R)-L_ S-VIDEO| HEADPHONEAntenna terminal-POWER INPUT-(DC 13V) m _
FRONT AND REAR CONTROL OPTIONS (Continued) • Before connecting a connection cord into the rear terminal, remove the back cover. Push in the tab and pull out the back cover carefully. • To mount the cover, insert the 2 hooks on the bottom of the cover into the cabinet and press on the upper part of the back cover until the tab locks in place with a click. ==Plug the headphone mini-plug into the HEADPHONE jack located on the rear of the TV set.
EZ SETUP ==When you turn on the TV for the first time, it will automatically memorize the broadcasting channels. Please perform the following instructions before you press MAIN POWER. (1) Insert the batteries into the remote control. (See page 8.) (2) Connect the antenna cable to the TV set. (See page 10.) (3) Connect the AC adapter to the DC input terminal of the product and plug in the AC cord to the wall outlet. (See page 9.
REMOTE CONTROL FLIP (p. 22) MENU/ /V/
BASIC OPERATION (Continued) 1 Press MAIN POWER MAIN the upper on. I 2 POWER, side The POWER located of the main indicator on • On-screen display unit, to 2 instantane- ously changes from red to green and the main unit is turned on. • The input mode indication several seconds. disappears after _STESEO
BASIC OPERATION POWER (Continued) Press VOL (+) to increase the sound volume. The segment of the indicator increases. VOLUME 50 IIIIIIIIIIIIIIIIIIIIIIIIII 2 ..... Press VOL (-) to decrease the sound volume. The segment of the indicator decreases. VOLUME 19 llllll ......................... To mute the sound _ _ (+)/(-) _ MTS _ Press MUTE to temporarily turn off the sound. The MUTE mark_(is displayed for 4 seconds. 2 Press MUTE or VOL (+)/(-) to turn the sound back to the previous level.
BASIC OPERATION (Continued) Changing channels by using Channel Select on the remote control or 3-digit I • This LCD number. TV set allows you to select up to 125 channels (1 to 125). To select a channel, enter a 2- 0-] To select a 1- or 2-digit channel number (e.g., Channel 5): Complete the following procedure within 4 seconds. _CH 1 Press the _ button. 2 Press the _ button. • When selecting a 1-digit channel number, do not fail to press the _ button first.
SELECTING MENU ITEMS • This LCD TV set allows you to adjust the various settings using the menu screen. Select menu item by following the steps below and then refer to the indicated page for details. the desired (Page 20) 1 2 Press MENU to display the MENU screen. Press A/V to select the desired menu item. 3 Press _1/1_ to enter. 4 Press MENU to exit.
ADJUSTMENT You can set the SLEEP TIMER to automatically turn off the TV. Directly setting the SLEEP TIMER 1 Press SLEEP to display the SLEEP TIMER screen. 2 Press SLEEP to set the sleep timer (in minutes). _!LEEP --- REMAIN The time can be set in increments of 30 minutes and in the range between 30 and 120 minutes. 0(_ The SLEEP TIMER is turned off when --- is displayed. W • The SLEEP TIMER screen automatically disappears in 3 seconds. ...
ADJUSTMENT You can set the brightness (Continued) of the screen. Directly setting the BRIGHTNESS 1 Press BRIGHT to display the BRIGHTNESS screen. 2 Press BRIGHT to change the setting.
ADJUSTMENT (Continued) You can set the orientation of the picture. Directly setting the PICTURE FLIP PIG 1 Press PIC. FLIP to display the PICTURE FLIP screen. 2 Press PIC. FLIP to change the setting. FLIP ABC _URE /7= FLIP . [NO_r_AL1 NORMAL_UPSIDEDOWN÷ MIRROR_ ROTATE • The PICTURE FLiP screen automatically disappears in 3 seconds.
ADJUSTMENT (Continued) The language for the On-Screen Display can be ENGLISH, SPANISH or FRENCH. 1 Press MENU to display the MENU screen. MENU [_7[KLEEP TtMER []VIDEO ADJUST []PRESET [CLOSEO CAPT]ON_ _]V-CHIP BLOCK []SET UP _NU/ SELECT:_ "
ADJUSTMENT (Continued) 1 Press MENU to display the MENU screen. MENU [_?[]NLEEPTIMER > [VIDEO AUJUST []PRESET []CLOSED CAPTiON_ [V-CNIP 8LOCK []SET UP SELECT:@ _NU/ TI
ADJUSTMENT (Continued) TV mode PICTURE Decrease contrast Increase contrast TINT Toward purple Toward green COLOR Lower color intensity BLACK LEVEL Less brightness SHARPNESS Soft picture COLOR SYSTEM ....................... _ ....................... _ Higher color intensity More brightness ...................... _........................
ADJUSTMENT (Continued) 1 Press MENU to display the MENU screen. MENU _[SLEEP TIMER []VIDEO ADJUST []PRESET [CLOSEO CAPTION_ I_Iv-cHIP BLOCK []SET UP SELECT:@ 2 3 Press A/_' PRESET. to move the cursor to Press
ADJUSTMENT • CHANNEL (Continued) SETTING It is necessary to set the receiving mode to AIR or CABLE channels to receive locally broadcast TV programs. 1 Press MENU to display the MENU screen. 2 Press A/V SET UP. 3 Press _1/_- to enter. to move the cursor to MENU [SLEEP TtMER []VIDEO ADJUST []PRESET []CLOSEO CAPT]ON_ i'_IV-CHIP BLOCK _[SET UP _ENU/ SELECT:_ AITI,I, 4 5 Press A/_' to move the cursor to CH-SETTING. Press _1/1_ to enter. 7 Press A/V to move the cursor to AIR/CABLE.
ADJUSTMENT • (Continued) Saving broadcast TV channels in the memory 1 2 _ENU/ 3 AIVI
ADJUSTMENT • (Continued) BLUE SCREEN Automatically turns the screen blue if a broadcast signal is not received. 1 Press MENU to display the MENU screen. 2 Press A/V SET UP. 3 Press _1/1_ to enter. to move the cursor to _EHU []SLEEP TIMER [VIOEO ADJUST []PRESET []CLOSED CAPTION_ r_V-CH[P 8LOCK _[SET UP SELECT:@ _ENU/ 4 AITI_I_ Press A/V to move the cursor to BLUE SCREEN. 6 Press _1/1_ to select ON or OFF. Press MENU to return to the main screen.
ADJUSTMENT (Continued) • SETTING CLOSED CAPTION • This TV set is equipped with an internal Closed Caption decoder. "Closed Caption" is a system which allows conversations, narration, and sound effects in TV programs and home videos to be viewed as captions on the TV screen (see the illustration). • Not all programs and videos will offer closed captioning. Please look for the "_' symbol to ensure that captions will be shown. • The Closed Caption broadcasts can be viewed in two modes: CAPTION and TEXT.
ADJUSTMENT • (Continued) SETTING CLOSED CAPTION Setting the CLOSED CAPTION on the MENU screen 1 2 ! Press MENU to display the MENU screen. Press A/_' to move the cursor to CLOSED CAPTION. MENU [_SLEEP TIMER []VIREO ADJUST []PRESET _[CLOSED CAPTION_ r_[-CHIP 8LOCK []SET UP MENU, 3 4 SELECT:@ Press <1/_- to enter. Press A/V CC/TEXT. ENTER:@ EXIT:_ []CLOSER CAPTION [RETgRN CC/TEXT {OFF] to move the cursor to W ELECT:@ 5 Press <1/_- to change the CLOSED CAPTION setting.
ADJUSTMENT • (Continued) V-CHIP • This function allows TV programs to be children from watching violent or sexual • Restriction of TV programs includes two the TV Parental Guidelines. The MPAA and content. restricted and TV usage to be controlled based on FCC data. it prevents scenes that may be harmful. ratings that contain information about the program: the MPAA rating and rating is restricted by age.
ADJUSTMENT (Continued) [2] TV PARENTAL GUIDELINES <:::::: content base :_ FV V (Fantasy Violence) (Violence) (Sexual Situation) (Adult Language) (Sexually Suggestive Dialog) TV-Y (All children) [] [] [] [] [] [] [] TV-Y7 (Direct to Older Children) TV-G (General Audience) X [] [] [] [] X X RATING "[ age base TV-PG (Parental Guidance U- S L Suggested) TV-14 (Parents Strongly Cautioned) X X X X TV-MA (Mature Audience Only) X X X D [] [] X X []: The content rating can be
ADJUSTMENT (Continued) • SETTING V-CHIP [1] MPAA RATING 1 Press MENU to display the MENU screen. MEOO TIMER _[SLEEP []VIDEO ADJUST []PRESET []CLOSED CAPTIOU_ IT'D-CHIP 8LOCK []SET UP ENU/ AI,I
ADJUSTMENT (Continued) [2] TV GUIDELINES • Setting TV GUIDELINES 1 Repeat steps 1 to 3 of [1] MPAA RATING. (See page 34.) 2 Press A/V to move the cursor to TV GUIDELINES. 3 Press _1/_- to enter. _]V-CHIP 8LOCK _NETURN MPAA C_ TV GUIOELiNES_ STATUS[OFF] _ENU/ SELECT:_ AITI,I, 4 5 • Setting BLOCK Press A/V to move the cursor to TV-Y7, and press _1/_- to select BLOCK. If you set TV-Y7 to BLOCK, TV-G, TV-PG, TV-14 and TV-MA are automatically blocked.
ADJUSTMENT (Continued) [3] ACTIVATING V-CHIP BLOCK • Setting STATUS You can activate V-CHIP BLOCK after setting [1] MPAA RATING and/ or [2] TV GUIDELINES. 1 Repeat steps 1 to 3 of [1] MPAA RATING. BTIv-cHIp BLOCK ORETUR_ MPAA TV GgIHELIHES_ BTATgS{ONI 2 0000 MENU/ AITI
ADJUSTMENT [5] CHANGING (Continued) THE V-CHIP BLOCK SETTINGS 1 Repeat steps 1 to 2 of [1] MPAA RATING, then INPUT SECRET NO. will be displayed. INPUT SECRET nO, £XIT:_ 2 Channel Select Input the 4-digit secret number by using Channel Select; the VCHIP select mode will be displayed. Set V-CHIP BLOCK again. INPUT SECRET nO, EXIT:_ [6] CHANGING OR CLEARING THE SECRET NUMBER If you forgetthe secret number,clear the secret number as follows.
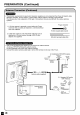
CONNECTING WITH EXTERNAL DEVICES You can enjoy picture and sound by connecting a VCR or a home video game system to the terminals located on the rear of the TV set. When connecting an external device, turn off the power of the main unit first to prevent any possible damage.
CONNECTING WITH EXTERNAL DEVICES (Continued) IConnecting a VCR, DVD player or a video camera (AV-INI/2/COMPONENT) 1 iii_!!_ ¸¸;ii_i_iii_>i!ii_i_iiii_i!i!!!!iiiii!_i!iii:!:!!!!ii!!!i!i!i!ii 1 __ _Video _ Audio _'\ Audio (L) (R) VCR PB PR --V _ _ Audio (L) Audio (R) DVD Video Player camera VCR • If your VCR (or other external devices) has an S-Video terminal, S-VIDEO connection is recommended. (Use an S-Video cable.
CONNECTING WITH EXTERNAL DEVICES (Continued) I Outputting video and audio (video output) I You can output video and audio data from the TV set through the AV output terminals (AV-OUT). • When using as an OUTPUT terminal, select PRESET in the MENU and set AV2 IN/OUT to OUT. (See page 26.) • The factory setting for AV2 IN/OUT is IN. ; f' Connect to a VCR, audio amplifier, etc. • AV2 has 2 OUT modes (see page 26).
TROUBLESHOOTING • Before calling for repair service, check the following the encountered symptoms. items for possible remedies to I TV set Problem There is no picture or sound. There is no picture. There is no picture from AV-INI. Thereis sound. _::::::::::::::::::: no There is no picture or sound, just noise. Picture isnot I ;. J • Reference Pages Check item • Make sure the AC adapter power outlet. • Reception other than those can be considered.
TROUBLESHOOTING (Continued) I Antenna Problem Check item The picture is not sharp. • • • • The reception may be weak. The state of the broadcast may also be bad. Make sure the antenna is facing the right direction. Make sure the outside antenna is not disconnected. The picture moves. The picture is doubled or tripled. The picture is spotted. There stripes screen colors • Cautions are on the or fade. regarding • Make sure the antenna is facing the right direction.
SPECIFICATIONS Items LC-20E Model 1U LCD panel 19.7" ASV & BLACK-TFT Number of dots 921,600 dots VGA Video color systems Destination N358, N443, PAL, PAL-M, PAL-N, SECAM, TV Standard TV function USA!Latin (CCIR) 3 Dimensional NTSC/PAL-M/PAL-N PLL 181 ch. STEREO MTS+SAP Y/C separation 125 ch. circuit Yes (N358 only) Digital comb filter Yes Brightness 430 cd/m 2 Lamp life 60,000 hours Viewing angles H: 170 ° V: 170 ° Audio amplifier 2.
DIMENSIONAL DRAWINGS Unit: inchl(mm) 7_/_ (189) 19_3/32(493) I I 79/32(185) 1229132 (328) I I I I I I v z 101_4(261) 43/64 315/16 7%2 (182)
CALLING FOR SERVICE For location of the nearest Sharp Authorized assistance, please call 1-800-BE-SHARE Service, or to obtain product literature, accessories, supplies, or customer LIMITED WARRANTY END-USER LIMITED WARRANTY SHARP ELECTRONICS CORPORATION warrants to the first end user purchaser that this Sharp brand product (the "Product"), when shipped in its original container, will be free from defective workmanship and materials, and agrees that it will, at its option, either repair the defect
SHARP " .,.,TED WA..A.T Consumer Electronics Congratulations Sharp Electronics of Canada Ltd.