
Specifications


English - 12 -
TV. Afterwards, insert your DVD player’s audio cable’s
connectors into the plural part of the VGA/Component
audio connection cable (see illustration below).
Colours of the connected jacks should match.
YPbPr
Side view
DVD Player
Connection Cable
(supplied)
YPbPr Video Cable
(Not supplied)
When the connection is made, switch to •
YPbPr source. See, Input selection section.
Note: To connect YPb Pr device, you should use supplied
component (YPbPr) connection cable
You may also connect through the • SCART input.
SPDIF
SCART
VGA
Coax.OUT
1
2
Scart Cable
(not supplied)
External device
Note• : These three methods of connection perform the
same function but in different levels of quality. It is not
necessary to connect by all three methods.
Connecting the LCD TV to a PC
For displaying your computer’s screen image on your
LCD TV, you can connect your computer to the TV set.
Power off both computer and display before making
any connections. Use 15-pin D-sub display cable to
connect a PC to the LCD TV. When the connection
is made, switch to PC source. See “Input selection”
section. Set the resolution that suits your viewing
requirements. Resolution information can be found
in the appendix parts
Do not plug out the USB/HDD during the recording. •
This may harm the connected USB/HDD.
Only two partitions on a HDD unit can be •
supported.
Some stream packets may not be recorded because •
of signal problems, so sometimes video may freezes
during playback.
Record, Play, Pause, Display (for PlayListDialog) •
keys could not be used when teletext is ON. If a
recording starts from timer when teletext is ON,
teletext is automatically turned off. Also teletext
usage is disabled when there is ongoing recording
or playback.
If the recording time of an event is longer than the
memory capacity, the following message will appear
on the screen: “There is not enough space for ‘event’
but it will be recorded until the drive is full”.
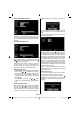
Connecting to a DVD Player via HDMI
Please refer to your DVD player’s instruction book
for additional information. Power off both the TV and
the device before making any connections.
Note: Not all cables shown in the illustration are
supplied.
If your DVD player has an • HDMI socket, you can
connect via HDMI for better video and audio quality.
SPDIF
SCART
VGA
Coax.OUT
1
2
External device
(not supplied)
HDMI Cable
When you connect to DVD player as illustrated above, •
switch to the connected HDMI source. See, Input
Selection section for more information on changing
sources.
Connecting to a DVD Player via
Component Sockets (YPbPr) or
Scart Cable
Some DVD players are connected through •
COMPONENT SOCKETS (YPbPr). In this case,
you must use the supplied Component video
connection cable for enabling connection. First,
plug single jack of the cable to the TV’s YPbPr
socket (side). Afterwards, insert your component
cable’s (not supplied) connectors into the plural
part of the Component video connection cable (see
illustration below). Colours of the connected jacks
should match.
To enable audio connection, use the • VGA/Component
Audio cable. First, plug single jack of the cable to the
A01_MB60_[GB]_1910UK_IDTV_TC_PVR_NICKEL16_40942LED_YPBPR_ROCKER_10073201_50190037.indd 12A01_MB60_[GB]_1910UK_IDTV_TC_PVR_NICKEL16_40942LED_YPBPR_ROCKER_10073201_50190037.indd 12 03.08.2011 08:48:4903.08.2011 08:48:49