ENGLISH LC-22DV510K LCD COLOUR TELEVISION SHARP ELECTRONICS (Europe) GmbH Sonninstraße 3, D-20097 Hamburg SHARP CORPORATION 50186848 http://www.sharp-eu.
Contents Features ................................................................. 3 Dear SHARP customer........................................... 3 Introduction ............................................................. 3 Preparation ............................................................. 3 Important safety precautions .................................. 4 Safety Precautions ................................................. 5 Connection to a Television Distribution System (Cable TV etc.
SPECIAL NOTE FOR USERS IN THE U.K. The mains lead of this product is fitted with a non-rewireable (moulded) plug incorporating a 5A fuse. Should or and of the same rating the fuse need to be replaced, a BSI or ASTA approved BS 1362 fuse marked as above, which is also indicated on the pin face of the plug, must be used. ASA Always refit the fuse cover after replacing the fuse. Never use the plug without the fuse cover fitted.
Dear SHARP customer Features • Remote controlled colour LCD TV. • Fully integrated Terrestrial digital TV (DVB-T - MPEG2) • HDMI connectors for digital video and audio. This connection is also designed to accept high definition signals. • USB input. • Programme recording • Programme timeshifting • 1000 programmes (analogue+digital). • OSD menu system. • Integrated tuner MPEG2 compatible. • Scart socket for external devices (such as video, video games, audio set, etc.). • Stereo sound system.
Important safety precautions • Cleaning—Unplug the AC cord from the AC outlet before cleaning the product. Use a damp cloth to clean the product. Do not use liquid cleaners or aerosol cleaners. • Use a soft damp cloth to gently wipe the panel when it is dirty. To protect the panel, do not use a chemical cloth to clean it. Chemicals may cause damage or cracks in the cabinet of the TV.
Safety Precautions Lightning Read the following recommended safety precautions carefully for your safety. Power Source The TV set should be operated only from a 220-240V AC, 50Hz outlet. Ensure that you select the correct voltage setting for your convenience. Power Cord Do not place the set, a piece of furniture, etc. on the power cord (mains lead) or pinch the cord. Handle the power cord by the plug.
LCD Screen The LCD panel is a very high technology product with about a million thin film transistors, giving you fine picture details. Occasionally, a few non-active pixels may appear on the screen as a fixed blue, green or red point. Please note that this does not affect the performance of your product. Warning! Do not leave your TV in standby or operating mode when you leave your house. Connection to a Television Distribution System (Cable TV etc.
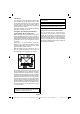
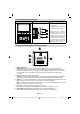
Package Contents Environmental Information • This television is designed to consume less energy to save environment. SLEEP SCREEN FAV LANG. You not only help to save the environment but also you can save money by reducing electricity bills thanks to the energy efficiency feauture of this TV.
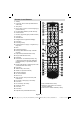
Remote Control Buttons 1. Standby 2. Image size / Zooms videos (in Media Browser video mode) 3. Sleep Timer 4. Mono / Stereo - Dual I-II / Currrent Language (*) (in DVB channels) SLEEP SCREEN FAV LANG. PRESETS 5. Favourite Mode Selection (in DVB channels) 6. Numeric buttons 7. Electronic programme guide (in DVB channels) 8. No function 9. Media Browser 10. Navigation buttons (Up/Down/Left/Right) EPG SWAP 11. No function 12. Recordings Library SOURCE 13.
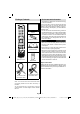
LCD TV and Operating Buttons FRONT and REAR VIEW Control buttons VIEW Control Buttons 1. Standby Off/On button 2. TV/AV button 3. Programme Up/Down buttonsVolume Up/Down buttons P\V-AV Note:You can use +/- buttons to change volume. If you want to change channels, press P/V/ AV button once and then use +/- buttons. If you hold the P/V/ AV button about a few seconds, source OSD will be displayed. Main menu OSD cannot be displayed via control buttons.
Viewing the Connections - Side Connectors 1. CI Slot is used for inserting a CI card. A CI card allows you to view all the channels that you subscribe to. For more information, see “Conditional Access” section. 2. USB Inputs. Note that programme recording feature is available via these USB inputs. You can connect external hard disk drives to this input. 3. TV control buttons. 4. Component Video Input (YPbPr) is used for connecting component video.
CAUTION ! Using USB Inputs USB Connection • You can connect a USB hard disk drive or USB memory stick to your TV by using the USB inputs of the TV. This feature allows you to play files stored in a USB drive or record programmes. • 2.5” and 3.5” inch (hdd with external power supply) external hard disk drives are supported. • To record a programme, you should first connect a USB disk to your TV while the TV is switched off. You should then switch on the TV to enable recording feature.
• Do not plug out the USB/HDD during the recording. This may harm the connected USB/HDD. • Only two partitions on a HDD unit can be supported. • Some stream packets may not be recorded because of signal problems, so sometimes video may freezes during playback. • Record, Play, Pause, Display (for PlayListDialog) keys could not be used when teletext is ON. If a recording starts from timer when teletext is ON, teletext is automatically turned off.
Connecting the LCD TV to a PC For displaying your computer’s screen image on your LCD TV, you can connect your computer to the TV set. Power off both computer and display before making any connections. Use 15-pin D-sub display cable to connect a PC to the LCD TV. When the connection is made, switch to PC source. See “Input selection” section. Set the resolution that suits your viewing requirements.
• If the TV will not be used for a long period i.e. holidays, then unplug the power cord from the mains socket. Input Selection Once you have connected external systems to your TV, you can switch to different input sources. Press “SOURCE” button on your remote control consecutively for directly changing sources. Volume Setting • Press “V+” button to increase the volume. Press “V-” button to decrease the volume. A volume level scale (slider) will be displayed on the screen.
Yellow button: Display EPG data in accordane with timeline schedule Blue button (Filter): Views filtering options. (RECORD): the TV will start to record the selected progamme. You can press again to stop the recording. Blue button (Filter): Views filtering options. INFO (Details): Displays the programmes in detail. Numeric buttons (Jump): Jumps to the preferred channel directly via numeric buttons. OK (Options): views/records or sets timer for future programs. Text (Search): Displays “Guide Search” menu.
• To cancel an already set recording, highlight that programme and press the OK button and select the option “Delete Rec. Timer”. The recording will be cancelled. • By pressing “ ” or “ ” button, select the country you want to set and press “ ” button to highlight Teletext Language option. Use “ ” or “ ” button to select desired Teletext Language. Note: You cannot switch to any other channel or source while there is an active recording on the current channel.
Installation Press “MENU” button on the remote control and select Installation by using “ ” or “ ” button. Press OK button and the following menu screen will be displayed. After all the available stations have been stored a channel list will be shown based on the broadcaster LCN press OK to accept this channel order and start viewing or use the Edit functions to change the order or delete unwanted channels. Select Automatic Channel Scan (Retune) by using “ ”/“ ” button and press OK button.
Manual Tuning HINT: This feature can be used for direct broadcast entry. • Select Manual Channel Scan from the Installation menu by using “ ”/“ ” and OK buttons. Manual Scan options screen will be displayed. • Select the desired Search Type using “ ” or “ ” button. Manual search options will change accordingly. Use “ ”/“ ” button to highlight an item and then press “ ” or “ ” button to set an option. You can press “MENU” button to cancel. Digital Manual Search fine tune screen will be displayed.
Operating the Channel List Locking a Channel You can press GREEN button to tag/untag all channels; YELLOW button to tag/untag a single channel. • Select the channel that you want to lock and select Lock option. Press OK button to continue. • You will be asked to enter parental control PIN. Default PIN is set as 0000. Enter the PIN number. • Press “ ” or “ ” button to select the channel that will be processed. Press “ ” or “ ” button to select a function on Channel List menu.
OK button to continue. Media Browser menu options will be displayed. Managing Stations: Sorting Channel List You can select broadcasts to be listed in the channel list. To display specific types of broadcast, you should use Active channel list setting. Also, when you plug USB devices, media browser screen will be displayed automatically: Select Active channel list from the Channel list menu by using “ ” or “ ” button. Press OK button to continue.
RED button: Sorts files by date. YELLOW button: Toggles viewing style. BLUE button: Changes media type. Slideshow Options Play ( button): Starts the video playback. Stop ( button): Stops the video playback. Pause ( button): Pause the video playback. Rewind ( button): Goes backward. Forward ( button): Goes forward. Pause ( button): Pauses the slideshow. button): Continues the slideshow. Subtitle/Audio (LANG. button): Sets subtitle/Audio. Continue ( Jump (GREEN button): Jumps to time.
0..9 (Numeric buttons): The TV will jump to the file starting with the letter you input via the numeric buttons on your remote control. Media Browser Settings Play This (OK button): Plays the selected file. Previous/Next (Left/Right buttons): Jumps to previous or next file to play. YELLOW: Toggles viewing style. BLUE: Changes media type. Recordings Library IMPORTANT: To view recordings library, you should first connect a USB disk to your TV while the TV is switched off.
Note: Switching to a different broadcast or source; and viewing main menu are not available during the timeshifting. Instant Recording IMPORTANT: To record a programme, you should first connect a USB disk to your TV while the TV is switched off. You should then switch on the TV to enable recording feature. Otherwise, recording feature will not be available. (RECORD) button to start recording an • Press event instantly while watching a programme.
The format being displayed in AUTO mode is completely independent of WSS information which could be included in the broadcast signal or the signal from an external device. 14:9 Zoom Note: Auto mode only will be available in HDMI, YPbPr and DTV sources. 16:9 This uniformly stretches the left and right sides of a normal picture (4:3 aspect ratio) to fill the wide TV screen. This option zooms to the 14:9 picture. 4:3 Use to view a normal picture (4:3 aspect ratio) as this is its original size.
Configuring Picture Settings You can use different picture settings in detail. Press “MENU” button and select the Picture icon by using “ ” or “ ” button. Press OK button to view Picture Settings menu. Game Mode: When Game Mode is set to On, specific game mode settings, which are optimized for better video quality, will be loaded. Note: When Game Mode is on, some items in the Picture Settings menu will be unavailable to be set.
Configuring Sound Settings Sound settings can be configured according to your personal preferences. Press “MENU” button and select the first icon by using “ ” or “ ” button. Press OK button to view Sound Settings menu. AVL: Automatic Volume Limiting (AVL) function sets the sound to obtain fixed output level between programmes (For instance, volume level of advertisements tend to be louder than programmes). Dynamic Bass: Dynamic Bass is used to increase bass effect of the TV set.
Using a Conditional Access Module Configuring Language Preferences IMPORTANT: Insert or remove the CI module only when the TV is SWITCHED OFF. You can operate the TV’s language settings using this menu. • In order to watch certain digital channels, a conditional access module (CAM) can be necessary. This module must be inserted in the CI slot of your TV. Press “MENU” button and select the fifth icon by using “ ” or “ ” button. Press OK button to view Settings menu.
Language Settings Parental Settings Menu Operation • Select an item by using “ ” or “ ” button. • Use “ ” or “ ” button to set an item. • Press OK button to view more options. In the configuration menu, highlight the Language Settings item by pressing “ ” or “ ” buttons. Press OK and Language Settings submenu will be displayed on the screen: Use “ ” or “ ” buttons to highlight the menu item that will be adjusted and then press “ ” or “ ” button to set.
• Use “ ” or “ ” button to set. The timer can be programmed between Off and 2.00 hours (120 minutes) in steps of 30 minutes. Setting Programme Timers Recording Configuration Select Recording Configuration item in the Settings menu to configure recording settings. The following menu is displayed for recording configuration. You can set programme timers for a particular programme using this feature. Press “ ” button to set timers on an event.
Hard Disk Info To view the details about the USB disk, highlight Hard Disk Info by using “ ” or “ ” key and press OK. USB disk information will be displayed: Configuring Date/Time Settings Configuring Source Settings You can enables or disable selected source options. The TV will not switch to the disabled source options when “SOURCE” button is pressed. Select Date/Time in the Settings menu to configure Date/Time settings. Press OK button. • Use “ ” or “ ” buttons to highlight Date/Time.
Menu Timeout: Changes timeout duration for menu screens. will be unavailable.To use Standby search please make sure that you select Standby Search as On. Scan Encrypted: When this setting is on, search process will locate the encrypted channels as well. If it is set as Off, encrypted channels will not be located in automatic search or manual search. If the Standby Search is set to On, when the TV is in standby mode, available broadcasts will be searched.
Note: Most TV stations use code 100 for their index pages. Coloured Buttons (RED/GREEN/YELLOW/ BLUE) Your TV supports both FASTEXT and TOP text systems. When these systems are available, the pages are divided into groups or topics. When FASTEXT system is available, sections in a teletext page will become colour-coded and can be selected by pressing the coloured buttons. Press a coloured button that corresponds to with your needs.
Appendix A: PC Input Typical Display Modes Appendix B: AV and HDMI Signal Compatibility (Input Signal Types) The display has a maximum resolution of 1920 x 1080. The following table is an illustration of some of the typical video display modes. Your TV may not support different resolutions. Supported resolution modes are listed below. If you switch your PC to an unsupported mode, a warning OSD will appear on the screen.
Appendix C: Supported DVI Resolutions When connecting devices to your TV’s connectors by using DVI converter cables (not supplied), you can refer to the following resolution information.
Appendix E: Software Upgrade • Your TV is capable of finding and updating new software upgrades over broadcast channels. • For broadcast channels search, TV looks the available channels stored in your settings. So before software upgrade search, it is advised to auto search and update all available channels. 1) Software upgrade search via user interface • It is possible manually to check if there is a new software upgrade for your TV set. • Simply navigate on your main menu.
Specifications TV BROADCASTING PAL/SECAM B/G D/K K’ I/I’ L/L’ RECEIVING CHANNELS VHF (BAND I/III) UHF (BAND U) HYPERBAND NUMBER OF PRESET CHANNELS 1000 CHANNEL INDICATOR On Screen Display RF AERIAL INPUT 75 Ohm (unbalanced) OPERATING VOLTAGE 220-240V AC, 50Hz. AUDIO German + Nicam Stereo AUDIO OUTPUT POWER (WRMS.
Dimensional Drawings English - 37 - 00_MB60_[GB]_(01_TV)_1910UK_IDTV_PVR_BRONZE17_22942LED_YPBPR_ROCKER_10072634_50186848.indd 37 17.08.
End of life disposal English - 38 - 00_MB60_[GB]_(01_TV)_1910UK_IDTV_PVR_BRONZE17_22942LED_YPBPR_ROCKER_10072634_50186848.indd 38 17.08.
Detachable Stand Uninstallation Method To install the TV on the wall, first of all, foot assembly should be removed. Unscrew the 4 screws that attach the foot assembly to the panel and remove the foot assembly from the panel. English - 39 - 00_MB60_[GB]_(01_TV)_1910UK_IDTV_PVR_BRONZE17_22942LED_YPBPR_ROCKER_10072634_50186848.indd 39 17.08.
Screw Dimensions L D Model D L Item Number LC-19LE510E Ø4 30 4 LC-19LE510K M4 18 4 Ø4 30 4 M4 18 4 Ø4 30 4 LC-22LE510E LC-22LE510K LC-22DV510E LC-22DV510K LC-24LE510E LC-24LE510K LC-24DV510E LC-24DV510K VESA 75 x 75 (W x H) Installation of the Screw To the wall To the product To the wall 75 x 75 (W x H) To the product To the wall 75 x 75 (W x H) M4 18 4 LC-32LE510E Ø4 30 8 LC-32LE530E M4 18 4 LC-40LE510E Ø4 30 8 LC-40LE530E M8 30 4 LC-32SH130E Ø4 30 8 LC-32SH
Features Contents Features ............................................................... 41 General Properties............................................ 41 Safety Information ................................................ 42 Notes on Discs ..................................................... 42 On handling discs ............................................. 42 On cleaning....................................................... 42 Licence Notification ..............................................
On cleaning Safety Information CAUTION DVD Player is a class 1 laser product. However this product uses a visible laser beam which could cause hazardous radiation exposure. Be sure to operate the player correctly as instructed. • Before playing, clean the disc with a cleaning cloth. Wipe the disc from the center out. CLASS 1 LASER PRODUCT • Do not use solvents such as benzine, thinner, commercially available cleaners or anti-static spray intended for vinyl LPs.
DVD Control Panel Buttons A. Disc loader B. Play / Pause Plays/pauses the disc. When DVD menu (root menu) is active, this button functions as “button select” (selects the highlighted item in menu) if this is not prohibited by the disc. C. Stop / Eject Stop playing disc / Eject or Load the disc Note: • You cannot eject the disc via the remote control. • While playing a file, you should press STOP button three times to eject. Overview of the Remote Control 1. Standby 2. Language selection (Set language) 3.
General Operation You can operate DVD, movie CD, music or picture CD’s content by using the proper buttons on your remote control. Below are main functions of commonly used remote control buttons. Buttons on the Remote Control / Movie Playback Picture Playback Music Playback Play Play Play Play Pause Pause Pause Pause Stop Stop Stop Stop / Skip Skip Previous / Next Previous / Next backward/forward backward/forward Shifts the zoomed picture left or right (if available).
11. Reverse stepping is not available. General Playback 12. For your convenience: Basic Play 1. Press on the power button 2. Please insert a disc to the loader. The disc will be automatically loaded and play commences if the disc does not have any menus recorded on it. A menu may appear on the TV screen after a few moments or the film may start immediately after the introduction of the Film Company. This behaviour depends on the disc content and may change.
Preferences SPDIF OUTPUT DEFAULT You can set Spdif Output as PCM or RAW. If you select PCM from SPDIF Output in DVD menu and play DVD with Dolby audio, you can get audio output with two channels via the speakers and the SPDIF Out. If you select RAW from SPDIF Output in DVD menu and play DVD with Dolby audio, speakers will be muted and you can get 5+1 Dolby audio via the SPDIF Out. If you choose RESET and press OK, the factorypresets are loaded. Parental level and parental password does not change.
Some functions ( Zoom etc) do not work • These functions are not available on the DVD. No picture • Have you pressed the correct buttons on the remote control? Try once more. No sound • Check the volume is set to an audible level. • Make sure you have not switched the sound off accidentally. Distorted sound Subtitles These are printed lines appearing at the bottom of the screen, which translate or transcribe the dialogue. They are recorded on the DVD discs.
Disc Types Compatible with This Unit D i s c Ty p e s (L o g o s ) R ec o rd in g Ty p e s D i s c S ize DV D S i n g le s i d e d ; 2 4 0 m in . 12 cm C h ar ac t er is tic s • S i n g le s i d e d ; 8 0 m in . 8 cm • 74 m in . Va r i o u s s c r e e n a n d a u d i o f u n c t i o n s c a n b e e a s il y s e l e c t e d t h r o u g h th e o n s c r ee n D o u b le s i d e d ; 1 6 0 m in .