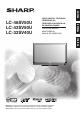
TELEVISOR CON PANTALLA DE CRISTAL LÍQUIDO OPERATION MANUAL MODE D'EMPLOI MANUAL DE OPERACIÓN ENGLISH FRANÇAIS TÉLÉVISEUR ACL ESPAÑOL LC-46SV50U LC-42SV50U LC-32SV40U LIQUID CRYSTAL TELEVISION LC-42SV50U LC-46SV50U IMPORTANT : Please read this operation manual before starting operating the equipment. IMPORTANT : Veuillez lire ce mode d’emploi avant de commencer à utilliser l’appareil. IMPORTANTE : Lea este manual de operación antes de comenzar a operar el equipo.
ENGLISH LC-46SV50U LC-42SV50U LC-32SV40U LIQUID CRYSTAL TELEVISION ENGLISH OPERATION MANUAL IMPORTANT: To aid reporting in case of loss or theft, please record the TV's model and serial numbers in the space provided. The numbers are located at the rear of the TV. Model No.: Serial No.: IMPORTANT INFORMATION WARNING: TO REDUCE THE RISK OF FIRE OR ELECTRIC SHOCK, DO NOT EXPOSE THIS PRODUCT TO RAIN OR MOISTURE.
IMPORTANT INFORMATION CAUTION: TO PREVENT ELECTRIC SHOCK,MATCH WIDE BLADE OF PLUG TO WIDE SLOT, FULLY INSERT. WARNING: FCC Regulations state that any unauthorized changes or modifications to this equipment not expressly approved by the manufacturer could void the user’s authority to operate this equipment. CAUTION: This product satisfies FCC regulations when shielded cables and connectors are used to connect the unit to other equipment.
DEAR SHARP CUSTOMER Thank you for your purchase of the Sharp Liquid Crystal Television. To ensure safety and many years of trouble-free operation of your product, please read the Important Safety Instructions carefully before using this product. IMPORTANT SAFETY INSTRUCTIONS 1) 2) 3) 4) 5) 6) 7) Read these instructions. Keep these instructions. Heed all warnings. Follow all instructions. Do not use this apparatus near water. Clean only with dry cloth. Do not block any ventilation openings.
IMPORTANT SAFETY INSTRUCTIONS 21) Replacement Parts—When replacement parts are required, be sure the service technician has used replacement parts specified by the manufacturer or have the same characteristics as the original part. Unauthorized substitutions may result in fire, electric shock, or other hazards. 22) Safety Check—Upon completion of any service or repairs to this product, ask the service technician to perform safety checks to determine that the product is in proper operating condition.
IMPORTANT SAFETY INSTRUCTIONS • Heat — The product should be situated away from heat sources such as radiators, heat registers, stoves, or other products (including amplifiers) that produce heat. • The Liquid Crystal panel is a very high technology product with 2,073,600 pixels (LC-46SV50U / LC-42SV50U) / 1,049,088 pixels (LC-32SV40U) , giving you fine picture details. Occasionally, a few non-active pixels may appear on the screen as a fixed point of blue, green or red.
IMPORTANT SAFETY INSTRUCTIONS CHILD SAFETY It Makes A Difference How and Where You Use Your Flat Panel Display Congratulations on your purchase! As you enjoy your new product, please keep these safety tips in mind: THE ISSUE • The home theater entertainment experience is a growing trend and larger flat panel displays are popular purchases. However, flat panel displays are not always supported on the proper stands or installed according to the manufacturer’s recommendations.
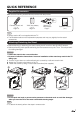
QUICK REFERENCE Supplied Accessories Make sure the following accessories are provided with the product. 46" x4 32" 42" Remote control unit ( X 1) Page 10 “AAA” size battery ( X 2) Page 12 Stand ( X 1) with Screws Page 7 Operation manual ( X 1) • Always use the AC cord supplied with the TV. • The illustrations above are for explanation purposes and may vary slightly from the actual accessories.
QUICK REFERENCE Detaching the stand neck for wall mounting CAUTION • Please use care when disassembling cabinet, stand, and pillar for wall mounting. • Detach the stand neck in the correct direction. • Do not remove the stand neck from the TV unless using an optional wall mount bracket to mount it. 1. Loosen the 4 screws that secure the stand neck by using a cross-head screwdriver. Remove stand cover from the TV set.
QUICK REFERENCE Quick Installation Tips 1. Attach your antenna to the back of the television. (See page 11.) 2. Connect the AC plug for the television into the AC outlet. 3. How to turn on the television for the first time. A) Press POWER on the television. B) The POWER indicator on the front of the television lights Green. POWER indicator POWER • Place the TV close to the AC outlet, and keep the power plug within reach. • This product must only be connected to a 120V, 60Hz AC outlet.
QUICK REFERENCE Using the Remote Control Unit Use the remote control unit by pointing it towards the remote control sensor on the TV. Objects between the remote control unit and the remote control sensor may prevent proper operation. ■ Cautions regarding the remote control unit • Do not expose the remote control unit to shock. In addition, do not expose the remote control unit to liquids, and do not place in an area with high humidity. • Do not install or place the remote control unit under direct sunlight.
Preparation Antennas To enjoy a clearer picture, use an outdoor antenna. The following is a brief explanation of the types of connections that are used for a coaxial cable. If your outdoor antenna uses a 75-ohm coaxial cable with an F-type connector, plug it into the antenna terminal at the rear of the TV set. 1. A 75-ohm system is generally a round cable with F-type connector that can easily be attached to a terminal without tools (Commercially available). 2.
Preparation Installing Batteries in the Remote Control Unit If the remote control fails to operate TV functions, replace the batteries in the remote control unit. 1 Open the battery cover. 3 Close the battery cover. 2 Insert two “AAA” size batteries (supplied with the product). • Place the batteries with their terminals corresponding to the ( ) and ( ) indications in the battery compartment. CAUTION Improper use of batteries can result in chemical leakage or explosion.
Contents IMPORTANT INFORMATION ..................................................................................................... 1 TRADEMARKS ............................................................................................................................ 2 IMPORTANT SAFETY INSTRUCTIONS ..................................................................................... 3 QUICK REFERENCE .........................................................................................................
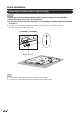
Part Names TV (Front) POWER indicator Remote control sensor Light sensor TV (Side/Rear) *2 *1 HEAD PHONE Channel buttons (CH / ) Volume buttons (VOL+ / _) INPUT 1 terminal (HDMI) USB MENU button INPUT button *1 POWER button *1: See pages 17, 18, 19 and 20 for external equipment connection. *2: See page 16, 21, 23 and 28 for button operations. • The illustrations in this operation manual are for explanation purposes and may vary slightly from the actual operations.
Part Names Remote Control Unit POWER 16 INPUT 1 2 3 4 5 6 7 8 9 17 0 DIS P LAY F RE E Z E 18 19 20 21 22 23 TV FLASHBACK MUT E + VOL ENT AUDIO S URROUND PC US B CH 2 3 4 5 6 7 ME NU 8 9 10 ENTER E X IT R E TU R N 24 FAV ORIT E CH 25 26 1 A B S LE E P CC C D VIEW MODE AV MODE 11 12 13 14 15 LCDTV GJ221 • When using the remote control unit, point it at the TV. 1. INPUT: Select a TV input source. (See page 23.) 2. 0–9: Set the channel. 3.
Introduction to Connections Experiencing HD Images An HDTV without an HD source is just an ordinary TV. To enjoy HD images on the TV, you should get HD programming from the following: • Over-the-air broadcasting via HD quality antenna • HD cable/satellite subscription • HD compatible external equipment • For information on updating to HD programming, ask your cable/satellite service provider. Types of Connection Image quality differs depending on the terminal used.
Connecting to External Equipment You can connect many types of external equipment to your TV. To view external source images, select the input source from INPUT on the remote control unit or on the TV. (See pages 15 and 23.) For connecting the TV to external equipment, use commercially available cables. CAUTION • To protect equipment, always turn off the TV before connecting any external equipment. • Please read the relevant operation manual (Blu-ray disc player, etc.) carefully before making connections.
Connecting to External Equipment When using Component cable (INPUT 4): • Blu-ray disc player • DVD player • HD cable/satellite set-top box Audio cable Component video cable PR (Red) PB (Blue) Y (Green) AUDIO-L (White) AUDIO-R (Red) COMPONENT OUT Back panel horizontal inputs • To enjoy 1080p display capability, connect your external equipment using an HDMI-certified cable or a component cable and set the equipment to 1080p output.
Connecting to External Equipment Connecting an Audio Amplifier When using coaxial cable: It is possible to output audio through the DIGITAL AUDIO terminal. PCM audio outputs from the terminal. Side Panel Vertical Output Coaxial Cable OPTICAL DIGITAL AUDIO INPUT • Digital Audio output is not available when using an HDMI input.
Connecting to External Equipment Connecting a PC Refer to page 43 for a list of PC signals compatible with the TV. When using HDMI cable (INPUT 1, 2 or 3): Back and side panel inputs HDMI-certified cable HDMI OUT • The HDMI terminals only support digital signal. When using DVI-HDMI conversion cable (INPUT 1,2,3): Back and side panel inputs Ø 3.5 mm stereo minijack cable AUDIO DVI-HDMI conversion cable DVI OUT • When using a DVI-HDMI conversion cable, you should make an analog audio connection.
Watching TV Turning On/Off the Power Press POWER on the TV, or POWER on the remote control unit to turn the power on. • POWER indicator: Power on, Green; Power off, red. Press POWER on the TV, or POWER on the remote control unit again to turn the power off. • The TV enters standby and the image on the screen disappears. POWER INPUT 1 2 3 POWER • If you are not going to use this TV for a long period of time, be sure to remove the AC cord from the AC outlet.
Watching TV Home: “Power Saving” is set to "On", and AV MODE is set to "STANDARD". Store: “Power Saving” is set to "Off" and AV MODE is set to "DYNAMIC (Fixed)". Picture Reset and Feature Demo can be set. 4. Air/Cable(Antenna setting) • Make sure what kind of connection is made with your TV when selecting “Air” or “Cable”. • Press / to select “Air” or “Cable” and press to the next step. TV EZ Setup Air/Cable 7.
Direct Button Operation MUTE POWER INPUT Mutes the current sound output. Press MUTE. ENTER 1 2 3 4 5 6 7 8 9 0 ENT DIS P LAY F RE E Z E + VOL TV AUDIO E X IT R E TU R N FAV ORIT E CH A B S LE E P CC C D VIEW MODE AV MODE • Mute can be canceled by using the method below. - Mute will be canceled if you press VOL + / - or MUTE. FLASHBACK MUT E S URROUND US B PC CH ME NU SLEEP LCDTV GJ221 Changing Channels You can change channels by pressing CH or 0-9, or • (DOT).
Direct Button Operation AV MODE AV MODE gives you several viewing options to choose from to best match the surrounding environment of the TV, which can vary due to factors like room brightness, type of program watched or the type of image input from external equipment. Press AV MODE. Current AV MODE displays. • Press AV MODE again before the mode displayed on the screen disappears. AUDIO ■ MTS/SAP stereo mode The TV has a feature that allows reception of sound other than the main audio for the program.
Direct Button Operation VIEW MODE You can select the screen size. 1 Press VIEW MODE. • The View Mode menu displays. • The menu lists the View Mode options selectable for the type of video signal currently being received. 2 Press VIEW MODE or / while the View Mode menu is displayed to select a desired item on the menu. • You can sequentially select a View Mode that has its own aspect ratio.
On-Screen Display Menu Menu Items For TV Mode Picture Settings ....................................................28 Initial Setup ...........................................................33 AV MODE (Changing Pic.Quality) .............................29 OPC ........................................................................29 Backlight .................................................................28 Contrast ..................................................................28 Brightness .......
On-Screen Display Menu On-Screen Display Menu Operation Example Example System Options Select Menu Initial Setup Select ENTER Picture Settings Information Enter RETURN Exit Menu Picture Settings Adjust STANDARD AV MODE OPC [STANDARD] [On] Initial Setup Select ENTER Picture Settings Information Enter RETURN Back STANDARD AV MODE OPC Backlight Contrast Contrast Brightness Brightness Color Color Tint Tint Sharpness Sharpness Advanced Advanced Reset Reset [ [ [ [ [ 82] 51] 50
On-Screen Display Menu Menu Operation Button Using the remote control Use the following buttons on the remote control to operate the menu. TV US B PC Picture Settings Adjusts the picture to your preference with the following picture settings. Example ME NU Picture Settings Picture Settings AV MODE ENTER OPC E X IT R E TU R N Menu STANDARD TV [On] 80] Contrast [ Press to open or close the menu screen. ◄/►: Press to select a desired item on the screen or adjust a selected item.
On-Screen Display Menu AV MODE (Changing Pic.Quality) The audio and video settings can be changed to suit the program or input content being watched. Select from the following AV modes. USER/STANDARD/MOVIE/GAME/PC/ DYNAMIC/DYNAMIC (Fixed) • You can select AV MODE by pressing AV MODE on the remote control unit. See page 24 for details of AV MODE settings. OPC Automatically adjusts the brightness of the screen. Off: The brightness is fixed at the value set in "Backlight". On: Automatically adjusts.
On-Screen Display Menu Power Control Audio Settings You can adjust the sound quality to your preference with the following settings. Example Audio Settings Power control setting allows you to save energy. Example TV Power Control Menu TV Audio Settings US B PC ME NU STANDARD [ 50] [ 50] EXIT RETURN [Off] Reset 1. Press MENU to display the MENU screen, and then press / to select "Audio Settings". 2. Press / to select a specific adjustment item. • Select "Surround" and then press / to set. 3.
On-Screen Display Menu System Options Change Audio MTS Example DIS P LAY F RE E Z E System Options Menu System Options TV FLASHBACK MUT E + VOL AUDIO S URROUND PC US B CH ME NU View Option Input Terminal Setting ENTER Caption Setup E X IT R E TU R N FAV ORIT E CH A B S LE E P CC C D VIEW MODE AV MODE 1. Press MENU to display the MENU screen, and then press / to select "System Options". 2. Press / to select a specific adjustment item and then press ENTER. 3.
On-Screen Display Menu Analog Closed Caption This allows you to select the Closed Captions service levels of analog broadcasting to be displayed. Closed captioning allows you to read the voice content of television programs on the TV screen. Designed to help the hearing impaired, this feature uses on-screen “text boxes“ to show dialogues and conversations while the TV program is in progress. Captions will appear on the screen during captioned broadcasts.
On-Screen Display Menu PC IN Video: Select this when the TV and PC are connected using an analog RGB cable and the audio is not input. Video+Audio: Select this when the TV and PC are connected using an analog RGB cable and the audio is input via a Ø 3.5 mm stereo minijack. HDMI IN Auto: Audio path is set to HDMI or PC line in automatically. HDMI(Digital): Select this when the TV and PC are connected using an HDMI-certified cable and audio is input via the same cable.
On-Screen Display Menu Air/Cable: Make sure what kind of connection is made with your TV when selecting "Air" or "Cable". CH Search: Channel auto search makes the TV look for all channels viewable in the set area. • If "Cable" is selected for Antenna setting, scrambled channels are removed after the Channel search has been completed. Completed: The settings confirmation screen is displayed. Confirm the information displayed on the screen. • See EZ Setup on pages 21 to 22 for setting each item.
On-Screen Display Menu TV Parental Guidelines V-Chip V-CHIP is an electronic filtering device built into your TV. This tool gives parents a great degree of control over broadcasts accessed by their children. It allows parents to select programs judged suitable for child viewing while blocking ones judged not suitable. It does so automatically once you activate the V-CHIP feature in your TV. "V-Chip" and "Status" will not be selectable from the menu if you do not first configure your secret number.
On-Screen Display Menu : The content rating can be set, but this rating is not normally broadcast by TV stations. : Content rating can be set. Canadian Rating Systems (Canadian English ratings and Canadian French ratings) • The TV rating systems in Canada are based on the Canadian Radio-Television and Telecommunications Commission (CRTC) policy on violence in television programming.
Enjoying Photo/Music/Video Playback You can connect the TV to a USB memory device, USB hard drive to enjoy viewing pictures, listening to music, and watching videos. • Depending on the USB memory device/USB hard drive, the TV may not be able to recognize the recorded data. • It may take time to read the recorded data if the USB memory device/USB hard drive contains many files or folders. • Use only alphanumeric characters for naming files.
Enjoying Photo/Music/Video Playback Press MENU to display the sub-menu. You can browse the files by the following options. • Sort • Media Type • Thumbnail size Buttons for viewing Individual Photos operation Buttons EXIT A (red) B (green) C (blue) D (yellow) / • When there are invalid photo files, the X mark will be display for the file.
Enjoying Photo/Music/Video Playback Buttons for playing music Press MENU to display the sub-menu. You can select the following options to play the musics. • • • • • • Buttons EXIT A(red) B(green) C (blue) Description Return to the thumbnail selection screen. Repeat one / Repeat all Play the music in random order. Go to the next/previous photo. Forward/Backward. Play/Pause. Display the information. Sub Menu Pause Repeat Shuffle On Show Info Hide Spectrum Lyric options 01/02 USB Media OK.
Appendix Troubleshooting Problem No power Unit cannot be operated. Possible Solution Check if you pressed POWER on the remote control unit. (See page 21.) If the indicator on the TV is still red, press POWER on the TV. Is the AC cord disconnected? (See page 9.) Has the power been turned on? (See page 21.) External influences such as lightning, static electricity, may cause improper operation.
Appendix Specifications Item LCD panel TV Function Model: LC-46SV50U Model: LC-42SV50U Size 46” Class (46” Diagonal) 42” Class (42” Diagonal) Resolution 2,073,600 pixels (1,920 x 1080) 2,073,600 pixels (1,920 x 1080) TV-standard (CCIR) American TV Standard ATSC/NTSC System VHF/UHF VHF 2-13ch, UHF 14-69ch CATV 1-135ch (non-scrambled channel only) Digital Receiving Terrestrial 2-69ch Channel Broadcast (8VSB) Digital cable *1 (64/256 1-135ch (non-scrambled channel only) QAM) Audio multiplex Au
Appendix Specifications Item LCD panel Model: LC-32SV40U Size 32” Class (31 33/64” Diagonal) Resolution 1,049,088 pixels (1,366 x 768) TV-standard (CCIR) VHF/UHF CATV Receiving Digital Terrestrial Channel Broadcast (8VSB) Digital cable *1 (64/256 QAM) Audio multiplex TV Function Audio out American TV Standard ATSC/NTSC System VHF 2-13ch, UHF 14-69ch 1-135ch (non-scrambled channel only) 2-69ch 1-135ch (non-scrambled channel only) BTSC System 5Wx2 Side INPUT 1 HDMI in with HDCP, Audio in (Ø 3.
Appendix PC Compatibility Chart It is necessary to set the PC correctly to display XGA and WXGA signal. PC Resolution 720 x 400 VGA SVGA PC XGA 640 x 480 800 x 600 1024 x 768 Horizontal Frequency Vertical Frequency VESA Standard 31.46 kHz 70.08 Hz — 31.47 kHz 59.94 Hz O 37.50 kHz 75.00 Hz O 37.88 kHz 60.32 Hz O 48.08 kHz 72.19 Hz O 46.88 kHz 75.00 Hz O 48.36 kHz 60.00 Hz O 56.48 kHz 70.07 Hz O 60.02 kHz 75.03 Hz O WXGA 1366 x 768 47.71 kHz 59.
Appendix RS232 Port Specifications PC control of the TV Command format • Attach an RS-232C cable cross-type (commercially available) to the supplied Din/D-Sub RS-232C for the connections. Eight ASCII codes + CR • This operation system should be used by a person who is accustomed to using computers. Command 4-digits: Command. The text of four characters.
Appendix Information on the Software License for This Product ■ Software composition The software included in this product is comprised of various software components whose individual copyrights are held by SHARP or by third parties.
Appendix Legal notices ■ FCC Part 15 This device complies with Part 15 of the FCC Rules. Operation of this product is subject to the following two conditions: (1) this device may not cause harmful interference, and (2) this device must accept any interference received, including interference that may cause undesired operation. This equipment has been tested and found to comply within the limits for a class B digital device, pursuant to Part 15 of the FCC Rules.
Calling for Service For location of the nearest Sharp Authorized Service, or to obtain product literature, accessories, supplies, or customer assistance, please call 1-800-BE-SHARP.
Dimensional Drawings Unit: inch (mm) Unité: pouce (mm) Unidad: pulgada (mm) LC-46SV50U 44 7/64 (1120) 5 23/64 (136) 3 53/64 22 43 /64 (575.67) 16 15 /32 (418) *1 27 7/8 (708) 29 21/32 (753) 40 13/64 (1021.
Dimensional Drawings Unit: inch (mm) Unité: pouce (mm) Unidad: pulgada (mm) LC-42SV50U 40 29/32 (1039) 15 9/16 (395) 20 47/64 (526.26) *1 11 3 /16 (284) 20 7/16 (519) Active area/Área activa/Zone active 7 7/8 (200) 2 49/64 (70) 7 7/8 (200) *1 3 33/64 (89) *1 26 7/64 (663) 27 27/32 (707) 36 3 /4 (933.
Dimensional Drawings Unit: inch (mm) Unité: pouce (mm) Unidad: pulgada (mm) LC-32SV40U 30 63/64 (787) 4 1 /32 (102) 3 15 /64 (82) 11 5/64 (281) 15 9/16 (395.26) *1 20 9 /16 (522) 22 3 /32 (561) 27 19/32 (700.
SHARP ELECTRONICS CORPORATION Sharp Plaza, Mahwah, New Jersey 07495-1163 SHARP CORPORATION Printed in China Imprimé au Chine Impreso en China XXXXXXXXXXXXX