AQUOS SHARP LC-40D78UN LIQUID CRYSTAL TELEVISION I'TI DOLBY DIGITAL IMPORTANT 1245 Supplied Make sure tile ] .................................. : Please read this operation manual before starting operating the equipment.
IMPORTANT.' Model No.: To aid reporting in case of loss or theft, please record the TV's model and serial numbers in the space provided. The numbers are located at the rear of the TM. IMPORTANT WARNING: Serial No.: INFORMATION TO REDUCE THE RISK OF FIRE OR ELECTRIC SHOCK, DO NOT EXPOSE THIS PRODUCT TO RAIN OR MOISTURE.
IMPORTANT INFORMATION INFORMATION: This equipment has been tested and found to comply with the limits for a Class B digital device, pursuant to Part 15 of the FCC Rules. These limits are designed to provide reasonable protection against harmful interference in a residential installation. This equipment generates, uses and can radiate radio frequency energy and, if not installed and used in accordance with the instructions, may cause harmful interference to radio communications.
DEAR SHARP CUSTOMER Thank you for your purchase of the Sharp of trouble-free operation of your product, using this product, IMPORTANT Liquid Crystal Television. p_ease read the Important SAFETY To ensure safety and many years Safety instructions carefully before INSTRUCTIONS Electricity is used to perform many useful functions, but it can also cause personal injuries and property damage if improperly handled. This product has been engineered and manufactured with the highest priority on safety.
iMPORTANT f, SAFETY iNSTRUCTiONS Outdoor Antenna Grounding If an outside antenna is connected to the television equipment, be sure the antenna system is grounded so as to provide some protection against voltage surges and built-up static charges.
iMPORTANT SAFETY iNSTRUCTiONS F ....... Caring for the Liquid Crystal panel • Turn off the main power and unplug the AC cord from the wall outlet before handling. • Gently wipe the surface of the display panel with a soft cloth (cotton, flannel, etc.). To protect the display panel, do not use a dirty cloth, liquid cleaners, or a chemical cloth (wet!dry sheet type cloth, etc.). This may damage the surface of the display panel.
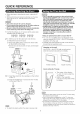
QUICK REFERENCE " o Before attaching (or detaching) the stand, unplug the AC cord. o Before performing work spread cushioning over the base area to lay the TV on. This will prevent it from being damaged. o Attach the stand in the correct direction, o Do not remove the stand from the TV unless using an optional wammmount bracket to mount it.
QUICK REFERENCE 1 Attach your antenna (See page 9.) 2 Connect outlet. to the back of the television. the AC plug for the television into the AC An HDTV without an HD source is just an ordinary "IV. To enjoy HD images on the "IV, you should get HD programming from the following: • Over_the_air broadcasting via HD quality antenna • HD cable/satellite subscription • HD compatible external equipment • For information on updating to HD programming, cable/satellite service provider.
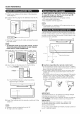
Preparation To enjoy a clearer picture, that are used for a coaxial plug it into the antenna use an outdoor antenna. The following is a brief explanation cable. If your outdoor antenna uses a 75-ohm coaxial cable terminal at the rear of the TV set. t .A 75-ohm system is generally a round cable with F4ype connector _Fqype that can easily be attached to a terminal without tools (Commercially available). _ 2.
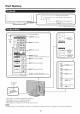
Part Names 0[ 0r ........ ® ® l [-- Remote control sensor '} oPc ...... ! * (See page18,) OPC indicator (See page 18.) | POWER indicator (See page 12.)_ * OPC: Optical Picture Control Antenna/Cable in _I-- INPUT 8 OUTPUT terminals L AN_LE terminals _'!I® p--I.PUT I ter,ninale 9,!1®tP--_"PUT _tem*,a_e INPUT 5 terminal (HDMI) _ ERVICE terminal *2 _ --I.PUT6terminal (.DMI/ powEM (H_ MENU -- INPUT 4 terminal (PC IN) POWER button I HH-MENU button INPUT I DIGITAl.
Connecting to External Equipment You can connect many types of external equipment to your TV. To view external source images, select the input soume from INPUT on the remote control unit or on the TV. (See page 1 5.) For connecting the TV to external equipment, use commercially available cables. The illustrations of the terminals are for explanation purposes and may vary slightly from the actual products. • To protect equipment, always turn off the TV before connecting any external equipment.
Watching TV Press POWER on tile TV or oil the remote control unit to turn the power on. o The POWER indicator (Green): The TV is on, o The Initial Installation starts when the TV powers on for the first time, If the TV has been turned on before, the Initial Installation will not be invoked, For changing the settings of the InitFalInstallation, perform "E7 setup" on the Setup menu on page 20, Press POWER power off.
Direct Button Operation You carl change the volume by pressing tile TV or on the remote control unit. VOL +/- on , To increase the vokJme, press VOL +. , To decrease the vokJme, press VOL -. I_ _ Audio :21 status When "Output Select" is set to "Variable", the indicator on the screen changes as shown below. I _1 See page 24 for details on the Output Select function. Mutes the current sound output. Press MUTE. "c_" will be displayed on the screen for 30 minutes, and the sound is silenced.
Direct Button Operation AV MODE gives you several viewing options to choose from to best match the surrounding environment of the TV, which can vary due to factors like room brightness, type of program watched or the type of image input from external [] MTS/SAP stereo mode The TV has a feature that allows reception of sound other than the main audio for the program. This feature is called Multi-channel Television Sound (MTS).
Direct Button Operation To view external source images, select the input source by pressing INPUT on the remote control unit or on the TV. 1 Press CC. o This will present the Closed Caption intom_ation display, 2 Press CC while the Closed still on the screen. Caption information is o Press repeatedly until you select the desired closed caption service. 1 2 Press INPUT. • A list ot selectabb sources appears. Press iNPUT input source.
Direct Button Operation You can select the screen size. 1 PressVIEW MODE. o The View Mode menu displays. o The menu lists the View Mode options sebctable for the type of video signal currently being received. 2 Press VIEW MODE or _./y while the View Mode menu is displayed • You can sequentially select a View Mode that has its own aspect ratio. to select a desired item on the menu. [] For 4:3 programs Example: Screen size images Side Bar S.
On-Screen Display Menu Jl Jh, Example " : Example 9-[I ...... Iooption AudioOnly ® ® Item displayed in yellow o This indicates the item currently selected. o Press ENTER to go to the adjustment screen for this item, Item displayed in white • This indicates that the item can be selected. 1 Press 2 ,_1 Press MENU _/1_ to display the MENU screen. to select the desired ,_2}Press _,/V to select a specific and then press ENTER.
On-Screen Display Menu Adjusts the picture to your preference following picture settings. Backlight The screen dims Contrast For less contrast The screen brightens For more contrast Brightness For bss brightness For bss color intensity Skin tones become reddish For less sharpness For more brightness For more color intensity Skin tones become greenish For more sharpness Color Tint Sharpness For a better correction.
On-Screen Display Menu ililiiii_i_ii_iiii_!_ii_ ¸_i_ii_i!iiiii_i!!ii!i_i_i_ii_ii _7_7_7_7_7_7_7_7_777_7_77_7_7_7_i!!_i_!_!!i!i_i_i_!i_!i_!i_i ¸!i_ii!i_ii!i_iii!!i!ili!ii!ii!ii!ii!ii!ii!iTi!i!_iTiTiTiTiTiTi77ii!ii!i!i ¸I¸iil mQ . • • The brightness level range of the OPC sensor's automatb adjustments can be set according to your preferences. The adjustment range of the OPC sensor can be set to a maximum of +16 and a minimum of-16. Max.
On-Screen DispJay Menu This setting allows you to skip the HDMI or PC-IN Input ("INPUT4 (PC)", "INPUT5 (HDMI)", "INPUT6 (HDMI)" You can run EZ Setup preset channels. Language: Select again, from even among French and Spanish). TV Location: Select "Home" after setting 3 languages or "Store" up and "INPUT7 (HDMI)") on the Input Selection Yes: Skips the input. No: Does not skip input.
On-Screen Display Menu For automatically adjusting tile PC image. Yes: Auto Sync. starts. No: This function does not work. To watch an HDMI or PCqN equipment select "INPUTS", "INPUT6" or "INPUT7" SOURCE" menu using INPUT on the remote control unit or on the TV. Enable: To use View Mode based on signal recognition, including an HDMI signal. Disable: No function. o When "Auto Sync." is successful, "Completed" displays. If not, "Auto Sync." failed. o "Auto Sync." may fail even if "Completed" displays.
On-Screen Display Menu V-CHIP is an electronic filtering device built into your TV. This tool gives parents a great degree of control ii!Ji_i_i_ii_i@i'_i_i_i_i_i_i_i_i_i_i_i_i_i!_i _@!@_!_!_!_!_!_!_!_!_!_!_!_!_!_!_!_!_!_!_!_!_!_!_!_!_!_!_!_!_!_!_!_ I!II _!i_i!i!_i_i_i_i_i_iiiii:ili:i!ili!i_ili_iiiiiiiii_i! _i_i_ _ii;!i_i I¸I_ _!_!_!_!_!_!_!_!_!_!_!_!_!_!_!_!_!_!_!_!_!_!_!_!_!_!_!_ over broadcasts accessed by their children.
On-Screen Display Menu [] TV Parental Guidelines Canadian Rating Systems (Canadian English ratings and Canadian French ratings) o The TV rating systems in Canada are based on the Canadian Radio Television and Tebcommunbations Commission (CRTC) policy on viobnce in television programming. o While violence is the most important content element to be rated, the structure developed takes into consideration other program content like language, nudity, sexuality and r_ature themee.
On-Screen [] Canadian Display Menu French Ratings Example When listening to music from a music program, can turn the screen off and enjoy audio only. On: Audio is output without screen image. Off: Both screen images and audio are output. o The screen image will return to normal when a button (except those tor audio adjustment, such as VOL, MUTE, AUDIO) is pressed. Press A/Y to adjust the item to your desired position. "Block" indicates the item is blocked. Press MENU to exit. E: Exempt programming.
On-Screen Display Menu D This function allows you to adjust the closed caption screen appearance to suit your preference. You can This function locks the operation buttons on the TV and the remote control. Off: No adjustment. RC Control Lock: All buttons on the remote control are locked. Button Control Lock: All buttons on the TV, except POWER, are locked. adjust 8 items: "Font Size", "Font Style", "Font Color", "Font Opacity", "Background Color", "Background Opacity", "Font Edge" and "Edge Cole€'.
On-Screen 3 4 Display Menu Press A/Y to select "Software press ENTER. Update", and then 7 Press ENTER to start checking memory device. 6 During the data checking, ENTER to start updating. o The screen becomes dark tot a while until the update screen can be displayed. Please wait tot the update screen to appear. Do not unplug the AC cord. • If you have already set the Secret No., go to step 4. Input the 4-digit secret number by using 0-9. 5 Press the data in the USB "Checking" blinks.
Appendix Problem Possible Solution o No power o Check if you pressed POWER on the remote control unit.._ Page 12 if the indicator on the TV does not light up, press POWER on the TV. o is the AC cord disconnected? _, Page 8 o Hasthe power beentumed on?.,Y Page 12 o Unit cannot be operated, o External influences such as lightning, static electricity, may cause improper operation.
Appendix Problem Possible Solution o No picture o Is connection to other components correct? _ Page 11 o Is the correct input signal type selected in "Input Select" atter connection? Page 24 o Is the correct input selected? .i,, Page 15 o Is "On" selected in "Audio One/"? _ Page 24 o If the PC image is not displayed, check the following: When connecting a laptop PC to the TV, check that display output mode of the PC is set to external monitor. Check the resolution setting on the PC.
Appendix Item LCD panel Model: LC=40D78UN Size 40" Class (40" Diagonal) Resolution 2,073,600 pixels (1,920 x 1,080) TV standard (CCIR) TV Function Receiving Channel American TV Standard ATSC/NTSC System VHF/UHF VHF 2-13ch, UHF 14 69ch CATV 1 135ch (non scrambled channel only) Digital Terrestrial 2-69ch Broadcast (8VSB) Digitalcable'_ (64/256OAM) Audio multiplex Audio out 1_135ch (non scrambled channel only) BTSC System 8W × 2 Rear Terminals INPUT 1 AV in, COMPONENT in INPUT 2 COMPONENT
Appendix It is necessary to set the PC correctly PC to display Resolution VGA XGA and WXGA Horizontal Frequency signal. Vertical Frequency VESA Standard 720 x 400 31.5 kHz 70 Hz 640 x 480 31.5 kHz 37.9 kHz 60 Hz 72 Hz O O 37.5 35.1 37.9 48.1 46.9 75 56 60 72 75 Hz Hz Hz Hz Hz O O O O O kHz kHz kHz kHz kHz SVGA 800 x 600 XGA 1024 x 768 48.4 kHz 56.5 kHz 60.0 kHz 60 Hz 70 Hz 75 Hz O O O WXGA SXGA 1360 x 768 1280x 1024 47.7 kHz 64.
Calling for Service For location of the nearest Sharp Authorized Service, customer assistance, please call 1-800-BE-SHARP. LIMITED SHARP in its defective This warranty changed, been does altered home your use In order which container, or part or is being their CORPORATION odg[na] Product not to any or tampered w_th.
VALID IN CANADA C LiMiTED WARRANTY Consumer Electronics Products Congratulations on your purchase! Sharp Electronics of Canada Ltd. (hereinafter called "Sharp") gives the following express warranty to the first consumer purchaser for this Sharp brand product, when shipped in its original container and sold or distributed in Canada by Sharp or by an Authorized Sharp Dealer: Sharp warrants that this product is free, under normal use and maintenance, from any defects in material and workmanship.