Contents TV - Features ......................................................... 2 Connecting to your mobile device via WiFi........ 19 Dear SHARP customer............................................ 3 Using MIRACAST.............................................. 19 Using DLNA Network Service............................ 20 Important safety precautions................................... 3 Environmental Information ..................................... 6 Internet Portal.........................................
TV - Features SPECIAL NOTE FOR USERS IN THE U.K. The mains lead of this product is fitted with a nonrewireable (moulded) plug incorporating a 5A fuse. Should the fuse need to be replaced, a BSI or ASTA approved BS 1362 fuse marked or and of the same rating as above, which is also indicated on the pin face of the plug, must be used. ASA Always refit the fuse cover after replacing the fuse. Never use the plug without the fuse cover fitted.
• Miracast. The illustrations and the OSD in this operation manual are for explanation purposes and may vary slightly from the actual operations. • The examples used throughout this manual are based on the LC-42LE762E model. Dear SHARP customer Thank you for your purchase of the SHARP LCD colour TV product. To ensure safety and many years of trouble-free operation of your product, please read Important safety precautions carefully before using this product.
• Ventilation—The vents and other openings in the cabinet are designed for ventilation. Do not cover or block these vents and openings since insufficient ventilation can cause overheating and/or shorten the life of the product. Do not place the product on a bed, sofa, rug or other similar surface, since they can block ventilation openings.
• If the cabinet is very dirty, wipe with a soft cloth (cotton, flannel, etc.) soaked in neutral detergent diluted with water and thoroughly wrung out, and then wipe with a soft dry cloth. • Avoid using benzene, thinner, and other solvents, as these may deform the cabinet and cause the paint to peel off. • Do not apply insecticides or other volatile liquids. Also, do not allow the cabinet to remain in contact with rubber or vinyl products for a long period of time.
Environmental Information This television is designed to consume less energy to help save the environment. To reduce energy consumption, you should take the following steps: The Standby Off/On button doesn´t separate this device completely from mains. Moreover the device consumes power in the standby operation. In order to separate the device completely from mains, the mains plug has to be pulled from the mains socket.
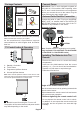
Package Contents Connect Power TV LED TV Batteries: 2 X AAA IMPORTANT: The TV set is designed to operate on 220-240V AC, 50 Hz socket. After unpacking, allow the TV set to reach the ambient room temperature before you connect the set to the mains. Plug the power cable to the mains socket outlet. Antenna/Cable/Satellite Connection Quick Guide 1 X Video & Audio Connection Cable Connect the aerial or cable TV plug to the AERIAL INPUT (ANT.
• Do not install or place the remote control unit under direct sunlight. The heat may cause deformation of the unit. • The remote control unit may not work properly if the remote control sensor of the TV is under direct sunlight or strong lighting. In such cases, change the angle of the lighting or the TV, or operate the remote control unit closer to the remote control sensor. Switching On/Off To Switch the TV On Connect the power cord to the mains socket.
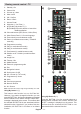
Viewing remote control - TV 1. Standby / On 2. Channel list a) 3. Volume up / down 4. Menu on/off 5. OK / Confirm 6. Return / Back 7. Internet Portal 8. My button 1 / YouTube (*) TV 9. a) (RC4847) My button 2 (**) b) (RC4848) Press this button to launch the Netflix application. 10. Coloured buttons (Red, Green, Yellow, Blue) 11. Mono-Stereo Dual I-II / Current language 12. Fast rewind (in media browser mode) 13. Pause (in media browser mode) / Timeshift recording 14. Programme recording 15.
Viewing the Connections Connector Type Cables Device Scart Connection (back) VGA Connection (back) PC/YPbPr Audio Connection (back) HDMI Connection (back&side) SPDIF (Optical Out) Connection (back) Side AV (Audio/Video) Connection (side) Side AV Connection Cable (supplied) Headphone Connection (side) Note: When connecting a device via the YPbPr or Side AV input, you must use connection cables to enable connection. For Side AV input you should use the supplied cable.
Using a Conditional Access Module IMPORTANT: Insert or remove the CI module only when the TV is SWITCHED OFF. In order to watch certain digital channels, a conditional access module (CAM) can be necessary. This module must be inserted in the CI slot of your TV. 1. Obtain the Conditional Access Module (CAM) and the viewing card by subscribing to a pay channel company, then insert those to the TV using the following procedure. 2.
First Time Installation When turned on for the first time, the language selection screen is displayed. Select the desired language and press OK. On the next screen, set your preferences using the navigation buttons and when finished, press OK to continue. You can activate Store Mode option at this point. This option is intended only for store use. It is recommended to select Home Mode for home use. If Store Mode is selected, a confirmation screen will be displayed. Select YES to proceed.
You can set your Media Browser preferences by using the settings menu. other cables between the TV and the audio system (A/V receiver or speaker system). Changing Image Size: Picture Formats When ARC is active, TV does not mute its other audio outputs automatically. So you need to decrease TV volume to zero manually, if you want to hear audio from connected audio device only (same as other optical or co-axial digital audio outputs).
Menu Features and Functions Picture Menu Contents 3D Settings Press to view 3D settings. Mode You can change the picture mode to suit your preference or requirements. The Picture mode can be set to one of these options: Cinema, Game, Sports, Dynamic and Natural. Contrast Sets the lightness and darkness values of the screen. Brightness Sets the brightness value for the screen. Sharpness Sets the sharpness value for the objects displayed on the screen.
Menu Features and Functions Sound Menu Contents Volume Adjusts the volume level. Equalizer Selects the equalizer mode. Custom settings can be made only when in User mode. Balance This setting is used for emphasizing left or right speaker balance. Headphone Sets headphone volume. Sound Mode You can select a sound mode (if the selected channel supports). AVL (Automatic Volume Limiting) This function sets the sound to obtain fixed output level between programmes.
Menu Features and Functions Subtitle Mode This option is used to select which subtitle mode will be on the screen (DVB subtitle / TXT subtitle) if both is available. Default value is DVB subtitle. Available only in Norway. Hard of Hearing Enables any special feature sent from the broadcaster. Audio Description Audio description refers to an additional narration track for blind and visually impaired viewers of visual media, including television and movies.
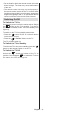
Electronic Programme Guide (EPG) Some, but not all channels send information about the current and next programmes. Press the “ ” button to view the EPG menu. Up/Down/Left/Right: Navigate EPG. OK: Displays programme options. INFO (İ): Displays, in detail information on programme selected. GREEN: Switches to List Schedule EPG. YELLOW: Switches to Timeline Schedule EPG. BLUE: displays filtering options. (RECORD): the TV will start to record the selected progamme. You can press again to stop the recording.
The files of the recorded programmes will not be available to be played on a computer. You can play the recordings only via your TV. Lip Sync delay may occur during the timeshifting. The TV can record programmes up to ten hours. Recorded programmes are split into 4GB partitions. Recordings of HD programmes can occupy bigger size on the USB disk depending on the broadcast’s resolution. For this reason it is recommended to use USB hard disk drives for recording HD programmes.
change the settings such as IP Address using this menu. Broadband ISP connection You can press YELLOW button to scan available networks for wireless connection. Afterwards, a list of networks will be displayed. Select your network from the list and press OK. If the selected network is protected with a password, key in the correct code. You can also use virtual keyboard to enter the password. Wait until the IP the address is shown on the screen. This means that the connection is now established.
2. Enable the Miracast function on the Miracast supported device and connect to the TV. (The TV changes according to the behavior of the device). Note: This feature can be used only if the mobile device supports Miracast. Scanning and connecting processes differ according to the programme you use. Android based mobile devices should have the software version V4.1.2 and above.
HBBTV System HbbTV (Hybrid Broadcast Broadband TV) is a standard that seamlessly combines TV services delivered via broadcast with services delivered via broadband and also enables access to Internet only services for consumers using connected TVs and settop boxes. Services delivered through HbbTV include traditional broadcast TV channels, catch-up services, video-on-demand, EPG, interactive advertising, personalisation, voting, games, social networking and other multimedia applications.
Try searching for wireless networks again, using the Network Settings menu screen. • The transmission speed differs depending on the distance and number of obstructions between the transmission products, the confi guration of these products, the radio wave conditions, the line traffic, and the products that you use. The transmission may also be cut off or get disconnected depending on the radio wave conditions DECT phones, or any other WiFi 11b appliances.
• Do not apply spray cleaners directly onto the surface of the 3D Glasses.This may result in discoloration and cracks and may cause the screen display to peel off. • Make sure the cleaning cloth is soft and does not contain any foreign material or dust. Using a dirty cloth will damage your 3D glasses. • Do not drop or bend the 3D glasses. • If the receiving range is out of the specified range, the screen may not be viewable as 3D video.
3D Viewing Information - continued Viewing Distance Size (inch) 42 50 Viewing distance (m) 1,5 1,8 Horizontal Viewing Angle 45 45 Vertical Viewing Angle It is strongly recommended that the TV is placed at a height as same as the eye level of the viewer. In case that is not possible, tilt the TV accordingly in its stand or wall mount.
download the upgrade. Press OK to continue with the reboot operation. 5. Are suitable plugs used to connect the aerial? 3 AM search and upgrade mode Strange, light, dark colour or colour misalignment 6. If you are in doubt, consult your dealer. While the TV is connected to an aerial signal. If Automatic scanning in the Upgrade Options menu is enabled, the TV wakes up at 03:00 and searches broadcast channels for new software upgrades.
Internet Connection Not Available / DLNA Mode Not Operating If the MAC address (a unique identifier number) of your PC or modem has been permanently registered, it is possible that your TV might not connect to the internet. In such a case, the MAC address is authenticated each time when you connect to the internet. This is a precaution against unauthorized access. Since your TV has its own MAC address, your internet service provider cannot validate the MAC address of your TV.
PC Typical Display Modes The following table is an illustration of some of the typical video display modes. Your TV may not support all resolutions.
Supported File Formats for USB Media Browser Media Extension Format Notes Video .dat, .mpg, .mpeg Mpeg1-2 1080P@30fps, 50Mbit/sec .ts, .trp, .tp, .m2ts MPEG2 , H.264, VC1, AVS, MVC H.264:1080Px2@25fps, 1080P@50fps MVC:1080P@ 24fps Other: 1080P@30fps 50Mbit/sec Audio .vob MPEG2 1080P@30fps 50Mbit/sec .mkv MPEG1-2-4, H.264 H.264:1080Px2@25fps, 1080P@ 50fps, 1080P@30fps, 50Mbit/sec .mp4 .mov MPEG4, XviD, H.264 H.264:1080Px2@25fps, 1080P@ 50fps, 1080P@30fps, 50Mbit/sec .
Supported File Formats for by MKV External Yes MicroDVD MPEG-4 Timed Text MPSub Ogg Kate Ogg Writ SAMI SubRip (Advanced) SubStation Alpha Embedded subtitle Yes Yes Yes SubViewer Universal Subtitle Format VobSub XSUB Yes Yes (only support 1.0 and 2.0) Yes Yes Yes Supported DVI Resolutions When connecting devices to your TV’s connectors by using DVI converter cable(DVI to HDMI cable - not supplied), you can refer to the following resolution information.
Wireless LAN Specifications Specifications Frequency Range TV BROADCASTING PAL B/G I/I’ D/K SECAM L/L’ D/K DIGITAL RECEPTION USA: 2.400 ~ 2.483GHz, 5.15 ~ 5.35GHz, 5.47 ~ 5.725GHz, 5.725 ~ 5.85GHz FULLY INTEGRATED DIGITAL TERRESTRIALCABLE TV(DVB-T-C) Europe: 2.400 ~ 2.483GHz, 5.15 ~ 5.35GHz, 5.47 ~ 5.725GHz Japan: 2.400 ~ 2.497GHz, 5.15 ~ 5.35GHz, 5.47 ~ 5.725GHz (DVB-T2 COMPLIANCE AND DVB-S/S2 SUPPORT IS DEPENDING ON THE MODEL) China: 2.400 ~ 2.483GHz, 5.725 ~5.
“YouTube and the YouTube logo are trademarks of Google Inc.” The “HD TV 1080P” Logo is a trademark of DIGITALEUROPE. The terms HDMI and High-Definition Multimedia Interface, and the HDMI Logo are trademarks or registered trademarks of HDMI Licensing LLC in the United States and other countries. The DVB logo is the registered trademark of the Digital Video Broadcasting—DVB—project.
Nero MediaHome Installation To install Nero MediaHome, please proceed as follows: Note: To use DLNA function, this software should be installed to your PC. 1. Insert the Nero Media Home installation disc in your optical disc drive. • The Nero Multi Installer screen with a button to start the installation process will open automatically. • If the window is not displayed automatically, double-click on the file SetupX located on the Nero MediaHome installation disc. 2.
End of life disposal English - 33 -
Dimensional Drawings 42240 50240 Note: The unit of the measurements is mm.
Installing the Stand IMPORTANT Please read the following information carefully before attaching the stand to your new Sharp Television. Installing the Stand • Before fitting the stand, ensure that the TV is unplugged from its power source. • Place the Sharp Television (1) on a soft, stable and flat surface, facing down. • Place the Stand (3) on the stand mounting pattern on the rear side of the TV.
Uninstalling the Stand IMPORTANT Please read the following information carefully before detaching the stand of your Sharp Television. Uninstalling the Stand • Before detaching the stand, ensure that the TV is unplugged from its power source. • Place the Sharp Television on a soft, stable and flat surface, facing down. • Unscrew gently the four screws that attach the foot assembly and remove the screws when they are completely unscrewed. • Remove the stand and plastic moulding gently from the panel.
Screw Dimensions Wall Mounting Screw length = A+B Screw Cabinet Wall mount angle TO THE PRODUCT MODEL VESA MIN. / MAX.