LC-45GD5U LIQUID CRYSTAL TELEVISION ENGLISH OPERATION MANUAL • The illustrations and on-screen displays in this operation manual are for explanation purposes and may vary slightly from the actual operations. • Menu items that are not selectable are grayed out. IMPORTANT: To aid reporting in case of loss or theft, please record the TV's model and serial numbers in the space provided. The numbers are located at the rear of the TV. Model No.: Serial No.
IMPORTANT INFORMATION CAUTION: TO PREVENT ELECTRIC SHOCK, WIDE SLOT, FULLY INSERT. MATCH WIDE BLADE OF PLUG TO CAUTION: DO NOT PLACE THIS PRODUCT ON AN UNSTABLE CART, STAND, TRIPOD, BRACKET, OR TABLE. THE PRODUCT MAY FALL CAUSING SERIOUS PERSONAL INJURY AND SERIOUS DAMAGE TO TH E PRODUCT, USE ONLY WITH A CART, STAND, TRIPOD, BRACKET, OR TABLE RECOMMENDED BY THE MANUFACTURER OR SOLD WITH THE PRODUCT.
DEAR SHARP CUSTOMER Thank you for your purchase of the Sharp Liquid Crystal Television. To ensure safety and many years of trouble-free operation of your product, please read the Important Safety Instructions carefully before using this product. IMPORTANT SAFETY INSTRUCTIONS F- Electricity is used to perform many useful functions, but it can also cause personal injuries and property damage if improperly handled. This product has been engineered and manufactured with the highest priority on safety.
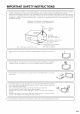
IMPORTANT SAFETY INSTRUCTIONS • Water and Moisture -- Do not use this product near vvater- for example, near a bath tub, wash bowl, kitchen sink, or laundry tub; in a wet basement; or near a swimming pool: and the like. product on an unstable base can cause the product to rail, resulting in serious personal injuries as well as damage to the product. Use only a cart, stand, tripod, bracket or table recommended by the manufacturer or sold with the product. When mounting the product on .
IMPORTANT SAFETY INSTRUCTIONS f • Outdoor Antenna Grounding -- I[ an outside antenna is connected to the television equipment, be sure the antenna system is grounded so as to provide some protection against voltage surges and built-up static charges.
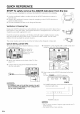
QUICK REFERENCE STOP! To safely remove the AQUOS television from the box It's best to use 2 people to remove the AQUOS television for stability, 1. Use the cardboard holders on either side of the AQUOS television to remove it from the box, 2. Remove the cardboard; however, keep the wrapping on the AQUOS television to protect it while moving, 3.
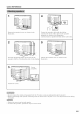
QUICK REFERENCE 1 4 Remove the terminal cover as shown in the illustration, Fasten the speaker cable with the holder, Connect the ends of the cable to the speaker terminals as shown in the illustration, Connect leads to speaker terminals of the same color, 2 5 Insert the prqjecting bulges on the side of the speakers into the corresponding slots in the display, Attach the terminal cover as shown in the illustration, 3 Screw Fasten the screw, • Do not remove the stand and speaker from the TV unle
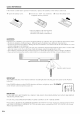
QUICK REFERENCE If the remote control fails to operate TV functions, replace the batteries in the remote control unit, 1 Open the battery cover, 2 Insert two "AAA" size batteries 3 Close the battery cover, (supplied with the product), • Place the batteries with their terminals corresponding to the (÷) and (-) indications in the battery compartment.
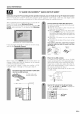
QUICK REFERENCE TV GUIDE ON SCREEN TM QUICK SETUP SHEET Once you set up the TV according to this operation manual, you are ready to set up TV Guide On Screen! Note: TV Guide On Screen TM interactive program guide supports cable-ready, cable box and digital cable services as well as over-the-air broadcast, It does not provide listings for satellite services, After completing the TV's initial set up, you see the TV Guide On Screen Setup Welcome Screen, Note: If TV Guide On Screen is not set up, pressi
QUICK REFERENCE On-Screen Setup • TV Guide uses setup information to provide TV listings and Iineups. The first two screens location, Follow the on screen instructions. ask you about your screen asks you about a VCR, If the answer is "YES", you are directed through additional screens, which include selecting and verifying the VCR brand. When successfully completed, you next see the screen in step 10 which asks about confirming of your settings. Press _1/I,- to move the highlight.
Contents IMPORTANT INFORMATION ........................... DEAR SHARP CUSTOMER .............................. IMPORTANT SAFETY INSTRUCTIONS ............... QUICK REFERENCE ....................................... Attaching speakers .................................... Contents ................................................... Trademarks ................................................ COPYRIGHT AND LICENSE NOTICE ............ PATENT NOTICE .......................................... Supplied accessories ...
Contents Other viewing options ................................. Viewing information of the program ............ Picture and still image .............................. Presetting remote control function ............... Appendix ................................................ Removing the stand ................................. Setting the TV on the wall ........................ Troubleshooting ....................................... Troubleshooting-TV Guide On Screen .........
Supplied accessories Make sure the following accessories are provided with the product, Page 8 Page 8 Page 6 Page 6 Page 6 Page 9 Aquos L_ LeRspeaker Page 7 • Always use the AC cord supplied Rightspeaker Page 7 with the LCD-TV, Q -13
Part names Volume buttons (VOL-/+ ) Channel buttons'* (CHV/A) INPUT button' POWER button ' INPUT button works as ENTER in TV Guide On Screen ** Channel buttons work as A/T in TV Guide On Screen F I J POWER OPC DL Remote controlsensor SLEEP l T -J j I ()PC sensor J [ POWER indicator , SLEEP indicator (When connecting Headphone jack headphones, the sound from the speakers is muted,) DL indicator OPC indicator • See page 18 For the TV status indicator.
Part names MONITOR OUT/ REC, OUT terminals G-LINK terminal ,.: 31os s0q _*S400 _LINK(TS_ i.
Part names 2 3 18 6 7 AIR: Receives air signal= CABLE: Receives cable signal. 8 VOL +/-: Sets the volume. (See page 34,) 9 a[lvirtual: page 34.) Selects Virtual Dolby Surround settings, (See 10 INFO: Disphysthe programinformationscreen.(Seepage 75.) 11 RECORD: Records the program to equipment (capable d recording). (See page 27.) In TV Guide On Screen, initiates the recording process. EXIT: Turns off the menu screen and TV Guide On Screen.
Preparation Use the remote control unit by pointing it towards the remote control sensor on the TV, Objects between the remote control unit and the remote control sensor may prevent proper operation, • Do not expose the remote control unit to shock, In addition, do not expose the remote control unit to liquids, and do not place in an area with high humidity, • Do not install or place the remote control unit under direct sunlight, The heat may cause deformation of the remote control unit, • The remote contr
Watching TV Simple operations for watching a TV program Press POWER on the TV or press TV POWER on the remote control, • POWER indicator (Blue): The TV is on. (After a few seconds, a window appears with sound.) i POWER • The initial setup starts when the TV powers on for the first time. If the TV has been turned on before, the EZ setup will not be invoked. See page 38 for performing EZ setup from the Setup menu.
Watch i ng TV When you turn on the TV for the first time, it will automatically memorize the broadcasting channels where you live, Perform the following steps before you press TV POWER on the remote control unit, 1. Insert the batteries into the remote control unit, (See page 8,) 2. Connect the antenna cable to the TV, (See page 17,) 3.
Watching TV (TV Guide On Screen) The TV Guide On Screen system is a free, on-screen interactive television program guide ("IPG') built into your LCD-TV, The TV Guide On Screen system was developed to help today's TV viewers, overwhelmed by myriad viewing choices, find what they want to watch quickly and easily, directly from their TV screen, The TV Guide On Screen system displays all the major TV channels and programs available in the viewer's household, Over-the-air or cable access to stations carrying
Watching TV (TV Guide On Screen) Info Box Info Box contains information about a show, service, ad, or provides general help, A Show Listing Info Box can have up to three sizes: Small, Large, and "No", The default size of the Info Box is Small, Press INFO to cycle among the sizes, Info Button The Info button appears on the button bar, if the Info box size can change and/or if there are additional Info screens, • Press 11t1=Oon the remote control to cycle between Inro box sizes, as available.
Watching TV (TV Guide On Screen) Basic initial setup Follow the on-screen prompts to configure the basic settings, Select your location. _._ Press A/T to select the country, TheTV Guide On Screen is now ready for testing. Do the following: _ Tune your cable box to channel 02, Make sure to leave your cable box turned on, and then press ENTER, (_ Enter the ZIP code (or postal code) for your location using the number buttons or A/V, Indicate the cable service connection.
Watching TV (TV Guide On Screen) VCR setting Connect a VCR to your TV and use the TV Guide On Screen system's program listings to easily schedule recordings using the one-touch recording feature, Set TV Guide On Screen to control your VCR.
Watching TV (TV Guide On Screen) Video Window VOL Clock CH Lock/Unlock Icon PAGE Video Window -- Basic buttons FAVORITE CH When you enter the Guide, the TV program for the current show appears in the Video Window, The Video Window also includes a clock display and a lock/ unlock icon to indicate the status of the Video Window, You can set the Video Window to remain on a single channel (locked) or change channels (unlocked) as you navigate through Listings, -- on the remote control ¸il ¸ TV
Watching TV (TV Guide Searching On Screen) programs You can search for programs alphabetically, by categoryHDTV, MOVIES, SPORTS, CHILDREN, EDUCATIONAL, NEWS, VARIETY, SERIES - or by keyword, and the result is displayed in a list, VOL • Repeat the same steps for the other categories, • When you want to record a program round during a search, press MENU and after "Episode options" displays, carry out "Set recording"= (See page 27.
Watching TV (TV Guide On Screen) Edit keyword ....
Watching TV (TV Guide On Screen) Using RECORD on the remote control Press A/V/_I/I_ to select the program you want to record on the LISTINGS, You can set any programs to record on a G-LINK connected recording device (VCR) directly from the LISTINGS for the appropriate day, : button By pressing RECORD, the program you want to record is set to record on time, "on time" is the default setting and can be changed, Set recording Press A/V/_I/I_ to select the program you want to record in the LISTINGS, Pre
Watching TV (TV Guide On Screen) The SCHEDULE is a list of programs created whenever you set a recording, or a reminder to watch a program, You can use this list to edit or delete the reminders and recordings you have set, Press MENU to display "Episode Options", Press A/V to select"go to Service Bar", and then press ENTER, Sort programs You can sort Record SCHEDULE list, and Remind Press _1/1_ to select SCHEDULE, The program listings in SCHEDULE display a range of icons and show information about the
Watching TV (TV Guide On Screen) Delete recording New manual Repeat stepsI and 2 inUsing SCHEDULE function, Press A/V to delete, recording Aside from setting recordings using the program LISTINGS menus, you can also define the schedule of recordings manually by following the steps below, Press A/V to record, to select the program you want to select the program you want Press MENU to display "Schedule Options", Press MENU to display "Record Options", Press A/V to select "delete recording", and th
Watching TV (TV Guide New manual On Screen) reminder Instead of setting a reminder from the program LISTINGS, you can set a reminder manually for a program that you want to watch or a recording you have set, After you initially complete Guide Setup, you can make changes to System settings in the "SETUP" screen, Press TV GUIDE and then press MENU, Press A/• to select the program you want to set reminder, Press MENU to display "Remind Options", Press &/• to select "go to Service Bar" in "Episode Optio
Watching TV (TV Guide On Screen) This setting lets you edit channel appears in LISTINGS, You can set each function information Press A/• to select "done", and then press ENTER to exit, that as follows: 1, Re-order the position the channel appears in LISTINGS 2, Change the channel number 3, Switch a channel • On - the channel is always displayed • Off- the channel is never displayed • Auto-Hide - the channel is only displayed when program information is available This setting lets you change the def
Watching Record TV (TV Guide default On Screen) options Remind Default Options Press TV GUIDE and then press MENU, Press TV GUIDE and then press MENU, Press A/• to select "go to Service Bar" in "Episode Options", and then press ENTER, Press A/• to select "go to Service Bar" in "Episode Options", and then press ENTER, Press • to select "Record press ENTER, Press • to select "Remind defaults", then press ENTER, defaults", and Press ENTER to display "Record Defaults", and Press ENTER to displa
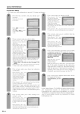
Watch i ng TV Method 4 1. Press INPUT. You can change channels in several ways by pressing AIR or CABLE to select the antenna and then following one of the methods below. 2. Press A/V ENTER. to select CableBox [TV], ant1 then press QOO ®O® QO® ®@O AIR OAB/F INPUT Ft_BACK @@®® vo OH PAGE Method 1 Using CHA/V on the remote control unit or on the TV. Method 2 1. Press FLASHBACK to switch to the previously tuned channel. 2. Press FLASHBACK again to switch back to the currently tuned channel.
Watching TV • Using MUTE on the remote • Changing the volume unit Mutes the current sound output, the volume You can change control unit, control on the TV or on the remote VOL CH PAGE VOL Press MUTE, • "E:_)" will be displayed on the screen for 30 minutes, and the sound is silenced. CH I PAGE • UsingVOL +/• To increase the volume, press VOL +, • To decrease the volume, press VOL -, till///ii !l I Volume adjustment • VOL -/+on the TV operates the same as VOL +/the remote control unit.
Watch i ng TV The TV has a feature that allows reception of sound other than the main audio for the program, This feature is called Multi-channel Television Sound (MTS), The TV with MTS can receive mono sound, stereo sound and Secondary Audio Programs (SAP), The SAP feature allows a TV station to broadcast other information, which could be audio in another language or something completely different like weather information, You can enjoy Hi-Fi stereo sound or SAP broadcasts where available.
Watch i ng TV • Digital Cable Module is called CableCARD TM, By attaching the CableCARD security module, you can receive various digital services provided by your Cable Company, To obtain and use a CableCARD security module you need to first submit an application, Please contact your cable company to discuss receiving an application, If the above procedure does not work, please follow the following steps instead.
Basic adjustment settings ['_ ' List of AV menu items to help you with operations [_ Picture OPC ........................................................ Backlight ................................................ Contrast ................................................. Brightness ............................................. Color ....................................................... Tint ......................................................... Sharpness .............................................
Basic adjustment You can run EZ Setup preset channels. settings again, even after setting up the Language setting Select from among 3 languages: English, French and Spanish. If initial setup does not memorize all the channels in your region, follow the instructions below to manually memorize the channels, Antenna setting Press MENU and the MENU screen displays, Press MENU and the MENU screen displays. Press _1/1_ to select "Setup", Press _1/1_ to select Press A/5' to select press ENTER. "Setup".
Basic adjustment settings Channel setting memory Press MENU and the MENU screen displays, Press _1/1_ to select "Setup", Press a,/V to select press ENTER, In order to receive digital air broadcasts, you need a digital broadcast antenna, You can confirm the antenna configuration through the "Antenna Setup - DIGITAL" screen, If necessary, adjust the direction of the antenna to obtain the maximum signal strength, "CH Setup", and then Signal Strength Press MENU and the MENU screen displays.
Basic adjustment settings Deleting Standby Mode may be setto either start the TV quickly from standby or conserve energy while on standby, favorite channel Press EDIT and the favorite channel screen displays, Press MENU and the MENU screen displays. Press A/V to select "1 Data Clear", and then press ENTER, Press
Basic adjustment settings Press MENU and the MENU screen displays, Adjusts the picture to your preference with the following picture settings, Press _1/1_ to select "Picture", RECORD _ 0 M_U Press A/V item, -- FAVORITE OH to select a specific adjustment Press _1/1_to adjust the item toyour desired position, -- • For resetting all adjustment items to [actory preset values, press A/T to select "Reset", press ENTER, press _1/1_ to select "Yes", and then press ENTER, Adjustments for PC source Pict
Basic adjustment Automatically settings adjusts the brightness of the screen, This TV provides various advanced optimizing the picture quality, functions for Press MENU and the MENU screen displays, Press MENU and the MENU screen displays, Press _1/1_ to select "Picture", Press _1/1_ to select "Picture", Press A/V to select "OPC", Press A/V to select "Advanced", press ENTER, Press _1/1_ to select "On" or "On: Display", and then Press A/V to select a specific adjustment item, • You can select "C,
Basic adjustment settings Provides sharper images with more depth by adjusting background sharpness, • The higher the number or the level, the more sharpness and depth you will get in images, However, this may also add more background noise.
Basic adjustment settings You can adjust the sound quality to your preference with the following settings, Press MENU and the MENU screen displays, You can er]joy the SURROUND 2ch stereo with Dolby Pro Logic II technology, VIRTUAL DOLBY DIGITAL is a technology certified by Dolby Laboratories that creates a virtualized surround sound experience from two speakers using Dolby Pro Logic or Dolby Pro Logic II, VIRTUAL DOLBY DIGITAL retains all the original multichannel audio information and provides the list
Basic adjustment settings Power control setting allows you to save energy, Power control setting allows you to save energy, Power management When set, the power will automatically shut down, No signal off When set to "Enable", the power will automatically shut down if no signal inputs for 15 minutes, Repeat steps 1 and 2 in No signal off, Press MENU and the MENU screen displays, Press A/V to select "Power Management", and then press ENTER, Press _1/1_ to select "Power Control", Press A/V to select
Basic adjustment settings Press A/V to select "REC Picture Size", and then press ENTER, This setting allows you to set the image of Digital broadcasting, You can adjust the settings for Digital image, 16:9TV Screen Size Set the format of image of Digital broadcasting, Press MENU and the MENU screen displays. Press _1/1_ to select Press _1/1_ to select the desired picture size, and then press ENTER, "Digital Setup".
Using external equipment You can connect many types of external equipment to your TV, like a DVD player, VCR, Digital TV tuner, PC, HDMI equipment, game console and camcorder, To view external source images, select the input source with INPUT on the remote control unit or on the TV, Selecting Explanation here is for the setting when connecting DVD to INPUT1 terminal, AIR CABLE oo VOL the INPUT signal Press MENU and the MENU screen displays, INPUT FLASHBACK o Press _1/1_ to select "Option", CH PAG
Using external equipment You can use the INPUT 1, INPUT 2, INPUT 4 or INPUT 5 terminals when connecting audiovisual equipment, to a DVD player and other When using component cable. DVD player When using composite cable. AV cable (commercially available) @@@ DVD player When using DVI cable.
Using external equipment You can use the INPUT 3 terminal when connecting a VCR and other audiovisual equipment, • The S-video terminal has priority over the video terminals. • The G-LINK cable connection with your VCR. I1 £ is necessary ir you want to use the recording features or the TV Guide On Screen system G-LINK cable AV cable (commercially available) S-video cable (commercially available) This end is connected necessary when @ @@ Screen's recording usingconnection TV Guide On [unction.
Using external equipment You can use the INPUT 1, INPUT 2, INPUT 4 or INPUT 5 terminals when connecting Cable) and other audiovisual equipment, a Digital TV STB (Air or • Ir your cable-TV company has CableCARD security module available, you can also use the CableCARD to receive HDTV programs. (See page 36.) When using component When cable. using DVI cable. (INPUT security module 5) _UIUIIIIUIUII _: :_' _ II01011111101011 mlnlllQI011 I_ ,,o : _======_ Audio cable I _ .....
Using external equipment Please use the INPUT 4 terminal when connecting I H_I HDMI equipment, Dll_ll[llll[llll I llIMll C ii HDMIcable (commercially available) HDMI equipment Press A/V to select the desired item and press ENTER, To watch an HDMI equipment image, select "INPUT4" from "INPUT SOURCE" menu using INPUT on the remote control unit or on the TV, (See page 61 ,) Press MENU and the MENU screen displays, Press A/V/_I/I_ to select the desired setting and press ENTER, Signal Type Auto
Using external equipment Use the INPUT 5 terminal to connect a PC, • Refer to page 83 for a list or Pc signals compatible with the TV. IIIIHI_]_tI,,IIIII | I I,J_ _lm==l L 3.5 mm stereo mini_jack cable (commercially _A_ • I I _4 I _ _ awJilable) I - PC with DVI cable (commercially I available) I I _ 3.
Using external equipment Up to 16 i,LINK devices can be connected using a daisy-chain connection with i,LINK cables, i,LINK is an interface connection using a serial transfer system and is able to transfer multimedia data, such as digital images and digital sound, between devices that have i,LINK terminals, i,LINK is a term defined in the IEEE1394 (Institute of Electrical and Electronics Engineers) standard, Currently, the transfer speeds are at 1O0 Mbps, 200 Mbps and 400 Mbps, each of them expressed as
Using external equipment • The function for automatically adjusting the recording mode of connected i,LINK devices can be turned on or off, • Since most of the currently available i,LINK devices automatically recognize the transfer rates of the pictures and sound being recorded and control the recording mode accordingly, you should always set this Mode to "Pass through" in normal circumstances, • Depending on the i,LINK devices used and the type of broadcast being recorded, this TV may not adjust the reco
Using external equipment • In order to control an i,LINK device from the TV, you must first choose the i, LINK device to be controlled, • One i,LINK device can be chosen from up to 16 i,LINK connected decks, • All i,LINK devices connected with i,LINK cables should automatically appear in the selection screen, Press i.
Using external equipment • An i,LINK compatible device can be controlled from the TV using the i,LINK control panel on the screen, • The steps in "i,LINK Setup" on page 54 need to be completed beforehand, • Please also refer to the operation manual of the i,LINK device to be used with this TV, Basic operation _ Press i.LINKto display the i,LINK control panel, (_ • The i.LINK button is also used to exit the i.LINK control panel. Press A/V/_I/I_ to select a function, and then press ENTER, i.
Using external equipment • IEEE1394 is the IEEE's international standard. • i.LINK and the i.LINK logo are registered trademarks or Sony Electronic, Inc. • A copy protection technology is used on i.LINK devices that incorporate copyright protection. This technology has received the approval orthe Digital Transmission Licensing Administrator (DTLA), an organization that administers copyright protection technologies, Some picture and sound data have restrictions on duplication.
Using external equipment • Before commencing this procedure, the steps in "i,LINK Setup" on page 54 need to be completed beforehand, • Please also refer to the operation manual of the AVHDD recorder/Blu-ray Disc recorder to be used with this TV, • You can display a list of the programs you have recorded on AV-HDD recorder and Blu-ray Disc, Press i.
Useful adjustment settings You can move the picture around on the screen, For adjusting position, a picture's horizontal and vertical Press A/V/_I/I_ to move an image on the screen to the desired position, Press ENTER to return to the initial image position, Press MENU and the MENU screen displays, Press _1/1_ to select "Setup", Press A/V to select "Position", press ENTER, Press A/V and then to select "H-Pos," or "V-Pos,", • While pressing A/T/_I/I_, an on-screen image, "Adjusting Position" displ
Useful adjustment For automatically settings adjusting the PC image, Press MENU and the MENU screen displays, Ordinarily you can easily adjust the picture as necessary to change image position using Auto Sync, In some cases, however, manual adjustment is needed to optimize the image, Press MENU and the MENU screen displays, Press _1/1_ to select "Setup", Press _1/1_ to select "Setup", Press A/V to select "Auto Sync,", and then press ENTER, Press A/V to select "Fine Sync,", and then press ENTER,
Useful adjustment settings DVI input signal setting Press INPUT to select INPUT5, c---n Selecting r----? @ input source Use this menu to select the input source, Press INPUT, • A list or selectable sources appears, Press INPUT again to select ._ INPUT5 the input source, • An image from the selected source automatically displays. • You can also select the input source by pressing A/T. • Ir the corresponding input is not plugged in, you cannot change the input.
Useful adjustment settings Lets you set the input terminal displayed INPUT SOURCE menu or channel display, using the You can set the orientation of the picture, Repeat steps 1 and 2 in Input Label, 0oAIR CABLE 0 VOL INPUT 0 FLASHBACK ( CH Press A/V to select "Picture Flip", and then press ENTER, PAG E RECORD _ Press A/V to select the desired mode, and then press ENTER, M_U 0 Standard]: normal ima( e, Press INPUT mode, to select the desired input ABC Press MENU and the MENU screen disp
Useful adjustment settings AV MODE gives you six viewing options to choose from to best match environment of the TV, which can vary due to factors like room brightness, type of program watched or the type of image input from external equipment, Press VIEW MODE, • The View mode menu displays, • The menu lists the view mode options selecta ble for the type or video signal currently received.
Useful adjustment TV settings TV VCR AUDIO CBL/SAT DVD FUNCTION 0 o 0 o SOURCE O0 You can select the screen size, Normal LIGHT • Connect the PC before making adjustments. (See page 52.) • Selectable screen size may vary with input signal type. GE) OE) (E) (]g C_3 CD REC Press VIEW MODE, • The View mode menu displays.
Useful adjustment settings Press A/V to select "3D Noise Reduction", and then press ENTER, • Some input signals may have to be registered manually to display properly. • The pairs or input signals (resolutions) in the list below are not distinguishable when received. In such case, you have to set the correct signal manually. After setting once, it will display when the same signal (resolution) is input again.
Useful adjustment Allows you to select settings what controls the audio Each time you press SLEEP, the remaining time switches as shown below, output, • When set, the time automatically starts counting down, • If you want to adjust the sleep timer, you can press SLEEP twice then change the time setting. • Five minutes before time expires, the remaining time displays each minute.
Useful adjustment settings Press CC, • Your TV is equipped with an internal Closed Caption decoder, It allows you to view conversations, narration and sound effects as subtitles on your TV, Closed Captions are available on some TV programs, and on some VHS home video tapes, at the election of the program provider, • Digital Closed Caption service is a new caption service available only on digital TV programs (also at the election of the service provider), It is a more flexible system than the original C
Useful adjustment settings This function allows you to adjust the closed caption screen appearance to suit your preference, Press MENU and the MENU screen displays, Press _1/1_ to select "Option", Press A/V to select "Caption Setup", and then press ENTER, Press A/V to select a specific adjustment item, • You can choose 7 items here; they are, (1_ "Caption Size", (2_ "Font Style", (3_ "Foreground Color", (4_ "Foreground Opacity", (5_ "Background Color", (_ "Background Opacity" and "Character Edge", D
Useful adjustment settings Select "New Secret No,", and then press ENTER, Input the new 4-digit secret number by using 0-9, Allows you to use a secret number to protect certain settings from being accidentally changed, New Secret No.
Useful adjustment settings Clearing the secret number Allows you to clear your secret number, Repeat steps 1 to 3 in Setting a secret number, • Secret number setting menu displays, Changing the secret number Allows you to change your current secret number, Input the 4-digit secret number by using 0 9, Repeat steps 1 to 3 in Setting a secret number, • Secret number setting menu displays, Press A/V to select "Secret No,", and then press ENTER, Input the 4-digit secret number by using 0 9, Press A
Useful adjustment settings V-CHIP is an electronic filtering device built into your TV, This tool gives parents a great degree of control over broadcasts accessed by their children, It allows parents to select programs judged suitable for child viewing while blocking ones judged not suitable, It does so automatically once you activate the V-CHIP feature in your Liquid Crystal Television, "V-Chip" and "Status" will not be selectable from the menu if you do not first configure your secret number, (See page
Useful adjustment settings L Voluntary TV Parental (TV Guidelines) Repeat steps I to 5 in Voluntary rating system (MPAA), movie rating system Press _1/1_ to select "Setup", to select ENTER, movie Press A/V to select "TV Guidelines", then press ENTER, (MPAA) Press MENU and the MENU screen displays, Press A/V then press Guidelines and Press A/V to adjust the item toyour desired position, "it" indicates the item is blocked, • The setting automatically enters "Block" for any ratings below your
Useful adjustment settings Canadian Rating Systems • The TV rating systems in Canada are based on the Canadian Radio-Television and Telecommunications Commission (CRTC) policy on violence in television programming, • While violence is the most important content element to be rated, the structure developed takes into consideration other program content like language, nudity, sexuality and mature themes, • When setting the V-CHIP on the Canadian system you can choose either the Canadian English ratings or
Useful adjustment Canadian English settings ratings Canadian French ratings Press MENU and the MENU screen displays, Repeat steps 1 to 5 in Canadian ratings, Press _1/1_ to select "Setup", Press A/V to select "Can, French Ratings", and then press ENTER, Press A/V then press to select ENTER, "Parental CTRL", and • Secret number setting menu displays only when "Secret No." is set. (See page 69.
Other viewing options Update You can currently view information watching, about RECORD _ a program you are by pressing ENTER, Press FREEZE to exit still image, M_U C®S Press INFO while watching a broadcast, • Inrormation displayed, program or the current the still image • Each time you press ENTER, the image on the right screen updates, will be • This function does not work in INPUT 4 (HDMI) and INPUT 5 (BVIq).
Other viewing Manufacturer options codes VCR BRAND Akai Audio Broksonic Canon Capehart Craig Curtis Mathis Daewoo DBX Dynatech Emerson Fisher Funai G.E.
Other viewing options Cable TV TV VCR c_d_ o DVD FUNCTION o o o AUDIO o SOURCE LIGHT 1 GE) (3D REC buttons When the FUNCTION is set to CBL/SAT the cable converter connected to the TV can operate using 1 to 4, 0 m EE) GD (3D (39 control 2 SOURCE POWER Turns the cable converter power on and orL 0-9 Press a button (or buttons) that corresponds channel that you wish to watch, to the 3 FLASHBACK * Press to switch between the current channel and the channel you were watching immediately
Other viewing options VCR control 8 _! The remote control unit button will function when the FUNCTION of the remote control to VCR, Tv T_ vo 2 A_,o __ _- buttons -7 • When the input selector button having the same number as the input terminal connecting the VCR is pressed, the VCR can operate using 1 to 8, 1 REC as follows unit is set CH A/V Press to select the channel or the TV tuner on the VCR, m ®®®11 o®®/| 2 SOURCE POWER Turns the power or the VCR on and off, 3 II Sets pauses and stil
Other viewing options Notice • When you change your address • If you change your address, please return the CableCARD security module to your Cable Provider Company, • You will need to request a new CableCARD security module from the cable provider at your new location, • About EAS (Emergency Alert System) • In the case of a national emergency, natural disaster, or other emergency situation, Cable MSO will broadcast an Emergency Alert Message (EAS message), When this unit receives an EAS message, if the l
Appendix Before detaching (or attaching) stand, unplug the AC cord from the AC input terminal, • Do not remove the stand from the TV unless using an optional wall mount bracket to mount it.
Appendix Problem Possible • No power Solution • Check if you pressed TV POWER on the remote control unit. (See page 18,) If the indicator on the TV is off, press POWER on the TV, • Is the AC cord disconnected? • Unit cannot be operated, • Remote operate. control unit (See page 6,) • External influences such as lightning, static electricity, may cause improper operation.
Appendix Problem Possible • LISTINGS disappeared power failure, Q -82 after a Solution • You should begin to receive listings again within 24 hours, • Some channel numbers in the TV Guide On Screen are incorrect. • You can correct them using "Changing channel display" under SETUP, • You have not received program listings, Listings usually appear within 24 hours after a success[ul Setup. • Check the connections between the TV, cable, antenna, and the G-LINK cable i[ using a cable box.
Appendix • The error message about rece )tion of broadcast The example of an error message displayed on a screen • Error code Possible Solution • Failed to receive broadcast. E202 • Check the antenna cable, Check that the antenna is correctly setup, • No broadcast now.
Appendix PC Control of the TV • When a program is set, the TV can be controlled from the PC using the RS-232C terminal, The input signal (PC/AV) can be selected, the volume can be adjusted and various other adjustments settings can be made, enabling automatic programmed playing, • Attach an RS-232C cable cross-type connections, • This operation (commercially available) to the supplied system should be used by a person who is accustomed Din/D-Sub and RS-232C for the to using computers, Communicat
Appendix Response code format Normal response IolKl.
Appendix Item Model: LC-45GD5U LCD panel Number or dots 45" Advanced TV Function Super View & BLACK TFT LCD 6,220,800 dots (1920 x 1080 x 3 dots) W-standard (CCIR) Receiving Channel VHF/UHF CATV American TV Standard ATSC/NTSC System VHF 2-13ch, UHF 14-69ch 1-125ch Digital Terrestrial Broadcast (8VBB) 2-69ch Digitalcable (64/256QAM) Audio multiplex Brightness Backlight Life Viewing angles Audio out Terminals Rear 1-1 35ch BTSC System 450 cd/m 2 60,000 hours (at Backlight Standard position) H:17
Dimensional drawings Unit: inch/(mm) 243%2 (677) 4921/64(1253) 439/64(1096) 410_4 (106) 431/64(114) 113032(304) HOWTO SET THE FACTORY PRESETS Check that the power indicator is not on. Remove the AC cord and switch off the power.
Calling for Service For location of the nearest Sharp Authorized Service, or to obtain product literature, accessories, customer assistance, please call 1-800-BE-SHARP, supplies, or LIMITED WARRANTY CONSUMER LIMITED WARRANTY SHARP ELECTRONICS CORPORATION warrants "Product"), when shipped in its original container, will will, at its option, either repair the defect or replace equivalent at no charge to the purchaser for parts or to the first consumer be free from defective the defective Product labor fo
VALID IN CANADA ONLY LIM ITED WARRANTY Consumer Electronics Products Congratulations on your purchase! Sharp Electronics of Canada Ltd. (hereinafter called "Sharp") gives the following express warranty to the first consumer purchaser Sharp brand product, when shipped in its original container and sold or distributed in Canada by Sharp or by an Authorized Sharp for this Dealer: Sharp warrants that this product is free, under normal use and maintenance, from any defects in material and workmanship.