
Operation Manual, Print Release Guide


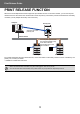
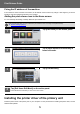
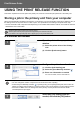
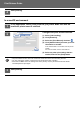
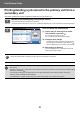

Table Of Contents

7
Print Release Guide
In a macOS environment
4
Start printing.
1
In the application, select [Print] from the [File] menu. Make sure that the
machine's printer name is selected.
2
Configure the print release function.
(1) Select [Job Handling].
(2) Click [Retention].
(3) Select the [Print Release] checkbox
.
(4) Click [Authentication] and enter your user
information as needed.
If user authentication is not enabled, this step can be
omitted.
For more information, see the User's Manual.
(5) Select any other print settings that are
needed, and click the [Print] button.
• The print release function cannot be used at the same time as the document filing function.
• You can change the number of copies and color mode at the time of printing.
• If less than 10 MB is free in the storage area of the primary unit, the job will not be stored. Delete
unneeded jobs and print again.
3
Start printing.
(1)
(2)
(3)
(4)
(5)