
Operation Manual, User's Manual


1-127
BEFORE USING THE MACHINE►HOW TO PLACE THE ORIGINAL
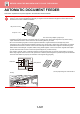
AUTOMATIC DOCUMENT FEEDER
This section explains how to place originals in the automatic document feeder.
• Place originals of different sizes together, if needed, in the automatic document feeder. In that case, use the "Others"
function in each mode to set [Mixed Size Original]. An original cannot be detected if all pages are of the same size but
some of them are set in a different orientation.
• Before inserting originals into the document feeder tray, be sure to remove any staples or paper clips.
• If originals have damp spots due to correction fluid, ink or paste up glue, wait until the originals are dry before making
copies. Otherwise the interior of the machine or the document glass may be soiled.
• Do not use the following originals. Incorrect original size detection, original misfeeds, and smudges may result.
Transparency film or other transparent material for backup copy, tracing paper, carbon paper, thermal paper or originals
printed with thermal transfer ink ribbon should not be fed through the document feeder. Originals to be fed through the
feeder should not be damaged, crumpled, folded, loosely pasted together, or have cut-out holes. Originals with multiple
punched holes other than two-hole or three-hole punched paper may not feed correctly.
• The condition, material, shape, or fabrication method of some business cards may prevent correct feeding or scanning.
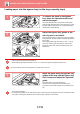
• When using originals with two or three holes, place them so that the punched edge is at a position away from the feed slot
of the document feeder tray. Specify the orientation of the original using [Original].
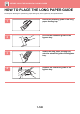
• When the document rolls in the original exit tray on the automatic document feeder, fix the paper fixing arm at the centre to
the top.
B5 (5-1/2" x 8-1/2")
A4 (8-1/2" x 11")
Hole positions
Feed slot
Paper fixing arm