
Operation Manual, Quick Start Guide


BEFORE USING THE MACHINE
11
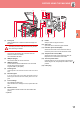
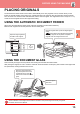
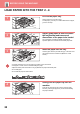
(1) Fusing unit
Heat is applied here to fuse the transferred image onto
the paper.
(2) LAN connector
Connect the LAN cable to this connector when the
machine is used on a network.
Use a shielded LAN cable.
(3) USB port (B type)
The machine does not use this connector.
(4) USB port (A type)
This is used to connect a USB device such as a USB
memory device to the machine.
Supports USB 2.0 (Hi-Speed).
(5) Scanning area
Originals placed in the automatic document feeder are scanned
here.
(6) Document glass
If you want to scan books or other thick originals that cannot be
fed through the automatic document feeder, place them on this
glass.
(7) Toner cartridge
This cartridge contains toner.
When the toner in a cartridge runs out, replace with new
one.
(8) Waste toner box
This container collects excess toner that remains after
printing.
(9) Handle
Grasp it when moving the machine.
(10) Side cover
Open this cover to remove a paper misfeed.
(11) Extension phone socket (TEL)
*
When the fax function of the machine is used, an
extension phone can be connected to this socket.
(12) Telephone line socket (LINE)
*
When the fax function of the machine is used, the
telephone line is connected to this socket.
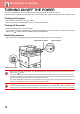
(13) The main power switch
Use this switch to turn on the power for the machine.
When using the fax, always keep this switch in the " "
position.
(14) Power plug
* Optional
(8) (10)(9) (8)(5) (6) (14)
(1) (3)(2) (4)
(7) (12) (13)(11)
The fusing unit is hot. Take care not to burn yourself
when removing a misfeed.