
Operation Manual, User's Manual
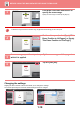
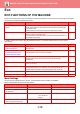
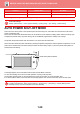
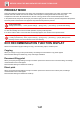
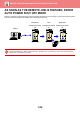
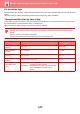
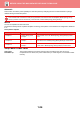
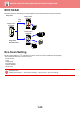
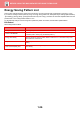
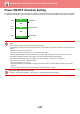
Table Of Contents

1-18
BEFORE USING THE MACHINE►BEFORE USING THE MACHINE
Changing the settings
Tapping the tab on the left of the screen allows you to change the settings.
You cannot tap the keys for functions whose settings cannot be changed.
3
Follow the on-screen instructions to
specify the erase range.
Specify the erase range and then tap the [OK] key.
To delete the image outside the selected range, tap [Reverse Erase Range] on the action panel.
4
On the action panel, select [Apply This
Erase Position to All Pages.] or [Apply
This Erase Position to This Page.].
5
As necessary, repeat the steps to specify the erase range and the pages to
which it is applied.
6
Tap the [Exit] key.
Erase Specified Range
Clear OK
Exit
Specify Range2
Specify Range3
Specify Range4
Height
Start Point
Width
X
Y
53
31
31
97
Height
Start Point
Width
Specify Range2
Specify Range3
Specify Range4
Erase Specified Range
Apply This Erase
Position to This Page.
Reverse Erase Range
Apply This Erase
Position to All Pages.
Erase Specified Range
Exit
Specify Range2
Erase Range1
Specify Range3
Specify Range4
1 / 6
Copies
Others
Send as well as print
Scan Original Again
Without change Settings
Store Data in Folder
File
Store Data Temporarily
Quick File
Start
CA
Paper Select
Original
Exposure
2-Sided Copy
Sort/Group
Staple Sort
Copy Ratio
Auto
A4
Auto
1-Sided→1-Sided
Auto
100%
Start
Colour Mode
Auto/Mono2
Resolution
200x200dpi
File Format
PDF
Original
Auto
Others
Address Book
Subject
File Name
Address Touch to Input Address
Options
Exposure
CA
Sending History
Quick File
Call Search Number
Check Send/Receive
Status
Send Same Image
as Fax Address
Store Data Temporarily
File
Store Data in Folder
Specified by System Settings