
Operation Manual, User's Manual
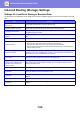
Table Of Contents

7-79
SETTING MODE►SYSTEM SETTINGS
1
Enable the [Inbound Routing] function.
Tap the [Administration Settings] from the menu.
Enable the [Inbound Routing] function from the setting screen.
2
Store the sender number or address.
Tap the [Sender Number /Address Registration] from the menu.
Enter the destination number or address that you wish to store.
If you wish to forward all received data, you need not store the sender number and address separately.
3
Store a forwarding table.
Tap the [Inbound Routing Settings] from the menu.
Tap the [Add] key on the displayed screen.
When the [Table Registration] screen appears, store the forwarding table.
4
Enable the stored forwarding table.
Tap the [Inbound Routing Settings] from the menu.
Set the forwarding table name that you wish to enable to .
To specify forwarding conditions, select [Forward based on the Conditions of Forward Destination 1-3], and also select
[Always Forward] or [Forward on Selected Day & Time]. If you have selected the [Forward on Selected Day & Time]
option, you can set the forwarding date and time in advance.