
Operation Manual, User's Manual


5-86
SCANNER/INTERNET FAX►OTHER FUNCTIONS
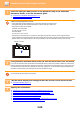
1
Place the card you want to scan in the document tray of the automatic
document feeder, or on the document glass.
► AUTOMATIC DOCUMENT FEEDER (page 1-107)
► DOCUMENT GLASS (page 1-109)
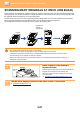
Cautions when placing business cards
• (Using automatic document feeder) Up to 12 business cards can be placed at once.
• (Using automatic document feeder) Separate the business cards by at least 5 mm.
• Supported card sizes are as follows:
Automatic document feeder:
51 x 89 mm to 55 x 91 mm.
Document Glass:
45 x 85 mm to 110 x 110 mm.
• If the shape of a business card is not square or rectangular, the business card may not be cropped correctly.
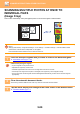
•
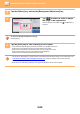
(Using automatic document feeder) Place the business cards with the top side of the cards at the far side of the document
glass as shown. If the cards are placed in the wrong orientation, it will not be possible to read the cards correctly.
2
(Using automatic document feeder) Keep the auto document feeder open, not closed.
If you scan the business cards with the auto document feeder closed, it will not be possible to detect the outlines of the
business cards and scanning will fail. Always use this function with the auto document feeder open. If a light source such
as an electric light shines onto the originals during scanning, cropping may not be successful. Adjust the angle of the
automatic document feeder so that the light source does not affect the image.
Do not look directly at the light during scanning.
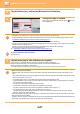
3
Tap the mode display and change to the base screen of the desired mode.
► CHANGING MODES (page 1-11)
4
Specify the destination.
► RETRIEVING A DESTINATION FROM AN ADDRESS BOOK (page 5-16)
► VIEWING A LIST OF THE SELECTED DESTINATIONS (page 5-19)
► USING A SEARCH NUMBER TO RETRIEVE A DESTINATION (page 5-20)
► ENTERING AN ADDRESS MANUALLY (page 5-21)
► SPECIFYING A NETWORK FOLDER (page 5-22)
► RETRIEVING A DESTINATION FROM A GLOBAL ADDRESS BOOK (page 5-24)
► USING A TRANSMISSION LOG TO RESEND (page 5-26)
Top side
Far side