
Operation Manual, User's Manual
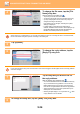
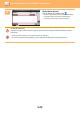
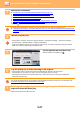
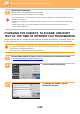
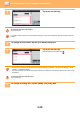
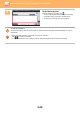
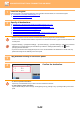
Table Of Contents

5-42
SCANNER/INTERNET FAX►TRANSMITTING AN IMAGE
1
Place the original.
Place the original in the document feeder tray of the automatic document feeder, or on the document glass.
► AUTOMATIC DOCUMENT FEEDER
(page 1-116)
► DOCUMENT GLASS (page 1-119)
2
Specify all destinations.
► RETRIEVING A DESTINATION FROM AN ADDRESS BOOK (page 5-15)
► VIEWING A LIST OF THE SELECTED DESTINATIONS (page 5-18)
► USING A SEARCH NUMBER TO RETRIEVE A DESTINATION (page 5-19)
► ENTERING AN ADDRESS MANUALLY (page 5-20)
► SPECIFYING A NETWORK FOLDER (page 5-21)
► RETRIEVING A DESTINATION FROM A GLOBAL ADDRESS BOOK (page 5-23)
► USING A TRANSMISSION LOG TO RESEND (page 5-25)
• One-touch keys that cannot be used for broadcast transmission are greyed out to prevent selection.
• If a Scan to FTP or Network Folder address is specified in a broadcast transmission, hyperlink e-mail transmission will
not take place.
• If [System Settings] → [Image Send Settings] → [Common Settings] → [Condition Settings] → [Be sure to press Next
Address Key ([+]) before selecting the next address.] is enabled in "Settings (administrator)", tap before
specifying the next destination.
• If you wish to send the same image (Mono2) as the one for the fax address to all destinations in normal mode, tap
[Send Same Image as Fax Address] on the action panel.
3
Tap [Address Review] on the action panel.
4
Confirm the destination.
• To cancel a specified destination:
Tap the key of the destination that you wish to cancel to release the selection.
• To switch delivery types (To/Cc/Bcc):
Tap the address that you want to change, and tap [Change to To], [Change to Cc], or [Change to Bcc] on the action
panel.
To
Cc
Start
Preview
All Destinations
AAA
BBB
CCC
Direct Entry
AAA.□□□
BBB.□□□
CCC.□□□
Direct Entry
Direct Entry
CA