
Operation Manual

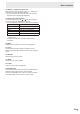


Table Of Contents
- IMPORTANT INFORMATION
- DEAR SHARP CUSTOMER
- SAFETY PRECAUTIONS
- TIPS AND SAFETY INSTRUCTIONS
- MOUNTING PRECAUTIONS
- Supplied Components
- System Requirements
- Part Names
- Connecting Peripheral Equipment
- Connecting the Power Cord
- Binding Cables
- Affixing the Stand Hole Protection Covers
- Preparing the Remote Control Unit
- Removing the Handles (PN-80SC5/PN-70SC5 only)
- Mounting a web camera
- Turning Power On/Off
- Touch action
- Basic Operation
- Menu Items
- Functional Restriction Setting (FUNCTION)
- Controlling the Monitor with a PC (RS-232C)
- Troubleshooting
- Specifications
- Mounting Precautions (For SHARP dealers and service engineers)

29
E
Menu Items
Adjustments for PC screen display
n
Automatic adjustment
When you use D-SUB (PC) (INPUT5) to display a computer
screen for the rst time, or when you change the setting of the
computer, use the automatic screen adjustment.
1. Switch the input to D-SUB (PC) and display the
adjustment pattern. (See the description below.)
2. Press MENU button and use
or button to display
the OTHERS menu.
3. Press
or button to select SCREEN, and press
ENTER button.
4. Press
or button to select AUTO SYNC..
5. Press
or button to select YES.
6. Press ENTER button.
The automatic adjustment is complete in several seconds.
TIPS
• If the screen cannot be adjusted properly with one
automatic adjustment, repeat the automatic adjustment two
or three times. Try manual adjustment if necessary.
n
Screen display for adjustment
Before adjusting the image quality or picture, display an image
that brightens the entire screen. If you are using a Windows
PC, use the adjustment pattern on the supplied CD-ROM.
Opening the adjustment pattern
The following example is performed in Windows 7.
1. Load the supplied CD-ROM into the computer’s CD-
ROM drive.
2. Open [CD Drive] in [Computer].
3. Double-click [Adj_uty.exe] in the [Monitor] folder.
The adjustment pattern will appear.
Adjust the screen automatically or manually.
4. When adjustment is nished, press the [Esc] on the
computer’s keyboard to quit the adjustment program.
5. Eject the CD-ROM from the CD-ROM drive.
TIPS
• If the display mode on the computer you are using is 65000
colors, the color levels in the color pattern may appear
differently or grayscale may appear to be colored. (This
is due to the specications of the input signal and is not a
malfunction.)