
Operation Manual, User's Manual

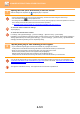
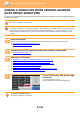

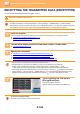

Table Of Contents

5-121
SCANNER/INTERNET FAX►OTHER FUNCTIONS
7
Specify the time (hour and minute) in 24-hour format.
After the settings are completed, tap and [Back] keys in sequence.
• Tap the areas displaying the hour and minute respectively, and enter the values using the numeric keys.
• It is convenient to use to finely adjust the time.
• The setting will show the current time. If the time is not correct, press the [CA] key to cancel the operation. Correct the
time in setting mode and then perform the timer transmission procedure.
► BEFORE USING THE MACHINE AS A N
ETWORK SCANNER FUNCTION (page 5-4)
To cancel the Timer Transmission settings:
Tap the [Off] key.
To set the date and time of the machine:
In "Settings", select [System Settings] → [Common Settings] → [Device Control] → [Clock Adjust].
If [Disabling of Clock Adjustment] has been enabled, the date and time cannot be modified. Select [System Settings] in
"Settings (administrator)" and select [System Settings] → [Common Settings] → [Device Control] → [Enable/Disable
Settings] to disable the [Disabling of Clock Adjustment] setting.
8
Tap the [Start] key to start scanning of the original.
• If you inserted the original pages in the document feeder tray, all pages are scanned.
A beep will sound to indicate that scanning has ended, and the machine stands by for transmission.
• When you place the original on the document glass, scan each page one at a time.
When scanning finishes, place the next original and tap the [Start] key.
Repeat until all pages have been scanned and then tap the [Read-End] key.
A beep will sound to indicate that scanning has ended, and the machine stands by for transmission.
You can tap the [Preview] key to check a preview of the image before sending an image. For more information, see
"CHECKING THE IMAGE TO BE T
RANSMITTED (page 5-69)" (When in fax mode, "CHECKING THE IMAGE TO BE
TRANSMITTED (page 4-29)").
The original is scanned into memory. The original cannot be scanned at a specified time.