
Operation Manual, User's Manual
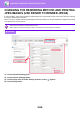

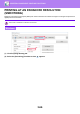

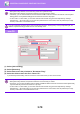
Table Of Contents

3-70
PRINTER►CONVENIENT PRINTING FUNCTIONS
(1) Select [Job Handling].
(2) Select [Retention].
(3) Select how to save the print data in "Document Filing".
(4) Select the folder to store the file in "Stored To".
If you selected [Custom Folder], enter the name of the custom folder where you want to save the file.
• When [Quick File] is selected, "Document Filing" will be set to [Hold After Print].
• When [Quick File] is selected, the password entered in "Document Filing" is cleared.
• If necessary, you can select the data format from CMYK and RGB for data to be stored in the machine. Click the [Other
Settings] button on the [Detailed Settings] tab and select the format from "Rip Style".
• To store a file in a custom folder, you must first create the custom folder using [Document Operations] in "Settings
(administrator)" → [Document Filing]. If you have set a password for the custom folder, enter the password (5 to 8 digit
number) in "PIN Code" on the stored to screen.
If you have configured to always use the force document filing function in "Printing Policy" on the [Configuration] tab, the
selection of [Document Filing] is hidden from the "Job Handling" menu.
macOS
• When [Quick File] is selected, "Document Filing" will be set to [Hold After Print].
• When [Quick File] is selected, the password entered in "Document Filing" is cleared.
• If necessary, you can select the data format from CMYK and RGB for data to be stored in the machine. Select [Advanced1]
in [Printer Features] and select the format from "Rip Style".
• To store a file in a custom folder, you must first create the custom folder using [Document Operations] in "Settings
(administrator)" → [Document Filing]. If you have set a password for the custom folder, enter the password (5 to 8 digit
number) in "PIN Code" on the folder selection screen.
(2)
(1)
(3) (4)