
Operation Manual, Software Setup Guide


5
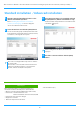
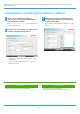
Standard installation / Advanced installation
1
Click the [Standard installation] button or the
[Advanced installation] button.
Refer to "Installing the printer driver / PC-Fax driver
(common procedure) (page 4)" on how to display the
"Choo
se an installation method" screen.
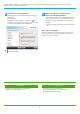
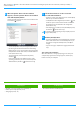
2
Select the machine and click the [Next] button.
You can also click the [Specify Condition] button and search
for the machine by entering the machine's name (host name)
or IP address, or selecting the search period.
3
Select the printer driver to be installed and click
the [Next] button. (Advanced installation only)
Click the checkbox of the printer driver to be installed so that
a checkmark ( ) appears.
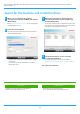
4
Check the contents and then click the [Next]
button.
• This screen is not displayed when only 1 device is found in
the search results.
• If the machine is not found, make sure that the machine is
powered on and that the machine is connected to the
network, and then click the [Re-search] button.
• When installing the PC-Fax Driver, this screen is not
displayed.
Related topics
When [Standard installation] or [Advanced installation]* is
selec
ted, the installation will take place as indicated below.
• Machine connection method: LPR Direct Print (Auto Search)
• Printer driver*: Standard installation: PCL6
Advanced installation: Select from PCL6, PS, PPD
• Printer driver name: Cannot be changed
• Display fonts*: Installed
* Will not be setup for the PC-Fax driver.
• Custom installation (P. 7)
Table of contents
Windows / Select the software to be installed
Installing the printer driver / PC-Fax driver (common procedure)