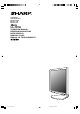
LCD Monitor LCD Farbmonitor Moniteur LCD Monitor LCD Monitor LCD LL-191A OPERATION MANUAL BEDIENUNGSANLEITUNG MODE D'EMPLOI MANUALE D'USO MANUAL DE FUNCIONAMIENTO 191A_cover1_2.
Table of Contents/Inhaltsverzeichnis/Table des matières/Indice/Índice/ Notice for Users in the USA . . . . . . . . . . . . . . . . . . . . . . . . . . . . . . . . . . . . . . . . . . . . . . . . . . . . . . . . . . . Notice for Users in Europe . . . . . . . . . . . . . . . . . . . . . . . . . . . . . . . . . . . . . . . . . . . . . . . . . . . . . . . . . . . . Notice for Users in the UK . . . . . . . . . . . . . . . . . . . . . . . . . . . . . . . . . . . . . . . . . . . . . . . . . . . . . . . . . . . . .
WARNING – FCC Regulations state that any unauthorized changes or modifications to this equipment not expressly approved by the manufacturer could void the user's authority to operate this equipment. Note: This equipment has been tested and found to comply with the limits for a Class B digital device pursuant to Part 15 of the FCC Rules. These limits are designed to provide reasonable protection against harmful interference in a residential installation.
Notice for Users in Europe This equipment complies with the requirements of Directives 89/336/EEC and 73/23/EEC as amended by 93/68/EEC. Dieses Gerät entspricht den Anforderungen der EG-Richtlinien 89/336/EWG und 73/23/EWG mit Änderung 93/68/EWG. Ce matériel répond aux exigences contenues dans les directives 89/336/CEE et 73/23/CEE modifiées par la directive 93/68/CEE. Dit apparaat voldoet aan de eisen van de richtlijnen 89/336/EEG en 73/23/EEG, gewijzigd door 93/68/ EEG.
Deutsch Français Español Italiano FOR CUSTOMERS IN U.K.
Congratulations! The display you have just purchased carries the TCO'03 Displays label. This means that your display is designed, manufactured and tested according to some of the strictest quality and environmental requirements in the world. This makes for a high performance product, designed with the user in focus that also minimizes the impact on our natural environment.
TCO Development SE-114 94 Stockholm, Sweden Fax: +46 8 782 92 07 Email (Internet): development@tco.se Current information regarding TCO'99 approved and labelled products may also be obtained via the Internet, using the address: http://www.tco-info.com/ 7 191A_notice.P65 7 12/15/2003, 5:32 PM Français Deutsch English What does labelling involve? This product meets the requirements for the TCO'99 scheme which provides for international and environmental labelling of personal computers.
Environmental requirements Flame retardants Flame retardants are present in printed circuit boards, cables, wires, casings and housings. Their purpose is to prevent, or at least to delay the spread of fire. Up to 30% of the plastic in a computer casing can consist of flame retardant substances. Most flame retardants contain bromine or chloride, and those flame retardants are chemically related to another group of environmental toxins, PCBs.
Tips and safety precautions . . . . . . . . . . . . . . . . . . . . . . . . . . . . . . . . . . . . . . . . . . . . . . . . . . . . . . . . . . . . Product description . . . . . . . . . . . . . . . . . . . . . . . . . . . . . . . . . . . . . . . . . . . . . . . . . . . . . . . . . . . . . . . . . . Angle adjustment . . . . . . . . . . . . . . . . . . . . . . . . . . . . . . . . . . . . . . . . . . . . . . . . . . . . . . . . . . . . . . . . . . . . Connecting the monitor and turning the monitor on and off .
Tips and safety precautions The Power Cord - Do not damage the power cord nor place heavy objects on it, stretch it or over bend it. Also, do not add extension cords. Damage to the cord may result in fire or electric shock. - Use only the power cord supplied with the monitor. - Insert the power plug directly into the AC outlet. Adding an extension cord may lead to fire as a result of overheating. - Do not remove or insert the power plug with wet hands. Doing so could result in electric shock.
English Product description 1. AUTO button ............................ This button is used to perform automatic adjustment of the screen (CLOCK, PHASE, H-POS and V-POS). (p.18) 2. MENU button ........................... This button is used to pop-up, select and close the OSD (On Screen Display) Menu. 3. / MODE button ..................... When the OSD Menu is displayed: This button is used to select menu options. When the OSD Menu is not displayed: This button is used to set DISPLAY MODE. buttons .......
Angle adjustment CAUTION! - Be sure to hold both sides of the monitor when adjusting the viewing angle. The LCD panel used in this monitor is made of glass. Pressure from hands on the LCD panel could cause damage. approx. 25° approx. 5° 12 191A_gb.
Connecting the monitor and turning the monitor on and off When the accessory audio cable is connected to the audio output terminal of the computer, the sound of the connected computer is output from the monitor speakers. You can also use the headphone jack of the display. - When connecting, ensure that both the monitor and computer are switched off. - Be careful not to over bend the cable or add extension cords as this could lead to a malfunction.
Connecting the monitor and turning the monitor on and off Connection of headphones (commercially available) Turning the power on 1. Turn on the main power of the monitor. Headphones (commercially available) can be connected. Main power switch Headphone terminal Headphones - When switching the main power switch on and off, always wait for an interval of at least 5 seconds. Rapid switching may result in malfunction.
Connecting the monitor and turning the monitor on and off English Turning the power off 1. Turn the computer off. 2. Press the monitor's power button. The power LED will disappear. Turn the computer off. Press power button. OFF If the monitor will not be used for a long time, turn off the main power switch of the monitor, and remove the power plug from the outlet. 15 191A_gb.
Adjusting the screen display and speaker volume Adjustment lock function Note: - All adjustments will be saved even after turning the power off. By disabling the control buttons (i.e. setting the lock) any attempted changes to adjusted values will be voided. 1. Turn off the monitor power. 2. While pressing the MENU button, press the power button (i.e. turn the power on). Continue to press the buttons until [ADJUSTMENT LOCKED] appears on the screen. The lock is set when the message is displayed.
Adjusting the speaker volume Setting display mode 1. Without the OSD Menu being displayed, press the or the button. 2. Check that [VOLUME] is selected. / MODE button If it is not selected, press the and select [VOLUME]. Color tone or brightness can be changed with one command. 3. Adjust by pressing the button (increase). STD Displays image with the color tone results from original scheme of liquid crystal panel. OFFICE Display brightness is lowered. (This mode saves power.
Adjusting the screen display Adjusting the screen automatically Automatic screen adjustment Automatic adjustment can be performed using either the AUTO button or the MENU button. Options in the ADJUSTMENT Menu can be adjusted automatically (CLOCK, PHASE, H-POS, V-POS). AUTO button 1. Press the AUTO button. 2. Press the AUTO button again. [ADJUSTING] will appear on the screen, and after a few seconds [ADJUSTING] will disappear. (The automatic adjustment is now complete.
Adjusting the screen display AUTO When [AUTO] is selected with the button, the [CLOCK], [PHASE], [H-POS] and [V-POS] settings are automatically adjusted. 1. Display an image that makes the entire screen light. (p.18) 2. Display the OSD Menu by pressing the MENU button. ADJUSTMENT Menu Select the option by pressing the / MODE button. MENU GAIN CONTROL Menu CLOCK The figure below demonstrates how to adjust so that vertical flicker noise is not emitted.
Adjusting the screen display GAIN CONTROL Menu COLOR CONTROL Menu AUTO When [AUTO] is selected with the button, the [BLACK LEVEL] and [CONTRAST] settings are automatically adjusted. After the automatic adjustment, perform manual adjustment when necessary. WHITE BALANCE 1. After selecting [WHITE BALANCE], press the button. The WHITE BALANCE menu will be displayed. BLACK LEVEL Total screen brightness can be adjusted while watching the color pattern. ( buttons) 2.
MODE SELECT-1 Menu MODE SELECT-2 Menu Note: - Depending on the resolution of the input signal, even if menu options can be selected, the display may not change. INFORMATION A model name (MODEL), a serial no. (S/N), and usage time (USAGE TIME) of the monitor can be checked. 1. After selecting [INFORMATION], press the button. The product information will display. 2. Press the MENU button. OSD H-POSITION (OSD horizontal position) The position of the OSD Menu can be moved to the left and right.
Monitor care Monitor care Troubleshooting Always remove the plug from the AC outlet when cleaning the monitor. If you think the monitor may be faulty, please check the following points before taking it to be repaired. If afterwards it still does not work, please contact the shop where you purchased the monitor or your nearest Sharp authorized Service Center. Cabinet and control panel section Use a soft dry cloth to lightly wipe away any grime from the cabinet and control panel.
Monitor care English Information for customers on environmentally friendly disposal of this SHARP product If this product cannot be used any more, it should be given away and disposed of in a legally correct and environmentally sound way. DO NOT DISPOSE OF THIS PRODUCT WITH YOUR HOUSEHOLD WASTE OR MIXED WITH OTHER WASTES ! YOU MIGHT ENDANGER THE ENVIRONMENT ! Sharp Corporation is committed to protecting the environment and conserving energy.
Specifications Product specifications Dimensions (Units: mm) Model name LL-191A-W (White)/LL-191A-B (Black) LCD display 48 cm measured diagonally TFT LCD module Resolution (max.) SXGA 1280 x 1024 pixels Displayable colors (max.) Approx.16.19 million colors (6 bit + FRC) Brightness (max.) 220 cd/m2 Dot pitch 0.294 (H) x 0.294 (V) mm Contrast ratio 500:1 Angle of visibility Left-right 160°; up-down 160° (contrast ratio > 5) Screen display size Horizontal 376.3 mm x Vertical 301.
Specifications Relevant signal timings Hsync Vsync (Mini D-sub connector with 15 pins) Dot frequency English Display mode The analog RGB input connector pin VESA No.
Installing set-up information and the ICC profile (For Windows) Depending on the type of computer or OS, you may need to install the monitor set-up information on your system. If so, follow the steps below to install the monitor set-up information. (Depending on the type of computer or OS, command names and methods may differ. Please follow the computer's own operation manual while reading this.
For Windows 2000 For Windows Me Installing monitor set-up information into Windows 2000, and setting the monitor's ICC profile as a predetermined value. This explanation assumes that the CD-ROM drive is "D" drive. Installing monitor set-up information into Windows Me, and setting the monitor's ICC profile as a predetermined value. This explanation assumes that the CD-ROM drive is "D" drive. 1. Load the accessory CD-ROM into the CD-ROM drive of the computer. 2. Click on the [Start] button.
Installing set-up information and the ICC profile (For Windows) Installing the ICC profile For Windows XP Installing the monitor's ICC profile. (If the set-up information has already been installed, so too has the profile, and there is no need to install it.) This explanation assumes that the CD-ROM drive is "D" drive. Installing monitor set-up information into Windows XP, and setting the monitor's ICC profile as a predetermined value. This explanation assumes that the CD-ROM drive is "D" drive. 1.
Information about the ColorSync profile (For MacOS) English About the ColorSync profile ColorSync is Apple Computer's color management system and enables color reproduction characteristics to be realized when used with a compatible application. A ColorSync profile describes the color characteristics of the LCD monitor. Notes: - This monitor's ColorSync profile works with MacOS 8.5 or above.
Instructions for attaching a VESA-compliant arm The following stand or arm can be attached to the monitor. - Stand (sold separately) Model name: NL-S02-H (Ivory) NL-S02-B (Black) - VESA-compatible arm (commercially available) 5. Attach the arm to the monitor with the four screws. Compatible commercially available arms Attachments must satisfy the following. - Compatible with the VESA standard. - Have a gap of 100 mm x 100 mm between the screw holes on the section to be attached.
191A_dt.P65 31 12/15/2003, 5:27 PM Deutsch 32 33 34 35 35 36 36 36 37 38 38 39 39 39 40 40 41 44 44 44 44 45 46 48 51 52 Français Tipp und Sicherheitsvorkehrungen . . . . . . . . . . . . . . . . . . . . . . . . . . . . . . . . . . . . . . . . . . . . . . . . . . . . . . Produktbeschreibung . . . . . . . . . . . . . . . . . . . . . . . . . . . . . . . . . . . . . . . . . . . . . . . . . . . . . . . . . . . . . . . . Winkeleinstellung . . . . . . . . . . . . . . . . . . . . . . . . . . . . . . . . .
Tipp und Sicherheitsvorkehrungen - Das TFT-Farb-LCD-Panel wurde unter Einsatz hochentwickelter Technologie gefertigt. Es jann jedoch vorkommen, dass an einigen Stellen Bildpunkte nicht aufleuchten oder permanent angezeigt werden. Wenn der Bildschirm von der Seite aus angesehen wird, können die Farben unregelmäßig oder zu hell erscheinen. Dies ist normal bei LCD-Monitoren und hat keinen Einfluss auf die Leistungsfähigkeit des Gerätes.
1. Taste AUTO .............................. Diese Taste dient zum Ausführen automatischer Einstellung des Bildschirms (CLOCK, PHASE, H-POS und V-POS). (S.40) 2. Taste MENU ............................. Mit dieser Taste öffnen, wählen und schließen Sie das OSD (On Screen Display) -Menü. / MODE ....................... Wenn das OSD-Menü angezeigt wird: 3. Taste Diese Taste wird zum Wählen der Menüoptionen verwendet.
Winkeleinstellung ACHTUNG! - Achten Sie darauf, den Monitor beim Einstellen des Sichtwinkels immer an beiden Seiten zu halten. Das in diesem Monitor verwendete LCDPanel besteht aus Glas. Durch Druck mit der Hand auf das LCD-Panel können Schäden hervorgerufen werden. Ca. 25° Ca. 5° 34 191A_dt.
- Bevor Sie den Monitor anschließen, müssen Sie den Monitor und den Computer ausschalten. - Achten Sie darauf, dass Sie das Kabel nicht überdehnen, und schließen Sie kein Verlängerungskabel an, da dies Funktionsstörungen hervorrufen kann. Schließen Sie das zusätzliche Audiokabel an Wenn das zusätzliche Audiokabel am Audioausgangsanschluss des Computers angeschlossen wird, wird der Ton des angeschlossenen Computers über die MonitorLautsprecher wiedergegeben.
Anschließen des Monitors und Ein- und Ausschalten des Monitors Anschluss von Kopfhörern (im Handel erhältlich) Einschalten des Monitors 1. Den Monitor mit dem Hauptnetzschalter einschalten. Kopfhörer (im Handel erhältlich) können angeschlossen werden. Hauptnetzschalter Kopfhöreranschluss Kopfhörer Hinweise: - Wenn Kopfhörer angeschlossen sind, ertönt aus den Lautsprechern des Monitors kein Klang. - Verwenden Sie Kopfhörer mit einem Kabel von weniger als 3 m Länge.
Anschließen des Monitors und Ein- und Ausschalten des Monitors English Ausschalten des Monitors Schalten Sie den Computer aus. Deutsch 1. Schalten Sie den Computer aus. 2. Drücken Sie den Netzschalter am Monitor. Die Betriebs-LED erlischt. Netzschalter betätigen. Français OFF Wenn der Monitor längere Zeit nicht verwendet wird, sollten Sie den Monitor mit dem Hauptnetzschalter ausschalten und den Netzstecker von der Netzsteckdose abtrennen. 37 191A_dt.
Einstellen Einstellen der der Bildschirmanzeige Bildschirmanzeige und der Lautsprecher-Lautstärke Hinweis: - Alle Einstellungen bleiben auch nach dem Abschalten des Monitors gespeichert. Einstellungssperrfunktion Wenn Sie die Steuertasten deaktivieren (d. h. die Sperre setzen), können keine Werte eingestellt werden. 1. Schalten Sie den Monitor aus. 2. Drücken Sie gleichzeitig die Taste MENU und den Netzschalter (d. h. Monitor einschalten).
3. Stellen Sie die Helligkeit mit der Taste (verringern) oder der Taste (erhöhen) ein. Hinweis: - Die Bildschirmanzeige für die Einstellung wird einige Sekunden nach der letzten Einstellung ausgeblendet. Die Modellbezeichnung (MODEL), die Seriennummer (S/N) und die Verwendungszeit (USAGE TIME) des Monitors kann überprüft werden. 1. Schalten Sie den Monitor aus. 2. Während des Drückens der Taste / MODE drücken Sie den Netzschalter am Monitor (d.h. der Monitor wird eingeschaltet).
Einstellen der Bildschirmanzeige Automatisches Einstellen des Bildschirms Automatische Bildschirmeinstellung Automatische Einstellung kann entweder mit der Taste AUTO oder der Taste MENU ausgeführt werden. Die Optionen im Menü ADJUSTMENT können automatisch eingestellt werden (CLOCK, PHASE, H-POS, V-POS). Taste AUTO 1. Drücken Sie die Taste AUTO. 2. Drücken Sie die Taste AUTO erneut. [ADJUSTING] erscheint im Bildschirm, und nach einigen Sekunden verschwindet [ADJUSTING] wieder.
Einstellen der Bildschirmanzeige ) MENU Menü GAIN CONTROL Wählen Sie die Option durch Drücken der Taste / MODE. Vertikales Flimmern PHASE Die untenstehende Abbildung zeigt, welche Einstellung vorgenommen werden muss, um horizontales Flimmern zu verhindern. (Tasten ) Hinweis: - Die Einstellungen unter [PHASE] dürfen erst erfolgen, nachdem [CLOCK] korrekt eingestellt wurde. MENU Menü COLOR CONTROL Wählen Sie die Option durch Drücken der Taste / MODE.
Einstellen der Bildschirmanzeige Menü GAIN CONTROL Menü COLOR CONTROL AUTO Wenn [AUTO] mit der Taste gewählt ist, werden die Einstellungen von [BLACK LEVEL] und [CONTRAST] automatisch vorgenommen. Nach der automatischen Einstellung führen Sie manuelle Einstellung wenn erforderlich. WHITE BALANCE 1.Nach der Wahl von [WHITE BALANCE] drücken Sie die Taste . Das Menü WHITE BALANCE erscheint. BLACK LEVEL Die gesamte Bildschirmhelligkeit kann während der Anzeige des Farbmusters eingestellt werden.
Hinweis: - Abhängig von der Auflösung des Eingangssignals ändert sich die Anzeige eventuell selbst dann nicht, wenn die Menüoptionen ausgewählt werden können. INFORMATION Die Modellbezeichnung (MODEL), die Seriennummer (S/N) und die Verwendungszeit (USAGE TIME) des Monitors kann überprüft werden. 1. Nach der Wahl von [INFORMATION] drücken Sie die Taste . Die Produktinformation wird angezeigt. 2. Drücken Sie die Taste MENU.
Pflege des Monitors Pflege des Monitors Die Leuchtstoffröhren des Monitors weisen eine begrenzte Lebensdauer auf. - Wenn sich der Bildschirm verdunkelt, dauernd flackert oder nicht aufleuchtet, hat die Leuchtstoffröhre das Ende ihrer Betriebslebensdauer erreicht. Wenden Sie sich an das Geschäft, in dem Sie den Monitor gekauft haben, oder an das nächste autorisierte Sharp-Kundendienstzentrum. - Am Anfang kann aufgrund der Eigenschaften der Leuchtstoffröhre Flimmern auftreten.
ENTSORGEN SIE DIESES PRODUKT NICHT MIT DEM HAUSHALTSMÜLL ODER GEMISCHT MIT ANDEREM MÜLL! DABEI BESTEHT GEFAHR FÜR DIE UMWELT! (3) Für unsere Kunden in den USA In diesem Produkt ist Zinn-Blei-Lötmaterial und eine Fluoreszenzlampe mit einer geringen Menge Quecksilber verwendet. Die Entsorgung dieser Materialien kann aufgrund von Umweltvorschriften geregelt sein. Bitte wenden Sie sich an die örtlichen Behörden oder an die Electronics Industries Alliance: http://www.eiae.
Technische Daten Produktspezifikationen Abmessungen (Einheiten: mm) Modellbezeichnung LL-191A-W (Weiß)/LL-191A-B (Schwarz) LCD-Anzeige 48 cm diagonal gemessen TFT-LCD-Modul Auflösung (max.) SXGA 1280 x 1024 Pixel Anzeigbare Farben (max.) Ca. 16,19 Millionen Farben (6 bit + FRC) Helligkeit (max.
Technische Daten Anzeigemodus Hsync Pinbelegung des AnalogsignalEingangsstecker Vsync Punktfrequenz English Relevante Signaltakte (15-poliger Mini-D-Sub-Stecker) US-Text Power MacintoshSerie Sun UltraSerie Funktion Roter Videosignaleingang Grüner Videosignaleingang Blauer Videosignaleingang GND GND Für rotes Videosignal GND Für grünes Videosignal GND Für blaues Videosignal GND +5V GND GND DDC-Daten Für Hsync-Signaleingang Für Vsync-Signaleingang DDC-Takt Français Nr.
Installieren der Setup-Informationen und des ICC-Profils (Für Windows) Je nach dem verwendeten Computer oder Betriebssystem muss die Installation der MonitorSetup-Informationen usw. eventuell über den Computer erfolgen. Führen Sie in diesem Fall die unten beschriebenen Schritte zum Installieren der Monitor-Setup-Informationen aus. (Je nach dem verwendeten Computertyp oder Betriebssystem können die Befehlsnamen und Verfahren von den hier beschriebenen abweichen.
Installieren der Monitor-Setup-Informationen unter Windows 2000 und Festlegen des Monitor-ICCProfils als vorbestimmter Wert. Die in den nachstehenden Bedienungshinweisen erwähnten Windows-Meldungen basieren auf der englischen Windows-Version. Dabei wird von Laufwerk "D" als CD-ROMLaufwerk angenommen. Installieren der Monitor-Setup-Informationen unter Windows Me und Festlegen des Monitor-ICCProfils als vorbestimmter Wert.
Installieren der Setup-Informationen und des ICC-Profils (Für Windows) Für Windows XP Installieren des ICC-Profils Installieren der Monitor-Setup-Informationen unter Windows XP und Festlegen des Monitor-ICCProfils als vorbestimmter Wert. Die in den nachstehenden Bedienungshinweisen erwähnten Windows-Meldungen basieren auf der englischen Windows-Version. Dabei wird von Laufwerk "D" als CD-ROMLaufwerk angenommen. Installieren des Monitor-ICC-Profils.
Informationen zum Profil ColorSync (Für MacOS) Deutsch English Informationen zum Profil ColorSync ColorSync ist das Farbverwaltungssystem von Apple Computers. Mit dieser Funktion erkennt das System die Farbwiedergabeeigenschaften bei Verwendung mit einer kompatiblen Anwendung. Ein ColorSync-Profil beschreibt die Farbeigenschaften des LCD-Monitors. Français Hinweise: - Das ColorSync-Profil dieses Monitors kann zusammen mit MacOS 8.5 oder höher eingesetzt werden.
Anweisungen zum Anbringen eines VESA-kompatiblen Monitorarms Der folgende Fuß oder Arm kann am Monitor angebracht werden. - Fuß (getrennt erhältlich) Modellbezeichnung: NL-S02-H (Hellgrau) NL-S02-B (Schwarz) - VESA-kompatibler Arm (im Handel erhältlich) Hinweise: - Der Fuß ist nur für diesen Monitor bestimmt, verwenden Sie ihn für keine anderen Geräte oder nutzen Sie ihn auf keine andere Weise.
Deutsch Français Italiano 54 55 56 57 57 58 58 58 59 60 60 61 61 61 62 62 63 66 66 66 66 67 68 70 73 74 English Español Conseils et mesures de sécurité . . . . . . . . . . . . . . . . . . . . . . . . . . . . . . . . . . . . . . . . . . . . . . . . . . . . . . . . Description du produit . . . . . . . . . . . . . . . . . . . . . . . . . . . . . . . . . . . . . . . . . . . . . . . . . . . . . . . . . . . . . . . . Réglage de l'inclinaison . . . . . . . . . . . . . . . . . . . . . . . . . . . . . . . . . .
Conseils et mesures de sécurité - Le panneau couleur LCD TFT utilisé dans ce moniteur est fabriqué avec une technologie de haute précision. Cependant, il peut avoir quelques points minuscules sur l'écran où les pixels ne s'allument jamais ou sont allumés en permanence. De plus, si l'écran est regardé avec un angle aigu, les couleurs ou la luminosité peuvent paraître inégales.
191A_fr.P65 55 12/15/2003, 5:28 PM Italiano Español English 1. Bouton AUTO ........................... Ce bouton est utilisé pour effectuer le réglage automatique sur l'écran (CLOCK, PHASE, H-POS et V-POS). (p.62) 2. Bouton MENU .......................... Ce bouton est utilisé pour faire apparaître, sélectionner et refermer le menu OSD (On Screen Display). 3. Bouton / MODE .................... Lorsque le menu OSD est affiché : Ce bouton est utilisé pour sélectionner les options du menu.
Réglage de l'inclinaison ATTENTION ! - Assurez vous de bien saisir les deux bords du moniteur lorsque vous réglez l'angle de vue. Le panneau LCD de cet appareil est en verre. Appuyer les mains sur le panneau LCD peut provoquer son endommagement. approx. 25° approx. 5° 56 191A_fr.
Raccorder le câble de signal analogique fourni à la borne de sortie analogique RVB de l'ordinateur. Quand le câble audio fourni est connecté à la borne de sortie audio de l'ordinateur, le son de l'ordinateur connecté est sorti par les hautparleurs du moniteur. Il est aussi possible d'utiliser la prise casque du moniteur.
Raccordement, activation et désactivation du moniteur Raccordement d'un casque audio (en vente dans le commerce) Activation de l'alimentation 1. Activer la source d'alimentation principale du moniteur. Un casque audio (en vente dans le commerce) peut être raccordé. Borne pour casque audio Interrupteur principal Casque audio - Pour allumer et éteindre avec l'interrupteur principal, toujours laisser un intervalle d'au moins 5 secondes. Une manœuvre trop rapide risque de causer des dysfonctionnements.
Raccordement, activation et désactivation du moniteur English Désactivation de l'alimentation Deutsch 1. Mettre l'ordinateur hors tension. 2. Appuyer sur le bouton d'alimentation du moniteur. La diode d'alimentation s'éteind. Appuyer sur le bouton d'alimentation. Mettre l'ordinateur hors tension.
Réglage de l'affichage du moniteur et du volume des haut-parleurs Fonction de verrouillage des réglages Remarque : - Tous les réglages seront sauvegardés, même après la mise hors tension du moniteur. En désactivant les boutons de commande (c'est-àdire en les verrouillant), toute tentative de modification des valeurs sera vaine. 1. Mettre le moniteur hors tension. 2. Appuyer simultanément sur les boutons MENU et d'alimentation (c'est-à-dire allumer le moniteur).
1. Sans que le menu OSD ne soit affiché, appuyer sur le bouton ou le bouton . 2. S'assurer que [VOLUME] est sélectionné. S'il n'est pas sélectionné, appuyer sur le bouton / MODE et sélectionner [VOLUME]. 3. Régler au moyen du bouton (augmenter). bouton Le nom du modèle (MODEL), le numéro de série (S/N) et la durée d'utilisation (USAGE TIME) du moniteur peuvent être vérifiés. 1. Coupez l'alimentation. / MODE, 2.
Réglage de l'affichage du moniteur Réglage automatique de l'écran Réglage automatique de l'écran Le réglage automatique peut être effectué en utilisant soit le bouton AUTO ou le bouton MENU. Les options CLOCK, PHASE, H-POS, V-POS du menu ADJUSTMENT peuvent être ajustées automatiquement. Bouton AUTO 1. Appuyez sur le bouton Auto. 2. Appuyez à nouveau sur le bouton Auto. [ADJUSTING] apparaîtra sur l'écran et disparaîtra quelques secondes plus tard. (Le réglage automatique est à présent terminé.
Réglage de l'affichage du moniteur MENU Menu GAIN CONTROL Sélectionner l'option en appuyant sur le bouton / MODE. Scintillement vertical PHASE L'illustration suivante montre comment le réglage doit s'opérer de manière à ce que le scintillement horizontal soit minimisé. (Boutons ) Remarque : - Les réglages de [PHASE] ne doivent être effectués qu'après avoir réglé [CLOCK] correctement. MENU Menu COLOR CONTROL MENU Menu MODE SELECT-1 Sélectionner l'option en appuyant sur le bouton / MODE.
Réglage de l'affichage du moniteur Menu GAIN CONTROL (CTRL. LUMINOSIT) Menu COLOR CONTROL (CTRL. DES COULEURS) AUTO Quand [AUTO] est sélectionné avec le bouton , les réglages de [BLACK LEVEL] et de [CONTRAST] sont effectués automatiquement. Après le réglage automatique, effectuer le réglage manuel si nécessaire. WHITE BALANCE 1. Après avoir sélectionné [WHITE BALANCE], appuyer sur le bouton . Le menu WHITE BALANCE sera affiché.
OFF TIMER (Minuterie de mise hors service) L'alimentation est coupée à l'expiration de la durée prescrite. 1. Après avoir sélectionné [OFF TIMER], appuyez sur le bouton . 2. Choisissez Marche [ON] ou Arrêt [OFF] en . utilisant les boutons Si vous choisissez Marche [ON], appuyez sur le bouton / MODE. puis précisez la durée avant coupure de l'alimentation en utilisant les boutons . (La durée peut être réglée entre 1 et 23 heures par pas d'une heure.) 3. Appuyer sur le bouton MENU.
Entretien du moniteur Entretien du moniteur Les lampes de rétroéclairage du moniteur ont une durée de vie limitée. - Si l'écran s'assombrit, scintille constamment ou ne s'éclaire plus, c'est que la lampe de rétroéclairage a atteint sa limite de vie. Se renseigner auprès du revendeur ou du réparateur agréé Sharp le plus proche. - Au début de l'utilisation, en raison de la conception des lampes de rétroéclairage, il se peut que l'écran scintille. (Il ne s'agit pas d'un dysfonctionnement.
La société Sharp s'implique dans la protection de l'environnement et la sauvegarde de l'énergie. Notre but est de minimiser l'impact sur l'environnement de nos produits par le développement et l'amélioration continue de nos technologies et de la conception de nos produits. De même, les instructions que nous donnons à nos clients vont dans le sens de la conservation de l'environnement.
Caractéristiques techniques Caractéristiques techniques du produit Dimensions (Unités : mm) Nom du modèle LL-191A-W (Blanc)/LL-191A-B (Noir) Moniteur LCD 48 cm en diagonale Module TFT à cristaux liquides Résolution (max.) SXGA 1280 x 1024 pixels Couleurs affichables (max.) Approx. 16,19 millions de couleurs (6 bit + FRC) Luminosité (max.
Caractéristiques techniques Vsync Bande passante English Hsync (Mini connecteur de type D-sub 15 broches) Série Macintosh Série Sun Ultra Français Saisie de texte US Fonction Entrée du signal vidéo rouge Entrée du signal vidéo vert Entrée du signal vidéo bleu GND GND Pour mise à la terre du signal vidéo rouge Pour mise à la terre du signal vidéo vert Pour mise à la terre du signal vidéo bleu +5V GND GND Données DDC Pour entrée signal H-sync. Pour entrée signal V-sync.
Installation des fichiers relatifs au paramétrage du moniteur et au profil ICC (Pour Windows) En fonction du type d'ordinateur ou du système d'exploitation, il peut parfois s'avérer nécessaire d'installer des fichiers relatifs au paramétrage du moniteur. Si c'est le cas, il convient de procéder comme suit pour installer sur l'ordinateur les fichiers relatifs au paramétrage du moniteur. (Le nom des commandes et les procédures peuvent varier en fonction du type d'ordinateur ou du système d'exploitation.
Si la boîte de dialogue "Add New Hardware Wizard" est apparue : 1. Placer le CD-ROM d'accessoires dans le lecteur de CD-ROM de l'ordinateur. 2. Cocher la case [Specify the location of the driver [Advanced]] et cliquer [Next]. 3. Cocher la case [Display a list of all the drivers in a specific location, so you can select the driver you want.], ensuite cliquer sur [Next]. 4. Lorsque [Models] apparaît, cliquer sur [Have disk], et s'assurer que [Copy manufacturer's files from:] est [D:] et cliquer sur [OK]. 5.
Installation des fichiers relatifs au paramétrage du moniteur et au profil ICC (Pour Windows) Pour Windows XP Installation du profil ICC Installation des fichiers relatifs au paramétrage du moniteur sous Windows XP, et au réglage du profil ICC du moniteur en tant que valeur par défaut. Les messages Windows mentionnés dans le mode d'emploi suivant se réfèrent à la version anglaise de Windows. Les explications qui suivent considèrent que le lecteur de CD-ROM est le lecteur "D".
Informations sur le profil ColorSync (Pour MacOS) Deutsch English A propos du profil ColorSync ColorSync est le système de gestion des couleurs de Apple Computer et il permet de réaliser les caractéristiques de l'affichage de couleurs lors d'une utilisation avec une application compatible. Un profil ColorSync décrit les caractéristiques de couleur du moniteur LCD. Français Remarques : - Le profil ColorSync de ce moniteur fonctionne sous MacOS 8.5 ou version ultérieure.
Instructions relatives à l'installation d'un bras conforme VESA Le support ou le bras suivant peut être fixé au moniteur. - Support (vendu séparement) Nom du modèle : NL-S02-H (Ivoire) NL-S02-B (Noir) - Bras conforme à la norme VESA (en vente dans le commerce) Remarques : - Le support est conçu spécifiquement pour ce moniteur, ne pas l'utiliser pour un autre équipement ou à d'autres fins.
Français Italiano 76 77 78 79 79 80 80 80 81 82 82 83 83 83 84 84 85 88 88 88 88 89 90 92 95 96 English Español Suggerimenti e precauzioni per la sicurezza . . . . . . . . . . . . . . . . . . . . . . . . . . . . . . . . . . . . . . . . . . . . . . Descrizione del prodotto . . . . . . . . . . . . . . . . . . . . . . . . . . . . . . . . . . . . . . . . . . . . . . . . . . . . . . . . . . . . . . Regolazione dell'angolazione . . . . . . . . . . . . . . . . . . . . . . . . . . . . . . . . . . . . . . . . .
Suggerimenti e precauzioni per la sicurezza - Lo schermo LCD-TFT a colori usato in questo monitor è stato fabbricato applicando tecnologia di alta precisione. Ciononostante sullo schermo potrebbero apparire piccolissimi punti dove i pixel o non s'illuminano o rimangono sempre illuminati. Inoltre, nel caso che la visione avviene da un'angolazione molto alta potrebbero notarsi disuniformità di colori o luminosità.
191A_it.P65 77 12/15/2003, 5:28 PM Italiano Español English 1. Tasto AUTO .............................. Questo tasto si usa per eseguire la regolazione automatica dello schermo (CLOCK, PHASE, H-POS e V-POS). (p.84) 2. Tasto MENU ............................. Questo tasto si usa per visualizzare, selezionare e chiudere il menu OSD (On Screen Display). 3. Tasto / MODE ....................... Quando il menu OSD è visualizzato: Questo tasto si usa per selezionare delle opzioni di menu.
Regolazione dell'angolazione ATTENZIONE! - Assicurarsi di tenere entrambi i lati del monitor quando si regola l'angolo di visione. Il schermo LCD usato in questo monitor è fatto di vetro. Una pressione con le mani sullo schermo LCD può causare danni. circa 25° circa 5° 78 191A_it.
Collegare il cavo audio, accessorio ATTENZIONE! Quando il cavo audio, accessorio, è collegato al terminale di uscita audio del computer, il suono del computer collegato viene ascoltato dagli altoparlante dello schermo. È anche possibile avvalersi della presa per cuffie dello schermo. - Quando eseguite i collegamenti, assicuratevi che sia il monitor che il computer siano spenti.
Collegamento del monitor ed accensione e spegnimento del monitor Collegamento delle cuffie (da acquistare in commercio) Accensione 1. Posizionate su acceso l'interruttore principale rete del monitor. Le cuffie (da acquistare in commercio) possono essere collegate. Terminale per le cuffie Interruttore principale rete Cuffie - Per accendere e spegnere l'interruttore dell'alimentazione principale, attendere sempre un tempo di almeno 5 secondi fra le due operazioni.
Collegamento del monitor ed accensione e spegnimento del monitor English Spegnimento 1. Spegnete il computer. 2. Premete il tasto di alimentazione del monitor. Il LED di alimentazione si spegnerà. Spegnete il computer. Premete il tasto di alimentazione.
Regolazione della visualizzazione sullo schermo e volume dell'altoparlante Nota: - Tutte le regolazioni verranno conservate anche dopo che si è spenta l'alimentazione. Funzione del blocco di regolazioni Disattivando i tasti di controllo (cioè settando il blocco) si impedirà ogni tentativo di cambiare i valori regolati. 1. Spegnete l'alimentazione del monitor. 2. Mentre premete il tasto MENU, premete il tasto di alimentazione (cioè accendete l'alimentazione).
Regolazione della visualizzazione sullo schermo e volume dell'altoparlante A menu OSD non visualizzato agire sul tasto / MODE . Ad ogni successiva pressione del tasto compare la voce successiva del menù (nell'ordine: STD → OFFICE → sRGB → VIVID → STD). L'On Screen display per la regolazione scompare alcuni secondi dopo l'ultima operazione. 1. Senza che il menu OSD sia visualizzato premete oppure il tasto . il tasto 2. Controllare che [VOLUME] sia selezionato.
Regolazione della visualizzazione sullo schermo Regolazione automatica dello schermo Regolazione automatica dello schermo La regolazione automatica può essere effettuata usando il tasto AUTO o il tasto MENU. Le opzioni nel menu ADJUSTMENT si possono regolare automaticamente (CLOCK, PHASE (FASE), H-POS, V-POS). Tasto AUTO 1. Premere il tasto AUTO. 2. Premere nuovamente il tasto AUTO. [ADJUSTING] comparirà sullo schermo e dopo alcuni secondi [ADJUSTING] sparirà.
Regolazione della visualizzazione sullo schermo AUTO Quando [AUTO] è selezionato con il tasto , le impostazioni [CLOCK], [PHASE], [H-POS] e [V-POS] sono eseguite automaticamente. 1. Prima di tutto visualizzate un'immagine che rende chiaro l'intero schermo. (p.84) 2. Visualizzare il menu OSD premendo il tasto MENU. Menu ADJUSTMENT Selezionare l'opzione premendo il tasto / MODE.
Regolazione della visualizzazione sullo schermo Menu GAIN CONTROL (CTRL. GUADAGNO) Menu COLOR CONTROL (CONTROLLO COLORE) AUTO Quando [AUTO] viene selezionato con il tasto , le impostazioni [BLACK LEVEL] e [CONTRAST] sono eseguite automaticamente. Dopo la regolazione automatica, eseguire la regolazione manuale se necessario. WHITE BALANCE 1. Dopo aver selezionato [WHITE BALANCE], premere il tasto . Il menu WHITE BALANCE sarà visualizzato.
OSD H-POSITION (posizione orizzontale dell'OSD) La posizione del menu dell'OSD può essere spostata verso sinistra e verso destra. (tasti ) OSD V-POSITION (posizione verticale dell'OSD) La posizione del menu dell'OSD può essere spostata in su ed in giù. (tasti ) OFF TIMER (TIMER PER SPEGNIMENTO AUTOMATICO) Allo scadere del periodo di tempo predisposto l'apparecchio si spegne automaticamente. 1. Dopo aver selezionato la voce [OFF TIMER], premere il tasto . 2.
Cura del monitor Cura del monitor I tubi fluorescenti del monitor hanno una durata di vita utile limitata. - Se lo schermo si scurisce, lampeggia con insistenza o non si illumina, significa che il tubo fluorescente ha raggiunto la fine della sua durata di servizio. Per favore informatevi presso il negozio, dal quale avete acquistato il monitor oppure dal Centro del Servizio Tecnico Assistenza Clienti della Sharp più vicino a voi.
(3) Per i nostri clienti negli Stati Uniti Questo prodotto utilizza la saldatura stagno e piombo e una lampada fluorescente che contiene una piccola quantità di mercurio. L'eliminazione di questi materiali può essere regolata con dovute considerazioni ambientali. Per la raccolta e le informazioni sul riciclaggio, si prega di prendere contatto con le vostre autorità locali o la Electronics Industries Alliance: http://www.eiae.
Specifiche Specifiche del prodotto Dimensioni (Unità: mm) Nome del modello LL-191A-W (Bianco)/LL-191A-B (Nero) Display LCD 48 cm misurati diagonalmente Modulo TFT LCD Risoluzione (max.) SXGA 1280 x 1024 pixel Colori visualizzabili (max.) Circa 16,19 million di colori (6 bit + FRC) Luminosità (max.
Sincronismo Sincronismo orizzontale verticale Frequenza punti (Connettore D sub mini a 15 pin) VESA Serie Sun Ultra Français Testo US Serie Power Macintosh Funzione Segnale video rosso in ingresso Segnale video verde in ingresso Segnale video blu in ingresso GND (massa) GND (massa) GND (massa) per il segnale video rosso GND (massa) per il segnale video verde GND (massa) per il segnale video blu +5V GND (massa) GND (massa) Dati DDC Per l'input del segnale di sincronismo orizzontale Per l'input del seg
Installazione delle informazioni di setup e del profilo ICC (Per Windows) A seconda del computer oppure del sistema operativo può essere necessario usare il computer per eseguire l'installazione delle informazioni di setup del monitor, ecc. In questo caso, seguite i passi indicati sotto per installare le informazioni di setup del monitor. (A seconda del tipo di computer oppure del sistema operativo, i nomi dei comandi ed i metodi possono essere differenti.
1. Inserire il CD-ROM degli accessori nel lettore CD-ROM del computer. 2. Fate clic sul pulsante [Start]. Da [Settings], scegliete [Control Panel]. 3. Fate doppio clic su [Display]. 4. Fate clic su [Settings], [Advanced] e [Monitor]. 5. Fate clic su [Properties], [Driver] e [Update Driver]. 6. Quando appare [Upgrade Device Driver Wizard], fate clic su [Next]. 7. Spuntate [Display a list of the known drivers for this device so that I can choose a specific driver] e fate clic su [Next]. 8.
Installazione delle informazioni di setup e del profilo ICC (Per Windows) Installazione del profilo ICC Per Windows XP Installazione del profilo ICC del monitor. (Se le informazioni di setup sono già installate, lo è anche il profilo e non occorre installarlo.) I messaggi di Windows, citati nelle istruzioni per l'uso che seguono, si basano sulla versione inglese di Windows. In questa spiegazione si parte dall'ipotesi che l'unità per CD-ROM sia "D".
Informazioni sul profilo ColorSync (Per MacOS) English Il profilo ColorSync ColorSync è il sistema di gestione dei colori della Apple Computer e consente di realizzare la riproduzione dei colori, quando lo si usa con un'applicazione compatibile. Un profilo ColorSync descrive le caratteristiche cromatiche del monitor LCD. Français Note: - Il profilo ColorSync di questo monitor funziona con MacOS 8.5 o superiore.
Istruzioni per collegare un braccio compatibile VESA Il supporto o braccio seguente può essere fissato al monitor. - Supporto (venduto separatamente) Nome del modello: NL-S02-H (Avorio) NL-S02-B (Nero) - Braccio compatibile VESA (da acquistare in commercio) 5. Attaccate il braccio al monitor con le quattro viti. Bracci compatibili da acquistare in commercio I collegamenti devono soddisfare le seguenti condizioni. - Compatibilità con lo standard VESA.
Français Italiano English Español Sugerencias y precauciones de seguridad . . . . . . . . . . . . . . . . . . . . . . . . . . . . . . . . . . . . . . . . . . . . . . . 98 Descripción del producto . . . . . . . . . . . . . . . . . . . . . . . . . . . . . . . . . . . . . . . . . . . . . . . . . . . . . . . . . . . . . . 99 Ajuste de ángulo . . . . . . . . . . . . . . . . . . . . . . . . . . . . . . . . . . . . . . . . . . . . . . . . . . . . . . . . . . . . . . . . . . .
Sugerencias y precauciones de seguridad - El panel LCD en color TFT utilizado en este monitor ha sido fabricado aplicando una tecnología de alta precisión. Sin embargo, hay muchos puntos minúsculos en la pantalla en los que los píxeles nunca se encienden o se mantienen encendidos permanentemente. Además, si la pantalla se mira desde un ángulo agudo, pueden verse incluso colores o brillo irregulares.
191A_es.P65 99 12/15/2003, 5:29 PM Italiano Español English 1. Botón AUTO ............................. Este botón se utiliza para hacer un ajuste automático de la pantalla (CLOCK, PHASE, H-POS y V-POS). (p.106) 2. Botón MENU ............................ Este botón se utiliza para ampliar, seleccionar y cerrar el menú OSD (On Screen Display). 3. Botón / MODE ...................... Cuando el menú OSD se vea en la pantalla: Este botón se utiliza para seleccionar opciones de menú.
Ajuste de ángulo ¡PRECAUCIÓN! - Asegúrese de sostener ambos lados del monitor al ajustar el ángulo de visión. El panel LCD que se utiliza en este monitor es de vidrio. Si presiona el panel LCD con las manos podría dañarlo. aprox. 25° aprox. 5° 100 191A_es.
Conecte el cable de audio suministrado ¡PRECAUCIÓN! - Antes de realizar la conexión, asegúrese de que tanto el monitor como el ordenador están apagados. - Tenga cuidado de no doblar excesivamente el cable ni utilizar cables de prolongación ya que ello podría llevar a un funcionamiento anómalo. Cuando el cable de audio suministrado se conecte al borne de salida de audio del ordenador, el sonido del ordenador conectado saldrá por los altavoces del monitor.
Conexión del monitor y encendido/apagado del mismo Conexión de auriculares (de venta en el comercio) Encendido 1. Conmute el interruptor primario del monitor. Se pueden conectar auriculares (de venta en el comercio). Interruptor primario Borne de auriculares Auriculares Notas: - Cuando están conectados los auriculares, no se oye ningún sonido por los altavoces del monitor. - Utilice los auriculares con un cable de menos de 3 m de largo.
Conexión del monitor y encendido/apagado del mismo English Apagado 1. Apague el ordenador. 2. Pulse el botón de encendido/apagado del monitor. El LED indicador de conexión se apagará. Pulse el botón de encendido/apagado. Apague el ordenador. Français OFF English Español Italiano Si no se va a utilizar el monitor durante mucho tiempo, desconecte la interruptor primario del monitor y desenchufe la clavija de alimentación de la toma de corriente. 103 191A_es.
Ajuste de la pantalla y volumen del altavoz Nota: - Todos los ajustes quedarán guardados incluso después de apagar. Reposición de todos los valores de ajuste Puede reponer todos los valores de ajuste a los valores originales de fábrica con una sola instrucción. 1. Apague el monitor. 2. Pulse los botones MENU y / MODE al mismo tiempo y, mientras lo hace, pulse el botón de encendido/apagado (es decir, encienda el monitor). Siga pulsando los botones hasta que aparezca [ALL RESET] en la pantalla.
1. Sin el menú OSD a la vista, pulse el botón o . 2. Compruebe que esté seleccionado [VOLUME]. Si no está seleccionado [VOLUME], pulse el botón / MODE y selecciónelo. 3. Realice el ajuste pulsando el botón (disminución) o el botón (aumento). Nota: - El menú de Máscara en pantalla (OSD) para realizar el ajuste desaparece pasados unos segundos después de la última instrucción.
Ajuste de la pantalla Ajuste automático de la pantalla Ajuste de pantalla automático (cuando se utiliza una señal analógica) Botón AUTO 1. Pulse el botón AUTO. 2. Vuelva a pulsar el botón AUTO. Aparecerá [ADJUSTING] en la pantalla y después de unos segundos, desaparecerá [ADJUSTING]. (Esto completa el ajuste automático.) Las opciones del Menú ADJUSTMENT (RELOJ, FASE, H-POS, V-POS) se pueden ajustar automáticamente.
Ajuste de la pantalla AUTO Cuando se selecciona [AUTO] con el botón ajustan automáticamente las selecciones [CLOCK], [PHASE], [H-POS] y [V-POS]. 1. En primer lugar aparece una imagen que pone toda la pantalla muy clara. (p.106) 2. Haga que aparezca el menú OSD pulsando el botón MENU. Menú ADJUSTMENT Seleccione la opción pulsando el botón / MODE. , se Parpadeo vertical PHASE En la figura siguiente se muestra cómo efectuar el ajuste de forma que no se genere un parpadeo horizontal.
Ajuste de la pantalla Menú GAIN CONTROL Menú COLOR CONTROL AUTO Cuando se selecciona [AUTO] con el botón , se ajustan automáticamente las selecciones [BLACK LEVEL] y [CONTRAST]. Después del ajuste automático, haga el ajuste manual cuando sea necesario. WHITE BALANCE 1. Después de seleccionar [WHITE BALANCE], pulse el botón . Aparecerá el menú WHITE BALANCE. BLACK LEVEL La luminosidad total de la pantalla puede ajustarse mientras se observa el patrón cromático.
OSD H-POSITION (posición horizontal OSD) La posición del menú OSD puede moverse hacia la izquierda y hacia la derecha. (botones ) OSD V-POSITION (posición vertical OSD) La posición del menú OSD puede moverse hacia ) arriba y abajo. (botones SCALING (nivel de graduación) La nitidez de la imagen puede regularse.
Conservación del monitor Conservación del monitor Los tubos fluorescentes del monitor tienen una vida útil limitada. - Si la pantalla se oscurece, parpadea persistentemente o no se enciende, el tubo fluorescente ha llegado al fin de su vida útil. Consulte a su proveedor o al servicio autorizado de asistencia técnica de Sharp más cercano. - Debido a las características de los tubos fluorescentes, la pantalla puede reverberar durante el período inicial de uso. (No se trata de una anomalía.
Sharp Corporation está comprometida a proteger el medio ambiente y a la conservación de energía. Nuestra meta es reducir el impacto sobre el medio ambiente de nuestos productos, ejecutando y mejorando continuamente las tecnologías diseño de productos y la información a los clientes para la conservación del medio ambiente.
Especificaciones Especificaciones del producto Nombre del modelo LL-191A-W (Blanco)/LL-191A-B (Negro) Display LCD 48 cm medidos en diagonal Módulo TFT LCD Resolución (máx.) SXGA 1280 x 1024 pixels Colores reproducibles (máx.) Aprox. 16,19 millones de colores (6 bit + FRC) Luminosidad (máx.
Especificaciones Vías del conector de entrada RGB analógica Sincronizaciones de las señales correspondientes Hsync Vsync English Modo display (Conector Mini D-sub de 15 vías) Frecuencia Series Sun Ultra Función Señal de entrada vídeo rojo Señal de entrada vídeo verde Señal de entrada vídeo azul GND 5 6 7 8 9 GND GND para señal de vídeo rojo GND para señal de vídeo verde GND para señal de vídeo azul +5V 10 11 12 13 14 15 GND GND Datos DDC Para entrada de señal Hsync Para entrada de señal Vsync Rel
Instalación de la información de configuración y del perfil ICC (Para Windows) Según sea el tipo de ordenador o de sistema operativo, puede que sea necesario utilizar el ordenador para llevar a cabo la instalación de la información de configuración del monitor, etc. Si así fuera, siga los pasos que se indican a continuación para instalar la información de configuración del monitor.
1. Introduzca el CD-ROM suministrado en la unidad de CD-ROM del ordenador. 2. Haga clic sobre el botón [Start]. En [Settings], seleccione [Control Panel]. 3. Haga doble clic en [Display]. 4. Haga clic en [Settings], [Advanced] y [Monitor]. 5. Haga clic sobre [Properties], [Driver] y [Update Driver]. 6. Cuando aparezca el Asistente [Upgrade Device Driver Wizard], haga clic sobre [Next]. 7.
Instalación de la información de configuración y del perfil ICC (Para Windows) Para Windows XP Instalación del perfil ICC Instalación de la información de configuración del monitor en Windows XP y configuración del perfil ICC del monitor como valor predeterminado. Los mensajes de Windows mencionados a continuación se refieren la versión inglesa. En la explicación se da por supuesto que la unidad de CD-ROM es la "D". Instalación del perfil ICC del monitor.
Información acerca del perfil ColorSync (Para MacOS) English Acerca del perfil ColorSync ColorSync es el sistema de gestión del color de Apple Computer y permite obtener características de reproducción cromática cuando se utiliza con una aplicación compatible. Un perfil ColorSync describe las características cromáticas del monitor LCD. Français Notas: - El perfil ColorSync de este monitor funciona con MacOS 8.5 o superior.
Instrucciones para acoplar un brazo de compatibilidad VESA El siguiente pedestal o brazo puede instalarse en el monitor. - Pedestal (vendido separadamente) Nombre del modelo: NL-S02-H (Gris Plomizo) NL-S02-B (Negro) - Brazo compatible con VESA (de venta en el comercio) 5. Acople el brazo al monitor apretando los cuatro tornillos. Brazos compatibles de venta en el comercio Los accesorios deben cumplir los siguientes requisitos: - Deben ser compatibles con el estándar VESA.
目录 120 121 122 123 123 124 124 124 125 126 126 127 127 127 128 128 129 132 132 132 132 133 134 136 139 140 汉语 技巧提示和安全注意事项 . . . . . . . . . . . . . . . . . . . . . . . . . . . . . . . . . . . . . . . . . . . . . . . . . . . . . . . . . . . . . 产品说明 . . . . . . . . . . . . . . . . . . . . . . . . . . . . . . . . . . . . . . . . . . . . . . . . . . . . . . . . . . . . . . . . . . . . . . . . . . 角度调节 . . . . . . . . . . . . . . . . . . . . . . . . . . . . . . . . . . . . . . . . . . . . . . . . . . . . . .
技巧提示和安全注意事项 - 本显示器所使用的TFT彩色液晶显示屏是用高精度 技术制造的。但是,在屏幕上可能会有微小的斑 点。在这些斑点之处,像素或者从来不亮,或者总 是点亮。另外,如果从一个倾斜的锐角来观看屏 幕,可能会看到彩色或亮度并不均匀。请注意,这 并不是故障,而是液晶显示屏的共同现象。这不会 影响显示器的性能。 - 不要让屏幕长时间显示静止不变的画面,否则会在 屏幕上留下“残留影像”。 - 如果把亮度调节到最小,那么有可能不容易看见所 显示的画面。 - 电脑信号的质量高低会影响到所显示的图像的质 量。建议采用能够输出高质量视频信号的电脑。 - 决不能用坚硬物件刮擦或敲打液晶显示器。 - 请注意,除了由法律规定的赔偿之外,日本夏普株 式会社对于客户或第三方在使用本机时所产生的错 误不承担责任,对于在使用本机时所产生的任何其 他有关本机的故障或损坏也不负责任。 - 本显示器及其附件若有升级,恕不另行通知。 显示器与附件的检查清单 - 请检查本包装内包括下列物品。 - 液晶显示器(1) - 模拟信号线(1) (型号名称:0NIT15G4-0015 ) - 音频线(1) (型号名称:0NIT17A3-U00
产品说明 14 8 6 13 7 5 5 2 3 4 9 10 11 12 1.“AUTO”(自动)按钮 ..................... 此按钮用于进行画面的自动调节(“CLOCK” (时钟)、 “PHASE” (相位)、 “H-POS” (水平位置)和“V-POS” (垂直位置))。(128页) 2.“MENU” (菜单)按钮 .................... 该按钮用于弹出、选择、以及关闭“OSD” (“On Screen Display” (屏 幕显示))菜单。 3. /“MODE” (模式)按钮 ......... 当“OSD” (屏幕显示)菜单显示出来时: 该按钮用于选择菜单上的选项。 当“OSD” (屏幕显示)菜单没有显示出来时: 该按钮用于设置“DISPLAY MODE” (显示模式)。 按钮 ..................................... 当“OSD” (屏幕显示)菜单显示出来时: 4.
角度调节 要小心! - 调节观看角度时,请务必抓住显示器的边上。此显 示器的液晶显示屏是用玻璃制作的。如果用手对液 晶显示屏施力,可能会损坏液晶显示屏。 约25度 1234567 1234567 1234567 约5度 1234567 122
连接显示器、开关显示器的电源 要小心! 连接附送的音频线 - 在进行连接时,请务必确认显示器和电脑的电源都 已经关闭。 - 注意不要过度弯曲连接线,也不要增加延长的电 线,因为这样可能会引起故障。 当附送的音频线连接到电脑的音频输出端子上时,所 连接的电脑的声音就从显示器的扬声器中播放出来。 也可以使用显示器的耳机插孔。 连接显示器与电脑 音频输入端子 音频输出端子 将附送的模拟信号线连接到电脑的模拟“RGB”(红 绿蓝)输出端子上。 模拟“RGB” (红绿蓝)端子 (15芯小型D-sub,3排) 音频线 模拟信号线 模拟“RGB” (红绿蓝)端子 (15芯小型D-sub,3排) 汉语 - 注意连接器的方向,将信号线紧紧地垂直插入连 接器,然后拧紧两边的螺钉。 如果连接到两排D-sub 15芯“Apple Power Macintosh” (强力苹果电脑),那么请在模拟信号线 上添加一个“Macintosh”转接头(市售)。 “Macintosh”转接头 注: - 连接“Sun Ultra”系列时,可能需要转接头(市 售)。 123
连接显示器、开关显示器的电源 连接耳机(市售) 打开电源 耳机(市售)也可以连接。 1. 打开显示器的主电源。 耳机端子 主电源开关 耳机 注: - 当连接耳机时,显示器的扬声器中就不再发出声音。 - 请使用接线短于3米的耳机。 - 在打开电源和关闭电源之间切换时,要等待至少 5秒的间隔。过快的切换会引起故障。 2. 按下显示器的电源按钮。 电源指示灯显示橙色。 3.
连接显示器、开关显示器的电源 关闭电源 1. 关闭电脑的电源。 2.
调节画面显示和扬声器音量 调节锁定功能 注: - 即使关闭了电源,所有的调节内容也都会被保存起 来。 使所有的调节内容复原 只要用一个命令,就可以把所有的调节内容都恢复到 本显示器出厂时所设置的默认值。 1. 关闭显示器的电源。 2. 同时按下“MENU” (菜单)按钮和 /“MODE” (模式)按钮,与此同时按下电源按钮(也就是打 开显示器的电源)。 一直按下按钮直到[ALL RESET] (全部复原)显 示在屏幕上。 当显示的内容消失时,复原操作就完成了。 通过使控制按钮无效(也就是设置锁定功能),就可 以防止更改任何已经调节好了的设置内容。 1. 关闭显示器的电源。 2.
调节画面显示和扬声器音量 调节扬声器音量 设置“DISPLAY MODE” (显示模式) 1. 在“OSD” (屏幕显示)菜单没有显示的情况下, 按下 按钮或 按钮。 2.
调节画面显示 自动调节画面 自动画面调节 可以用“AUTO”(自动)按钮或“MENU”(菜单)按钮 进行自动调节。 能自动调节“ADJUSTMENT” (调节)菜单上的选项 (“CLOCK” (时钟)、“PHASE” (相位)、“HPOS” (水平位置)、 “V-POS” (垂直位置))。 “AUTO” (自动)按钮 1. 按下“AUTO”(自动)按钮。 2.
调节画面显示 手动画面调节 “ADJUSTMENT” (调节)菜单 1. 显示使整个屏幕发亮的图像。(128页) 2.
调节画面显示 “GAIN CONTROL” (增益控制)菜单 “COLOR CONTROL” (色彩控制)菜单 “AUTO”(自动) 用 按钮选择[AUTO](自动)后,将自动调节[BLACK LEVEL](黑色电平)和[CONTRAST](对比度)设定。自 动调节后如有必要,请进行手动调节。 “WHITE BALANCE” (白色平衡) 1.
调节画面显示 “MODE SELECT-1” (模式选择-1)菜单 “MODE SELECT-2” (模式选择-2)菜单 注: - 由于输入信号的解像度有所不同,即使菜单选项可 以选择,显示的画面也可能不改变。 “INFORMATION” (信息) 可检查显示器的机型名(MODEL)(机型)、系列号(S/ N)(系列号)和使用时间(USAGE TIME)(使用时间)。 1. 选择[INFORMATION](信息)后按下 按钮。 会显示本机的信息。 2.
显示器的维护 显示器的维护 故障诊断 在清扫显示器时,请务必先把电源插头从交流电源插 座中拔出。 如果您感到显示器可能有了故障,那么在请人修理之 前请先检查如下各项。 如果问题仍然不能消除,那么请与您购买本显示器的 商店或就近的日本夏普株式会社授权的服务中心接 洽。 外壳和控制面板部分 用柔软的干布轻轻擦掉外壳和控制面板上的尘垢。 如果非常脏,那么可以用中性洗涤剂沾湿软布,充分 拧干后将尘垢擦掉。 本显示器的荧光灯管是有一定时间寿命的。 - 如果屏幕变暗、持续不停地颤动或者不能点亮, 则荧光灯可能已至使用寿命。请与您购买本显示 器的商店或就近的日本夏普株式会社授权的服务 中心接洽。 - 在使用的最初阶段,由于荧光灯管的特性,画 面可能会有颤动。 (这不是故障。)如果发生这种 现象,请先把电源关闭,然后再把电源打开试 一试。 液晶显示屏部分 用柔软的干布轻轻擦掉液晶显示屏上的污垢和灰尘。 (像医用纱布或擦镜头布那样的软布就很适用。) 要小心! - 决不可使用稀释剂、汽油、酒精、玻璃清洁剂等, 否则可能导致颜色改变或变形。 - 决不可用任何硬物刮擦显示器,也不可对显示器施 加强力,否则可能会使显示器留
显示器的维护 有关用户爱护环境地丢弃本夏普产品的 信息 如果本机已不能使用,则应合法地并爱护环境地将其 丢弃。 丢弃时请勿将本机与一般垃圾一起丢弃或与其它垃圾 混在一起!否则会破坏环境! 夏普公司已作出保证,要保护环境并节省能源。我们 的目标是通过不断改进生产技术、产品设计和向用户 提供环保信息,最大限度地减少我公司产品对环境的 影响。 (1) 对于比利时、荷兰、瑞典和瑞士的用户 夏普公司参加各国的电器产品的再生利用系统, 这些系统是这些国家的环境保护法所规定的。 下面是各国的详细说明。 瑞典 该国的再生利用信息 请利用瑞典的电子设备再生利用系统 “ELRETUR”,访问网站 http://www.el-kretsen.se 荷兰 请利用荷兰的电子设备再生利用系统 “ICT-Milieu”,访问网站 http://www.nederlandict.nl/index.php 比利时 请利用比利时的电子设备再生利用系 统“Recupel”,访问网站 http://www.recupel.be 瑞士 请利用瑞士的电子设备再生利用系统 “SWICO”,访问网站 http://www.swico.
规格 型号名称 LL-191A-W(白色)/LL-191A-B(黑色) 液晶显示器 48厘米对角线长 TFT液晶显示模块 解像度(最大) SXGA 1280×1024像素 可显示的色彩种数(最大) 约16,190,000种颜色(6位+FRC) 亮度(最大) 220烛光/米2 像素间距 0.294(水平)× 0.294(垂直)毫米 对比度 500:1 可视角度 左-右160度;上-下160度 (对比度 > 5) 屏幕显示尺寸 水平376.3毫米×垂直301.1毫米 视频信号 模拟“RGB” (红绿蓝) (0.
规格 相关的信号时序 显示模式 模拟“RGB” (红绿蓝)输入连接器的插脚 15芯小型D-sub连接器 水平同步 垂直同步 像素频率 (千赫兹) (赫兹) (兆赫兹) VESA 序号 1 2 3 4 5 6 7 8 9 10 11 12 13 14 15 US文本 “Power Macintosh” (强力苹果 电脑)系列 Sun Ultra 系列 功能 红色视频信号输入 绿色视频信号输入 蓝色视频信号输入 GND(地线) GND(地线) 用于红色视频信号“GND” (地线) 用于绿色视频信号“GND” (地线) 用于蓝色视频信号“GND” (地线) + 5伏 GND(地线) GND(地线) DDC数据 用于水平同步信号输入 用于垂直同步信号输入 DDC时钟 电源管理 DPMS模式 屏幕 功率消耗 ON (打开) 显示器开启 36瓦 水平同步 垂直同步 STANDBY (待机) SUSPEND (休眠) 显示器关闭 1.
安装设置信息和ICC文档(用于“Windows”) 根据电脑或电脑操作系统的不同型号规格,有可能需 要在电脑内安装设置信息。如果属于这种情况,那么 请按照如下步骤来安装显示器设置信息。 (由于电脑 或电脑操作系统的型号规格不同,操作命令的名称和 方法也可能有所不同。在阅读本操作说明时,请参照 电脑本身的使用说明书。) 关于ICC文档 ICC(国际色彩协会)文档是一个描述液晶显示器色彩 再生特性的文件。使用适合ICC文档的显示器可以获 得高精度的色彩再生。 - “Windows 98”、 “Windows Me”、 “Windows 2000”、 “Windows XP”都使用ICC文档。 - 在安装“Windows 98”、 “Windows Me”、 “Windows 2000”、 “Windows XP”的设置信息 (如下所述)时,就会把ICC文档也安装进去。如 果只想安装ICC文档,那么请参阅第138页的“安装 ICC文档”。 - 使用ICC文档时,请如下设置∶ - [DISPLAY MODE](显示模式)∶[STD](标准)或 [OFFICE](省电) - [WHITE BALANCE](白色平衡)∶
安装设置信息和ICC文档(用于“Windows”) 对于“Windows Me” 把显示器设置信息安装到“Windows 2000”, 把显示器的ICC文档设置为预先确定的值。 在下述安装说明中,所用的菜单名称指的是英文版的 “Windows”中的菜单名称。请把这些名称作为安装 时的参考指南。 在本说明中,假定光盘驱动器是“D”驱动器。 把显示器设置信息安装到“Windows Me”,把显示器 的ICC文档设置为预先确定的值。 在下述安装说明中,所用的菜单名称指的是英文版的 “Windows”中的菜单名称。请把这些名称作为安装 时的参考指南。 在本说明中,假定光盘驱动器是“D”驱动器。 1. 将附送的光盘装入电脑的“D”驱动器。 2. 单击[Start] (开始)按钮。从[Settings] (设置) 菜单上选择[Control Panel] (控制面板)。 3. 双击[Display] (显示)。 4. 单击[Settings] (设置)、[Advanced] (高级), 然后[Monitor] (显示器)。 5.
安装设置信息和ICC文档(用于“Windows”) 安装ICC文档 对于“Windows XP” 把显示器设置信息安装到“Windows XP”,把显示器 的ICC文档设置为预先确定的值。 在下述安装说明中,所用的菜单名称指的是英文版的 “Windows”中的菜单名称。请把这些名称作为安装 时的参考指南。 在本说明中,假定光盘驱动器是“D”驱动器。 1. 将附送的光盘装入电脑的“D”驱动器。 2. 单击[Start] (开始)按钮。选择[Control Panel] (控制面板)。 3. 切换到“Classic View(经典视图)”。 4. 双击[Display] (显示)。 5. 单击[Settings] (设置)、[Advanced] (高级)、 然后[Monitor] (显示器)。 6. 单击[Properties] (属性)、[Driver] (驱动程 序)、然后[Update Driver] (更新驱动程序)。 7.
关于“ColorSync” (彩色同步)文档的信息(用于苹果机的MacOS) 关于“ColorSync”(彩色同步)文档 “ColorSync” (色彩同步)是“Apple Computer” (苹 果电脑)的色彩管理系统。与兼容的显示器一起使用 时,能实现色彩再生特性。 “ColorSync” (彩色同步) 文档描述了液晶显示器的色彩特性。 注: - 本显示器的“ColorSync” (彩色同步)文档要用 MacOS8.5或更高的版本。 - 使用ColorSync(彩色同步)文档时,请如下设置∶ - [DISPLAY MODE](显示模式)∶[STD](标准)或 [OFFICE](省电) - [WHITE BALANCE](白色平衡)∶[STD](标准) - [GAMMA](灰度)∶[0] 设置“ColorSync”(彩色同步)文档 注: - 需将“PC Exchange” (PC交换)或“File Exchange” (文件交换)安装在系统内。 - 由于电脑或电脑操作系统的型号规格不同,操作命 令的名称和方法也可能有所不同。在阅读本操作说 明时,请参照电脑本身的使用说明书。 汉语 1.
关于安装VESA规格支架的说明 下列底座或支架可以装配到显示器上。 - 底座(另外销售) 型号名称∶NL-S02-H(灰白色) NL-S02-B(黑色) - 可用于VESA的支架(市售) 5. 用四个螺钉把支架安装到显示器上。 可以使用的市售支架 装配必须满足: - 和VESA规格兼容 - 在将要安装的地方的螺钉孔间距必须为100毫米× 100毫米。 - 在把支架或底座安装到显示器上之后,支架或底座 不得跌落或折断。 如何装配支架或者底座 - 注意不要过度弯曲连接线或者增加延长线,否则会 引起故障。 - 按照这些指令进行操作时,请参考支架或者底座附 带的使用说明书里的安装指令。 注: - 用于安装支架的螺钉应该是长度为从安装表面突出 6毫米到8毫米的M4螺钉。使用其它的螺钉可能导 致显示器脱落或设备内部的损坏。 6 - 8毫米 要小心! 用于安装支架的螺钉 - 小心别将手指夹在显示器和底座之间,也不要碰倒 底座,否则都可能造成伤害。 支架 1. 去掉连接线。 2. 在一个合适的水平面上铺上一块柔软的布。 3. 注意不要损坏了显示器,轻轻的将显示器显示面朝 下放在布上。 4.
MEMO 141
MEMO 142
MEMO 143
MEMO 144
MEMO 145
MEMO 146
191A_cover4.
SHARP CORPORATION Printed in China Gedruckt in China Imprimé en Chine Stampato in Cina Impreso en China P/N: 0NI-191A-E001 1925-1300-5520 191A_cover4.