FRANÇAIS ESPAÑOL LCD MONITOR MONITEUR LCD MONITOR LCD ENGLISH LL-S242A-W LL-P202V SETUP MANUAL MANUEL D’INSTALLATION MANUAL DE INSTALACIÓN ENGLISH ....... E1 FRANÇAIS...... F1 ESPAÑOL .....
IMPORTANT: To aid reporting in case of loss or theft, please record the product’s model and serial numbers in the space provided. The numbers are located in the rear of the product. Model No.: Serial No.: U.S.A. ONLY WARNING: FCC Regulations state that any unauthorized changes or modifications to this equipment not expressly approved by the manufacturer could void the user’s authority to operate this equipment.
Contents Binding Cables..................................................................5 Connecting Peripheral Equipment..................................6 Connecting the Monitor to a Power Source...................7 Installation.........................................................................8 Turning Power ON/Off.................................................... 11 Specifications.................................................................12 ENGLISH IMPORTANT INFORMATION................
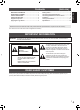
SAFETY PRECAUTIONS Electricity is used to perform many useful functions, but it can also cause personal injuries and property damage if improperly handled. This product has been engineered and manufactured with the highest priority on safety. However, improper use can result in electric shock and/or fire. In order to prevent potential danger, please observe the following instructions when installing, operating and cleaning the product.
SAFETY PRECAUTIONS (Continued) ENGLISH If a monitor is not positioned in a sufficiently stable location, it can be potentially hazardous due to falling. Many injuries, particularly to children, can be avoided by taking simple precautions such as: • Using fixing devices like wall mount brackets recommended by the manufacturer. • Only using furniture that can safely support the monitor. • Ensuring the monitor is not overhanging the edge of the supporting furniture.
Supplied Components If any component should be missing, please contact your dealer.
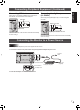
Binding Cables • When connecting cables, spread a soft cloth on a stable level surface such as a desk, and gently place the monitor on it with the screen facing down. Video cable and USB cable ENGLISH Caution Secure the video cable (HDMI or DisplayPort) and USB cable using the cable clamp. 1. Remove the cable clamp. 2. Route the cables through the cable 3. Push the cable clamp down into place. restraint slot.
Connecting Peripheral Equipment DisplayPort input terminal Caution • Be sure to turn off the power and disconnect the plug from the power outlet before connecting/disconnecting cables. Also, read the manual of the equipment to be connected. • Do not forcibly bend or apply force to cables. Doing so may result in wire breakage or other damage. • When connecting cables, spread a soft cloth on a stable level surface such as a desk, and gently place the monitor on it with the screen facing down.
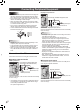
Connecting Peripheral Equipment (Continued) When using a commercially available mouse, keyboard, or other device, connect the device to the USB port. USB cable Connecting the digitizer pen (LL-P202V) When using the supplied digitizer pen, connect the digitizer pen cable. ENGLISH Connecting USB devices Digitizer pen cable USB terminal Check the orientation of the connector and insert it horizontally as far as it will go.
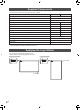
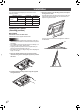
Installation You can install the touch display for each monitor in the following positions. Installation position LL-S242A-W LL-P202V Rack stand Yes No Variable stand No Yes Pen writing position No Yes Horizontal position Yes Yes Standing position 3. Place the monitor in the standing position, and adjust the angle of the stand. Hold the display with one hand so that it does not fall over, hold the rear leg of the stand with your other hand, and adjust the angle of the stand.
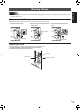
Installation (Continued) Placement on the rack stand Place the unit on the supplied rack stand. 1. Attach the back of the stand to the front. Place the front and back sides together, and attach the hinge. Tape Back Front hinge part Front ENGLISH 3. Peel off the adhesive tape securing the support to the back side. nLL-S242A-W Support Back 4. Fold down the support, inserting the tabs into the holes on the front side. Back hinge part 5. Position the stand. Tape Front Back Support 6.
Installation (Continued) Installing on a table (Pen writing position/Horizontal position) Portrait orientation Remove the monitor from the stand and place face-down on a table or other level surface. Caution • Do not exert a large amount of force on the monitor from above. Doing so may damage the flap. (LL-P202V) • After removing the monitor from the rack stand, store the stand so that the screws will not be lost.
Installation (Continued) nLL-S242A-W Horizontal position Place the monitor on a table or other level surface. 1. Simply lay the unit on the desired location. ENGLISH 2. Place the monitor where you want to use it. Turning Power ON/Off Turning on the power Turning off the power 1. Press the POWER button. 1. Turn off the PC. 2. Depress the POWER button for around 2 seconds. POWER button POWER button Press Power LED The power LED turns on. The power LED turns off.
Specifications Model Power requirement Operating temperature Operating humidity Power consumption (during normal operation) * Dimensions (excluding protrusions) Weight LL-S242A-W (white) LL-P202V AC 100 V - 240 V, 50/60 Hz (when using the supplied AC adapter), DC 19 V 32°F to 95°F (0°C to 35°C) 20% to 80% (no condensation) 48W (36W) (when using supplied 41W (29W) (when using supplied AC adapter) AC adapter) inch (mm) Approx. 22-5/16 x 1-1/8 x 13-5/16 Approx. 18-1/4 x 1 x 10-13/16 (566.4 x 28.7 x 338.
Table des matières INFORMATION IMPORTANTE..........................................1 CHER CLIENT....................................................................1 PRÉCAUTIONS DE SÉCURITÉ........................................2 MESURES DE SÉCURITÉ.................................................3 Composants fournis.........................................................4 Application du logo adhésif.............................................4 Fixation des câbles.........................................
PRÉCAUTIONS DE SÉCURITÉ L’électricité remplit de nombreuses fonctions utiles, mais elle peut provoquer des blessures et des dégâts matériels si elle n’est pas utilisée correctement. Cet appareil a été conçu et fabriqué en attachant la plus grande importance à la sécurité. Cependant, une utilisation inadéquate peut entraîner une décharge électrique et/ou un incendie.
PRÉCAUTIONS DE SÉCURITÉ (Suite) Afin de satisfaire aux normes EMC, utiliser des câbles blindés pour connecter les bornes suivantes : borne d’entrée HDMI, borne d’entrée DisplayPort MESURES DE SÉCURITÉ - N’utilisez pas le moniteur dans un endroit où il y a beaucoup de poussières, où le degré d’humidité est élevé, ou encore là où il pourrait se trouver en contact avec de l’huile ou de la vapeur, car cela pourrait provoquer un début d’incendie.
Composants fournis Si un composant venait à manquer, veuillez contacter votre revendeur.
Fixation des câbles Attention • Pendant le raccordement des câbles, étalez un tissu doux sur une surface horizontale stable, telle qu’un bureau, et placez le moniteur délicatement dessus, en orientant l’écran vers le bas. Câble vidéo et câble USB Fixez le câble vidéo (HDMI ou DisplayPort) et le câble USB à l’aide du serre-câble. 1. Enlevez le serre-câble. 2. Insérez le câble dans le détrompeur. 3. Poussez le serre-câble en position.
Connexion de périphériques Borne d’entrée DisplayPort Attention • Veillez à bien mettre hors tension l’interrupteur principal puis débranchez la prise de l’alimentation secteur avant de connecter ou de déconnecter les câbles. Lisez également le manuel de l’équipement à connecter. • Ne pliez pas les câbles avec force et n’exercez pas de pression sur ces derniers. Ils pourraient se rompre ou être endommagés.
Connexion de périphériques (Suite) Connexion de périphériques USB Lors de l’utilisation d’une souris, d’un clavier ou d’un autre périphérique en vente dans le commerce branchez cet appareil au port USB. Connexion du stylet de numérisation (LL-P202V) Lors de l’utilisation du stylet de numérisation, branchez le câble du stylet.
Installation Vous pouvez installer l’écran tactile de chaque moniteur dans les positions suivantes. Position d’installation LL-S242A-W LL-P202V Position Support fixe Support variable verticale Positionnement pour écriture Position horizontale Oui Non Non Oui Non Oui Oui Oui 3. Disposez le moniteur à la verticale, puis réglez l’angle du support. Tenez l’écran d’une main pour qu’il ne bascule pas, tenez le pied arrière du support avec l’autre main et ajustez l’angle du support.
Installation (Suite) 3. Enlevez le ruban adhésif fixant l’élément de maintien sur le panneau arrière. nLL-S242A-W Installation sur le support fixe Placez l’appareil sur le support fixe fourni. 1. Fixez les panneaux avant et arrière du support. Assemblez ensemble les panneaux avant et arrière, puis attachez la charnière. Ruban adhésif Arrière Partie avant de la charnière Arrière 4. Dépliez l’élément de maintien et insérez les attaches dans les orifices du panneau avant.
Installation (Suite) Installation sur une table (positionnement pour écriture/ position horizontale) Orientation verticale Retirez le moniteur de son support et placez-le à plat, face écran vers le bas, sur une table ou une autre surface plane. Attention • Ne forcez pas trop sur le moniteur par en haut. Cela pourrait endommager le volet. (LL-P202V) • Une fois le moniteur retiré du support fixe, rangez ce dernier de manière à ne pas perdre les vis.
Installation (Suite) 2. Placez le moniteur là où vous souhaitez l’utiliser. nLL-S242A-W Position horizontale Placez le moniteur sur une table ou une autre surface plane. 1. Placez simplement l’appareil à l’horizontale à l’endroit souhaité. FRANÇAIS Mise sous / hors tension Mise sous tension Mise hors tension 1. Appuyez sur le bouton d’alimentation POWER. 1. Éteignez le PC. 2. Appuyez sur le bouton d’alimentation POWER pendant environ 2 secondes.
Caractéristiques Modèle Alimentation Température de fonctionnement Hygrométrie de fonctionnement Consommation électrique (en fonctionnement normal) * Dimensions (à l’exclusion des éléments qui dépassent) Poids LL-S242-W (blanc) LL-P202V CA 100 V - 240 V, 50 / 60 Hz (en utilisant l'adaptateur secteur fourni), CC 19 V 0°C à 35°C 20% à 80% (sans condensation) 48W (36W) (en utilisant l'adaptateur 41W (29W) (en utilisant l'adaptateur secteur fourni) secteur fourni) Environ 566,4 (L) x 28,7 (P) x 338,3 Environ
Índice INFORMACIÓN IMPORTANTE..........................................1 ESTIMADO CLIENTE DE SHARP.....................................1 PRECAUCIONES DE SEGURIDAD..................................2 INSTRUCCIONES DE SEGURIDAD.................................3 Componentes suministrados..........................................4 Aplicar el adhesivo del logotipo......................................4 [ESPAÑOL] Fijación de los cables.......................................................
PRECAUCIONES DE SEGURIDAD La electricidad se emplea para muchas funciones útiles pero también puede causar lesiones personales y daños en la propiedad si se manipula de forma inadecuada. Este producto se ha diseñado y fabricado poniendo el máximo énfasis en la seguridad. No obstante, el uso inadecuado podría tener como resultado descargas eléctricas y/o incendios. Para evitar peligros potenciales, observe las siguientes instrucciones cuando instale, utilice y limpie el producto.
PRECAUCIONES DE SEGURIDAD (Continuación) 20. No toque las partes del producto o el adaptador CA que se calientan durante un tiempo prolongado. Podrían producirse quemaduras de baja temperatura. Para mantener la conformidad con la normativa sobre compatibilidad electromagnética (EMC), utilice cables blindados para la conexión a los siguientes terminales: terminal de entrada HDMI y DisplayPort.
Componentes suministrados Si faltara alguno de los componentes, póngase en contacto con su distribuidor.
Fijación de los cables Precaución • Al conectar los cables, coloque un paño suave en una superficie nivelada y estable, como una mesa, y coloque suavemente el monitor sobre el mismo con la pantalla boca abajo. Cable de vídeo y cable USB Fije el cable de vídeo (HDMI o DisplayPort) y el cable USB mediante la abrazadera para cable. 1. Retire la abrazadera para cable. 2. Pase el cable a través de la ranura de sujeción del cable. 3. Presione hasta colocarla la abrazadera para cables.
Conexión de equipos periféricos Terminal de entrada DisplayPort Precaución • Asegúrese de desconectar el equipo y desenchufarlo de la toma de corriente antes de conectar o desconectar los cables. Asimismo, lea el manual del equipo que desea conectar. • No doble demasiado ni aplique fuerza en exceso sobre los cables. De lo contrario puede romperlos o dañarlos.
Conexión de equipos periféricos (Continuación) Conexión de dispositivos USB Si utiliza un ratón, teclado u otro dispositivo de venta en comercios, conecte el dispositivo al puerto USB. Cable USB Conexión del lápiz digitalizador (LL-P202V) Si utiliza el lápiz digitalizador, conecte el cable del lápiz digitalizador. Cable del lápiz digitalizador Terminal USB Compruebe la orientación del conector e insértelo horizontalmente hasta donde llegue.
Instalación Puede instalar la pantalla táctil de cada monitor en las siguientes posiciones. Posición de instalación LL-S242A-W LL-P202V Pedestal de bastidor Sí No Pedestal regulable No Sí Estilo para escritura con lápiz No Sí Posición horizontal Sí Sí Posición de pie 3. Coloque el monitor en la posición de pie y ajuste el ángulo del pedestal. Sujete la pantalla con una mano para que no caiga, sujete la pata posterior del pedestal con la otra mano y ajuste el ángulo del pedestal.
Instalación (Continuación) 3. Retire la cinta adhesiva que fija el soporte al lado trasero. nLL-S242A-W Colocación en el pedestal de bastidor Coloque la unidad en el pedestal de bastidor suministrado. 1. Acople la parte trasera del pedestal a la parte frontal. Coloque las partes frontal y trasera juntas y acople la bisagra. Tapa Parte trasera Parte de bisagra frontal Parte frontal Soporte Parte trasera 4. Pliegue el pedestal e inserte las lengüetas en los orificios del lado frontal. 5.
Instalación (Continuación) Instalación en una mesa (Estilo para escritura con lápiz/ posición horizontal) Orientación vertical Retire el monitor del pedestal y colóquelo boca abajo sobre una mesa u otra superficie nivelada. Precaución • No ejerza demasiada fuerza sobre el monitor desde arriba, ya que hacerlo podría dañar la tapa. (LL-P202V) • Después de retirar el monitor del pedestal de bastidor, guarde el pedestal para que no se pierdan los tornillos.
Instalación (Continuación) 2. Coloque el monitor donde vaya a utilizarlo. nLL-S242A-W Posición horizontal Coloque el monitor sobre una mesa u otra superficie nivelada. 1. Tumbe la unidad en el lugar que prefiera. Encendido/apagado Apagado de la alimentación 1. Pulse el Botón POWER. 1. Apague el PC. 2. Pulse el Botón POWER durante unos 2 segundos. Botón POWER Botón POWER Presionar LED indicador de conexión Se enciende el LED indicador de conexión.
Especificaciones Modelo Requisitos de alimentación Temperatura de funcionamiento Humedad de funcionamiento Consumo de energía (Durante el normal funcionamiento) * Dimensiones (excluidas las protuberancias) Peso LL-S242A-W (blanco) LL-P202V 100 V - 240 V ca, 50/60 Hz (al usar el adaptador CA suministrado), 19 V cc 0°C a 35°C 20% al 80% (sin condensación) 48W (36W) (al usar el adaptador CA 41W (29W) (al usar el adaptador CA suministrado) suministrado) (mm) Aprox. 566,4 (An) x 28,7 (Pr) x Aprox.
Printed in China Imprimé en China Impreso en Chine 14A KS1 TINSE1348MPZZ(1)