
User Manual
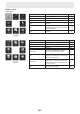
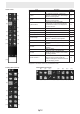
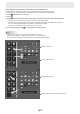


Table Of Contents
- Introduction
- Required Operating Environment
- Starting and Exiting the Software
- Layout of Basic Screen
- Saving and Sending a File by E-mail
- Opening Files
- Edit Operations
- Adding a board / changing the board to be edited
- Changing the sheet to edit
- Drawing with a Pen
- Erasing a drawn line
- Drawing shapes
- Drawing straight lines or arrows
- Drawing a shape with the figure pen
- Inputting text
- Searching for text and handwritten characters in the board
- Importing and pasting an image
- Editing an object
- Undo/redo operation
- Enlarging the view of the screen
- Using multiple touch pens simultaneously
- Launching an External Application (Full version only)
- Searching the Internet (Full version only)
- Importing a Document as an Image (Pen Software Printer Driver) (Full version only)
- Acquiring an Image From a Multifunction Machine
- Acquiring an image from a TWAIN device (Full version only)
- Linking to Microsoft PowerPoint (Full version only)
- Printing
- Using a Secondary Display (Full version only)
- Customizing the Settings
- Installing/Uninstalling the Software (Full version only)
- Intellectual Property Rights and Other Matters that Apply to This Software

15
E
Customizing the icons that appear in the classic menu and oating menu
These settings are shared by the classic menu and oating menu (horizontal and vertical).
The settings of the horizontal display of the oating menu are shared with the vertical display.
1. Touch
“All Functions” in the menu.
2. Touch
.
3. Drag the desired icon from the icon list at the right to the menu and insert it in the desired position.
• To add an icon to the bottom of the menu, drop the icon in the blank space.
• The same icon cannot be added more than once. Icons that have already been added are grayed out.
• An icon can be dragged between menu positions at the left and inserted.
• To remove an icon from the menu, drag the icon to the icon list.
4. To close the settings, touch
or a point outside the settings menu.
TIPS
• At least one or more “Pen” icon should be displayed on the menu.
• Cannot remove “Eraser”, “Select” and “All Functions” icon from the menu.
• To return the menu display to the default state, touch “Restore Default Settings”.
Drag to add an icon
Drag to remove an icon
Drag and insert an icon
To add to the bottom, drag to the empty space