R LCD MONITOR LCD FARBMONITOR MONITEUR LCD MONITOR LCD MONITOR LCD LL-T15S1 OPERATION MANUAL BEDIENUNGSANLEITUNG MODE D’EMPLOI MANUALE D’USO MANUAL DE FUNCIONAMIENTO - This operation manual is made using recycled paper. - Diese Bedienungsanleitung ist auf Recycling-Papier gedruckt. - Ce mode d’emploi a été imprimé sur du papier recyclé. - Questo manuale operativo è prodotto con carta riciclata. - Este manual de uso está impreso en papel reciclado.
Table of Contents / Inhaltsverzeichnis / Table des matières / Indice / Índice English . . . . . . . . . . . . . . . . . . . . . . . . . . . . . . . . . . . . . . . . . . . . . . . . . . . . . . . . . . . . . . . . . . . . . . . . Deutsch . . . . . . . . . . . . . . . . . . . . . . . . . . . . . . . . . . . . . . . . . . . . . . . . . . . . . . . . . . . . . . . . . . . . . . Français . . . . . . . . . . . . . . . . . . . . . . . . . . . . . . . . . . . . . . . . . . . . . . . . . . . . . . . . . . . . . . .
Notice for Users in the USA . . . . . . . . . . . . . . . . . . . . . . . . . . . . . . . . . . . . . . . . . . . . . . . . . . . . . . . . . . . 4 TCO'99 . . . . . . . . . . . . . . . . . . . . . . . . . . . . . . . . . . . . . . . . . . . . . . . . . . . . . . . . . . . . . . . . . . . . . . . . . . . 5 Notice for Users in Europe . . . . . . . . . . . . . . . . . . . . . . . . . . . . . . . . . . . . . . . . . . . . . . . . . . . . . . . . . . . . 7 Notice for Users in the UK . . . . . . . . . . . . . . .
Notice for Users in the USA FCC Statement WARNING – FCC Regulations state that any unauthorized changes or modifications to this equipment not expressly approved by the manufacturer could void the user's authority to operate this equipment. Note: This equipment has been tested and found to comply with the limits for a Class B digital device pursuant to Part 15 of the FCC Rules. These limits are designed to provide reasonable protection against harmful interference in a residential installation.
English Congratulations! You have just purchased a TCO'99 approved and labelled product! Your choice has provided you with a product developed for professional use. Your purchase has also contributed to reducing the burden on the environment and also to the further development of environmentally adapted electronics products.
TCO Development SE-114 94 Stockholm, Sweden Fax: +46 8 782 92 07 Email (Internet): development@tco.se Current information regarding TCO'99 approved and labelled products may also be obtained via the Internet, using the address: http://www.tco-info.com/ Environmental requirements Flame retardants Flame retardants are present in printed circuit boards, cables, wires, casings and housings. Their purpose is to prevent, or at least to delay the spread of fire.
This equipment complies with the requirements of Directives 89/336/EEC and 73/23/EEC as amended by 93/68/EEC. Dieses Gerät entspricht den Anforderungen der EG-Richtlinien 89/336/EWG und 73/23/EWG mit Änderung 93/68/EWG. Ce matériel répond aux exigences contenues dans les directives 89/336/CEE et 73/23/CEE modifiées par la directive 93/68/CEE. Dit apparaat voldoet aan de eisen van de richtlijnen 89/336/EEG en 73/23/EEG, gewijzigd door 93/68/ EEG. Dette udstyr overholder kravene i direktiv nr.
Notice for Users in the UK FOR CUSTOMERS IN U.K. IMPORTANT The wires in this mains lead are coloured in accordance with the following code : GREEN-AND-YELLOW : Earth BLUE : Neutral BROWN : Live As the colours of the wires in the mains lead of this apparatus may not correspond with the coloured markings identifying the terminals in your plug proceed as follows.
- - - - - Monitor and accessory checklist - Please check that the following items are included in the package. - LCD monitor (1) - AC adapter (1) - Audio cable (2) - Utility Disk for Windows (1) - Operation manual (1) Under certain display conditions, minute specks or spots may be noticeable. This is common for liquid crystal monitors and is not a malfunction. The LCD panel has been manufactured using highly elaborate technology. Properly working pixels comprise 99.99% of total pixels.
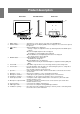
Product description Front view Left side surface Rear view 15 7 9 8 10 11 12 13 1 2 1. 2. 3. 4. 5. 6. 7. 8. 9. 10. 11. 12. 13. 14. 15. 3 14 4 5 6 MENU button .......................... This button is used to pop-up, select and close the OSD Menu. SELECT button ....................... When the On Screen Display (OSD) menu is displayed, choose the menu option to be adjusted. buttons ............................
Standing up and adjusting the monitor Standing up the monitor Press down on the stand and lift up the top section of the monitor. Adjusting the monitor Lightly holding both sides of the monitor, adjust it to a suitable viewing angle. 25 3 Folding up the monitor (when packing it away) - Except when folding away the monitor to transport it, do not fold down the monitor. Unnecessarily folding and unfolding the monitor could lead to malfunction. 1. Remove the AC adapter. 2.
Connecting the monitor and turning the monitor on and off Connecting the monitor to a computer (PC etc.) Connecting the monitor to headphones and a microphone When connecting, ensure that both the monitor and computer are switched off. Headphones and a microphone (both to be purchase separately) can be connected here. Note: - Do not overly bend the cable or add extension cords as this could lead to malfunction.
For Windows98 Installing monitor set-up information into Windows98. This explanation assumes that the floppy disk drive is "A drive". Turning the power on 1. Turn on the computer. 2. Press the monitor's power button. The power LED will be lit green, and the screen will display an image. If the "Add new Hardware Wizard" has appeared: 1. Place the Utility Disk (provided) into the computer's A drive. 2. Click [Next]. 3.
Connecting the monitor and turning the monitor on and off For Windows2000 Installing monitor set-up information into Windows2000. This explanation assumes that the floppy disk drive is "A drive". For WindowsMe Installing monitor set-up information into WindowsMe. This explanation assumes that the floppy disk drive is "A drive". 1. Place the Utility Disk (provided) into the computer's A drive. If the "Add new Hardware Wizard" has appeared: 1. Place the Utility Disk (provided) into the computer's A drive.
3. Use the SELECT button to choose a language. 4. Press the MENU button. The setting is complete. From now, messages and adjustment menus will be displayed in the chosen language. Adjusting the screen dispray Automatic screen adjustment (right column) The clock, phase, H-POS (horizontal positioning) and VPOS (vertical positioning) functions can be adjusted automatically. Adjustment of backlight (p.16) Brightness of backlight can be adjusted. Manual adjustment (p.
Adjusting the screen display and speaker volume Opening the Adjustment Pattern (for Windows) Adjusting the backlight If you are using Windows, you can use the Adjustment Pattern on the accompanying Utility Disk. This explanation is for Windows 95/98/Me/2000, and assumes that the floppy disk drive is "A drive". 1. Place the Utility Disk (provided) into the computer's A drive. 2. Open [My Computer] and select [3 ½ Floppy (A:)]. If using Windows 3.1, open [File Manager] and choose "A drive". 3.
When not adjusting brightness automatically 1. Without the OSD Menu being displayed, press the button or the button. MENU 1: ADJUSTMENT [ [ AUTO BRIGHTNESS OFF ] 31 [ BRIGHT English Adjusting the screen display and speaker volume A D J U S T ME N T MA N U A L C L OC K PHASE H - POS V - POS ] 2. Adjust by pressing the button (darker) or the button (lighter). 3. Press the MENU button. The OSD Menu will disappear.
Adjusting the screen display and speaker volume MENU 2: GAIN CONTROL MENU 3: WHITE BALANCE BLACK LEVEL and CONTRAST are optimized before shipment, but can be adjusted to suit. WHITE BALANCE (color tone) can be adjusted as necessary. (As adjustments are made before shipment, there is no real necessity for further alteration.
MENU 4: MODE SELECT M OD E [ Adjusting the speaker volume S E L E CT OSD H - POS I T I ON OSD V - POS I T I ON 640 4 0 0 L I NE S S CAL I NG L E VEL 1 1024x768 V : 60Hz Without the OSD menu and backlight adjustment bar being displayed, press the buttons to adjust the volume. ] 720 L E VEL 2 H : 4 8 kHz Notes: - Depending on the resolution of the input signal, even if menu options can be selected, the display may not change.
Monitor care and repair Monitor care Troubleshooting Always remove the plug from the AC outlet when cleaning the monitor. If you think the monitor may be faulty, please check the following points before taking it to be repaired. If afterwards it still does not work, please contact the shop where you purchased the monitor or your nearest Sharp authorized Service Center. Cabinet and control panel section Use a soft dry cloth to lightly wipe away any grime from the cabinet and control panel.
LCD display 38 cm (diagonal) TFT LCD module Resolution (max.) XGA 1024 x 768 Displayable colors (max.) 16.19 million colors (6bit + FRC2bit) Dot pitch 0.297(H) x 0.297(V) mm Brightness (max.) 200cd/m 2 Contrast ratio 300 : 1 Angle of visibility Left-right 120°, Up-down 95° Screen display size Horizontal 304.1 mm x Vertical 228.1 mm Video signal Analog RGB (0.
Specifications Signal timings Display mode 640x480 VESA 800x600 1024x768 US text Power Macintosh series 720x400 640x480 832x624 1024x768 Hsync (kHz) Vsync (Hz) Dot frequency (MHz) 31.5kHz 37.9kHz 37.5kHz 35.1kHz 37.9kHz 48.1kHz 46.9kHz 48.4kHz 56.5kHz 60.0kHz 31.5kHz 35.0kHz 49.7kHz 60.2kHz 60Hz 72Hz 75Hz 56Hz 60Hz 72Hz 75Hz 60Hz 70Hz 75Hz 70Hz 66.7Hz 74.6Hz 75Hz 25.175MHz 31.5MHz 31.5MHz 36.0MHz 40.0MHz 50.0MHz 49.5MHz 65.0MHz 75.0MHz 78.75MHz 28.3MHz 30.5MHz 57.3MHz 80.
Power management DDC (Plug & Play) The monitor is based on VESA DPMS (Display Power Management Signaling). To activate the monitor's Power Management function, both the video card and the computer must conform to the VESA DPMS standard. This monitor supports the VESA DDC (Display Data Channel) standard. DDC is a signal standard for carrying out Plug & Play functions on the monitor or PC. It transfers information such as degree of resolution between the monitor and PC.
Instructions for installing a VESA compliant arm An arm based on the VESA standard can be attached to the monitor. The arm must be purchased separately. 4. Remove the four screws and then remove the stand from the monitor. When choosing the arm to be installed please take note of the following points. - The arm should be compatible with the VESA standard, and there must be a gap of 75 mm x 75 mm between the screw holes on the section to be attached.
Deutsch F I 26 27 29 30 30 31 32 34 34 34 34 35 35 37 37 37 38 39 41 42 42 42 42 43 46 E Hinweis für Benutzer in den USA . . . . . . . . . . . . . . . . . . . . . . . . . . . . . . . . . . . . . . . . . . . . . . . . . . . . . . TCO'99 . . . . . . . . . . . . . . . . . . . . . . . . . . . . . . . . . . . . . . . . . . . . . . . . . . . . . . . . . . . . . . . . . . . . . . . . . . Hinweis für Benutzer in Europa . . . . . . . . . . . . . . . . . . . . . . . . . . . . . . . . . . . . . . . . . . . . . . .
Hinweis für Benutzer in den USA FCC-Hinweis ACHTUNG – Änderungen oder Modifikationen an diesem Gerät, die nicht ausdrücklich vom Hersteller genehmigt wurden, können laut FCC-Richtlinie zum Erlöschen der Betriebsberechtigung führen. Hinweis: Dieses Gerät wurde geprüft und entspricht den Grenzwerten für digitale Geräte der Klasse B gemäß Teil 15 der FCC-Richtlinien. Diese Grenzwerte dienen dem ausreichenden Schutz gegen Störungen bei einer Installation in Wohnbereichen.
GB 27 F Deutsch Welche Bedeutung hat die Kennzeichnung? Dieses Produkt entspricht den Anforderungen der TCO‘99-Verordnung, die sich mit internationalen Kennzeichnungen und Umweltzeichen für PCs befaßt. Die Kennzeichnungen wurden gemeinsam von der TCO (Schwedische Zentralorganisation für Angestellte und Beamte), Svenska Naturskyddsforeningen (Schwedische Gesellschaft für Naturschutz) und Statens Energimyndighet (Schwedische Nationale Energiebehörde) entwickelt.
TCO Development SE-114 94 Stockholm, Sweden Fax: +46 8 782 92 07 Email (Internet): development@tco.se Aktuelle Informationen zu Produkten mit TCO‘99-Zulassung und -Kennzeichnung erhalten Sie auch im Internet unter folgender Adresse: http://www.tco-info.com/ Umweltanforderungen Flammschutzmittel Flammschutzmittel kommen in Platinen, Kabeln, Drähten, Verkleidungen und Gehäusen vor. Sie sollen die Ausbreitung eines Brandes verhindern oder zumindest verzögern.
This equipment complies with the requirements of Directives 89/336/EEC and 73/23/EEC as amended by 93/68/EEC. GB Hinweis für Benutzer in Europa Ce matériel répond aux exigences contenues dans les directives 89/336/CEE et 73/23/CEE modifiées par la directive 93/68/CEE. Dit apparaat voldoet aan de eisen van de richtlijnen 89/336/EEG en 73/23/EEG, gewijzigd door 93/68/ EEG. Deutsch Dieses Gerät entspricht den Anforderungen der EG-Richtlinien 89/336/EWG und 73/23/EWG mit Änderung 93/68/EWG.
Hinweis für Benutzer in GB FÜR KUNDEN IN GB WICHTIG Die Drähte in diesem Netzkabel sind nach folgendem Code farbig gekennzeichnet: GRÜN/GELB : Masse BLAU : Nulleiter BRAUN : Stromführend Da die Farben der Drähte im Netzkabel dieses Gerätes möglicherweise nicht den Farbkennzeichnungen der Anschlüsse in Ihrem Stecker entsprechen, müssen Sie folgendermaßen vorgehen.
- - - - GB F - Checkliste für Monitor und Zubehör - Prüfen Sie den Kartoninhalt auf Vollständigkeit. - LCD Farbmonitor(1) - Netzadapter (1) - Audiokabel (2) - Utility Disk (für Windows/Macintosh) (1) - Bedienungshandbuch(1) I - Das Netzkabel - Beschädigen Sie das Netzkabel nicht, stellen Sie keine schweren Gegenstände darauf, und überdehnen oder knicken Sie es nicht. Verwenden Sie keine Verlängerungskabel. Ein beschädigtes Kabel kann einen Brand oder Stromschlag verursachen.
Produktbeschreibung Vorderansicht Linke Seite Rückansicht 15 7 9 8 10 11 12 13 1 2 3 14 4 5 6 1. Taste MENU ....................... Mit dieser Taste öffnen, wählen und schließen Sie das OSD-Menü. 2. Taste SELECT ................... Wenn das OSD-Menü (On Screen Display) angezeigt wird, wählen Sie die Menüoption aus, die Sie einstellen möchten. 3. Tasten .........................
GB Produktbeschreibung Aufstellen und Justieren des Monitors Aufstellen des Monitors F Deutsch Drücken Sie auf den Fuß, und heben Sie den oberen Teil des Monitors an. Einstellen des Monitors Halten Sie beide Seiten des Monitors fest, und stellen Sie den Monitor auf einen angenehmen Blickwinkel ein. I 25 E 3 Zusammenklappen des Monitors (zum Einpacken) - Klappen Sie den Monitor nur für Transportzwecke zusammen.
Anschließen des Monitors und Ein- und Ausschalten des Monitors Verbinden des Monitors mit einem Computer (PC usw.) Verbinden des Monitors mit einem Kopfhörer und Mikrofon Bevor Sie den Monitor anschließen, müssen Sie den Monitor und den Computer ausschalten. Hier können Kopfhörer oder ein Mikrofon (beide separat erhältlich) angeschlossen werden. Hinweis: - Überdehnen Sie das Kabel nicht, und schließen Sie kein Verlängerungskabel an, da dies Funktionsstörungen hervorrufen kann.
GB Anschließen des Monitors und Ein- und Ausschalten des Monitors 8. Klicken Sie auf [OK], und schließen Sie das Fenster. Einschalten des Monitors Wenn der "Add new Hardware Wizard" angezeigt wird: 1. Legen Sie die (mitgelieferte) Utility Disk in Laufwerk A des Computers ein. Hinweis: - Wenn Sie den Monitor zum ersten Mal einrichten oder eine Komponente des bestehenden Systems geändert haben, führen Sie vor der Verwendung eine automatische Bildschirmeinstellung (S. 37) durch. F Netzschalter 2.
Anschließen des Monitors und Ein- und Ausschalten des Monitors Für Windows 2000 Installieren der Monitor-Setup-Informationen unter Windows 2000 und Festlegen des Monitor-ICC-Profils als vorbestimmter Wert. Die in den nachstehenden Bedienungshinweisen erwähnten Windows-Meldungen basieren auf der englischen Windows-Version. Bei dieser Beschreibung wird als Laufwerksbuchstabe für das Diskettenlaufwerk "Laufwerk A" angenommen.
GB Einstellen der Bildschirmanzeige und der Lautsprecher-Lautstärke Hinweis: - Alle Einstellungen bleiben auch nach dem Abschalten des Monitors gespeichert. Automatische Bildschirmeinstellung Alles Zurücksetzen - MENU Alle Einstellwerte können mit einem Befehl auf die werksseitigen Einstellungen zurückgesetzt werden. 1. Schalten Sie den Monitor über den Netzschalter aus. 2. Drücken Sie gleichzeitig die Tasten MENU und SELECT sowie den Netzschalter (d. h. Monitor einschalten).
Einstellen der Bildschirmanzeige und der Lautsprecher-Lautstärke Hinweise: - In den meisten Fällen reicht eine automatische Einstellung aus. - Falls erforderlich, können in folgenden Fällen nach der automatischen Einstellung auch noch manuelle Einstellungen vorgenommen werden (S. 39). - Wenn eine weitere Feineinstellung erforderlich ist. - Wenn [OUT OF ADJUST] angezeigt wird. (Wenn auf dem Bildschirm ein ganz dunkles Bild angezeigt wird, ist die automatische Bildschirmjustierung möglicherweise deaktiviert.
GB Einstellen der Bildschirmanzeige und der Lautsprecher-Lautstärke MENU 1: ADJUSTMENT ] (dunkler) 1024x768 V : 60Hz MANUAL: Hinweis: - Das OSD-Menü wird einige Sekunden nach dem letzten Befehl automatisch ausgeblendet. AUTO: Die Feineinstellung kann über das OSD-Menü vorgenommen werden. C L OC K PHASE H - POS V - POS 1024x768 V : 60Hz AUTO H : 4 8 kHz Einzelne Menüoptionen werden manuell eingestellt. Alle Menüoptionen werden automatisch eingestellt.
Einstellen der Bildschirmanzeige und der Lautsprecher-Lautstärke MENU 3: WHITE BALANCE WHITE BALANCE (Farbton) kann nach Bedarf eingestellt werden. (Da die Einstellungen vor der Auslieferung erfolgen, ist normalerweise keine Änderung erforderlich.) MENU 2: GAIN CONTROL BLACK LEVEL und CONTRAST werden vor der Auslieferung optimal eingestellt. Eine Justage ist jedoch möglich.
GB Einstellen der Bildschirmanzeige und der Lautsprecher-Lautstärke MENU 4: MODE SELECT [ Einstellen der Lautsprecher-Lautstärke S E L E CT OSD H - POS I T I ON OSD V - POS I T I ON 640 4 0 0 L I NE S S CAL I NG L E VEL 1 1024x768 V : 60Hz Wenn weder das Menü OSD noch der Balken zur Einstellung der Hintergrundbeleuchtung angezeigt wird, regeln Sie die Lautstärke des Lautsprechers, indem Sie die Taste (leiser) oder die Taste (lauter) drücken.
Pflege des Monitors und Reparaturen Pflege des Monitors Fehlersuche Ziehen Sie immer erst den Stecker aus der Steckdose, bevor Sie Reinigungsarbeiten am Monitor ausführen. Falls Störungen am Monitor auftreten, prüfen Sie erst folgende Punkte, bevor Sie sich an den Kundendienst wenden. Falls sich die Störung hiermit nicht beheben läßt, wenden Sie sich an das Geschäft, in dem Sie den Monitor gekauft haben, oder an die nächstgelegene autorisierte Sharp-Kundendienstzentrale.
Abmessungen (Einheiten: mm) F 313 355 368 Deutsch LCD-Anzeige 38 cm TFT-LCD-Modul Auflösung (max.) XGA 1024 x 768 Anzeigbare Farben (max.) 16,19 Millionen Farben (6bit+FRC2bit) Punktabstand 0,297(H) x 0,297(V) mm Helligkeit (max.
Technische Daten Signaltakte Anzeigemodus 640x480 VESA 800x600 1024x768 US-Text Power Macintosh -Serie 720x400 640x480 832x624 1024x768 Hsync (kHz) Vsync (Hz) Punktfrequenz (MHz) 31,5 kHz 37,9 kHz 37,5 kHz 35,1 kHz 37,9 kHz 48,1 kHz 46,9 kHz 48,4 kHz 56,5 kHz 60,0 kHz 31,5 kHz 35,0 kHz 49,7 kHz 60,2 kHz 60 Hz 72 Hz 75 Hz 56 Hz 60 Hz 72 Hz 75 Hz 60 Hz 70 Hz 75 Hz 70 Hz 66,7 Hz 74,6 Hz 75 Hz 25,175 MHz 31,5 MHz 31,5 MHz 36,0 MHz 40,0 MHz 50,0 MHz 49,5 MHz 65,0 MHz 75,0 MHz 78,75 MHz 28,3 MHz 30,5 MH
DDC (Plug & Play) Der Monitor basiert auf VESA DPMS (Display Power Management Signaling). Um die Power Management-Funktion des Monitors zu aktivieren, müssen sowohl die Videokarte als auch der Computer dem Standard VESA DPMS entsprechen. Dieser Monitor unterstützt den Standard VESA DDC (Display Data Channel). DDC ist ein Signalstandard zum Ausführen von Plug & Play-Funktionen am Monitor oder PC. Er überträgt Informationen, beispielsweise den Auflösungsgrad, zwischen dem Monitor und dem PC.
Anweisungen zum Anbringen eines VESAkompatiblen Monitorarms 4. Lösen Sie die vier Schrauben, und nehmen Sie den Monitorfuß ab. Ein Arm basierend auf dem VESA-Standard kann am Monitor angebracht werden. Der Arm ist separat erhältlich. Falls Sie sich dafür entscheiden, einen Arm zu installieren, müssen Sie folgende Punkte beachten. • Der Arm muß mit dem VESA-Standard kompatibel sein, und zwischen den Schraubenbohrungen und dem zu befestigenden Abschnitt muß ein Abstand von mindestens 75 mm x 75 mm vorliegen.
D Français I 48 49 51 52 52 53 54 56 56 56 56 57 57 59 59 59 60 61 63 64 64 64 64 65 68 E Avis aux utilisateurs américains . . . . . . . . . . . . . . . . . . . . . . . . . . . . . . . . . . . . . . . . . . . . . . . . . . . . . . . TCO'99 . . . . . . . . . . . . . . . . . . . . . . . . . . . . . . . . . . . . . . . . . . . . . . . . . . . . . . . . . . . . . . . . . . . . . . . . . . Avis aux utilisateurs européens . . . . . . . . . . . . . . . . . . . . . . . . . . . . . . . . . . . . . . . . . . . . .
Avis aux utilisateurs américains Déclaration FCC AVERTISSEMENT – La réglementation FCC stipule que toute modification/changement non autorisé(e) apporté(e) à cet équipement et non expressément approuvé(e) par le fabricant peut annuler la capacité de l'utilisateur à se servir dudit équipement. Remarque : Cet équipement a été testé et jugé conforme aux limites d'un appareil numérique de Classe B, conformément à la section 15 de la réglementation FCC.
GB 49 Français D Qu'implique la labellisation? Ce produit répond aux critères exigés par le programme TCO'99, qui assure la labellisation internationale et environnementale des ordinateurs personnels.
TCO Development SE-114 94 Stockholm, Sweden Fax: +46 8 782 92 07 Email (Internet): development@tco.se Les informations actualisées relatives aux produits agréés et labellisés TCO'99 peuvent également être obtenues via Internet, à l'adresse : http://www.tco-info.com/ Exigences environnementales Retardateurs de flamme Les retardateurs de flamme sont présents dans les cartes à circuits imprimés, les câbles, les fils, les boîtiers et enceintes closes.
This equipment complies with the requirements of Directives 89/336/EEC and 73/23/EEC as amended by 93/68/EEC. GB Avis aux utilisateurs européens Ce matériel répond aux exigences contenues dans les directives 89/336/CEE et 73/23/CEE modifiées par la directive 93/68/CEE. D Dieses Gerät entspricht den Anforderungen der EG-Richtlinien 89/336/EWG und 73/23/EWG mit Änderung 93/68/EWG. Dette udstyr overholder kravene i direktiv nr. 89/336/EEC og 73/23/EEC med tillæg nr. 93/68/EEC.
Avis aux utilisateurs britanniques Destiné aux clients britanniques IMPORTANT Les fils du câble d'alimentation portent le code de couleurs suivant : VERT/JAUNE : Terre BLEU : Neutre MARRON : Phase Étant donné que les fils du câble d'alimentation de cet appareil peuvent ne pas correspondre aux marques colorées identifiant les bornes de votre prise, veuillez procéder de la manière suivante.
- - - - Moniteur et liste des accessoires - S’assurer que les éléments suivants sont bien présents dans l’emballage: - Moniteur LCD (1) - Adaptateur secteur (1) - Câble audio (2) - Disquette utilitaire (pour Windows) (1) - Manuel d’utilisation (1) Remarques : - Il est conseillé de ne pas se débarrasser du carton d’emballage au cas où le moniteur devrait être transporté.
Description du produit Vue avant Face gauche Vue arrière 15 7 9 8 10 11 12 13 1 2 1. 2. 3. 4. 5. 6. 7. 8. 9. 10. 11. 12. 13. 14. 15. 3 14 4 5 6 Bouton MENU ..................... Ce bouton est utilisé pour faire apparaître, sélectionner et refermer le menu OSD. Bouton SELECT ................. Lorsque le menu On Screen Display (OSD) est affiché, choisir parmi les options du menu pour effectuer les réglages. Les boutons ...............
GB Description du produit Réglage de l’inclinaison du moniteur Français D Relevage du moniteur Appuyer sur le support et relever la partie supérieure du moniteur. I Réglage de l’inclinaison du moniteur Maintenir légèrement les deux côtés du moniteur et l’ajuster jusqu’à obtenir un angle de visualisation adéquat. 25 E 3 Repliement du moniteur (pour l’emmener) - Ne pas replier le moniteur excepté s’il va être transporté.
Raccordement, activation et désactivation du moniteur Raccordement du moniteur à un ordinateur (PC, etc.) Raccordement du moniteur à une microphone et casques audio Lors du raccordement, s’assurer que l’alimentation tant du moniteur que de l’ordinateur est désactivée. Des casques audio ou un microphone (tous deux disponibles séparément) peuvent y être connectés. Remarque : - Ne pas courber le câble de manière excessive ni y ajouter de rallonge car cela peut conduire à un dysfonctionnement.
GB Raccordement, activation et désactivation du moniteur 8. Cliquer sur [OK] et refermer la fenêtre. Activation de l’alimentation Si la boîte de dialogue "Add New Hardware Wizard" est affichée : 1. Placer la disquette utilitaire (fournie) dans le lecteur A de l’ordinateur. Remarque : - Lors de la toute première installation du moniteur, ou après avoir changé un des aspects de la configuration du système, effectuer un réglage automatique de l’écran avant de commencer l’utilisation (p. 59). 2.
Raccordement, activation et désactivation du moniteur Pour Windows Me Installation des fichiers relatifs au paramétrage du moniteur sous WindowsMe, et au réglage du profil ICC du moniteur en tant que valeur par défaut. Les messages Windows mentionnés dans le mode d´emploi suivant se réfèrent à la version anglaise de Windows. Les explications qui suivent considèrent que le lecteur de disquettes est le "lecteur A".
Si nécessaire, le moniteur peut être réglé comme suit : Réglage automatique du moniteur (colonne de droite) L’horloge, la phase, le H-POS (positionnement horizontal) et le V-POS (positionnement vertical) peuvent être ajustés automatiquement. Réglage du rétro-éclairage (p. 60) La luminosité du rétro-éclairage peut être ajustée. Réglage manuel (p. 61) Un ajustement fin peut être effectué au moyen du menu du moniteur actif (OSD).
Réglage de l'image au moniteur et volume des haut-parleurs Remarques : - Dans la plupart des cas, le réglage automatique s’avère suffisant. - Si nécessaire en raison d’un des facteurs suivants, des réglages manuels (p. 61) peuvent être effectués après un réglage automatique. - Lorsqu’un réglage fin est nécessaire. - Lorsque [OUT OF ADJUST] est affiché. (Lorsque le moniteur affiche une image complètement noire, il se peut que le réglage automatique de l’écran ne soit pas opérationnel.
GB Réglage de l'image au moniteur et volume des haut-parleurs MENU 1 : ADJUSTMENT (RÉGLAGE) 2. Régler au moyen du bouton (plus clair). bouton 3. Presser le bouton MENU. Le Menu OSD disparaîtra. A D J U S T ME N T MA N U A L ] 1024x768 V : 60Hz (plus sombre) ou du AUTO ] 140 5 060 0 5 D C L OC K PHASE H - POS V - POS H : 4 8 kHz MANUEL : Les options individuelles du menu sont réglées manuellement. AUTO : Chaque option du menu est réglée automatiquement.
Réglage de l'image au moniteur et volume des haut-parleurs MENU 2 : GAIN CONTROL (CONTRÔLE DES COULEURS) Le niveau de noir et le contraste sont optimisés dans les réglages d’usine, mais peuvent être adaptés par la suite à la convenance de l’utilisateur. [ G A I N C O N T RO L MA N U A L BLACK LEVEL CONTRAST ] 30 40 DISPLAY COLORS 1024x768 V : 60Hz AUTO MENU 3 : WHITE BALANCE (BALANCE DES BLANCS) La BALANCE DES BLANCS (nuances des couleurs) peut être réglée si nécessaire.
GB Réglage de l'image au moniteur et volume des haut-parleurs MENU 4 : MODE SELECT (SÉLECTION DU MODE) Sans pour autant devoir afficher le Menu de Réglage ni la barre de réglage du rétro-éclairage, il est possible d’ajuster le volume des haut-parleurs en pressant la touche (pour diminuer le volume) ou la touche (pour augmenter le volume).
Entretien et réparation du moniteur Entretien du moniteur Dépannage Toujours débrancher la prise de l’alimentation murale en c.a. lors du nettoyage du moniteur. Si le moniteur est jugé défectueux, vérifier les points suivants avant de l’emmener en réparation. Si après cela, il ne fonctionne toujours pas correctement, contacter le magasin où il a été acheté ou votre mainteneur agréé Sharp le plus proche.
Moniteur LCD Module TFT à cristaux liquides 38 cm Résolution (max.) XGA 1024 x 768 Couleurs affichables (max.) 16,19 millions de couleurs (6bit+FRC2bit) Définition 0,297(H) x 0,297(V) mm Luminosité (max.) 200cd/m 2 Rapport de contraste 300:1 Angle de vision Horizontal : 120° , Vertical : 95° Surface d’affichage Horizontal : 304,1 mm x Vertical : 228,1 mm Signal vidéo Analogique RVB (0,7Vp-p) [75Ω] Signal sync.
Caractéristiques techniques Fréquence des signaux Mode affichage Hsync (kHz) 31,5kHz 37,9kHz 37,5kHz 35,1kHz 37,9kHz 48,1kHz 46,9kHz 48,4kHz 56,5kHz 60,0kHz 31,5kHz 35,0kHz 49,7kHz 60,2kHz 640x480 VESA 800x600 1024x768 Saisie de texte US Macintosh série Vsync (Hz) 720x400 640x480 832x624 1024x768 Bande passante (MHz) 60Hz 72Hz 75Hz 56Hz 60Hz 72Hz 75Hz 60Hz 70Hz 75Hz 70Hz 66,7Hz 74,6Hz 75Hz 25,175MHz 31,5MHz 31,5MHz 36,0MHz 40,0MHz 50,0MHz 49,5MHz 65,0MHz 75,0MHz 78,75MHz 28,3MHz 30,5MHz 57,3MHz 80,
DDC (Plug & Play) Le moniteur est basé sur un système VESA DPMS (signalisation de la gestion d’alimentation de l’affichage). Pour activer la fonction de gestion de l’alimentation du moniteur, la carte vidéo et l’ordinateur doivent être conformes à la norme VESA DPMS. Ce moniteur supporte la norme VESA DDC (Display Data Channel). Le DDC est une norme de signal servant à exécuter les fonctions Plug & Play sur un moniteur ou un ordinateur.
Instructions relatives à l’installation d’un bras conforme VESA 4. Enlever les quatre vis et ensuite le support du moniteur. Un bras conforme à la norme VESA peut être fixé au moniteur. Ce bras doit être acheté séparément. Lors du choix du bras à installer, veiller à tenir compte des points suivants : • Le bras doit est compatible avec la norme VESA, et il doit rester un écart d’au moins 75 mm x 75 mm entre les trouves prévus pour les vis sur la section à attacher.
D F Italiano 70 71 73 74 74 75 76 78 78 78 78 79 79 81 81 81 82 83 85 86 86 86 86 87 90 E Avviso per gli utenti negli in USA . . . . . . . . . . . . . . . . . . . . . . . . . . . . . . . . . . . . . . . . . . . . . . . . . . . . . . TCO'99 . . . . . . . . . . . . . . . . . . . . . . . . . . . . . . . . . . . . . . . . . . . . . . . . . . . . . . . . . . . . . . . . . . . . . . . . . . Avviso per gli utenti in Europa . . . . . . . . . . . . . . . . . . . . . . . . . . . . . . . . . . . . . . . . . . . . .
Avviso per gli utenti negli in USA Dichiarazione FCC AVVERTIMENTO – I regolamenti FCC stabiliscono che qualsiasi cambiamento o modifica, apportati a quest'apparecchio senza l'espressa approvazione del fabbricante, possono invalidare la facoltà dell'utente di mettere in funzione questo apparecchio. Nota : Questo apparecchio è stato sottoposto a prova e si è constatato che esso rientra nei limiti stabiliti per un dispositivo digitale di classe B in conformità alla Parte 15 dei regolamenti FCC.
GB 71 F D Qual è il significato del marchio? Il marchio indica la conformità del prodotto ai requisiti del progetto TCO'99 che prevede l'attribuzione di un marchio internazionale e ambientale ai personal computer.
TCO Development SE-114 94 Stockholm, Sweden Fax: +46 8 782 92 07 Email (Internet): development@tco.se È possibile inoltre ricevere via Internet le informazioni relative ai prodotti approvati e dotati di marchio TCO'99 scrivendo all'indirizzo: http://www.tco-info.com/ Requisiti ambientali Additivi ignifughi Gli additivi ignifughi sono presenti nelle schede a circuito stampato, nei cavi, nei rivestimenti e negli alloggiamenti. Il loro scopo consiste nel prevenire o almeno ritardare l'espandersi delle fiamme.
This equipment complies with the requirements of Directives 89/336/EEC and 73/23/EEC as amended by 93/68/EEC. GB Avviso per gli utenti in Europa Ce matériel répond aux exigences contenues dans les directives 89/336/CEE et 73/23/CEE modifiées par la directive 93/68/CEE. D Dieses Gerät entspricht den Anforderungen der EG-Richtlinien 89/336/EWG und 73/23/EWG mit Änderung 93/68/EWG. Dit apparaat voldoet aan de eisen van de richtlijnen 89/336/EEG en 73/23/EEG, gewijzigd door 93/68/ EEG.
Avviso per gli utenti nel Regno Unito PER CLIENTI NEL REGNO UNITO IMPORTANTE I conduttori in questo cavo di collegamento alla rete sono colorati conformemente al seguente codice: VERDE E GIALLO : Terra BLU : Neutro MARRONE : Sotto tensione Dato che i colori dei conduttori nel cavo rete di quest'apparecchiatura potrebbero non corrispondere ai contrassegni colorati che identificano i terminali nella vostra spina, procedete come segue.
- - - - Lista di controllo del monitor e degli accessori - Per favore controllate che la confezione contenga i seguenti articoli. - Monitor LCD (1) - Adatatore AC (1) - Cavo audio (2) - Dischetto dei programmi di utilità (per Windows) (1) - Manuale d’uso (1) Note - Vi si suggerisce di conservare il cartone per il caso in cui risulti necessario trasportare il monitor. - I diritti d’autore per il programma del Disco per la regolazione delle impostazioni del monitor sono detenuti dalla Sharp Corporation.
Descrizione del prodotto Vista frontale Superficie del lato sinistro Vista posteriore 15 7 9 8 10 11 12 13 1 2 3 14 4 5 6 1. Tasto MENU .................................. Questo tasto si usa per visualizzare, selezionare e chiudere il menu OSD. 2. Tasto SELECT .............................. Quando il menu dell’On Screen Display (OSD) è visualizzato, selezionate l’opzione di menu da regolare. 3. Tasti ......................................
GB Descrizione del prodotto Collocare il monitor verticalmente e regolarlo F D Mettere su il monitor Premete verso il basso sul supporto ed alzate la sezione superiore del monitor. Italiano Regolazione del monitor Tenendo delicatamente da entrambi i lati del monitor, regolatelo su un angolo visivo adatto. 25 E 3 Ripiegare il monitor (quando lo si imballa) - Non ripiegate verso il basso il monitor, fatta eccezione per il caso in cui ripiegate il monito per trasportarlo.
Collegamento del monitor ed accensione e spegnimento del monitor Collegamento del monitor ad un computer (PC ecc.) Collegamento del monitor ad un cuffie e microfono Cuffie o microfono (entrambi da acquistare separatamente) si possono collegare qui. Nota - Non curvate eccessivamente il cavo e non aggiungete delle prolunghe in quanto ciò può dar luogo a difetti di funzionamento. Quando eseguite i collegamenti, assicuratevi che sia il monitor che il computer siano spenti.
GB Collegamento del monitor ed accensione e spegnimento del monitor 6. Verificate che le impostazioni del monitor siano selezionate e fate clic su [OK]. Accensione 1. Accendete il computer. 2. Premete il tasto di alimentazione del monitor. Il LED di alimentazione si illuminerà in verde, lo schermo visualizzerà un’immagine. Per Windows98 Installazione delle informazioni di setup del monitor in Windows98, e impostazione del profilo ICC del monitor come valore predeterminato.
Collegamento del monitor ed accensione e spegnimento del monitor Per Windows2000 Per WindowsMe Installazione delle informazioni di setup del monitor in WindowsMe, e impostazione del profilo ICC del monitor come valore predeterminato. I messaggi di Windows, citati nelle istruzioni per l´uso che seguono, si basano sulla versione inglese di Windows. In questa spiegazione si parte dall'ipotesi che l'unità per dischetti floppy sia "A".
GB Regolazione della visualizzazione sullo schermo e volume dell’altoparlante Nota - Tutte le regolazioni verranno conservate anche dopo che si è spenta l’alimentazione. Regolazione automatica dello schermo MENU All reset (ripristina tutto) Le opzioni in MENU 1 (ADJUSTMENT) (REGOLAZIONE) si possono regolare automaticamente (CLOCK, FHASE, H-POS (POSIZIONE ORIZZONTALE), V-POS (POSIZIONE VERTICALE). Tutti i valori delle regolazioni si possono riportare ai loro valori originali di fabbrica in un comando.
Regolazione della visualizzazione sullo schermo e volume dell’altoparlante Note - Nella maggioranza dei casi la regolazione automatica è sufficiente. - Se necessario, per una qualsiasi delle cause seguenti, si possono eseguire delle regolazioni manuali (p. 83) dopo aver eseguito la regolazione automatica. - Quando occorre un’ulteriore regolazione fine. - Quando [OUT OF ADJUST] viene visualizzato.
GB Regolazione della visualizzazione sullo schermo e volume dell’altoparlante Quando non regolate la luminosità automaticamente 1. Senza il menu OSD visualizzato, premete il tasto oppure il tasto . MENU 1: ADJUSTMENT (REGOLAZIONE) ] (più AUTO ] 140 5 060 0 5 1024x768 V : 60Hz H : 4 8 kHz Nota - Il menu OSD scompare automaticamente vari secondi dopo l’ultimo comando. Note - Premete il tasto per selezionare AUTO.
Regolazione della visualizzazione sullo schermo e volume dell’altoparlante MENU 3: WHITE BALANCE (BILANCIAMENTO DEL BIANCO) WHITE BALANCE (tonalità del colore) si può regolare a seconda delle necessità. (Dato che le regolazioni vengono fatte prima della spedizione, non vi è una necessità reale di ulteriori modifiche.) MENU 2: GAIN CONTROL (CONTROLLO DEL GUADAGNO) BLACK LEVEL (livello del nero) e CONTRAST (contrasto) sono ottimizzati prima della spedizione, ma si possono regolare in modo da essere adatti.
GB Regolazione della visualizzazione sullo schermo e volume dell’altoparlante MENU 4: MODE SELECT (SELEZIONE DEL MODO) [ Regolazione del volume dell’altoparlante S E L E CT OSD H - POS I T I ON OSD V - POS I T I ON 640 4 0 0 L I NE S S CAL I NG L E VEL 1 1024x768 V : 60Hz Quando non sono visualizzati né il menu di regolazione né la barra di regolazione della retroilluminazione, regolate il volume dell’altoparlante, premendo il tasto (per ridurre il volume) oppure il tasto (per aumentare il volume).
Cura e riparazione del monitor Cura del monitor Ricerca ed eliminazione di inconvenienti Quando pulite il monitor, scollegate sempre la spina dalla presa di corrente alternata. Se pensate che il monitor possa avere dei difetti di funzionamento, per favore controllate i punti seguenti, prima di portarlo a riparare.
Display LCD Module TFT LCD da 38 cm Risoluzione (max.) XGA 1024 x 768 Colori visualizzabili (max.) 16,19 milioni di colori (6bit + FRC2bit) Dimensione dei pixel 0,297(H) x 0,297(V) mm Luminosità (max.
Specifiche Sincronizzazione dei segnali Modalità di visualizzazione 640x480 VESA 800x600 1024x768 testo US Power Macintosh (serie). 720x400 640x480 832x624 1024x768 Sincronizzazione Sincronismo Frequenza dei orizzontale (kHz) verticale (Hz) pixel (MHz) 31.5kHz 37,9kHz 37,5kHz 35,1kHz 37.9kHz 48,1kHz 46,9kHz 48,4kHz 56,5kHz 60,0kHz 31.
Gestione dell’energia DDC (Plug & Play) Il monitor è basato su VESA DPMS (Display Power Management Signaling) (Segnalazioni della gestione dell’energia del display). Per attivare la funzione di gestione dell’energia del monitor, sia la scheda video che il computer devono essere conformi alle norme dello standard VESA DPMS. Questo monitor supporta lo standard VESA DDC (Display Data Channel). DDC è uno standard per i segnali per eseguire le funzioni Plug & Play sul monitor o sul PC.
Istruzioni per l’installazione di un braccio compatibile VESA Un braccio basato sullo standard VESA si può collegare al monitor. Il braccio deve essere acquistato separatamente. 4. Rimuovete le quattro viti e rimuovete quindi il supporto dal monitor. Nello scegliere il braccio da installare, per favore prendete nota dei seguenti punti. • Il braccio dovrebbe essere compatibile con lo standard VESA, e dovrebbe esservi uno spazio di almeno 75 mm x 75 mm tra i fori delle viti sulla parte da collegare.
Índice 92 93 95 96 96 97 98 100 100 100 100 101 101 103 103 103 104 105 107 108 108 108 108 109 112 Español Nota para usuarios en EE.UU. . . . . . . . . . . . . . . . . . . . . . . . . . . . . . . . . . . . . . . . . . . . . . . . . . . . . . . . . TCO ’99 . . . . . . . . . . . . . . . . . . . . . . . . . . . . . . . . . . . . . . . . . . . . . . . . . . . . . . . . . . . . . . . . . . . . . . . . . Nota para usuarios en Europa . . . . . . . . . . . . . . . . . . . . . . . . . . . . . . . . . . . . . . .
Notice for Users in the USA FCC Statement WARNING – FCC Regulations state that any unauthorized changes or modifications to this equipment not expressly approved by the manufacturer could void the user's authority to operate this equipment. Note: This equipment has been tested and found to comply with the limits for a Class B digital device pursuant to Part 15 of the FCC Rules. These limits are designed to provide reasonable protection against harmful interference in a residential installation.
Why do we have environmentally labelled computers? In many countries, environmental labelling has become an established method for encouraging the adaptation of goods and services to the environment. The main problem, as far as computers and other electronics equipment are concerned, is that environmentally harmful substances are used both in the products and during their manufacture.
TCO Development SE-114 94 Stockholm, Sweden Fax: +46 8 782 92 07 Email (Internet): development@tco.se Current information regarding TCO'99 approved and labelled products may also be obtained via the Internet, using the address: http://www.tco-info.com/ Environmental requirements Flame retardants Flame retardants are present in printed circuit boards, cables, wires, casings and housings. Their purpose is to prevent, or at least to delay the spread of fire.
Notice for Users in Europe This equipment complies with the requirements of Directives 89/336/EEC and 73/23/EEC as amended by 93/68/EEC. Dieses Gerät entspricht den Anforderungen der EG-Richtlinien 89/336/EWG und 73/23/EWG mit Änderung 93/68/EWG. Ce matériel répond aux exigences contenues dans les directives 89/336/CEE et 73/23/CEE modifiées par la directive 93/68/CEE. Dit apparaat voldoet aan de eisen van de richtlijnen 89/336/EEG en 73/23/EEG, gewijzigd door 93/68/ EEG.
Notice for Users in the UK FOR CUSTOMERS IN U.K. IMPORTANT The wires in this mains lead are coloured in accordance with the following code : GREEN-AND-YELLOW : Earth BLUE : Neutral BROWN : Live As the colours of the wires in the mains lead of this apparatus may not correspond with the coloured markings identifying the terminals in your plug proceed as follows.
Sugerencias y precauciones de seguridad • • • • • • • • Bajo determinadas circunstancias pueden apreciarse diminutas manchas o puntos. Esto es normal en el caso de monitores de cristal líquido y no se trata de una anomalía. El panel LCD ha sido fabricado con la tecnología más sofisticada y avanzada. Pixels operando correctamente incluyen el 99,99% del total de pixels. No obstante, debe saber que el 0,01% o menos de los pixels puede fallar o ser un poco más brillante de lo normal.
Descripción del producto Vista delantera Superficie del lado izquierdo Vista trasera 15 7 8 9 10 11 12 13 1 2 1. 2. 3. 4. 5. 6. 7. 8. 9. 10. 11. 12. 13. 14. 15. 3 14 4 5 6 Botón MENU .............................. Este botón se utiliza para ampliar, seleccionar y cerrar el menú OSD (On Screen Display = máscara en pantalla). Botón SELECT .......................... Cuando aparezca el menú ”Máscara en Pantalla” (OSD), elija la opción del menú que quiere ajustar. Botones ..........................
Descripción del producto Levantamiento y ajuste del monitor Levantamiento del monitor Ejerza presión sobre la base y levante la sección superior del monitor. Ajuste del monitor Agarre ligeramente los dos lados del monitor (por la sección verde) y ajústelo hasta que el ángulo de visión sea el adecuado. 25 Español 3 Bajada del monitor (para embalarlo) • No baje el monitor a menos que quiera transportarlo. El levantamiento y bajada innecesarios del monitor podrían llevar a un funcionamiento anómalo. 1.
Conexión del monitor y encendido/apagado del mismo Conexión del monitor a un ordenador (PC, etc.) Conexión del monitor a un auriculares y micrófono Antes de realizar la conexión, asegúrese de que tanto el monitor como el ordenador están apagados. Se pueden conectar aquí unos auriculares o un micrófono (ambos a comprar por separado). Nota: • No doble excesivamente el cable ni utilice cables de prolongación ya que ello podría llevar a un funcionamiento anómalo.
Conexión del monitor y encendido/apagado del mismo 7. Compruebe que el monitor está funcionando y a continuación haga clic en [Apply]. Encendido 1. Encienda el ordenador. 2. Pulse el botón de encendido/apagado del monitor. El LED indicador de conexión se iluminará de color verde y en la pantalla se verá una imagen. LED indicador de conexión 8. Haga clic sobre [OK] y cierre la ventana. 9. Retire el Disquete de utilidades de la unidad A.
Conexión del monitor y encendido/apagado del mismo Para Windows2000 Instalación de la información de configuración del monitor en Windows2000 y configuración del perfil ICC del monitor como valor predeterminado. Los mensajes de Windows mencionados a continuación se refieren la versión inglesa. En la explicación se da por supuesto que la unidad de disquetes es la "A". 1. Introduzca el Disquete de utilidades (proporcionado) en la unidad A del ordenador. 2. Haga clic sobre el botón [Start].
Ajuste de la pantalla y volumen del altavoz En caso necesario, la pantalla se puede ajustar de la manera siguiente. Ajuste automático de la pantalla (columna derecha) Las funciones reloj, fase, H-POS (posición horizontal) y V-POS (posición vertical) se pueden ajustar automáticamente. Regulación de la retroiluminación (p.104) La luminosidad de la retroiluminación se puede regular. Ajuste manual (p. 105) Se pueden realizar ajustes de precisión a través del menú Máscara en pantalla (OSD).
Ajuste de la pantalla y volumen del altavoz Notas: • En la mayoría de los casos, el ajuste automático es suficiente. • Se puede llevar a cabo un ajuste manual (p. 105) tras el ajuste automático, si resultara necesario debido a una de las siguientes circunstancias. • Cuando sea necesario realizar un ajuste de precisión. • Cuando se vea [OUT OF ADJUST] en la pantalla. (Cuando en la pantalla se vea una imagen totalmente oscura, el ajuste automático de la pantalla puede estar deshabilitado.
Ajuste de la pantalla y volumen del altavoz MENU 1: ADJUSTMENT Si no se desea regular la luminosidad automáticamente 1. Sin el menú OSD a la vista, pulse el botón o el botón . [ AUTO BRIGHTNESS OFF ] 31 [ BRIGHT 2. Realice el ajuste pulsando el botón o el botón (más claro). 3. Pulse el botón MENU. El menú OSD desaparecerá.
Ajuste de la pantalla y volumen del altavoz MENU 2: GAIN CONTROL BLACK LEVEL y CONTRAST se optimizan antes de salir de fábrica pero se pueden ajustar según se desee. [ G A I N C O N T RO L MA N U A L BLACK LEVEL CONTRAST ] 30 40 DISPLAY COLORS 1024x768 V : 60Hz AUTO MENU 3: WHITE BALANCE En caso necesario, se puede ajustar WHITE BALANCE (tonalidad cromática). (Ya que los ajustes se realizan antes de salir de fábrica, no es realmente necesario cambiarlos).
Ajuste de la pantalla y volumen del altavoz MENU 4: MODE SELECT M OD E [ Ajuste del volumen del altavoz S E L E CT OSD H - POS I T I ON OSD V - POS I T I ON 640 4 0 0 L I NE S S CAL I NG L E VEL 1 1024x768 V : 60Hz ] 720 L E VEL 2 Sin que el menú OSD ni la barra de ajuste de la retroiluminación se vean en la pantalla, ajuste el (para reducir el volumen del altavoz pulsando el botón volumen) o el botón (para aumentar el volumen).
Conservación y reparación del monitor Conservación del monitor Solución de problemas Desenchufe siempre la clavija de la toma de corriente alterna antes de limpiar el monitor. Si cree que el monitor pudiera estar averiado, compruebe los puntos siguientes antes de llevarlo a reparar. Si después de ello sigue sin funcionar, póngase en contacto con su proveedor o con el servicio autorizado de asistencia técnica de Sharp más cercano.
Especificaciones Dimensiones (Unidades: mm) 313 368 355 200 Longitud del cable de señal RGB: aprox. 1,8 m 130 Español 45 Display LCD Módulo TFT LCD Color 38 cm Resolución (máx.) XGA 1024 x 768 Colores reproducibles (máx.) 16,19 millones de colores (6bit + FRC2bit) Retícula 0,297(H) x 0,297(V) mm Luminosidad (máx.
Especificaciones Señales de sincronización Modo display 640x480 VESA – IBM AT compatible – Series PC-9800 800x600 1024x768 Series PC-9800 US text Series Power Macintosh 640x480 720x400 640x480 832x624 1024x768 Hsync (kHz) Vsync (Hz) Frecuencia (MHz) 31,5kHz 37,9kHz 37,5kHz 35,1kHz 37,9kHz 48,1kHz 46,9kHz 48,4kHz 56,5kHz 60,0kHz 24,8kHz 31,5kHz 31,5kHz 35,0kHz 49,7kHz 60,2kHz 60Hz 72Hz 75Hz 56Hz 60Hz 72Hz 75Hz 60Hz 70Hz 75Hz 56Hz 70Hz 70Hz 66,7Hz 74,6Hz 75Hz 25,175MHz 31,5MHz 31,5MHz 36,0MHz 40,0M
Especificaciones DDC (Plug & Play) El monitor está basado en la tecnología VESA DPMS (Display Power Management Signaling). Para activar la función Power Management del monitor, tanto la tarjeta de vídeo como el ordenador deben cumplir el estándar VESA DPMS. Este monitor soporta el estándar VESA DDC (Display Data Channel). DDC es un estándar de señalización para la ejecución de las funciones Plug & Play en el monitor o PC. Transmite información tal como el grado de resolución entre el monitor y el PC.
Instrucciones para la instalación de un brazo de compatibilidad VESA Puede acoplar un brazo conforme al estándar VESA al monitor. El brazo debe adquirirlo por separado. 4. Retire los cuatro tornillos y a continuación retire la base del monitor. A la hora de elegir el brazo a acoplar, considere los puntos siguientes. • El brazo debe ser compatible con el estándar VESA y en la sección a acoplar debe haber una separación de 75 mm x 75 mm como mínimo entre los orificios para los tornillos.
R SHARP CORPORATION © 2001 SHARP CORPORATION Printed in China 624315160002 0LTHG15160002 (1)