ENGLISH FRANÇAIS LL-S201A ESPAÑOL LCD MONITOR MONITEUR LCD MONITOR LCD LCD FARBMONITOR DEUTSCH SETUP MANUAL MANUEL D’INSTALLATION MANUAL DE INSTALACIÓN INSTALLATIONSANLEITUNG ENGLISH ....... E1 FRANÇAIS...... F1 ESPAÑOL ..... S1 DEUTSCH......
NOTE FOR USERS IN U.K. IMPORTANT The wires in this mains lead are coloured in accordance with the following code: BLUE: “NEUTRAL” BROWN: “LIVE” CONNECTING PLUG TO MAINS LEAD: As the colours of the wires in the mains lead of this apparatus may not correspond with the coloured markings identifying the terminals in your plugs, proceed as follows: • The wire which is coloured BLUE must be connected to the terminal which is marked with the letter N or coloured BLACK.
Contents Connecting Peripheral Equipment..................................5 Connecting the monitor to a power source...................6 Installation.........................................................................6 Turning Power ON/Off......................................................8 Specifications...................................................................8 ENGLISH IMPORTANT INFORMATION.............................................1 DEAR SHARP CUSTOMER...............................
SAFETY PRECAUTIONS Electricity is used to perform many useful functions, but it can also cause personal injuries and property damage if improperly handled. This product has been engineered and manufactured with the highest priority on safety. However, improper use can result in electric shock and/or fire. In order to prevent potential danger, please observe the following instructions when installing, operating and cleaning the product.
SAFETY PRECAUTIONS (Continued) ENGLISH If a monitor is not positioned in a sufficiently stable location, it can be potentially hazardous due to falling. Many injuries, particularly to children, can be avoided by taking simple precautions such as: • Using fixing devices like wall mount brackets recommended by the manufacturer. • Only using furniture that can safely support the monitor. • Ensuring the monitor is not overhanging the edge of the supporting furniture.
Supplied Components If any component should be missing, please contact your dealer. Liquid Crystal Display Monitor: 1 Power cord CD-ROM (Utility Disk): 1 Setup Manual (this manual): 1 Touch pen: 1 AC adapter: 1 USB cable (USB-microUSB Type B): 1 Stand (front, back, bottom cover, Fixing screws: 2): 1 * SHARP Corporation holds authorship rights to the Utility Disk program. Do not reproduce it without permission. * Keep packaging for use when transporting monitor, etc.
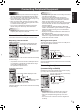
Connecting Peripheral Equipment TIPS • Be sure to turn off the power and disconnect the plug from the power outlet before connecting/disconnecting cables. Also, read the manual of the equipment to be connected. • Do not forcibly bend or apply force to cables. Doing so may result in wire breakage or other damage. • When connecting cables, spread a soft cloth on a stable level surface such as a desk, and gently place the monitor on it with the screen facing down.
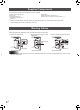
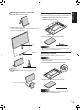
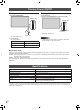
Connecting the monitor to a power source Caution • Use only the AC adapter and power cord supplied with the monitor. 1. Connect the monitor to the power outlet using the supplied AC adapter and power cord. Back of monitor For power outlet AC adapter connection terminal Core restrainer AC adapter (Supplied) Power cord (Supplied) AC adapter core 2. Push the AC adapter core into the core restrainer Installation The monitor can be installed in three different ways. Standing position 3.
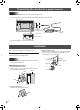
1. Place the stand on a level surface. Pen writing position Place the monitor at an angle on a table or other level surface. 1. Hold the flap by the depression on the back of the monitor and pull the flap up. ENGLISH nMounting the monitor on the stand 2. Set the monitor on the stand. Set the monitor so that the logo in the center is aligned with the circle mark on the stand. Depression 2. Place the monitor where you want to use it.
Turning Power ON/Off Turning on the power Turning off the power 1. Press the POWER button. 1. Turn off the PC. 2. Depress the POWER button for around 2 seconds. POWER button POWER button Press The power LED turns off. Power LED The power LED turns on. Caution 2. Turn on the PC. The screen appears.
Table des matières INFORMATION IMPORTANTE..........................................1 CHER CLIENT....................................................................1 PRÉCAUTIONS DE SÉCURITÉ........................................2 MESURES DE SÉCURITÉ.................................................3 Composants fournis.........................................................4 Fixation des câbles...........................................................4 [FRANÇAIS] Connexion de périphériques...............
PRÉCAUTIONS DE SÉCURITÉ L’électricité remplit de nombreuses fonctions utiles, mais elle peut provoquer des blessures et des dégâts matériels si elle n’est pas utilisée correctement. Cet appareil a été conçu et fabriqué en attachant la plus grande importance à la sécurité. Cependant, une utilisation inadéquate peut entraîner une décharge électrique et/ou un incendie.
PRÉCAUTIONS DE SÉCURITÉ (Suite) Afin de satisfaire aux normes EMC, utiliser des câbles blindés pour connecter les bornes suivantes : borne d’entrée HDMI, borne d’entrée DisplayPort Ce produit est conçu pour une utilisation commerciale uniquement et, en tant que tel, n’est pas soumis à la réglementation (CE) 1275/2008 mettant en œuvre la Directive européenne 2005/32/CE sur les exigences d’écoconception en termes de consommation électrique en mode veille ou éteint.
Composants fournis Si un composant venait à manquer, veuillez contacter votre revendeur. Moniteur à cristaux liquides : 1 Cordon d’alimentation CD-ROM (Utility Disk) : 1 Manuel d’Installation (ce manuel) : 1 Stylet : 1 Adaptateur secteur : 1 Câble USB (USB-USB micro type B) : 1 Support (couvercle avant, arrière, bas, Vis de fixation : 2) : 1 * SHARP Corporation détient les droits d’auteur du programme de l’Utility Disk. Veuillez ne pas le reproduire sans autorisation de la société.
Connexion de périphériques Attention CONSEILS CONSEILS • Les images peuvent ne pas s’afficher correctement selon l’ordinateur (carte vidéo) connecté. Connexion à un PC Raccordez le moniteur à un PC à l’aide du câble de raccordement. • La longueur des câbles de signal ou l’environnement ambiant sont susceptibles d’affecter la qualité de l’image. • La vidéo s’affiche via la borne où entre le signal. Dans cette situation, même si un signal entre par l’autre borne, l’affichage ne changera pas.
Raccordement du moniteur à une source d’alimentation Attention • Utilisez uniquement l’adaptateur secteur et le cordon d’alimentation fournis avec le moniteur. 1. Raccordez le moniteur à la prise d’alimentation à l’aide de l’adaptateur secteur et du cordon d’alimentation fournis. Arrière du moniteur Vers la prise d’alimentation secteur Borne de l'adaptateur secteur Adaptateur secteur (fourni) Détrompeur Cordon d’alimentation (fourni) Adaptateur secteur 2.
nFixation du moniteur sur le support 1. Placez le support sur une surface plane. Positionnement pour écriture Placez le moniteur sur le coin d’une table ou d’une autre surface plane. 1. Tenez le volet par la partie creuse située à l’arrière du moniteur et tirez-le vers le haut. FRANÇAIS 2. Placez le moniteur sur le support. Positionnez le moniteur de façon à ce que le logo central soit aligné avec la marque circulaire du support. Creux 2. Placez le moniteur là où vous souhaitez l’utiliser.
Mise sous / hors tension Mise sous tension Mise hors tension 1. Appuyez sur le bouton d’alimentation POWER. 1. Éteignez le PC. 2. Appuyez sur le bouton d’alimentation POWER pendant environ 2 secondes. Bouton d'alimentation Bouton d'alimentation Appuyer Appuyer pendant 2 secondes environ Diode d'alimentation La diode d’alimentation s’éteint. La diode d’alimentation s’allume. Attention 2. Mettez le PC en marche. L’écran apparaît. État • Pour un arrêt prolongé du moniteur, débranchez la prise.
Índice INFORMACIÓN IMPORTANTE..........................................1 ESTIMADO CLIENTE DE SHARP.....................................1 PRECAUCIONES DE SEGURIDAD..................................2 INSTRUCCIONES DE SEGURIDAD.................................3 Componentes suministrados..........................................4 Fijación de los cables.......................................................4 [ESPAÑOL] Conexión de equipos periféricos....................................
PRECAUCIONES DE SEGURIDAD La electricidad se emplea para muchas funciones útiles pero también puede causar lesiones personales y daños en la propiedad si se manipula de forma inadecuada. Este producto se ha diseñado y fabricado poniendo el máximo énfasis en la seguridad. No obstante, el uso inadecuado podría tener como resultado descargas eléctricas y/o incendios. Para evitar peligros potenciales, observe las siguientes instrucciones cuando instale, utilice y limpie el producto.
PRECAUCIONES DE SEGURIDAD (Continuación) 20. No toque las partes del producto o el adaptador CA que se calientan durante un tiempo prolongado. Podrían producirse quemaduras de baja temperatura. Para mantener la conformidad con la normativa sobre compatibilidad electromagnética (EMC), utilice cables blindados para la conexión a los siguientes terminales: terminal de entrada HDMI y DisplayPort.
Componentes suministrados Si faltara alguno de los componentes, póngase en contacto con su distribuidor. Monitor de pantalla de cristal líquido: 1 Cable de alimentación CD-ROM (disco de utilidades): 1 Manual de Instalación (este manual): 1 Lápiz táctil: 1 Adaptador CA: 1 Cable USB (USB-microUSB tipo B): 1 Pedestal (frontal, trasero, cubierta inferior, Tornillos de fijación: 2): 1 * SHARP Corporation posee los derechos de autor del programa Disco de utilidades. No lo reproduzca sin permiso.
Conexión de equipos periféricos Precaución CONSEJOS • Asegúrese de desconectar el equipo y desenchufarlo de la toma de corriente antes de conectar o desconectar los cables. Asimismo, lea el manual del equipo que desea conectar. • No doble demasiado ni aplique fuerza en exceso sobre los cables. De lo contrario puede romperlos o dañarlos.
Conexión del monitor a una fuente de energía Precaución • Utilice solo el adaptador CA y el cable de alimentación suministrado con el monitor. 1. Conecte el monitor a la toma de corriente con el adaptador CA y el cable de alimentación suministrados. Parte trasera del monitor Para toma de alimentación Terminal de conexión del adaptador CA Sujeción principal Adaptador CA (suministrado) Cable de alimentación (suministrado) Núcleo del adaptador CA 2.
nMontaje del monitor sobre el pedestal 1. Coloque el pedestal en una superficie horizontal. Posición para escritura con lápiz Coloque el monitor en ángulo sobre una mesa u otra superficie horizontal. 1. Sujete la solapa por el rebaje situado en la parte posterior del monitor y tire de la sola hacia arriba. 2. Coloque el monitor en el pedestal. Ajuste el monitor de forma que el logotipo del centro quede alineado con la marca del círculo del pedestal. Rebaje 2.
Encendido/apagado Encendido de la alimentación Apagado de la alimentación 1. Pulse el Botón POWER. 1. Apague el PC. 2. Pulse el Botón POWER durante unos 2 segundos. Botón POWER Botón POWER Presionar LED indicador de conexión Se enciende el LED indicador de conexión. Pulsar durante unos 2 segundos Se apaga el LED indicador de conexión. Precaución 2. Encienda el PC. Aparece la pantalla.
Inhalt WICHTIGE INFORMATIONEN...........................................1 VEREHRTE KUNDIN, VEREHRTER KUNDE...................1 SICHERHEITSVORKEHRUNGEN.....................................2 SICHERHEITSANLEITUNG...............................................3 Mitgelieferte Komponenten.............................................4 Bündelung von Kabeln.....................................................4 [DEUTSCH] Anschließen von Zusatzgeräten......................................
SICHERHEITSVORKEHRUNGEN Elektrizität erfüllt viele nützliche Aufgaben, kann aber auch Personen- und Sachschäden verursachen, wenn sie unsachgemäß gehandhabt wird. Dieses Produkt wurde mit Sicherheit als oberster Priorität konstruiert und hergestellt. Dennoch besteht bei unsachgemäßer Handhabung u.U. Stromschlag- und Brandgefahr. Um mögliche Gefahren zu vermeiden, befolgen Sie beim Aufstellen, Betreiben und Reinigen des Produkts bitte die nachstehenden Anleitungen.
SICHERHEITSVORKEHRUNGEN (Fortsetzung) 20. Vermeiden Sie es, Teile des Produkts, die sich erwärmen, über längere Zeit hinweg zu berühren. Dies könnte zu leichten Verbrennungen führen.
Mitgelieferte Komponenten Sollte eine der angeführten Komponenten fehlen, kontaktieren Sie bitte Ihren Händler. LCD-Monitor: 1 Netzkabel CD-ROM (Utility Disk): 1 Installationsanleitung (diese Anleitung): 1 Touch-Pen: 1 Netzadapter: 1 USB-Kabel (USB - Micro-USB Typ B): 1 Fuß (Vorderteil, Hinterteil, Unterteil, o Befestigungsschrauben: 2): 1 * Die SHARP Corporation besitzt die Autorenrechte am Utility Disk Programm.
Anschließen von Zusatzgeräten Achtung TIPPS • Schalten Sie unbedingt den Hauptschalter aus und ziehen Sie den Netzstecker, bevor Sie Kabel anschließen oder abziehen. Lesen Sie auch das Handbuch des Gerätes, das Sie an den Monitor anschließen möchten. • Biegen Sie Kabel nicht mit Gewalt und unterlassen Sie auch sonst jegliche Kraftanwendung auf Kabel. Andernfalls kann es zu Kabelbrüchen oder sonstigen Beschädigungen kommen.
Anschließen des Monitors an eine Stromquelle Achtung • Verwenden Sie nur das mit dem Monitor mitgelieferte Netzkabel und den mit dem Monitor mitgelieferten Netzadapter. 1. Stecken Sie den Monitor unter Verwendung des mitgelieferten Netzadapters und des mitgelieferten Netzkabels an der Netzsteckdose an. Rückseite des Monitors Zur Wandsteckdose Netzadapteranschluss Zugentlastung/ Funkentstörung Netzadapter (mitgeliefert) Netzkabel (mitgeliefert) Kabel des Netzadapters 2.
nBefestigung des Monitors auf dem Fuß 1. Stellen Sie den Fuß auf eine ebene Fläche. Position zum Schreiben mit dem Touch-Pen Sie können den Monitor leicht angewinkelt auf einen Tisch oder eine andere ebene Oberfläche legen. 1. Greifen Sie die Klappe an der Aussparung an der Rückseite des Monitors und ziehen Sie die Klappe nach oben. 2. Stellen Sie den Monitor auf den Fuß. Platzieren Sie den Monitor so, dass das Logo in der Mitte auf die Kreismarkierung am Fuß ausgerichtet ist. Aussparung 2.
Ein- und Ausschalten Einschalten der Stromversorgung Ausschalten der Stromversorgung 1. Drücken Sie auf die POWER-Taste. 1. Schalten Sie den PC aus. 2. Halten Sie die POWER-Taste circa 2 Sekunden lang gedrückt. Netztaste Netztaste Drücken Circa 2 Sekunden lang gedrückt halten Betriebs-LED Die Betriebs-LED erlischt. Nun leuchtet die Betriebs-LED. Achtung 2. Schalten Sie den PC ein. Die Bildschirmanzeige erscheint.
Printed in China Imprimé en China Impreso en Chine Gedruckt in China 13A YT1 TINSM1309MPZZ(1)
ERRATA SHEET ENGLISH Error Page 8 Correction nOperation mode nOperation Mode When the monitor is turned on for the first time after being shipped from the factory, the operation mode setting screen will be displayed. Set it to MODE1 or MODE2. MODE1.......If there is no operation for 4 hours or more, the monitor automatically enters standby mode. Power consumption in standby mode is also minimized. MODE2.......Will perform standard operation.