
MiniDisc Player User Manual


■ Recording from a tuner or a CD (Manual recording)
● Manual recordings can be started and stopped as you like.
Recordings can not be made in the
following situations:
● Recording on a playback-only Mini-
Disc (commercially available music)
● If a Minidisc is protected against ac-
cidental erasure (page 9)
About the recording level:
● If the recording level is too low, the
playback sound volume may be too
low to hear well. If it is too high, the
playback sound may be greatly dis-
torted. Since digitally recorded CDs
have a large dynamic range (the
volume can vary tremendously from
very soft to extremely loud), do not
set the recording level any higher
than is necessary.
Precautions when recording:
● Do not jar or bump the main unit
while recording. Otherwise, the
recording may be unusable.
● Depending on the strength and type
of playback signal in the original
recording, the new recording may
not begin or pause at the correct
point when in the synchro mode. If
this happens, try making a manual
recording.
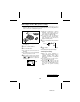
Precautions when inserting a Mini-
Disc:
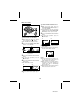
● To insert a Minidisc, push on the
middle of the edge of the disc while
holding it parallel to the main unit.
● If any resistance is felt, do not try to
force the MiniDisc into the unit. It
may cause more problems. If resis-
tance is felt, remove the MiniDisc
and try reloading it.
Notes:
● Whenever any button is pressed, the
remote control display will light for
about 4 seconds.
● The REC button does not light.
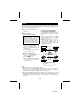
1 Put the unit in the recording stand-by
mode. (Perform steps 1 - 4 in the
“Synchro recording” section.)
2 Press the button.
● Recording will start.
● To record from a CD, press the
button, and then start playback on the
equipment connected to this unit.
● Track numbers can be created while
recording. (Page 17)
To interrupt recording:
Press the button while recording.
● The unit will enter the recording stand-
by mode.
● To resume recording, press the
button again.
The track number will be increased by
one each time you interrupt a record-
ing.
To stop recording:
Press the ■/:OFF button.
● If the unit is left alone after the record-
ing has stopped, the power will be
turned off about 2 minutes later.
After recording:
Press the ■/:OFF button while in the stop
mode.
● After the track number has been written
on the disc, the power will be turned off
automatically. (For details about the
TOC, see page 20.)
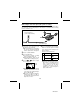
To remove the MiniDisc:
Turn off the power and move the EJECT
lever in the direction indicated by the
arrow.
11
MD-MS702