
Service manual


MD-R2
– 13 –
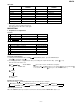
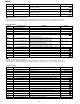
KEY NAME ILLUMINATE
SEGMENT
TIMER 10 ROW DOT INPUT SELECT TOC
DISPLAY 11 ROW DOT EJECT 7 ROW DOT
REVIEW ALL PLAY 4 ROW DOT
CUE PM STOP 5 ROW DOT
ENTER 8 ROW DOT REC 6 ROW DOT
JOG. UP 17 (M.C.) NAME 9 ROW DOT
JOG. DOWN 18 (M.C.) TIME AM
PROGRAM PRGM
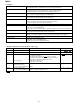
KEY TEST
KEY NAME ILLUMINATE
SEGMENT
D) Recording test mode (ENTER+REC)
This mode is auto recording repeat mode.
After disc full. Erase all and rec start again.
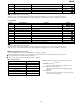
1. Preparation for adjustment
Test disc
MD SECTION
Type
Test disc Part No.
1 High reflection disc TGYS1 (SONY) RRCDT0101AFZZ
2 Low reflection disc Recording minidisc UDSKM0001AFZZ
3 Head Adjusting transparent RRCDT0103AFZZ
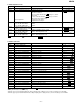
Extension Cable (See Fig. 26-4)
Type
Part No.
1 Extension PWB for servicing RUNTK0457AFZZ
2 Extension Connector (2 Pin) QCNWK0059AFZZ
3 Extension Connector (6 Pin) QCNWK0107AFZZ
4 Extension Cable (5 Pin) QCNWK0109AFZZ
3 Extension Cable (28 Pin) QCNWK0108AFZZ
2. Test mode
Test mode setting method
1. Holding down the ENTER button and MD (PLAY/PAUSE) button, press the RESET button.
(State A is changed to state B .)
2. Insert the playback disc 1 (high reflection disc) or recording disc 2 (low reflection disc). (State C is set.)
Thus, the test mode state is set.
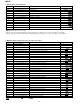
A tsm e : TEST MODE represents version of MD microcomputer.
TEST STOP state (When the MD (STOP) button is ressed in the C state, the indication A
is restored. To restore C again, press the ENTER button.)
B EJECT
TEST
C AUT YOBI
TEST
Entering the specific mode
Whenever the CD (PLAY/PAUSE) button is pressed, the mode is changed.
AUTO pre-adjustment AUTO adjustment RESULT SUB RESULT
EEPROM setting MANUAL adjustment MANUAL pre-adjustment
• Canceling the test mode
When the POWER button is pressed, the test mode is canceled, and the POWER OFF state is set.