
Service manual


MD-R2
– 5 –
(Continued)
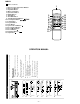
Setting the time
After step 7, described in the “Setting the date” section
8 Set the “hour” using the jog dial.
When you turn the jog dial and let go, the hour will change
up or down by one. When you turn and hold it, the hour will
change continuously.
The clock uses the 12-hour system. Pay attention to the AM
or PM indicator in the display.
AM 0:00 → midnight, PM 0:00 → noon
9 Press the ENTER button to set the “hour”.
10Adjust the “minute” using the jog dial.
11
Press the ENTER button to set the “minute”.
When the ENTER button is pressed, the clock will show the
correct time.
Checking the date and time
After pressing the TIMER button, turn the jog dial until the date
and time are displayed.
Resetting the date and time
See “Setting the clock”.
Once you have set the date and time, “TIME ADJUST” will
not be displayed in step 2. Turn the jog dial to make the date
and time appear.
If you do not need to change the settings, just press the
ENTER button without turning the jog dial again.
DELETE/CLEAR
TIMER
ENTER
DATE
CLOCK
DATE
CLOCK
DATE
CLOCK
DATE
CLOCK
8
9
10
11
PM
PM
PM
PM
TROUBLESHOOTING
Moisture condensation
In the following cases, condensation may form inside
the unit.
Shortly after turning on a heater.
When the unit is placed in a room where there is ex-
cessive steam or moisture.
When the unit is moved from a cool place to a warm
place.
When the unit has condensation inside, the disc signals
cannot be read, and the product may not function
properly.
If this happens, remove the disc, and open the disc
holder. The condensation should evaporate in approxi-
mately 1 hour. The unit will then function properly.
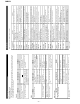
If a problem occurs
If this product is subjected to strong external inter-
ference (mechanical shock, excessive static electricity,
abnormal supply voltage due to lightning, etc.) or if it
is operated incorrectly, it may malfunction or the display
may not function correctly. If such a problem occurs,
do the following:
Unplug the AC power cord from the AC outlet.
Wait about 20 - 30 seconds and then plug the AC power
lead back into the AC outlet.
Press the reset button on the back of the unit.
When the reset button is pressed, all of the settings in
memory will be erased.
If strange sounds, smells or smoke come out of the unit
or if a foreign object falls into the unit, turn off the power,
unplug the AC power cord from the AC outlet, immedi-
ately. Contact your nearest authorized Sharp servicer.
If a power failure occurs during recording
If the AC power plug is disconnected from the AC outlet
or a power failure occurs during recording (before the
TOC information has been recorded on the disc), the
audio portion being recorded at that time will be erased.
When a recording is being added to a MiniDisc which
already has a recording on it, if the TOC is not updated
before the power failure, the added recording will be
erased.
If a power failure occurs or the AC power cord is dis-
connected for about 10 minutes, when power is restored,
TOC will be written on the disc.
RESET
Pen, pencil, etc.