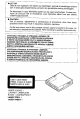
ENGLISH INTRODUCTION Thank you for purchasing.this SHARP product, For the best performances, read this manual o careful. It will guide you In operating your SHARP product Page SPECIAL NOTES .. ACCESSORIES ., PRECAUTIONS .. o NAMES OF CONTROLS AND INDICATORS .. POWER SOURCE.. -6 PLAYING A DIMINISH -8 CONVENIENT PLAYBACK ® The AC adapter supplied with the MD3321H must nat be used with other equipment. @ US and foreign patents licensed from Dolby Laboratories Licensing Corporation.
ik o important @ Do not wear your earphones when you wre crossing steels or near traffic. @ Do not use your saxophones whilst driving a moor vehicle, it may create a dangerous traffic hazard and may be illegal. Remember to obey all of the safety lutes In your area. # Do not play e suit at & high volume. Hearing experts advise against Attendant play &t high volume levels. @ If you experience ringing In your ears, reduce the value or discontinues use.
W Notes about the rechargeable battery =058 ADO\ the rechargeable battery ® A rechargeable lithium-ion battery is the only Kind that 6an be used. Even if the battery supplied with the unit fs not used, you should charge it at least acne every threat months because of the special duality of unis battery. The' rechargeable battery can be charged approximately 300 mes, ® Do not use any battery other than that specified. Use of other espalier may cause malfunctions.
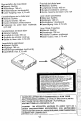
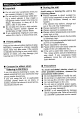
NAMES OF CONTROLS AND INDICATORS Panorama N T Main unit . Power Indicator . Hand strap Holder . 5V DC Input Socket Effect Lever . Stop/Power Off Button . Play/Fast Forward Button . Hold Switch . Battery Case Connection “Terminals, . Earphone/Remote Control Socket Rechargeable Battery Cover W Emote control unit . Attachment Eye . Play/Pause/Fast Reverse/ Fast Forward Shuttle Switch Play Mode Button Sot ind Button Earphone Socket .
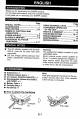
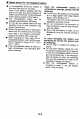
LR e e This unit can be used with the following power sources: & rechargeable battery, an AG adapter, a battery case, and a separately available car adapter (AD-CA20X). Insert securely, all the way in. AC 220-230 v, 50/60 Hz Note's: ® After charging bas bean completed, the AC adapter may be left consisted. {For examples, when charging at night) @ tithe rechargeable battery is in the unit, Will be charged, even whilst operating the unit.
player 3 \ Back of the MD Caution: @ V Whilst you are using the rechargeable battery and the alkaline battery at the same time, do not remove either of thees, If you do, playback will stop and the power may be disconnected. ® Do not use rechargeable baffler (nickalcadmium battery etc) In the patter case. @ I the unit is not used for a long period halftime, remove the battery. (Even f the parer is turned off, the battery will be drained slowly but continuously) Be sure 10 hold the fug when removing .
ALy Earp horas For the For the theft (L) To the (3 / REMOTE socket Ha mote control unit T insert the harpoons plug filmy ino the earphone socket on te femoral control unit. 2 pig e remote control unit g the {1/ REMOTE ‘socket on the main unit, Push the plug all ihe way it Note: @ Since the cremate control unit plug has only | one correct orientation, pig it in as shown in the drawing. Load a Mini Disc in the traction indicated by the arrow ori the Wisconsin, with the labs side facing up.
To turn off the power: Cross the M (W-OFF) button whilst in the stop mode, ® I the unit is not operated for at cast 2 minutes whilst in the stop mode, the power will shut off automatically. To remove the Mini Disc: Turn off the power and move the EJECT lever in the direction indicated by the arrow. . About the indication on the MD slot: The indication on the MDD slot slows you to see the unit.
CONVENIENT PLAYBACK FUNCTIONS | PASS {Auto Program Search System) PASS autocratically locates the. beginning of any track. Ta move to the beginning of the next track: Mace the shuttle switch cn the upper side of the remote control unit fo W or press the -/ i button on the main unit during payback, To re-start the frack being played: Move the shut lie switch on the upper side of the remote control unt to I« during playback.
# Random play or repeat play {Remote control) During playback or whilst in the stop mode, press the PLAY MODE button repeatedly to select the playback mode. -y RANDOM Random pay . Repeat play of tracks in v I RANDOM oz random android Rep sat play of all of e tracks Rep sat play of & single track P No display Normal payback @ 1 the playback mode is distracted whilst stopped, press the Wi button 1o start playback, Notes: ® I random play or random repeat play the unit will select and pay racks automatically.
# To check the total playing time — 1o necktie toll praying time (Remote control) Whilst in the stop made, pass the DIPS shuttle switch. ® Each teems the shuttle switch is pressed, e display will change as follows: Disc name {"NO NAME" is displayed i ot accord) BEST b " Total dumber Iota! playing of tracks time 8 To check the elapsed time and remaining time of the ZIC remaining time of the track (Remote contort) During playback, press the DIPS shuttle switch.
IR ® Before connecting 2ny oilier equipment, tum off ihe power to all units. ® Connect the plugs securely. {proper connections may cause noise of malfunctions. ® Adjust the volume on both this unit 2nd any other equipment connected to it W Recording both sound and character information on another Mini Disc at the same time ® To make edit recording, check the operation manual for the equipment connected 1o this unit. ® When using this unit, be sure to use it with the AC adapter.
CONVENIENT OPERATION OF THE UNIT M _Checking the remaining amount of hatter charge The remaining amount of battery charge is shown by the battery indicator the ‘remote control display during operative e Battery indicator
™ To eliminate the confirmation sound (Remote control) Every teems a bunion is pressed, a “beep” will be heard in the earphones. o site rice the “seep” sound, do tha fallowing: 1 whits in the stop mode Hals down the PLAY MODE button until “SET UP" appears. @ Wuhan you release the bunion, “BEEP 1" will appear. 2 Press the PLAY MODE button. @ “BEEP 0" will appear, and the confirmation sound will disappear.
PLAY Made cancel the auto-pay function {Remote control) When a Mini Disc is inserted, the power will be turned on automatically, and playback wil begin. You can cancel automatic playback. 1 Whilst in the stop mode Hold down the PLAY MODE button until “SET UP” appears. ® When you release the mutton, “BEEP 1 or “BEEP 0" will appear. 2 wove the shingle switch on the upper side until "Plautus” appears, 3 Press the PLAY MODE button. ® “PL off will appear, and the auto-play function will be cancelous.
WHAT IS A MINI DISC? A Mini Disc is a disc inside a protective cartridge. You can handle it freely without worrying about dust, fingerprints, afc. However, i dust enters the opening of the cartridge, or there is excessive dirt on the cartridge. or the ca ridge becomes warped, you may experience malfunctions. Please noel the following. Handling the Mini Disc Do not touch the disc directly! Do not open the shelter or touch the dies directly. If the sutler is opened forcibly, it may break.
Many potential “problems” can be rescinded by the owner without calling a service technician. If something seems to be wrong with thug product, check the following before calling your authorized SHARP dealer or service irenic. PROBLEM CAUSE The unit does rot turn on, ® is the AC adapter disconnected? ® [s the battery exhausted? s the unit in the hold mode? ® Has condensation formed inside the unit? @ is.
ERROR MESSAGES When an error message is displayed on the display, proceed as lollops: Display Weaning Remedy ® Noting is recorded. Replace the disc with a BLANK recorded disc. ® The disc is damaged or Replace the disc. the musing information is E-READ not written properly on the disc. @ The units malfunctioning To have it repaired, ask E-MYS and will require service. the distributor where you purchased fhe ail ® The temperature is o Turn off the power, and E-TEMP high. wait for a while.