
Service manual


MD-SR50H/50W/60E/60W
– 5 –
OPERATION MANUAL
POWER SOURCE
You can power this unit with an AC adaptor or a commercially available alkaline bat-
tery (LR6, “AA” size).
You can also power this unit with a rechargeable battery (AD-N70BT) or car adaptor
(AD-CA20X) which are available separately.
2
1
4
3
5
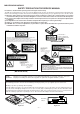
For MD-SR50H AC 220-230V, 50/60 Hz
For MD-SR50W AC 110-240V, 50/60 Hz
For MD-SR60E AC 230-240V, 50/60Hz
For MD-SR60W AC 220V, 50 Hz
Insert securely
,
all the way in.
To the DC
IN 5V socket
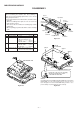
■ Rechargeable battery power
When the rechargeable battery is used for the
first time or when you want to use it after a
long period of disuse, be sure to charge it fully.
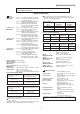
1
Open the battery cover.
● Slide the battery cover as far as it will go
to the outside and then lift to open it.
If the battery cover is lifted without be-
ing slid all the way out, it may break.
2
Insert the rechargeable battery accord-
ing to the polarity marked on the bottom
of the unit.
3
Close the battery cover.
4
Plug the AC adaptor into the AC socket,
and then insert the plug on the AC adap-
tor lead into the DC IN 5V socket.
5
Press the :OFF/CHRG ( • ■ ) button to
begin charging.
● “
” will appear, and the battery
will begin charging.
● After about 3.5 hours have
passed,
“ ” will go out.
This indicates that the battery charg-
ing is about 90% complete.
●
To charge the battery fully, continue
charging for about 2 more hours.
(In this case, you do not need to press
the :OFF/CHRG ( • ■ ) button. Even if
the :OFF/CHRG ( • ■ ) button is
pressed, “
” will not appear.)
Notes:
● After charging has been completed, the
AC adaptor may be left connected.
(For example, when charging at night.)
● The battery will not be charged when the
power to the main unit is turned on.
●
Do not force the battery cover open too far.
●
Do not use a rechargeable battery or an
AC adaptor other than those specified.
● The charging time will vary, depending
on the condition of the battery.
● When the battery is charged for the first
time or is charged after not being used
for a long period, the operating time may
be shorter than normal.The battery life
will recover with normal use i.e. charg-
ing and discharging.
● To avoid shortening the service life of the
battery only recharge the battery after it
has been completely discharged.
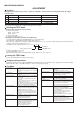
RECORDING USING THE OPTICAL DIGITAL CABLE
This is the method used for recording digi-
tal signals from CDs or MDs exactly as they
are stored on the original. Compared to re-
cordings made from analogue inputs, digi-
tal recordings have extremely high-quality
sound.
■ Synchro recording
1
Connect the external equipment.
2
Insert a recordable MiniDisc, and then
press the REC button.
3
Put the equipment connected to this unit
into the playback stand-by mode.
4
Press the ENTER/SYNC button.
5
Start the playback on the equipment
connected to this unit.
■ Manual recording
1
Place the unit in the recording stand-by
mode. (Perform steps 1 - 3 in the “Syn-
chro recording” section.)
2
Press the button, and then start
playback on the equipment connected
to this unit.
● When recording from digital inputs, it is
not necessary to adjust the recording
level.
Notes:
● This unit incorporates a sampling rate
converter.
When this unit is connected to digital
equipment such as CS/BS tuners or DAT
tape recorders that use a different sam-
pling frequency (32 kHz or 48 kHz), re-
cordings can still be made. (The sam-
pling frequency of this unit is 44.1 kHz.)
● When making a digital recording from a
portable CD player (if the player has a
sound skip prevention function and this
function is turned on) the optical output
will drop out and digital recording will not
be possible. Be sure to turn the sound
skip prevention function off.
There are cases where digital recording
may be impossible.
In the following cases digital recording is
impossible, even if you are using digital
cables.
When you attempt to make a new digital
recording from a track that was digitally re-
corded on a MiniDisc.
● MiniDiscs are designed so that only first
generation digital copies can be made.
Further digital copies are prevented by
the SCMS (Serial Copy Management
System).
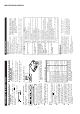
Playback
Digital cable
CD player, MD
player, etc.
Digitally recorded MiniDisc
Analogue recording is
possible.
Recording
Playback
Digital cable
Recording
MD player