
Service manual


MD-X5H/CP-X5H
– 6 –
When you have set the date and time, this unit can be used as a clock. It
can be used for timer recording or for timer playback. It is also used to store
the MD recording date in memory.
1 Press the ON/STAND-BY button to turn the power on.
2 Press the TIMER/DELETE button.
3 Within 10 seconds, press the or button to select "TIME ADJUST".
4 Within 10 seconds, press the ENTER button.
The unit will enter the date setting mode.
5 Adjust the day by pressing the or button.
6 Press the ENTER button to set the date.
7 Adjust the month by pressing the or button.
8 Press the ENTER button to set the month.
9 Adjust the year by pressing the or button.
Press the button once to increase or decrease the year by one. Keep
pressing it to advance continuously.
For a year after 2000, set "00" for 2000, "01" for 2001 and so on.
10 Press the ENTER button to set the year.
The unit will enter the time setting mode.
11 Adjust the hour by pressing the or button.
Press the button once to increase or decrease the hour by one. Keep
pressing it to advance continuously.
12 Press the ENTER button to set the hour.
13 Adjust the minute by pressing the or button.
Press the button once to increase or decrease the minutes by one.
When the button is held down, the time will change in increments of 5
minutes.
14 Press the ENTER button to set the minute.
The clock will start operating.
When about 3 seconds have elapsed, the original display will reappear.
Notes:
In the event of a power failure or when the AC power lead is discon-
nected, the clock display will go out.
When the AC power supply is restored, the clock display will flash on
and off to indicate the time when the power failure occurred or when the
AC power lead was disconnected.
Whilst recording an MD, you cannot set the date and clock. Be sure to
set the date and clock before recording.
The range of dates that can be entered is from January 1, 1997 to
December 31, 2049.
To change the setting:
Once you have set the date and time, "TIME ADJUST" will not be
displayed in step 3. Press the or button to make the date and time
appear.
If you don't need to change the settings, just press the ENTER button.
To check the date and time:
Press the TIMER/DELETE button, and press the or button until the
date and time appear.
I When about 10 seconds have elapsed, the original display will reap-
pear.
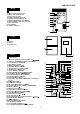
SETTING THE CLOCK
2
3
4
5
6
7
8
9
10
11
12
13
14
ENTER
TIMER/
DELETE
ON/STAND-BY
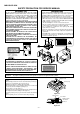
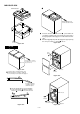
PREPARATION FOR USE
Notes concerning use:
Replace the batteries if the control distance decreases or operation
becomes erratic.
Periodically clean the transmitter LED on the remote control and the
sensor on the main unit with a soft cloth.
Exposing the sensor on the main unit to strong light may interfere with
operation. Change the lighting or the direction of the unit.
Keep the remote control away from moisture, excessive heat, shock,
and vibrations.
0.2m - 6m
(8" - 20')
Remote sensor
15
15
MINIDISC SYSTEM LIMITATIONS
Even if the maximum recording time of a MiniDisc is not When the number of tracks used reaches the limit, regardless of the remainder being
reached, “DISC FULL” or “TOC FULL” may be displayed. recording time, further recording will be impossible. (Maximum number of tracks: 255)
Even if the number of tracks and the recording time have When emphasis information (equalizer treatment in the treble section) in a track
not reached the limit, “DISC FULL” may be displayed. switches on/off many times, each change is assumed to be the beginning of a new
track, which will quickly use up all available track numbers, making further recording
impossible, regardless of the remaining time, recording time or the number of tracks
on the original.
Even if several short tracks are erased, the remaining When the remaining recording time of a disc is displayed, short tracks less than 15
recording time may not show an increase. seconds long may not be included in the total.
Two tracks may not be combined in editing. For MiniDiscs which repeated recording and editing operations were performed,
the COMBINE function may not work.
The total of the recorded time and time remaining on a disc A cluster (about 2 seconds) is normally the minimum unit of recording. So, even if a
may not add up to the maximum possible recording time. track is less than 2 seconds long, it will use about 2 seconds of space on the disc.
Therefore, the time actually available for recording may be less than the remaining
time displayed.
If there are scratches on a disc, those sections will be automatically avoided (no
recording will be placed in those sections). Therefore, recording time will be
reduced.
TROUBLESHOOTING
If a problem occurs
If this product is subjected to strong external interference (mechanical
shock, excessive static electricity, abnormal supply voltage due to light-
ning, etc.) or if it is operated incorrectly, it may malfunction or the display
may not function correctly. If such a problem occurs, do the following:
1 Unplug the AC power lead from the AC socket.
2 Press the RESET button on the back of the unit for at least 3 seconds.
3 Plug the AC power lead back into the AC socket.
When the RESET button is pressed, all of the settings in memory will be
erased.
If strange sounds, smells or smoke come out of the unit, or if a foreign
object falls into the unit, turn off the power, unplug the AC power lead
from the AC socket immediately. Contact the shop where you pur-
chased the unit.
RESET
OPERATION MANUAL