
Specifications

<P=002>
(Continued)
■ Recording from the built-in radio onto a Mini-
Disc
1 Tune in to the desired station. (See pages 12 - 13.)
2 Load a recordable MiniDisc.
3 Press the REC ● button.
● The unit will enter the record stand-by mode.
At this time, auto tuning is impossible.
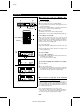
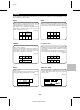
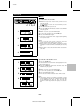
1 2 3 4 5
6
10
7 8 9 10/0
PROGRAM
MD/CD/TUNER DIRECT KEY
TIMESLEEP DISPLAY
VOLUME
MODE ON/OFF
SURROUND
AUTO
MARK
REC
MODE
AUX
3D
REC
BASS/
TREBLE
P-MODE
CD
CLEAR
ST-MODE
TUNER
BAND
MD
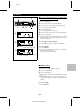
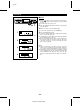
1 2 3
12 3
1
1
3
4
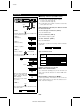
CD
DISC-1
DISC-2
DISC-3
MD
ON/STAND-BY
VOLUME
TUNER
(BAND)
MODE
ON/OFF
CD PLAY
1
2
3
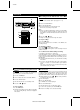
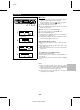
CD MD DIGITAL EDIT
NAME /
TOC EDIT
TIMER /
DELETE DISPLAY
ENTER
TRACK START
TUNING
CURSOR
REC
1 2 3
SURROUND
3D
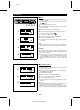
134
2
ON/
STAND-BY
Note:
● Before recording an AM broadcast, enter the record standby
mode, and then separate the AM loop aerial from the main
unit. Adjust it so that the AM broadcast can be tuned in most
clearly.
4 Press the MD button.
● During recording, you cannot change the station.
To stop recording:
Press the MD ■ button.
After the track number has been written on the MiniDisc, the
recording will stop.
To interrupt recording:
Press the MD button during recording.
Press the MD button again to resume recording. The track
number increases.
To record the track number during recording:
A recording is performed as a single track.
To identify different sections of the recording you can increase
the track number at any point during the recording process. To
create a new track number, whilst in the record mode, press the
REC ● button.
● The track number will increase by one, and then the recording
will continue.
● If you press the REC ● button and assign a track number,
a space of at least 15 seconds should be given between
tracks.
If the space is shorter than 15 seconds, tracks may not be
connected when they are edited.
■ To re-record
When you want to re-record, you can erase a track that is already
recorded, starting from any point in the old track, to begin a new
recording. Be aware that when you do this, all of the tracks and
track names that follow the newly recorded track will be erased.
1 During playback, press the MD button at the point where
you want to begin re-recording.
● The unit will pause.
2 Press the REC ● button.
● "R. ERASE OK?" will be displayed.
3 Press the ENTER button.
● This unit will be in the recording pause mode.
● To cancel the operation, press the MD ■ button.
4 Select the recording source and start recording.
■ To record without using One-Touch
Editing
Without using one-touch recording, the following oper-
ation allows you to record from the first track.
1 Press the CD ■ button.
2 Load a compact disc and a recordable MiniDisc.
3 Press the REC ● button.
● The unit will enter the record stand-by mode.
4 Press the CD button.
To stop recording:
Press the MD ■ button.
● After the track number has been written on the Mini-
Disc, the recording will stop. However, CD playback
will continue.
MD-ZV30H TINSZ0217AWZZ
E-22