AX-1100M MICROWAVE OVEN WITH STEAM AND GRILL OPERATION MANUAL WITH COOKBOOK This operation manual contains important information which you should read carefully before using your microwave oven. IMPORTANT: There may be a serious risk to health if this operation manual is not followed or if the oven is modified so that it operates with the door open. 900 W (IEC 60705) SUK AX1100M_intro.indd 1 10.9.
CONTENTS Page IMPORTANT SAFETY INSTRUCTIONS .........................................................................1 INSTALLATION .........................................................................................................4 OVEN DIAGRAM .....................................................................................................5 CONTROL PANEL .....................................................................................................6 IMPORTANT INSTRUCTIONS ...............
IMPORTANT SAFETY INSTRUCTIONS IMPORTANT SAFETY INSTRUCTIONS: READ CAREFULLY AND KEEP FOR FUTURE REFERENCE This oven is designed to be used on a countertop only. It is not designed to be built into a kitchen unit. Do not place the oven in a cabinet. The oven door may become hot during cooking. Place or mount the oven so that the bottom of the oven is 85 cm or more above the floor. Keep children away from the door to prevent them burning themselves.
IMPORTANT SAFETY INSTRUCTIONS Individuals with PACEMAKERS should check with their doctor or the manufacturer of the pacemaker for precautions regarding microwave ovens. Do not place the oven in areas where heat is generated. For example, close to a conventional oven. Do not install the oven in an area of high humidity or where moisture may collect. Do not store or use the oven outdoors. Clean the oven cavity and the oven floor after use. These must be dry and free from grease.
IMPORTANT SAFETY INSTRUCTIONS Use care when opening door. To avoid burns from escaping heat and steam, let hot air or steam escape before removing or replacing food. Always open containers, popcorn makers, oven cooking bags, etc., away from the face and hands to avoid steam burns that can be caused by over boiling. To a v o i d b u r n s , a l w a y s t e s t f o o d temperature and stir before serving and pay special attention to the temperature of food and drink given to babies, children or the elderly.
INSTALLATION • When replacing the plug please ensure that you use a BSI or ASTA approved plug to BS1363, this should be fitted with a brown coloured 13 amp fuse approved by BSI or ASTA to BS1362. If you have any doubt about electrical connection seek the help of a qualified electrician. 1. Remove all packing materials from the inside of the oven cavity. Discard the loose polythene sheet from between the door and cavity. Remove the feature sticker, if attached, from the outside of the door. 2.
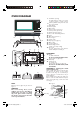
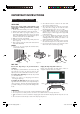
OVEN DIAGRAM 1 Ventilation openings Be aware that hot steam or air comes out during steam or combi cooking, and keep children away from the oven. 2 Door open handle 3 LCD display 4 Control panel 5 Oven lamp 6 Upper position (position 3) 7 Lower position (position 2) 8 Water tank (See page 7.) 9 Door seals and sealing surfaces 10 Latch 11 Oven floor (position 1) 12 Door hinges 13 Steam outlets 14 Drip tray (See page 7.
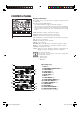
CONTROL PANEL Display information: The display shows useful information including cooking time and cooking mode. 1. Cooking mode & START indicators The indicator will flash or light up during the operation. You can press a concerned key when the indicators are flashing. When the indicators light up on the display, they mean that each cooking mode is selected or the oven is operating in each cooking mode. STEAM MICRO 1 GRILL START AUTO: Automatic cooking is selected or in progress.
IMPORTANT INSTRUCTIONS Before Cooking with Steam Before cooking with steam, read this section carefully. 2. An insufficient amount of water in the water tank may cause an undesired result. 3. We recommend that you empty the water tank every time after cooking. Do not leave the water tank filled with water in the oven over a day. 4. If "Err, WATER (flashing)" is shown in the display during Steam cooking, refer to Troubleshooting Chart on page 21. The message will not appeared in Descale function. 5.
IMPORTANT INSTRUCTIONS Steam in Automatic and Manual Cooking Before cooking 1. Make sure the water tank is filled with room temperature drinking water and is installed correctly. (See page 7.) 2. Make sure the empty drip tray is installed. (See page 7.) 3. Place food in the oven. Make sure to place the glass tray in lower position (position 2) for cooking with steam mode. After Cooking 1. After the oven has cooled, remove and empty the water tank, wipe oven cavity.
IMPORTANT INSTRUCTIONS Drain Water Function 2 Perform the Drain Water function at least once a day after cooking with steam. It takes up to 7 minutes. Press INFO/KITCHEN TIMER twice to select In F2. x2 The Drain Water Function helps prevent scale build up and removes left over water. 3 Place the glass tray in lower position (position 2). Ensure it is touching the back wall of the oven. 4 Do not place any food in the oven. Close the door firmly.
BEFORE USING OF THE FIRST TIME, CLEAN THE OVEN BEFORE OPERATING • Before operating your oven, make sure you read and understand this operation manual completely. • Before the oven can be used, follow these procedures: 1. Ensure the drip tray is in the correct position. See page 7. 2. See below for getting started. You may detect smoke or a burning smell when using the grill for the first time, this is normal and not a sign that the oven is out of order.
AUTOMATIC COOKING Automatic Operation can be used when cooking with steam, grill or microwave functions. Refer to each function for the details. Steam Menus WARNING for stacking the steam tray and glass tray: After cooking, take out the steam tray first. See Figure 2 on page 5. Be aware of excess water from the steam tray, we recommend you place it directly on a flat dish or tray to avoid spillages. Before taking out the glass tray, make sure that it is cool.
AUTOMATIC COOKING Auto Defrost Menus Auto Grill Menus There are 4 Auto Grill menus. AG1: Chicken Legs AG2: Grilled Chicken There are 4 Auto Defrost menus. Do not use the glass tray, steam tray and metal rack. dE1: Steak/Chops dE2: Minced Meat dE3: Poultry dE4: Bread AG3 : Fish Gratin AG4 : Grilled Skewer Refer to the Auto Grill Menus Guide for details on page 37-38. Example: To cook 0.4kg of Chicken Legs. Refer to the Auto Defrost Menus Guide for details on page 39. Example: To defrost a 0.5 kg steak.
MANUAL COOKING Manual Cooking can be used in Steam, Grill, Combi and Microwave mode. Refer to the "Manual Cooking Chart" and "Food and Utensil Position Chart" below. The charts give information on each setting. Manual Cooking Chart Cooking mode Steam Temp/power range Time range Water tank High 100 °C 0 - 35 min. YES Low 70 - 95°C * Grill: 100% power Microwave: 10 - 70% power 0 - 60 min. YES 0 - 99 min. 50 sec. NO 0 - 99 min. 50 sec. NO Grill: 50% power Microwave: 10 - 70% power 0 - 99 min.
MANUAL COOKING Steam Manual Steam has 2 options, Steam High and Steam Low. Always cook food using the steam tray and glass tray. See page 13 for the details. And see the important instructions on page 7-8. Cooking mode STEAM LOW Example: To cook for 20 minutes on Steam Low (80°C). PROCEDURE Temperature Steam High 1 100°C Steam Low 70 - 95°C Use Steam High to steam foods such as chicken or vegetables. Use Steam Low to steam fish or egg custard gently.
MANUAL COOKING Grill Combi The grill heating element at the top of the oven cavity has one power setting only. This mode does not use steam. This mode can be programmed for up to 99 minutes 50 seconds. It is only possible to cook on one layer using this mode. Place the food onto the rack on glass tray and select desired position depending on the food size. Example: To cook for 10 minutes on Grill. Combi combines microwave power with grill. Combi has 2 options; Combi High and Combi Low.
MANUAL COOKING Microwave To change the microwave power level, press MICROWAVE POWER LEVEL until the desired power level is displayed. Microwave is fast and convenient for cooking, reheating and defrosting. First enter the cooking time then the power level. This mode does not use steam. This mode can be programmed for up to 99 minutes 50 seconds. There are 6 different power levels. Example: To defrost for 5 minutes on 30%.
OTHER CONVENIENT FEATURES More or Less Time Adjustment (LESS (▼) / MORE (▲) keys) Multiple Sequence Cooking This function allows you to cook using up to 3 manual cooking programmes; combinations of Microwave, Grill and Combi. a) To use with automatic cooking: You can adjust cooking results as you like. Should you discover that you like to cook an automatic menu for longer, press MORE (▲) after entering weight and before pressing START/AUTO MINUTE.
OTHER CONVENIENT FEATURES Kitchen Timer Info Info provides 5 features. In F1: Drain In F2: Descale In F3: Water Hardness Use the Kitchen Timer as a minute timer or to monitor the standing time for cooked/defrosted food. Example: To set the kitchen timer for 5 minutes. These features can be selected by pressing INFO/ K I T C H E N T I M E R until the desired function is displayed and pressing START/AUTO MINUTE . PROCEDURE 1 Open and close the door to activate Kitchen Timer function.
OTHER CONVENIENT FEATURES Demonstration Mode Child Lock Child Lock prevents unwanted oven operation by small children. The oven can be set so that the control panel is deactivated and locked. This feature is normally used in store to demonstrate the product features. To demonstrate, press INFO/KITCHEN TIMER 4 times (In F4). And then press START/AUTO MINUTE. "dISP" will appear in the display. Cooking operations can now be demonstrated with no power in the oven.
CLEANING AND CARE Oven interior Key Point for Cleaning - Immediately and frequently! The food splashes and oily meat juice, remaining on the oven interior walls will get stuck and hard to remove if it is not cleaned immediately and after each use. The usage of the steam function will assist in this cleaning process. They will be also perishable by the influence of steam.
TROUBLESHOOTING CHART If EE is displayed or you think the oven is not working properly, check the chart below before consulting an authorised SHARP Service Agent. This will help to prevent unnecessary service calls. WARNING: Never adjust, repair or modify the oven by yourself. It is hazardous for anyone other than a qualified service technician trained by SHARP to carry out any service or repair operation.
TROUBLESHOOTING CHART The following situations are normal and are not signs that the oven is malfunctioning. QUESTION / SITUATION ANSWER The display is black / blank. * Open the door and close. * Check the power plug is properly connected to a suitable wall outlet. * Check the wall socket and fuse are functioning properly. * Disconnect the power cord, wait for a minute. Then reconnect, open and close the door. The display is fine but START/ AUTO MINUTE will not function when pressed.
TROUBLESHOOTING CHART The following situations are normal and are not signs that the oven is malfunctioning. ANSWER QUESTION / SITUATION Steam Noise / Sound Water is found inside the oven when the door is opened. Steam has condensed inside the oven. Wipe dry with a soft cloth or a sponge after cooling. Steam comes out from the bottom of the oven. The air ventilation openings are at the oven bottom (left side). It is normal for used steam to come from the air ventilation openings.
SERVICE CALL CHECK Please check the following before calling for service. 1. Power supply Check the power plug is properly connected to a suitable wall outlet. Check the line fuse/circuit breaker is functioning properly. 2. When the door is opened, does the oven lamp light? Yes 3. Place a cup of water (approx. 150 ml) in the oven and close the door securely. Programme the oven for one minute on 100% power and start the oven.
COOKBOOK Points To Remember • Please make reading the Operation Manual your very first step in working with your new oven. This important booklet explains exactly how the oven works and what you need to know to operate it successfully. • Use the information in the charts and recipes to help adapt your own favorite recipes or convenience foods for preparation in the oven. • The stated cooking times in the charts and recipes are guidelines and are based on standard conditions.
COOKBOOK About Utensils and Coverings The chart below will help you decide what utensils and coverings should be used in each mode. Utensils Coverings Cooking Mode Aluminium Foil Steam Grill YES YES Combi Microwave YES YES Small flat pieces of aluminum foil placed smoothly on food can be used to shield areas from cooking or defrosting too quickly. Keep foil at least 2 cm from walls of oven.
COOKBOOK ACCESSORIES There are many microwave or heat-resistant accessories available for purchase. Evaluate carefully before you purchase so that they meet your needs. A microwave-safe thermometer will assist you in determining correct doneness and assure you that foods have been cooked to safe temperatures when using microwave-only cooking. Sharp is not responsible for any damage to the oven when accessories are used.
COOKBOOK - Advice for STEAM Food characteristics Density Food density will affect the amount of cooking time needed. Cut the food into thinner parts if possible, and arrange in single layer. Quantity The cooking time must be increased as the amount of food cooked in the oven increases. Size Small foods and small pieces cook faster than large ones, as heat can penetrate from all sides to the centre. For even cooking make all the pieces the same size.
COOKBOOK Microwave Cooking Advice - Special Notes and Warning for MICROWAVE - DO DON’T Eggs, fruits, nuts, seeds, vegetables, sausages and oysters * Puncture egg yolks and whites and oysters before cooking to prevent "explosion". * Pierce skins of potatoes, apples, squash, hot dogs, sausages and oysters so that steam escapes. * Cook eggs in shells. This prevents "explosion", which may damage the oven or injure yourself. * Cook hard/soft boiled eggs. * Overcook oysters. * Dry nuts or seeds in shells.
COOKBOOK - Advice for MICROWAVE Cooking Techniques Arrange food carefully Place the thickest areas toward outside of dish. Watch cooking time Cook for the shortest amount of time indicated and add more time as needed. Food severely overcooked can smoke or ignite. Cover foods before cooking Check recipe for suggestions: paper towels, microwave plastic wrap or a lid. Covers prevent spattering and help foods to cook evenly.
AUTOMATIC COOKING CHART Steam Menus Guide - Ensure the water tank is filled with room temperature drinking water to the MAX mark and is installed correctly. Rice/Pasta/Egg Menu number St11 Menu name Weight range (Increasing unit) 0.1 - 0.2 kg (100g) White rice (Long grain) (initial temp 20°C) X1 St12 X2 St13 X4 Rice 100 g 200 g Water 150 ml 300 ml Food/Tray* Position 2 • Place rice in a flat, round dish (23cm diameter) and cover with water. • Place the dish on the steam tray in the glass tray.
AUTOMATIC COOKING CHART Steam Menus Guide Vegetable 1 layer Menu number St21 X1 St22 X2 St23 X3 St24 X4 St25 X5 Menu name Weight range (Increasing unit) Procedure Food Position Fresh Vegetable 1 0.2 - 0.8 kg (100g) • Prepare the vegetables and cut into similar pieces, e.g. strips, florets, cubes or slices except (initial temp 20°C) for asparagus and small mushrooms.
AUTOMATIC COOKING CHART Steam Menus Guide Vegetable 2 layers (Vegetable + Potato) Menu number St51 X1 St52 X2 Menu name Weight range (Increasing unit) Procedure Food Position 0.4 - 1.2 kg* (100g) • Peel the potatoes and cut into similar pieces of Potato: 2 Vegetable 1 Vegetable: 3 approx. 25g. + Potato • Prepare the vegetables and cut into similar (initial temp 20°C) * Total weight of vegetables and pieces, e.g. strips, florets, cubes or slices expect Soft Vegetables: potatoes.
AUTOMATIC COOKING CHART RECIPES FOR RICE/PASTA/EGG Crème Caramel (St13) [ Utensils ] 4 Ramekin dishes Steam tray Glass tray [ Ingredients ] 200 ml Milk 1/2 Vanilla pod 100 ml Pouring cream 2 Eggs 1 Egg yolk 30 g Sugar Ingredients for the caramel 100 g Sugar 4 tbsp Cold Water Serves 4 [Procedure] 1. Warm the milk and vanilla pod for 1 minute on 100% microwave power, then add the cream. 2. Whisk the eggs and egg yolk with the sugar. Remove the vanilla pod from the milk.
AUTOMATIC COOKING CHART RECIPES FOR BALANCED MENUS (St-41 and St-42) OF STEAM MENUS Salmon fillets with broccoli florets (St-41) [Utensils] 2 Steam trays, glass tray Ingredients Deep-frozen salmon fillets Lemon juice, pepper Broccoli florets 1 portion 125 g (1 piece) 100 g 2 portions 3 portions 4 portions 250 g (2 pieces) 375 g (3 pieces) 500 g (4 pieces) 200g 300 g 400g [Preparation] 1. Sprinkle the deep-frozen fish fillets with lemon juice and pepper and place into the steam tray on the glass tray.
AUTOMATIC COOKING CHART Chicken breast with potato wedges and a vegetable medley (St-42) [Utensils] 2 Steam trays, glass tray Ingredients Chicken breast fillets Salt, pepper, paprika Potatoes, peeled cut into wedges Mushrooms, cut into half Red pepper, sliced Broccoli florets Fresh parsley, chopped 1 portion 150 g 75 50 50 40 2 portions 300 g g g g g 150 g 100 g 100 g 80 g 3 portions 450 g 225 150 150 120 g g g g 4 portions 600 g 300 200 200 160 g g g g [Preparation] 1.
AUTOMATIC COOKING CHART Auto Grill Menus Guide Menu number AG1 X1 AG2 X2 AG3 X3 AG4 X4 Menu name Weight range (Increasing unit) Procedure Food Position 0.2 - 1.0 kg (100g) • Mix the ingredients and spread on chicken Chicken Legs legs. (initial temp 5°C) • Pierce the skin of the chicken legs. Ingredients for 1 kg (5 pieces) chicken • Put the chicken legs on the rack in the glass tray legs: 2 tbsp oil, 1/2 tsp salt, 1 tsp sweet with the thin ends towards the centre.
AUTOMATIC COOKING CHART AG3 Fish Gratin Creamy fish and vegetable gratin [Procedure] [ Ingredients ] 1. Wash the leeks and divide in 2 parts from top to bottom. Cut into thin 600 g Rose Fish Fillet strips. 250 g Leeks 2. Peel the onions and carrots and cut into thin strips. 50 g Onion 3. Put the vegetables, butter and spices into a casserole dish and mix well. 100 g Carrot Cook on the oven floor (position 1) for 5-6 minutes on 100P microwave 1 tbsp. Butter power. Stir once in-between cooking.
AUTOMATIC COOKING CHART Auto Defrost Menus Guide Menu number dE1 X1 dE2 X2 dE3 X3 dE4 X4 Menu name Weight range (Increasing unit) Procedure 0.2 - 1.0 kg (100g) • Place the food on a plate or flan dish on the centre of the Steak/Chops oven floor (position1). (initial temp -18°C) • When the oven stops and the audible signals sound, turn the food over, rearrange and separate if possible. If necessary shield thin parts and warm spots with aluminium foil.
TABLES TABLE: HEATING DRINKS AND FOOD Food/Drink Quantity Setting -g/ml- Time -Min- Method Drinks, 1 cup 150 MICRO 100P approx.1 One-plate meal Vegetables, Meat and garnishes) 400 MICRO 100P 4-6 Stew, Soup 200 MICRO 100P 1 - 21/2 Garnishes 200 MICRO 100P approx.2 Sprinkle with some water, cover, stir occasionally 200 MICRO 100P 2-3 Sprinkle with some sauce, cover, Sausages, 2 pieces 180 MICRO 100P approx.
TABLES TABLE: DEFROSTING WITH THE MICROWAVE Food Quantity -g- Setting Power -Level- Time -Min- Sausage 300 MICRO 30P 4-5 Lay beside each other, turn after half of the defrosting time.
TABLES TABLE: COOKING, GRILLING AND BROWNING Food Roasts (Pork, Veal, Lamb) Quantity -g- Setting Power -Level- 500 MICRO COMBI HIGH MICRO COMBI HIGH MICRO COMBI HIGH MICRO COMBI HIGH MICRO COMBI HIGH MICRO COMBI HIGH 100P 30P 70P 30P 100P 30P 70P 30P 100P 30P 70P 30P MICRO COMBI HIGH MICRO COMBI HIGH MICRO COMBI HIGH MICRO COMBI HIGH MICRO COMBI HIGH 1000 1500 Roast beef (medium) 1000 1500 Meatloaf 1000 Time -Min- Method 5-7 6 - 8* 4-6 6-8 9 - 12 8 - 10* 8 - 10 7-9 19 - 22 11 - 13* 14 - 16
TABLES TABLE: COOKING WITH STEAM HIGH Use glass tray and steam tray. Steam in position 2. Food Quantity Cauliflower, whole approx. 900g Corn on the cob 4 pieces (800g) White rice (Basmati) 200g Starting Temp. Cooking method 20°C STEAM HIGH 20°C STEAM HIGH Cooking time -Minapprox. 35 Instructions Food Place the cauliflower into the steam tray on the glass tray. 2 15 - 18 Place the food into the steam tray on the glass tray. 2 20°C STEAM HIGH approx.
TABLES TABLE: COOKING WITH STEAM LOW This setting uses a low temperature from 70°C – 95°C in 5°C increments to cook delicate items like terrines, flans, fresh seafood, desserts to perfection. This programme is ideal for slow cooking meat after briefly sear the meat in a hot pan on a hob and where a very tender result is wanted. In the below chart you will find some examples. Use the glass tray in position 2 and the steam tray in position 3.
RECIPES Using the Recipes • All recipes in this cookbook are intended for 4 portions, unless stated otherwise. • Recommendations for suitable cooking utensils and total cooking time are given at the beginning of each recipe. Total cooking time of each recipe is for the ingredients in the recipes. When you cook with another amount, adjust the cooking time. Usually the recipe will result in ready-to-eat amounts of food, unless another amount is specifically noted.
RECIPES BARLEY SOUP Switzerland : Bündner Gerstensuppe Total cooking time: approx. 26 - 33 minutes Utensils: Bowl with lid (2 Iitre capacity) Procedure 1. Put the butter and diced onion in the dish and cover with the lid. Place it on the centre of the oven floor (position 1) and cook. approx. 1 - 2 min. MICRO 100P 2. Add the vegetables to the dish. Then add the bones, the strips of bacon and the barley and fill with the meat stock. Season with pepper and cook with the lid on. 1. 9 - 11 min. MICRO 100P 2.
RECIPES Meat, Fish and Poultry FRESH TUNA WITH VEGETABLES France : Thon frais braisé aux tomates et aux poivrons Total cooking time: approx. 15 - 17 minutes Utensils: Shallow oval gratin dish with lid (approx. 26 cm diameter) Procedure 1. Wash the tuna, pat dry and sprinkle with lemon juice. Allow the fish to stand for approximately 15 minutes, then pat dry again and add salt. 2. Spread oil on the bottom of the dish and lay the tuna in it. Arrange the vegetables on top of the fish.
RECIPES STUFFED ROAST CHICKEN Austria : Gefülltes Brathähnchen Stuffed roast chicken for two servings Total cooking time: approx. 34 - 42 minutes Utensils: Small bowl with lid Thread Procedure 1. Wash the chicken, pat it dry and season the cavity with salt, rosemary and marjoram. 2. To make the filling, soak the bread roll for approximately 10 minutes in cold water, and then squeeze out excess water. Mix butter and egg yolk with salt, parsley, nutmeg, and stuff the chicken with the mixture.
RECIPES STUFFED HAM Spain : Jamón relleno Total cooking time: approx. 20 - 24 minutes Utensils: Bowl with lid (2 Iitre capacity) Shallow oval gratin dish with lid or microwave foil (approx. 26 cm long) Procedure 1. Cut the spinach finely, mix with the quark and the cheese and season to taste. 2. Place a tablespoon of the filling on each slice of the cooked ham and roll up. Secure the ham with a wooden toothpick. 3. Make a béchamel sauce.
RECIPES FILET OF SOLE France : Filets de sole or 2 Portions Total cooking time: approx. 13 - 15 minutes Utensils: Shallow oval gratin dish with lid or microwave foil (approx.26 cm) Procedure 1. Wash the fish and pat dry. Remove any bones. 2. Slice the lemon and the tomatoes finely. 3. Grease the gratin dish with butter. Place the fish in it and drizzle with vegetable oil. 4. Sprinkle the fish with parsley, lay the slices of tomato on top and season.
RECIPES LASAGNE Italy : Lasagne al forno Total cooking time: approx. 23 - 28 minutes Utensils: Bowl with lid (2 Iitre capacity) Shallow rectangular gratin dish (approx.
RECIPES BERRY JELLY WITH VANILLA SAUCE Denmark : Rødgrød med vanilie sovs Total cooking time: approx. 8 - 11 minutes Utensils: 2 dishes with lids (2 Iitre capacity) Procedure 1. Reserve some of the fruit for decoration. Puree the rest of the berries with the wine. Put into the bowl, cover and cook on the centre of the oven floor (position 1). 5 - 7 min. MICRO 100P Add sugar and lemon juice. 2. Leave gelatine in cold water for 10 minutes to soften. Remove and squeeze out water.
RECIPES ASPARAGUS SOUFFLÉS For 2 servings Total cooking time: approx. 25 minutes Utensils: Bowl with 0.5 Iitre capacity 4 Ramekin dishes (diameter approx. 8cm) Glass tray Procedure 1. Mix together in a small bowl the sour cream, asparagus liquid, flour and seasonings. Heat on the centre of the oven floor (position 1). Stir once during heating. 50 sec. MICRO 100P Then allow the sause to cool. 2. Grease the ramekin dishes. Beat the egg white until stiff peaks form. 3.
GUARANTEE Sharp Electronics (UK) Ltd. (“Sharp”) guarantees that for a period of 12 months from the date of purchase the enclosed product will be free from defects in materials and workmanship. Sharp agrees to provide for the repair or, at its option, the replacement of a defective product. Sharp reserves the right to replace defective parts, or the product, with new or refurbished items. Items that are replaced become the property of Sharp.
SPECIFICATIONS AC Line Voltage AC Power required Microwave Grill Micro/Grill Steam Off Mode (Energy Save Mode) Input Current Microwave Grill Micro/Grill Steam Output Power Microwave Grill Steam MAFF Heating Category : : : : : : : : : : : : : : 230-240 V, 50 Hz, single phase 1.53 kW (at 235 V) 1.15 kW (at 235 V) 2.60 kW (at 235 V) 0.95 kW (at 235 V) less than 0.5 W 6.8 A (at 235 V) 4.9 A (at 235 V) 11.5 A (at 235 V) 4.1 A (at 235 V) 900 W (IEC 60705) 1.10 kW (at 235 V) 0.
Sharp Electronics (UK) Ltd. London, UK UK: 08705 274277 (office hours) Ireland: 01 676 0648 (office hours) Website: http://www.sharp.co.uk/support TINSEB285WRRZ-K01 Printed in Thailand 56 SUK AX1100M_eng.indd 56 10.9.