
Setup guide
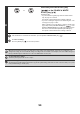

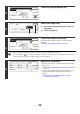
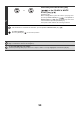

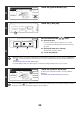
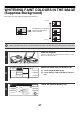
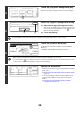

Table Of Contents
- TABLE OF CONTENTS
- ABOUT THIS MANUAL
- BEFORE USING THE MACHINE AS A NETWORK SCANNER
- ENTERING DESTINATIONS
- BASIC PROCEDURE FOR TRANSMISSION IN SCAN MODE
- SCANNING TO E-MAIL, FTP, DESKTOP, AND NETWORK FOLDER
- CHANGING THE EXPOSURE AND EXPOSURE MODE
- CHANGING THE RESOLUTION
- AUTOMATICALLY SCANNING BOTH SIDES OF AN ORIGINAL (2-Sided Original)
- SPECIFYING THE ORIGINAL SCAN SIZE AND SEND SIZE (Enlarge/Reduce)
- CHANGING THE COLOUR MODE
- CHANGING THE FILE FORMAT
- CHANGING THE SUBJECT, FILE NAME, REPLY-TO, AND MESSAGE
- BASIC PROCEDURE FOR SCANNING IN USB MEMORY MODE
- BASIC PROCEDURE FOR TRANSMISSION IN INTERNET FAX MODE
- CHECKING THE STATUS OF TRANSMISSION/RECEPTION JOBS
- CONVENIENT FUNCTIONS
- SENDING THE SAME IMAGE TO MULTIPLE DESTINATIONS (Broadcast Transmission)
- ERASING PERIPHERAL SHADOWS ON THE IMAGE (Erase)
- SCANNING AN ORIGINAL AS TWO SEPARATE PAGES (Dual Page Scan)
- SENDING AN IMAGE AT A SPECIFIED TIME (Timer Transmission)
- WHITENING FAINT COLOURS IN THE IMAGE (Suppress Background)
- SCANNING BOTH SIDES OF A CARD ONTO A SINGLE PAGE (Card Shot)
- SCANNING MANY ORIGINALS AT ONCE (Job Build)
- SCANNING ORIGINALS OF DIFFERENT SIZES (Mixed Size Original)
- SCANNING THIN ORIGINALS (Slow Scan Mode)
- STORING SCAN OPERATIONS (Programs)
- FORWARDING A RECEIVED INTERNET FAX TO AN E-MAIL ADDRESS (Inbound Routing Settings)
- INTERNET FAX FUNCTIONS
- SCANNING FROM A COMPUTER (PC SCAN MODE)

90
8
Press the [COLOUR START] key
( ) or the [BLACK & WHITE
START] key ( ).
Scanning begins.
• If you inserted the original pages in the document feeder
tray, all pages are scanned.
A beep will sound to indicate that scanning is finished.
• If you are scanning the original on the document glass, scan
each page one page at a time.
When scanning of one page finishes, replace it with the next
page and press the [COLOUR START] key ( ) or the
[BLACK & WHITE START] key ( ). Repeat until all pages
have been scanned and then press the [Read-End] key.
A beep will sound to indicate that scanning is finished.
If the destination is an Internet fax destination, press the [BLACK & WHITE START] key ( ).
To cancel scanning...
Press the [STOP] key ( ) to cancel the operation.
When the erase function is used, erase takes place at the edges of the original image. If you also use a reduction or an
enlargement setting, the erase width will change according to the selected ratio. For example, if the erase width setting is 20
mm (1") and the image is reduced to 50%, the erase width will be 10 mm (1/2").
To cancel the erase setting...
Touch the [Cancel] key in the screen of step 5.
System Settings (Administrator): Erase Width Adjustment
The default erase width setting is linked to the copy mode system setting, and can be set from 0 mm to 20 mm (0" to 1"). The
factory default setting is 10 mm (1/2").
or